|
|
|
|
|
|
| |
| |
|
|
|
|
| |
| |
|
|
"LanuHum" <Lan### [at] yandex ru> wrote:
> "Mr" <nomail@nomail> wrote:
>
> >
> > I am hoping that we will be able to evaluate the hair color from a UV image or
> > pattern applied to the emitter.
> >
>
> I partially solved a problem with UV. There are thoughts concerning increase in
> number of hair with a gradient along a curve.
> It is necessary to combine sphere_sweep + while or to break one object of
> sphere_sweep into some objects and to provide to the user to choose model option
Honestly, I could with no problem export 2 million + hair,only parsing is a
little long but it works, so I don't see why we should modify the scene
structure, this is user decision, not something the program should do imho.
Your textured hair looks nice. I managed to implement the procedural textures
for alpha / specular /diffuse / bump but it's still buggy and a mess. I need to
fix a few bugs first. but I will also try to add your texture evaluation code
for hair if you agree. ru> wrote:
> "Mr" <nomail@nomail> wrote:
>
> >
> > I am hoping that we will be able to evaluate the hair color from a UV image or
> > pattern applied to the emitter.
> >
>
> I partially solved a problem with UV. There are thoughts concerning increase in
> number of hair with a gradient along a curve.
> It is necessary to combine sphere_sweep + while or to break one object of
> sphere_sweep into some objects and to provide to the user to choose model option
Honestly, I could with no problem export 2 million + hair,only parsing is a
little long but it works, so I don't see why we should modify the scene
structure, this is user decision, not something the program should do imho.
Your textured hair looks nice. I managed to implement the procedural textures
for alpha / specular /diffuse / bump but it's still buggy and a mess. I need to
fix a few bugs first. but I will also try to add your texture evaluation code
for hair if you agree.
Post a reply to this message
|
|
| |
| |
|
|
|
|
| |
| |
|
|
"Mr" <nomail@nomail> wrote:
>
> Honestly, I could with no problem export 2 million + hair,only parsing is a
> little long but it works, so I don't see why we should modify the scene
> structure, this is user decision, not something the program should do imho.
development:
If hair direct, it is better to write down them as a cone
#declare Hair = cone {<0,0,0>,0.01,<1,0,0>,0.01}
Parsing takes not enough time
If hair curling, it is better to write down them as sphere_sweep
Parsing takes a lot of time - Your only option
And, as I understood, you can't paint the ends of black hair in white color
And, at you everything is good!
class ExportHair(Operator):
bl_idname = "ob.exporthair"
bl_label = "Add hair"
def execute(self, context):
import bmesh
import mathutils
from math import pi
scene=context.scene
ob=context.object
global_matrix = mathutils.Matrix.Rotation(-pi / 2.0, 4, 'X')
matrix=global_matrix*ob.matrix_world
for pSys in ob.particle_systems:
for mod in ob.modifiers:
if mod.type == 'PARTICLE_SYSTEM':
if mod.particle_system.settings.type == 'HAIR' and
mod.particle_system.name==pSys.name:
modPovName=string_strip_hyphen(bpy.path.clean_name(mod.particle_system.name))
numberHairs = (len(mod.particle_system.particles) +
len(mod.particle_system.child_particles))
file=open("%s/%s.inc"%(scene.pov.scene_path,modPovName),'w')
file.write("#declare Array%s = array[%s]
{\n"%(modPovName,len(mod.particle_system.child_particles)))
steps=mod.particle_system.settings.draw_step
steps=(2**steps)+1
radiusRoot =
mod.particle_system.settings.pov.thickness_root
radiusTip =
mod.particle_system.settings.pov.thickness_tip
for i in
range(len(mod.particle_system.particles),numberHairs):
if mod.particle_system.settings.pov.hair_type ==
"CONE":
coRoot = pSys.co_hair(ob,i,0)
coTip = pSys.co_hair(ob,i,steps-1)
file.write("cone{\n")
centerRoot = "<%.4g,%.4g,%.4g>"%(coRoot[:])
file.write("%s,
%.4g,\n"%(centerRoot,radiusRoot))
centerTip = "<%.4g,%.4g,%.4g>"%(coTip[:])
file.write("%s, %.4g},\n"%(centerTip,radiusTip))
if mod.particle_system.settings.pov.hair_type ==
"SPLINE":
file.write("spline { cubic_spline\n")
numPtAll=steps+4
co = pSys.co_hair(ob,i,0)
file.write("0/%s
<%.4g,%.4g,%.4g>\n"%(numPtAll,co[0],co[1],co[2]))
file.write("1/%s
<%.4g,%.4g,%.4g>\n"%(numPtAll,co[0],co[1],co[2]))
for p in range(0,steps):
co = pSys.co_hair(ob,i,p)
file.write("%s/%s
<%.4g,%.4g,%.4g>\n"%(p+2,numPtAll,co[0],co[1],co[2]))
file.write("%s/%s
<%.4g,%.4g,%.4g>\n"%(numPtAll-2,numPtAll,co[0],co[1],co[2]))
file.write("%s/%s
<%.4g,%.4g,%.4g>\n"%(numPtAll-1,numPtAll,co[0],co[1],co[2]))
file.write("},\n")
file.write("}\n")
file.write("#declare ArrayColors%s = array[%s]
{\n"%(modPovName,len(mod.particle_system.child_particles)))
tex =
ob.active_material.active_texture.pov.tex_images_data
image=bpy.data.images[tex]
image_width = image.size[0]
image_height = image.size[1]
image_pixels = image.pixels[:]
for i in range(0,len(mod.particle_system.particles)):
uv_co = pSys.uv_on_emitter(mod, pSys.particles[i],
i, 0)
x_co = round(uv_co[0] * (image_width - 1))
y_co = round(uv_co[1] * (image_height - 1))
pixelnumber = (image_width * y_co) + x_co
r = image_pixels[pixelnumber*4]
g = image_pixels[pixelnumber*4+1]
b = image_pixels[pixelnumber*4+2]
col = (r,g,b)
file.write("rgb <%.4g,%.4g,%.4g>\n"%(r,g,b))
file.write("}\n")
if mod.particle_system.settings.pov.hair_type ==
"SPLINE":
file.write("#declare Segment%s =\n"%modPovName)
file.write("sphere {0,%.4g}\n\n"%radiusRoot)
file.write("#declare HairStep = 1;\n")
file.write("#declare Hairs%s =\n"%modPovName)
file.write("union {\n")
file.write(" #declare I = 0;\n")
file.write(" #while (I <
%s)\n"%len(mod.particle_system.child_particles))
file.write(" union {\n")
file.write(" #declare ctr = 0;\n")
file.write(" #declare col = 0;\n")
file.write(" #while (ctr < 1)\n")
file.write(" object { Segment%s
texture{pigment{rgb col}}\n"%modPovName)
file.write(" translate
Array%s[I](ctr)}\n"%modPovName)
file.write(" #declare ctr = ctr +
0.0025;\n")
file.write(" #if (ctr > 0.5)\n")
file.write(" #declare col = col +
0.0025;\n")
file.write(" #end\n")
file.write(" #if (ctr > 0.6)\n")
file.write(" #declare col = 1;\n")
file.write(" #end\n")
file.write(" #end }\n")
file.write("#declare I = I + HairStep ;\n")
file.write("#end }\n")
file.close()
if mod.particle_system.settings.pov.hair_type == "CONE":
file.write("#declare HairStep = 1;\n")
file.write("#declare Hairs%s =\n"%modPovName)
file.write("union {\n")
file.write(" #declare I = 0;\n")
file.write(" #while (I <
%s)\n"%len(mod.particle_system.child_particles))
file.write(" object { Array%s[I]
texture{pigment{ArrayColors%s[I]}}}\n"%(modPovName,modPovName))
file.write("#declare I = I + HairStep ;\n")
file.write("#end }\n")
file.close()
return {'FINISHED'}
> but I will also try to add your texture evaluation code
> for hair if you agree.
You only speak, but, anything you do.
Post a reply to this message
|
|
| |
| |
|
|
|
|
| |
| |
|
|
Thomas de Groot <tho### [at] degrootorg> wrote:
> On 22-1-2014 22:03, Robert McGregor wrote:
> > Could also save UV mapped parametric mesh representations of the sweeps and
> > render those just as one normally would expect the hair to be textured.
>
> Interesting, but I am lost about your two solutions ;-) would you mind
> to give us a little piece of code?
>
> Thomas
Well, it looks like others have already thoroughly investigated my first
suggestion. Regarding parametric mesh2 objects from hair splines, they give us
auto-UVs for each hair (for the requested gradient along a curve). The trick
lies in building actual hairs that conform to any given set of spline "hair
guides," and this is trivial when using Mike Williams' "SweepSpline.inc" to
build parametric mesh2 spline sweeps.
"SweepSpline.inc" has been around for about 10 years now; I first found it on
Mike Williams' isosurface tutorial website. His macro sweeps one spline (a
profile curve) along another (a path curve), tapered by a third, giving complete
control over profile shape, path, taper and mesh density. Plus, since it's built
atop "makemesh.inc," by Ingo Janssen, it enables easy saving of a resulting mesh
to an include file.
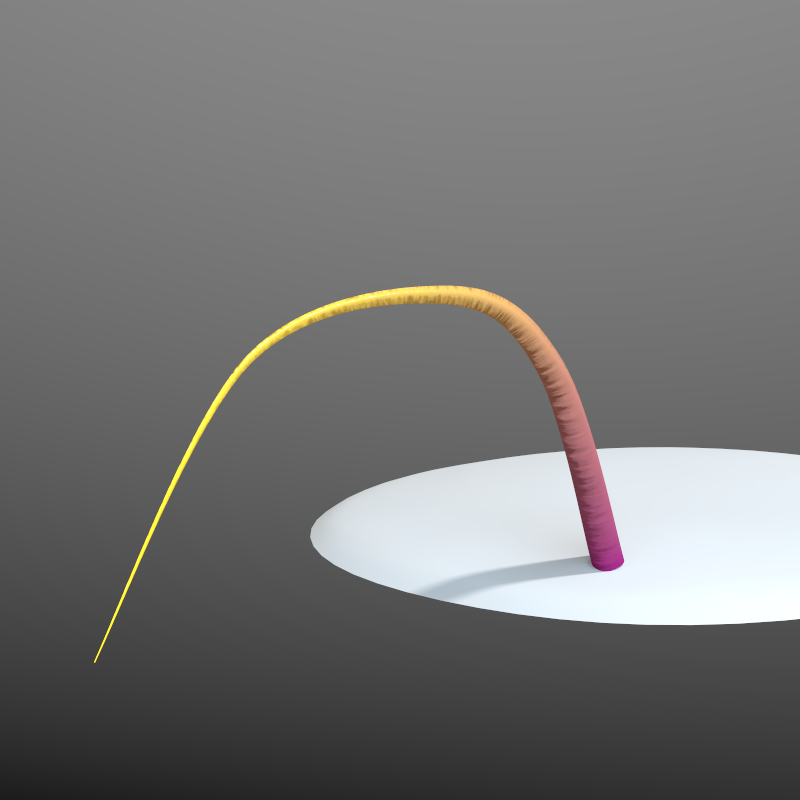
Here's an example image using a simple path curve with 5 nodes (and two
additional control points outside the 0-1 range to "pin" the ends). A single
exaggerated, UV mapped mesh2 hair grows from a simple base mesh surface. Basic
code is:
// This spline describes the profile curve (circular)
#declare VSpline = spline {
natural_spline
-0.25, < 0,-1, 0>,
0, < 1, 0, 0>,
0.25, < 0, 1, 0>,
0.5, <-1, 0, 0>,
0.75, < 0,-1, 0>,
1, < 1, 0, 0>,
1.25, < 0, 1, 0>
}
// This spline describes how the width varies along the sweep
#local WSpline = spline {
cubic_spline
-1.0, Rad_Base, // control point
0.0, Rad_Base,
1.0, Rad_Tip,
2.0, Rad_Tip // control point
}
// This spline describes the sweep path
#declare USpline = spline {
cubic_spline
-0.25, aVec[0], // control point
0.00, aVec[0], // root
0.25, aVec[1],
0.50, aVec[2], // center
0.75, aVec[3],
1.00, aVec[4], // tip
1.25, aVec[4], // control point
}
// make a mesh2 hair by sweeping variable width profile curve along path
#local Filename = ""
object { SweepSpline(USpline, VSpline, WSpline, Upoints, Vpoints, Filename)
texture { uv_mapping
pigment {
gradient u
color_map { [0 srgb <0.5,0,0.5>][1 srgb <1,1,0>]] }
}
finish { specular 0.9 roughness 0.01 }
}
Cheers
-------------------------------------------------
www.McGregorFineArt.com
Post a reply to this message
Attachments:
Download 'sweepsplinehair1.png' (426 KB)
Preview of image 'sweepsplinehair1.png'
|
|
| |
| |
|
|
|
|
| |
| |
|
|
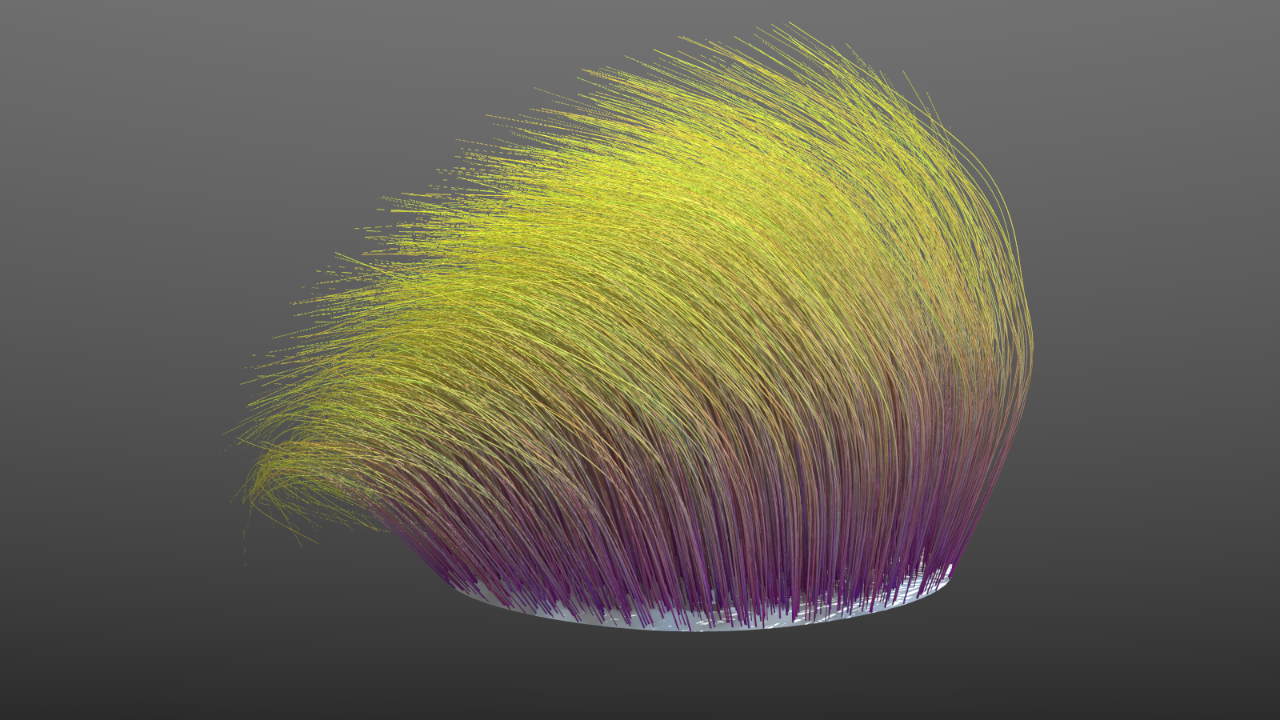
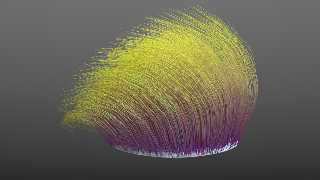
Here's a more complex example using path splines grown from 5000 root vectors.
Each root was randomly traced onto a simple base surface mesh, generating 5000
lightweight (300 polygons each) UV mapped mesh2 hairs. Each hair has a unique
texture - a random variant of the same dark magenta roots and light yellow tips
color palette as my previous example.
It's slow to render, but it looks good. Source files posted in p.b.s-f
If POV-Ray could auto-calculate UVs on sphere_sweeps at render time, that would
be the optimal solution to this... maybe a simple patch can fix it.
-------------------------------------------------
www.McGregorFineArt.com
Post a reply to this message
Attachments:
Download 'sweepsplinehair2.png' (768 KB)
Preview of image 'sweepsplinehair2.png'
|
|
| |
| |
|
|
From: James Holsenback
Subject: Re: Sphere_sweep: gradient along a curve.
Date: 10 Feb 2014 19:21:02
Message: <52f96cee@news.povray.org>
|
|
|
| |
| |
|
|
On 02/10/2014 06:14 PM, Robert McGregor wrote:
> Here's a more complex example using path splines grown from 5000 root vectors.
> Each root was randomly traced onto a simple base surface mesh, generating 5000
> lightweight (300 polygons each) UV mapped mesh2 hairs. Each hair has a unique
> texture - a random variant of the same dark magenta roots and light yellow tips
> color palette as my previous example.
>
> It's slow to render, but it looks good. Source files posted in p.b.s-f
>
> If POV-Ray could auto-calculate UVs on sphere_sweeps at render time, that would
> be the optimal solution to this... maybe a simple patch can fix it.
>
> -------------------------------------------------
> www.McGregorFineArt.com
>
>
dang ... that's pretty good!
Post a reply to this message
|
|
| |
| |
|
|
|
|
| |
| |
|
|
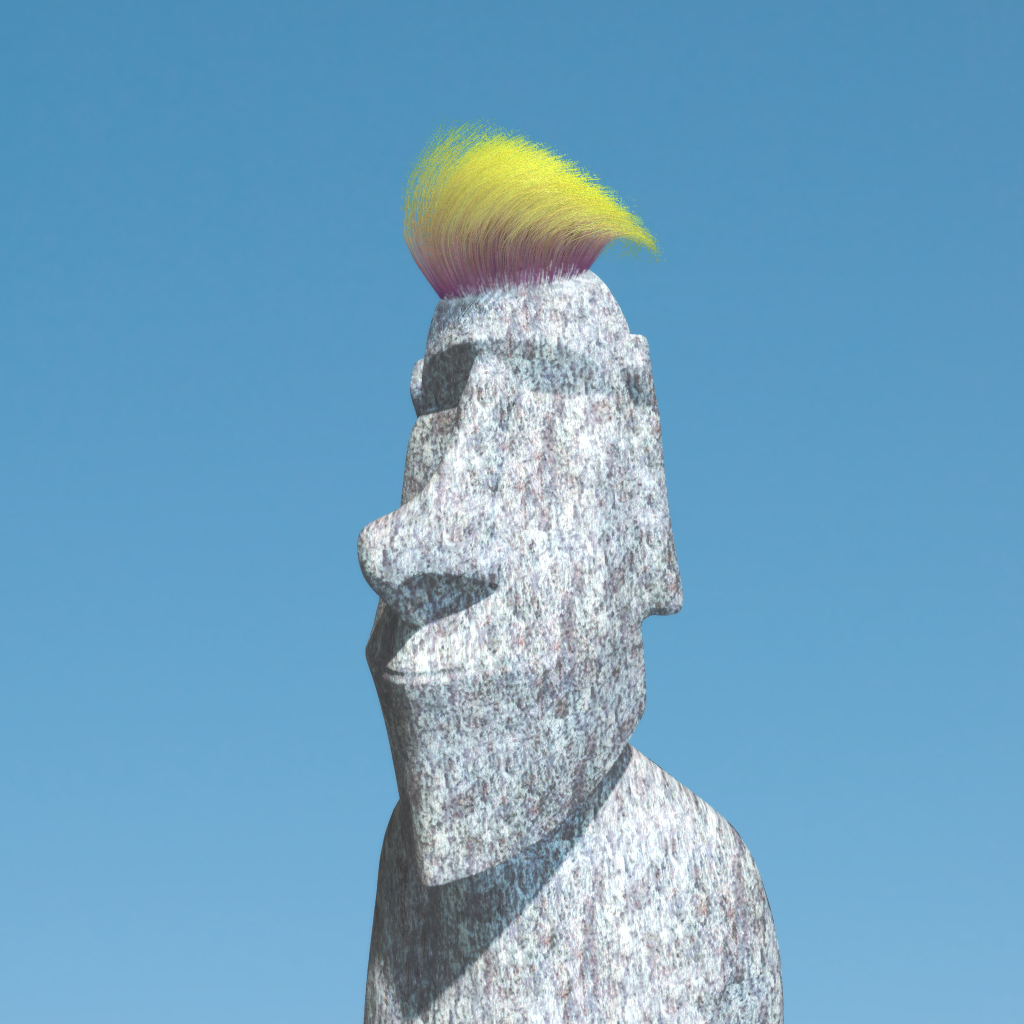
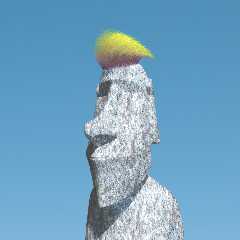
And, just for fun, here's the rest of what the hair was actually growing on.
-------------------------------------------------
www.McGregorFineArt.com
Post a reply to this message
Attachments:
Download 'statuehair.png' (883 KB)
Preview of image 'statuehair.png'
|
|
| |
| |
|
|
|
|
| |
| |
|
|
Le 11/02/2014 00:14, Robert McGregor a écrit :
> If POV-Ray could auto-calculate UVs on sphere_sweeps at render time, that would
> be the optimal solution to this... maybe a simple patch can fix it.
Something like u being the "position" on the sphere_sweep and v being
the circumference ?
A few questions:
* for u, what is the range ? 0 to 1 for the whole sphere_sweep, or 0 to
n-1, n being the number of coordinates ?
* for v, most complex: how to orient it (where is 0 ?)
--
Just because nobody complains does not mean all parachutes are perfect.
Post a reply to this message
|
|
| |
| |
|
|
|
|
| |
| |
|
|
On 11-2-2014 5:41, Robert McGregor wrote:
> And, just for fun, here's the rest of what the hair was actually growing on.
>
LOL
Thanks Robert. Your examples beautifully explain the technique. This
could be an interesting option for Poseray too for treating Poser hair.
Now it converts lines to tubes which works fine indeed, but maybe this
would be a smarter solution.
Thomas
Post a reply to this message
|
|
| |
| |
|
|
|
|
| |
| |
|
|
On 11-2-2014 0:14, Robert McGregor wrote:
> Here's a more complex example using path splines grown from 5000 root vectors.
> Each root was randomly traced onto a simple base surface mesh, generating 5000
> lightweight (300 polygons each) UV mapped mesh2 hairs. Each hair has a unique
> texture - a random variant of the same dark magenta roots and light yellow tips
> color palette as my previous example.
>
> It's slow to render, but it looks good. Source files posted in p.b.s-f
If the texture was applied to a bunch of hairs instead of individual
hairs, would that not speed up the render? Otoh, the result would be
more artificial I guess...
Thomas
Post a reply to this message
|
|
| |
| |
|
|
|
|
| |
| |
|
|
Le_Forgeron <lef### [at] freefr> wrote:
> Le 11/02/2014 00:14, Robert McGregor a écrit :
>
> > If POV-Ray could auto-calculate UVs on sphere_sweeps at render time, that would
> > be the optimal solution to this... maybe a simple patch can fix it.
>
> Something like u being the "position" on the sphere_sweep and v being
> the circumference ?
> A few questions:
> * for u, what is the range ? 0 to 1 for the whole sphere_sweep, or 0 to
> n-1, n being the number of coordinates ?
> * for v, most complex: how to orient it (where is 0 ?)
>
Exactly: u = spline position, v = circumference
I think a normalized u over 0-1 range for the entire sweep would make texturing
more manageable, using something like:
sphere_sweep {
...
texture { uv_mapping
pigment {
gradient u
color_map { [0 rgb <1,0,0>][1 rgb <0,1,0>]] }
}
}
}
The starting position for v shouldn't matter as it's a seamless loop around the
circumference (like cylindrical mapping).
-------------------------------------------------
www.McGregorFineArt.com
Post a reply to this message
|
|
| |
| |
|
|
|
|
| |
|
|