|
 |
Thomas de Groot <tho### [at] degroot org> wrote:
> On 22-1-2014 22:03, Robert McGregor wrote:
> > Could also save UV mapped parametric mesh representations of the sweeps and
> > render those just as one normally would expect the hair to be textured.
>
> Interesting, but I am lost about your two solutions ;-) would you mind
> to give us a little piece of code?
>
> Thomas
Well, it looks like others have already thoroughly investigated my first
suggestion. Regarding parametric mesh2 objects from hair splines, they give us
auto-UVs for each hair (for the requested gradient along a curve). The trick
lies in building actual hairs that conform to any given set of spline "hair
guides," and this is trivial when using Mike Williams' "SweepSpline.inc" to
build parametric mesh2 spline sweeps.
"SweepSpline.inc" has been around for about 10 years now; I first found it on
Mike Williams' isosurface tutorial website. His macro sweeps one spline (a
profile curve) along another (a path curve), tapered by a third, giving complete
control over profile shape, path, taper and mesh density. Plus, since it's built
atop "makemesh.inc," by Ingo Janssen, it enables easy saving of a resulting mesh
to an include file.
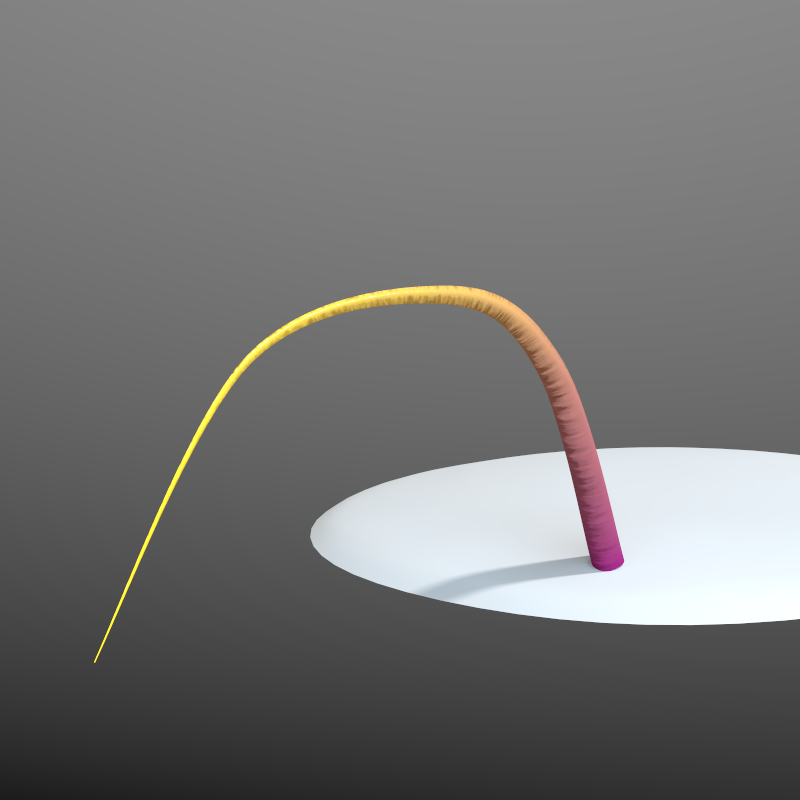
Here's an example image using a simple path curve with 5 nodes (and two
additional control points outside the 0-1 range to "pin" the ends). A single
exaggerated, UV mapped mesh2 hair grows from a simple base mesh surface. Basic
code is:
// This spline describes the profile curve (circular)
#declare VSpline = spline {
natural_spline
-0.25, < 0,-1, 0>,
0, < 1, 0, 0>,
0.25, < 0, 1, 0>,
0.5, <-1, 0, 0>,
0.75, < 0,-1, 0>,
1, < 1, 0, 0>,
1.25, < 0, 1, 0>
}
// This spline describes how the width varies along the sweep
#local WSpline = spline {
cubic_spline
-1.0, Rad_Base, // control point
0.0, Rad_Base,
1.0, Rad_Tip,
2.0, Rad_Tip // control point
}
// This spline describes the sweep path
#declare USpline = spline {
cubic_spline
-0.25, aVec[0], // control point
0.00, aVec[0], // root
0.25, aVec[1],
0.50, aVec[2], // center
0.75, aVec[3],
1.00, aVec[4], // tip
1.25, aVec[4], // control point
}
// make a mesh2 hair by sweeping variable width profile curve along path
#local Filename = ""
object { SweepSpline(USpline, VSpline, WSpline, Upoints, Vpoints, Filename)
texture { uv_mapping
pigment {
gradient u
color_map { [0 srgb <0.5,0,0.5>][1 srgb <1,1,0>]] }
}
finish { specular 0.9 roughness 0.01 }
}
Cheers
-------------------------------------------------
www.McGregorFineArt.com org> wrote:
> On 22-1-2014 22:03, Robert McGregor wrote:
> > Could also save UV mapped parametric mesh representations of the sweeps and
> > render those just as one normally would expect the hair to be textured.
>
> Interesting, but I am lost about your two solutions ;-) would you mind
> to give us a little piece of code?
>
> Thomas
Well, it looks like others have already thoroughly investigated my first
suggestion. Regarding parametric mesh2 objects from hair splines, they give us
auto-UVs for each hair (for the requested gradient along a curve). The trick
lies in building actual hairs that conform to any given set of spline "hair
guides," and this is trivial when using Mike Williams' "SweepSpline.inc" to
build parametric mesh2 spline sweeps.
"SweepSpline.inc" has been around for about 10 years now; I first found it on
Mike Williams' isosurface tutorial website. His macro sweeps one spline (a
profile curve) along another (a path curve), tapered by a third, giving complete
control over profile shape, path, taper and mesh density. Plus, since it's built
atop "makemesh.inc," by Ingo Janssen, it enables easy saving of a resulting mesh
to an include file.
Here's an example image using a simple path curve with 5 nodes (and two
additional control points outside the 0-1 range to "pin" the ends). A single
exaggerated, UV mapped mesh2 hair grows from a simple base mesh surface. Basic
code is:
// This spline describes the profile curve (circular)
#declare VSpline = spline {
natural_spline
-0.25, < 0,-1, 0>,
0, < 1, 0, 0>,
0.25, < 0, 1, 0>,
0.5, <-1, 0, 0>,
0.75, < 0,-1, 0>,
1, < 1, 0, 0>,
1.25, < 0, 1, 0>
}
// This spline describes how the width varies along the sweep
#local WSpline = spline {
cubic_spline
-1.0, Rad_Base, // control point
0.0, Rad_Base,
1.0, Rad_Tip,
2.0, Rad_Tip // control point
}
// This spline describes the sweep path
#declare USpline = spline {
cubic_spline
-0.25, aVec[0], // control point
0.00, aVec[0], // root
0.25, aVec[1],
0.50, aVec[2], // center
0.75, aVec[3],
1.00, aVec[4], // tip
1.25, aVec[4], // control point
}
// make a mesh2 hair by sweeping variable width profile curve along path
#local Filename = ""
object { SweepSpline(USpline, VSpline, WSpline, Upoints, Vpoints, Filename)
texture { uv_mapping
pigment {
gradient u
color_map { [0 srgb <0.5,0,0.5>][1 srgb <1,1,0>]] }
}
finish { specular 0.9 roughness 0.01 }
}
Cheers
-------------------------------------------------
www.McGregorFineArt.com
Post a reply to this message
Attachments:
Download 'sweepsplinehair1.png' (426 KB)
Preview of image 'sweepsplinehair1.png'
|
|