|
|
|
|
|
|
| |
| |
|
|
|
|
| |
| |
|
|
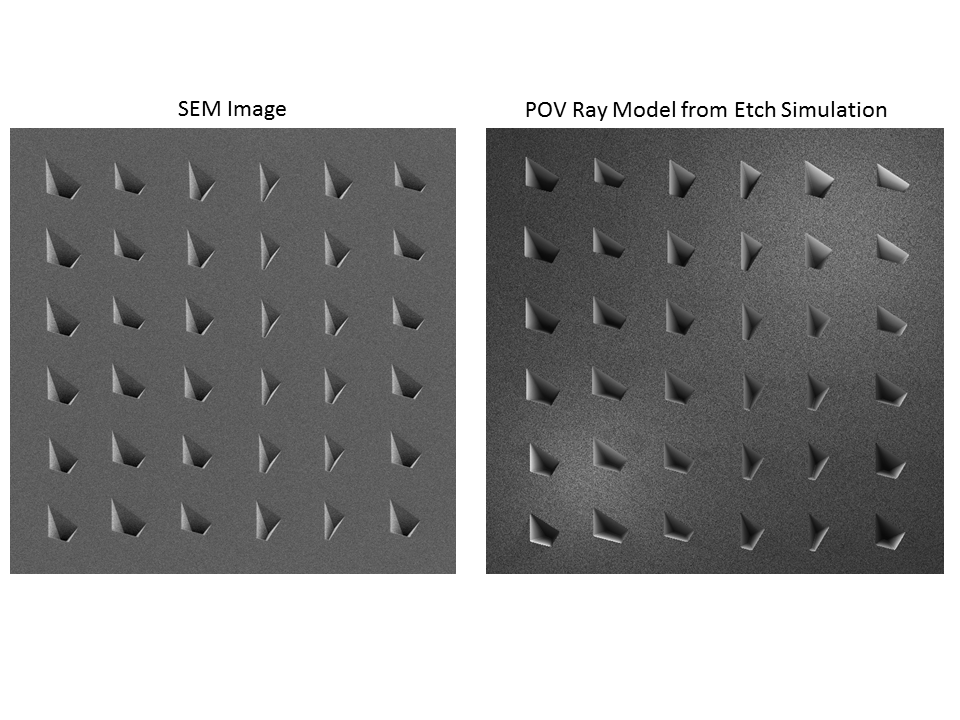
"Kenneth" <kdw### [at] gmail com> wrote:
> I cobbled together a scene similar to the one posted, and it's really hard to
> get that SEM 'look.' Even more irritating is that the indents almost always look
> like bumps. I tried lights, radiosity with no lights, a radiosity 'ring' around
> the object, no_shadow, etc. This is the closest I've gotten--and it still looks
> somewhat ambiguous.
>
> There's something intrinsic to electron microscope and SEM images that might
> make recreating the look with a 'standard' lighting setup difficult.
>
> Most such images appear to have 'lighting' that *surrounds* the object--except
> in the front. And no shadows, in the usual meaning. They almost look like
> photographic negatives. (I found one image--a really cool one of an ant--and
> 'inverted' it in Photoshop; the result looks like it's lit with a SINGLE light
> source, shining directly from the camera position...and with a rapid fall-off of
> light on all the side/slanting surfaces.) How to get the reverse of that with
> 'positive' lighting may not be so easy. For example, it's hard to get regular
> light sources to 'fall off' in brightness in just such a way as those SEM
> indents show. If the object was like an ant--in other words, a detailed 3D model
> in space--then maybe a radiosity set-up might work, using a white HEMISPHERE
> behind the model as the only 'light source.' But a simple planar surface--like
> the OP's model--can't take advantage of that.
>
> So my final idea was kind of a cheat: to color the planar surface with a
> gradient y pigment, receding into the surface--somewhat dark at the very
> surface, then immediately lighter, then falling to darkness again to the bottom
> of the pits. And using two area lights to either side.
Kenneth,
Wow, that looks great! Would you be willing to share your color map for the
gradient and the light_source parameters you used. Thanks so much for your help!
Regards,
Kevin com> wrote:
> I cobbled together a scene similar to the one posted, and it's really hard to
> get that SEM 'look.' Even more irritating is that the indents almost always look
> like bumps. I tried lights, radiosity with no lights, a radiosity 'ring' around
> the object, no_shadow, etc. This is the closest I've gotten--and it still looks
> somewhat ambiguous.
>
> There's something intrinsic to electron microscope and SEM images that might
> make recreating the look with a 'standard' lighting setup difficult.
>
> Most such images appear to have 'lighting' that *surrounds* the object--except
> in the front. And no shadows, in the usual meaning. They almost look like
> photographic negatives. (I found one image--a really cool one of an ant--and
> 'inverted' it in Photoshop; the result looks like it's lit with a SINGLE light
> source, shining directly from the camera position...and with a rapid fall-off of
> light on all the side/slanting surfaces.) How to get the reverse of that with
> 'positive' lighting may not be so easy. For example, it's hard to get regular
> light sources to 'fall off' in brightness in just such a way as those SEM
> indents show. If the object was like an ant--in other words, a detailed 3D model
> in space--then maybe a radiosity set-up might work, using a white HEMISPHERE
> behind the model as the only 'light source.' But a simple planar surface--like
> the OP's model--can't take advantage of that.
>
> So my final idea was kind of a cheat: to color the planar surface with a
> gradient y pigment, receding into the surface--somewhat dark at the very
> surface, then immediately lighter, then falling to darkness again to the bottom
> of the pits. And using two area lights to either side.
Kenneth,
Wow, that looks great! Would you be willing to share your color map for the
gradient and the light_source parameters you used. Thanks so much for your help!
Regards,
Kevin
Post a reply to this message
|
|
| |
| |
|
|
|
|
| |
| |
|
|
Sure; glad to help. Here are the lights and the texture. This assumes that your
own square SEM model is lying flat horizontally, with the top surface exactly at
y=0 (and centered on the origin; but that's not critical.) Your own model might
not be the same size as mine (which is 1X1), so adjust the light distances and
the gradient y pigment scale if needed. BTW, the overall brightness will depend
on what assumed_gamma you use in your scene. (I used 2.2 for this test.)
// The lights...
light_source {
<0, 0, 0>
color rgb .7
area_light
<12, 0, 0> <0, 0, 12> // lights spread out across this distance (x * z)
4, 4 // total number of lights in grid (4x*4z = 16 lights)
adaptive 0 // 0,1,2,3...
jitter // adds random softening of light
circular // make the shape of the light circular
orient // orient light
translate <-10, 7, 10>
}
light_source {
<0, 0, 0>
color rgb .9
area_light
<12, 0, 0> <0, 0, 12> // lights spread out across this distance (x * z)
4, 4 // total number of lights in grid (4x*4z = 16 lights)
adaptive 0 // 0,1,2,3...
jitter // adds random softening of light
circular // make the shape of the light circular
orient // orient light
translate <10, 20, 10>
}
// The texture...
texture{
pigment{
gradient y
pigment_map{
[.01 // For the top surface only
average
pigment_map{
[1 rgb .16]
[1.5 bumps scale .003]
}
]
[.01 rgb .9] // immediately under the surface
[1 rgb .2]// for the indents
}
scale .039*<1,-1,1> // Adjust the multiplier so
// the bottom of your SEM indents don't start showing the repeating
// gradient y pattern. The -1 for y just 'flips' the gradient y, as
// I specified the colors going 'up', not down.
}
finish{ambient 0 diffuse 1} // You might want to add a
// little bit of ambient.
}
Post a reply to this message
|
|
| |
| |
|
|
|
|
| |
| |
|
|
"Kenneth" <kdw### [at] gmailcom> wrote:
> Sure; glad to help. Here are the lights and the texture. This assumes that your
> own square SEM model is lying flat horizontally, with the top surface exactly at
> y=0 (and centered on the origin; but that's not critical.) Your own model might
> not be the same size as mine (which is 1X1), so adjust the light distances and
> the gradient y pigment scale if needed. BTW, the overall brightness will depend
> on what assumed_gamma you use in your scene. (I used 2.2 for this test.)
>
> // The lights...
> light_source {
> <0, 0, 0>
> color rgb .7
> area_light
> <12, 0, 0> <0, 0, 12> // lights spread out across this distance (x * z)
> 4, 4 // total number of lights in grid (4x*4z = 16 lights)
> adaptive 0 // 0,1,2,3...
> jitter // adds random softening of light
> circular // make the shape of the light circular
> orient // orient light
> translate <-10, 7, 10>
> }
>
> light_source {
> <0, 0, 0>
> color rgb .9
> area_light
> <12, 0, 0> <0, 0, 12> // lights spread out across this distance (x * z)
> 4, 4 // total number of lights in grid (4x*4z = 16 lights)
> adaptive 0 // 0,1,2,3...
> jitter // adds random softening of light
> circular // make the shape of the light circular
> orient // orient light
> translate <10, 20, 10>
> }
>
> // The texture...
> texture{
> pigment{
> gradient y
> pigment_map{
> [.01 // For the top surface only
> average
> pigment_map{
> [1 rgb .16]
> [1.5 bumps scale .003]
> }
> ]
> [.01 rgb .9] // immediately under the surface
> [1 rgb .2]// for the indents
> }
> scale .039*<1,-1,1> // Adjust the multiplier so
> // the bottom of your SEM indents don't start showing the repeating
> // gradient y pattern. The -1 for y just 'flips' the gradient y, as
> // I specified the colors going 'up', not down.
> }
> finish{ambient 0 diffuse 1} // You might want to add a
> // little bit of ambient.
> }
Kenneth,
Thanks again! I implemented your code with my mesh but I am having trouble
getting the pigment_map to work. I used a plane y and a difference statement to
determine that the top surface is at y=-1.3077 and the bottom of the pyramids is
around y=-2.9 (not all of them are the same depth). But the following
pigment_map does not look like yours:
#declare Tex_Silicon =
texture{
pigment{
gradient y
pigment_map{
[1.4 // For the top surface only
average
pigment_map{
[1 rgb 0.16]
[1.5 bumps scale .003]
}
]
[1.4 rgb 0.9] // immediately under the surface
[2.9 rgb 0.2]// for the indents
}
scale 1*<1,-1,1> // Adjust the multiplier so
// the bottom of your SEM indents don't start showing the repeating
// gradient y pattern. The -1 for y just 'flips' the gradient y, as
// I specified the colors going 'up', not down.
}
finish{ambient 0 diffuse 1} // You might want to add a little bit of ambient.
}
I zipped up my POV file so you (and others if they like) can work with the real
thing.
Your help (as are all the other posts on this thread) most appreciated!
Regards,
Kevin McPeak
Post a reply to this message
Attachments:
Download 'kmcpeak_pyramids_pov.zip' (1359 KB)
|
|
| |
| |
|
|
|
|
| |
| |
|
|
"kmcpeak" <kmc### [at] ethzch> wrote:
> "Kenneth" <kdw### [at] gmailcom> wrote:
> > Sure; glad to help. Here are the lights and the texture. This assumes that your
> > own square SEM model is lying flat horizontally, with the top surface exactly at
> > y=0 (and centered on the origin; but that's not critical.) Your own model might
> > not be the same size as mine (which is 1X1), so adjust the light distances and
> > the gradient y pigment scale if needed. BTW, the overall brightness will depend
> > on what assumed_gamma you use in your scene. (I used 2.2 for this test.)
> >
> > // The lights...
> > light_source {
> > <0, 0, 0>
> > color rgb .7
> > area_light
> > <12, 0, 0> <0, 0, 12> // lights spread out across this distance (x * z)
> > 4, 4 // total number of lights in grid (4x*4z = 16 lights)
> > adaptive 0 // 0,1,2,3...
> > jitter // adds random softening of light
> > circular // make the shape of the light circular
> > orient // orient light
> > translate <-10, 7, 10>
> > }
> >
> > light_source {
> > <0, 0, 0>
> > color rgb .9
> > area_light
> > <12, 0, 0> <0, 0, 12> // lights spread out across this distance (x * z)
> > 4, 4 // total number of lights in grid (4x*4z = 16 lights)
> > adaptive 0 // 0,1,2,3...
> > jitter // adds random softening of light
> > circular // make the shape of the light circular
> > orient // orient light
> > translate <10, 20, 10>
> > }
> >
> > // The texture...
> > texture{
> > pigment{
> > gradient y
> > pigment_map{
> > [.01 // For the top surface only
> > average
> > pigment_map{
> > [1 rgb .16]
> > [1.5 bumps scale .003]
> > }
> > ]
> > [.01 rgb .9] // immediately under the surface
> > [1 rgb .2]// for the indents
> > }
> > scale .039*<1,-1,1> // Adjust the multiplier so
> > // the bottom of your SEM indents don't start showing the repeating
> > // gradient y pattern. The -1 for y just 'flips' the gradient y, as
> > // I specified the colors going 'up', not down.
> > }
> > finish{ambient 0 diffuse 1} // You might want to add a
> > // little bit of ambient.
> > }
> Kenneth,
>
> Thanks again! I implemented your code with my mesh but I am having trouble
> getting the pigment_map to work. I used a plane y and a difference statement to
> determine that the top surface is at y=-1.3077 and the bottom of the pyramids is
> around y=-2.9 (not all of them are the same depth). But the following
> pigment_map does not look like yours:
>
> #declare Tex_Silicon =
> texture{
> pigment{
> gradient y
> pigment_map{
> [1.4 // For the top surface only
> average
> pigment_map{
> [1 rgb 0.16]
> [1.5 bumps scale .003]
> }
> ]
> [1.4 rgb 0.9] // immediately under the surface
> [2.9 rgb 0.2]// for the indents
> }
> scale 1*<1,-1,1> // Adjust the multiplier so
> // the bottom of your SEM indents don't start showing the repeating
> // gradient y pattern. The -1 for y just 'flips' the gradient y, as
> // I specified the colors going 'up', not down.
> }
> finish{ambient 0 diffuse 1} // You might want to add a little bit of ambient.
> }
>
> I zipped up my POV file so you (and others if they like) can work with the real
> thing.
>
> Your help (as are all the other posts on this thread) most appreciated!
>
> Regards,
> Kevin McPeak
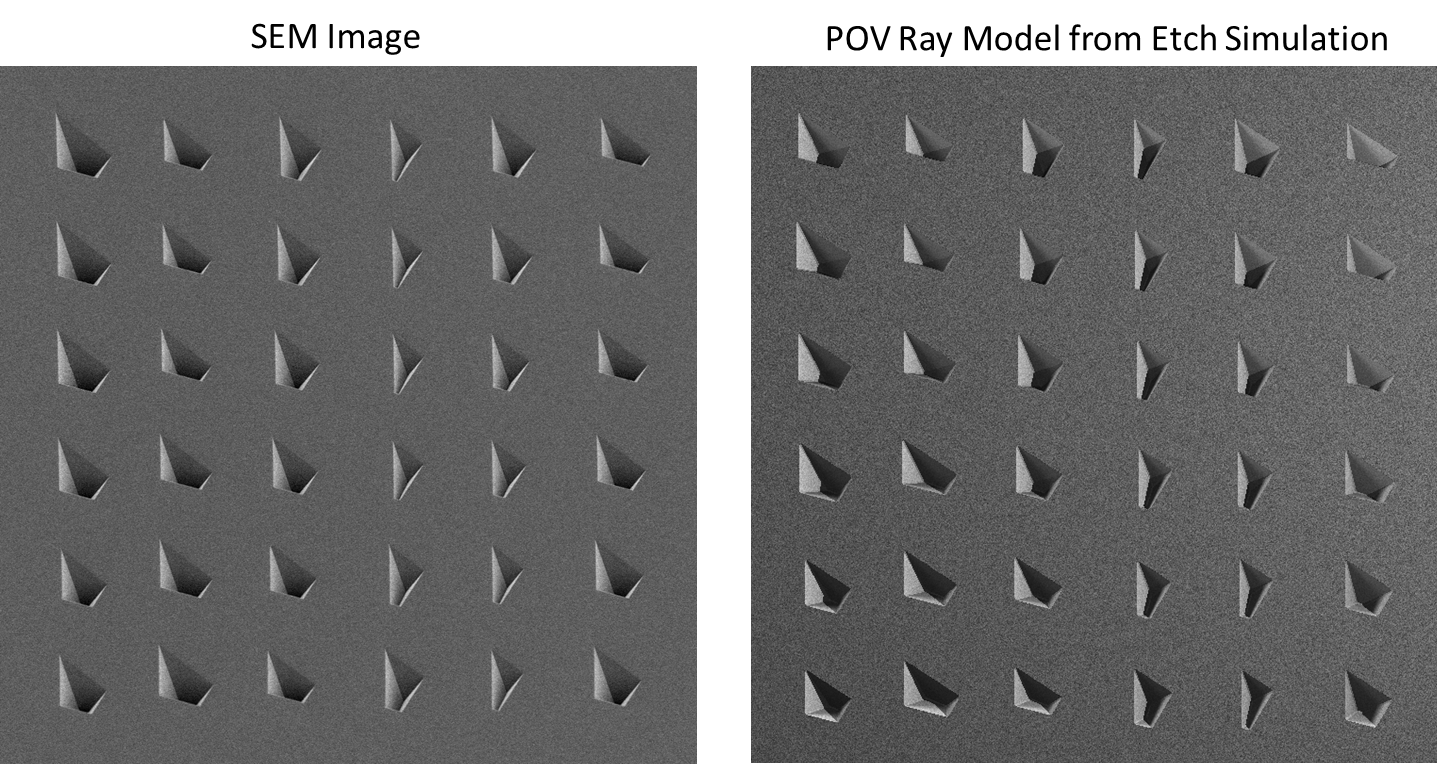
I used a transform to bring the top of the silicon surface to y = 0. This helped
me figure out the pigment_map. Attached is my latest effort. I think I need to
move the lights a bit but overall this is way way better than where I started.
Thanks so much to all of you for your help!
Latest code:
#declare Tex_Silicon =
texture{
pigment{
gradient y
pigment_map{
[0.01 // For the top surface only
average
pigment_map{
[1 rgb 0.16]
[1.5 bumps scale .003]
}
]
[0.01 rgb 0.6] // immediately under the surface
[0.8 rgb 0.2]// for the indents
}
scale 1.65*<1,-1,1> // Adjust the multiplier so
// the bottom of your SEM indents don't start showing the repeating
// gradient y pattern. The -1 for y just 'flips' the gradient y, as
// I specified the colors going 'up', not down.
}
finish{ambient 0.2 diffuse 1} // You might want to add a little bit of
ambient.
}
Post a reply to this message
Attachments:
Download 'fig1_sem-pov_comparison.png' (304 KB)
Preview of image 'fig1_sem-pov_comparison.png'
|
|
| |
| |
|
|
|
|
| |
| |
|
|
"kmcpeak" <kmc### [at] ethzch> wrote:
>
> I used a transform to bring the top of the silicon surface to y = 0. This
> helped me figure out the pigment_map. Attached is my latest effort. I think
> I need to move the lights a bit but overall this is way way better than
> where I started.
Hey, that's looking *much* better.
I think (as you say) that the light positions are still not quite right. It
looks like they are 'diagonal' to the object, and still too close to it. In my
own tests, those light positions turned out to be rather critical, to change the
'bumps' into 'indents.' Try placing them exactly left-and-right to the object,
really far away, and maybe lower in y(?). (And no fade-power, of course.) With
some more experimentation, you'll probably find the 'sweet spot' for those
lights.
Post a reply to this message
|
|
| |
| |
|
|
|
|
| |
| |
|
|
"Kenneth" <kdw### [at] gmailcom> wrote:
> "kmcpeak" <kmc### [at] ethzch> wrote:
>
> >
> > I used a transform to bring the top of the silicon surface to y = 0. This
> > helped me figure out the pigment_map. Attached is my latest effort. I think
> > I need to move the lights a bit but overall this is way way better than
> > where I started.
>
> Hey, that's looking *much* better.
>
> I think (as you say) that the light positions are still not quite right. It
> looks like they are 'diagonal' to the object, and still too close to it. In my
> own tests, those light positions turned out to be rather critical, to change the
> 'bumps' into 'indents.' Try placing them exactly left-and-right to the object,
> really far away, and maybe lower in y(?). (And no fade-power, of course.) With
> some more experimentation, you'll probably find the 'sweet spot' for those
> lights.
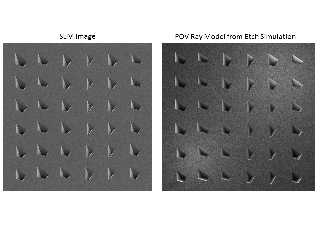
After some movement of the lights and adding bumps to the etch pits attached is
my latest best effort. Might stop here... Code below:
#declare Tex_Silicon =
texture{
pigment{
gradient y
pigment_map{
[0.01 // For the top surface only
average
pigment_map{
[1 rgb 0.3]
[1.25 bumps scale .0005]
}
]
[0.01 // immediately under the surface
average
pigment_map{
[1 rgb 0.7]
[0.5 bumps scale .0005]
}
]
[0.8 // for the indents
average
pigment_map{
[1 rgb 0.5]
[0.5 bumps scale .0005]
}
]
}
scale 1.65*<1,-1,1> // Adjust the multiplier so
// the bottom of your SEM indents don't start showing the repeating
// gradient y pattern. The -1 for y just 'flips' the gradient y, as
// I specified the colors going 'up', not down.
}
finish{ambient 0.1 diffuse 1} // You might want to add a little bit of
ambient.
}
#declare Material_0=material{
texture {Tex_Silicon }
}
camera {
location <0.00000, 55, 0.000000> // <up/down, height, right/left>
look_at <0.000000, 0.000000, 0.000000>
right x*image_width/image_height
//up <0,0,1>
rotate <0, 90, 0>
}
// The lights...
// Top left
light_source {
<0, 0, 0>
color rgb .7
area_light
<20, 0, 0> <0, 40, 0> // lights spread out across this distance (x * z)
8, 8 // total number of lights in grid (4x*4z = 16 lights)
adaptive 0 // 0,1,2,3...
jitter // adds random softening of light
circular // make the shape of the light circular
orient // orient light
translate <50, 20, 80> // <+up/-down, +height, -right/+left>
}
// Right middle
light_source {
<0, 0, 0>
color rgb .9
area_light
<0, 0, 0> <10, 30, 0> // lights spread out across this distance (x * z)
8, 8 // total number of lights in grid (4x*4z = 16 lights)
adaptive 0 // 0,1,2,3...
jitter // adds random softening of light
circular // make the shape of the light circular
orient // orient light
translate <10, 35, -60> // <+up/-down, +height, -right/+left>
}
// Top
light_source {
<0, 0, 0>
color rgb .2
area_light
<0, 0, 0> <30, 0, 30> // lights spread out across this distance (x * z)
8, 8 // total number of lights in grid (4x*4z = 16 lights)
adaptive 0 // 0,1,2,3...
jitter // adds random softening of light
circular // make the shape of the light circular
orient // orient light
translate <0, 50, 0> // <+up/-down, +height, -right/+left>
}
Post a reply to this message
Attachments:
Download 'fig1_sem-pov_comparison.png' (965 KB)
Preview of image 'fig1_sem-pov_comparison.png'
|
|
| |
| |
|
|
|
|
| |
| |
|
|
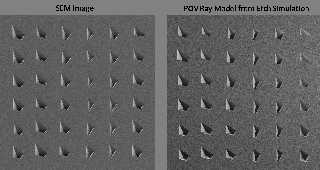
I just remarqued a peculiar detail:
In the SEM omage, the lower edge of the indents are never visible, while
on the POV version, they are visible starting with the second row.
My proposal:
Use an orthographic camera.
Alain
Post a reply to this message
|
|
| |
| |
|
|
|
|
| |
| |
|
|
"kmcpeak" <kmc### [at] ethzch> wrote:
>
> After some movement of the lights and adding bumps to the etch pits attached is
> my latest best effort. Might stop here...
>
That's looking almost perfect. Well done, really.
But don't stop yet ;-) It's always the last 5% of the work (or maybe the last
1%!) that really 'sells' a computer graphics rendering. And that's usually the
most difficult and hair-pulling part, because the final tweaking is so subtle at
this stage.
The *only* thing I would say is that the bright parts of the indents don't have
quite enough 'tonality' or fading-to-darkness as they recede into the pits. Your
lights code looks right, so I'm thinking that the gradient y pigment might be
scaled too deeply into the surface (in other words, fading to black somewhere
*below* the bottom of the pits.) OR, maybe try reducing the diffuse value in the
finish. Which will naturally make the SURFACE darker too, of course ;-/ Yet
more tweaking...
But the result will be worth it!
Post a reply to this message
|
|
| |
| |
|
|
|
|
| |
| |
|
|
"Kenneth" <kdw### [at] gmailcom> wrote:
> "kmcpeak" <kmc### [at] ethzch> wrote:
>
> >
> > After some movement of the lights and adding bumps to the etch pits attached is
> > my latest best effort. Might stop here...
> >
>
> That's looking almost perfect. Well done, really.
>
> But don't stop yet ;-) It's always the last 5% of the work (or maybe the last
> 1%!) that really 'sells' a computer graphics rendering. And that's usually the
> most difficult and hair-pulling part, because the final tweaking is so subtle at
> this stage.
>
> The *only* thing I would say is that the bright parts of the indents don't have
> quite enough 'tonality' or fading-to-darkness as they recede into the pits. Your
> lights code looks right, so I'm thinking that the gradient y pigment might be
> scaled too deeply into the surface (in other words, fading to black somewhere
> *below* the bottom of the pits.) OR, maybe try reducing the diffuse value in the
> finish. Which will naturally make the SURFACE darker too, of course ;-/ Yet
> more tweaking...
>
> But the result will be worth it!
Thanks for the encouragement Kenneth! I will keep plugging away. One issue
regarding the pigment gradient is that not all the pyramids have the same y
value for the bottom of their pit. So I struggled finding the *best* value since
it worked for some but not all. Do you see any way around that?
Alain, I will also give the orthographic camera a shot, thanks for that
suggestion.
Kevin
Post a reply to this message
|
|
| |
| |
|
|
|
|
| |
| |
|
|
"kmcpeak" <kmc### [at] ethzch> wrote:
>
> Thanks for the encouragement Kenneth! I will keep plugging away. One issue
> regarding the pigment gradient is that not all the pyramids have the same y
> value for the bottom of their pit. So I struggled finding the *best* value since
> it worked for some but not all. Do you see any way around that?
Ah, I didn't think of that. My own little test had the indents bottoming-out at
almost the same depth (give or take a tiny amount.)
There actually *is* a way to give each indent it's own special gradient-y
treatment(!) But it's crazily complicated, so I won't go into great detail; here
are the basics, though:
POV-Ray has a pattern called BOXED. In essence, it can be used to 'encapsulate'
any of POV-Ray's other patterns (like gradient y.) In this use, it's kind of
like a 'once' statement for patterns--the pattern on the inside of the 'box',
and a transparent rgbt 1 added for everywhere outside.
Anyway, first your entire SEM model would get its own texture/pigment (NOT a
gradient-y this time but just whatever makes the surface look good--bumps,
averaged, whatever.) Then multiple 'boxed' textures are added with their
encapsulated gradient-y's--so each indent get its own boxed pattern to override
the 'main' texture just in those places (with the boxes appropriately scaled of
course, which is the tricky part--and placed right under the surface.)
There is a method in POV-Ray for almost anything!
Post a reply to this message
|
|
| |
| |
|
|
|
|
| |
|
|