|
|
|
|
|
|
| |
| |
|
|
|
|
| |
| |
|
|
"Trevor G Quayle" <Tin### [at] hotmail com> wrote:
> The actual water (as a heightfield as in the renders):
> -tgq
Big enough to see the tile is starting to swirl like the outdoor pool image.
I am scaling the tile to get an approx 0.4 to 1 tile size (eyeballed), but that
scales the grout also. It's boggling.
This pool has a depth of 60; I wanted to see how far down the wall could be
seen. The outdoor pool looked like 3.5 feet. (about 10 for Lego ppl)
Tile scaling needs ... ? doh!
#declare tileplaid =
texture {
pigment { uv_mapping
gradient x
pigment_map{
[1/7 rgb 1][1/7 gradient y
colour_map{
[1/7 rgb 1]
[1/7 rgb <.6,.6,1> ]
}
]
}
scale <1/160,1/20,1>*.7
}
finish { basic_finish }
}
#declare pool_box =
difference {
box { <-16, -66.5, -16> <224, 0, 224> } // legoworld hole
box { <-8, -60, -8> <216, 1, 216> }
texture { tileplaid }
}
Many thanks go to Professor Trevor G Quayle.
Thank you, this is great water.
(have yet to discover what went wrong with 1st poolwater)
Beginning to look like "outdoor-pool-image" could be achieved. com> wrote:
> The actual water (as a heightfield as in the renders):
> -tgq
Big enough to see the tile is starting to swirl like the outdoor pool image.
I am scaling the tile to get an approx 0.4 to 1 tile size (eyeballed), but that
scales the grout also. It's boggling.
This pool has a depth of 60; I wanted to see how far down the wall could be
seen. The outdoor pool looked like 3.5 feet. (about 10 for Lego ppl)
Tile scaling needs ... ? doh!
#declare tileplaid =
texture {
pigment { uv_mapping
gradient x
pigment_map{
[1/7 rgb 1][1/7 gradient y
colour_map{
[1/7 rgb 1]
[1/7 rgb <.6,.6,1> ]
}
]
}
scale <1/160,1/20,1>*.7
}
finish { basic_finish }
}
#declare pool_box =
difference {
box { <-16, -66.5, -16> <224, 0, 224> } // legoworld hole
box { <-8, -60, -8> <216, 1, 216> }
texture { tileplaid }
}
Many thanks go to Professor Trevor G Quayle.
Thank you, this is great water.
(have yet to discover what went wrong with 1st poolwater)
Beginning to look like "outdoor-pool-image" could be achieved.
Post a reply to this message
Attachments:
Download 'legoworld_pool2test.png' (529 KB)
Preview of image 'legoworld_pool2test.png'

|
|
| |
| |
|
|
|
|
| |
| |
|
|
"alphaQuad" <alp### [at] earthlinknet> wrote:
>
> I am scaling the tile to get an approx 0.4 to 1 tile size (eyeballed), but that
> scales the grout also. It's boggling.
>
> Tile scaling needs ... ? doh!
>
> #declare tileplaid =
> texture {
> pigment { uv_mapping
> gradient x
> pigment_map{
> [1/7 rgb 1][1/7 gradient y
> colour_map{
> [1/7 rgb 1]
> [1/7 rgb <.6,.6,1> ]
> }
> ]
> }
> scale <1/160,1/20,1>*.7
> }
> finish { basic_finish }
> }
The 1/7 value is the grout width value. The tile is 6/7 units and the grout is
1/7 units.
Use declare and math to adust tile/grout sizes:
#declare TilSiz= <xdim,ydim,0>; //tile offsetting (tile size plus grout line)
#declare GrtSiz= gwid; //grout width
texture {
pigment { uv_mapping
gradient x
pigment_map{
[GrtSiz/(TilSiz.x+GrtSiz) rgb 1]
[GrtSiz/(TilSiz.x+GrtSiz) gradient y
colour_map{
[GrtSiz/(TilSiz.y+GrtSiz) rgb 1]
[GrtSiz/(TilSiz.y+GrtSiz) rgb <.6,.6,1> ]
}
]
}
scale TilSiz
}
finish { basic_finish }
}
This way you can make the tiles bigger (change TilSiz) without changing the
grout size, or vice versa.
-tgq
Post a reply to this message
|
|
| |
| |
|
|
|
|
| |
| |
|
|
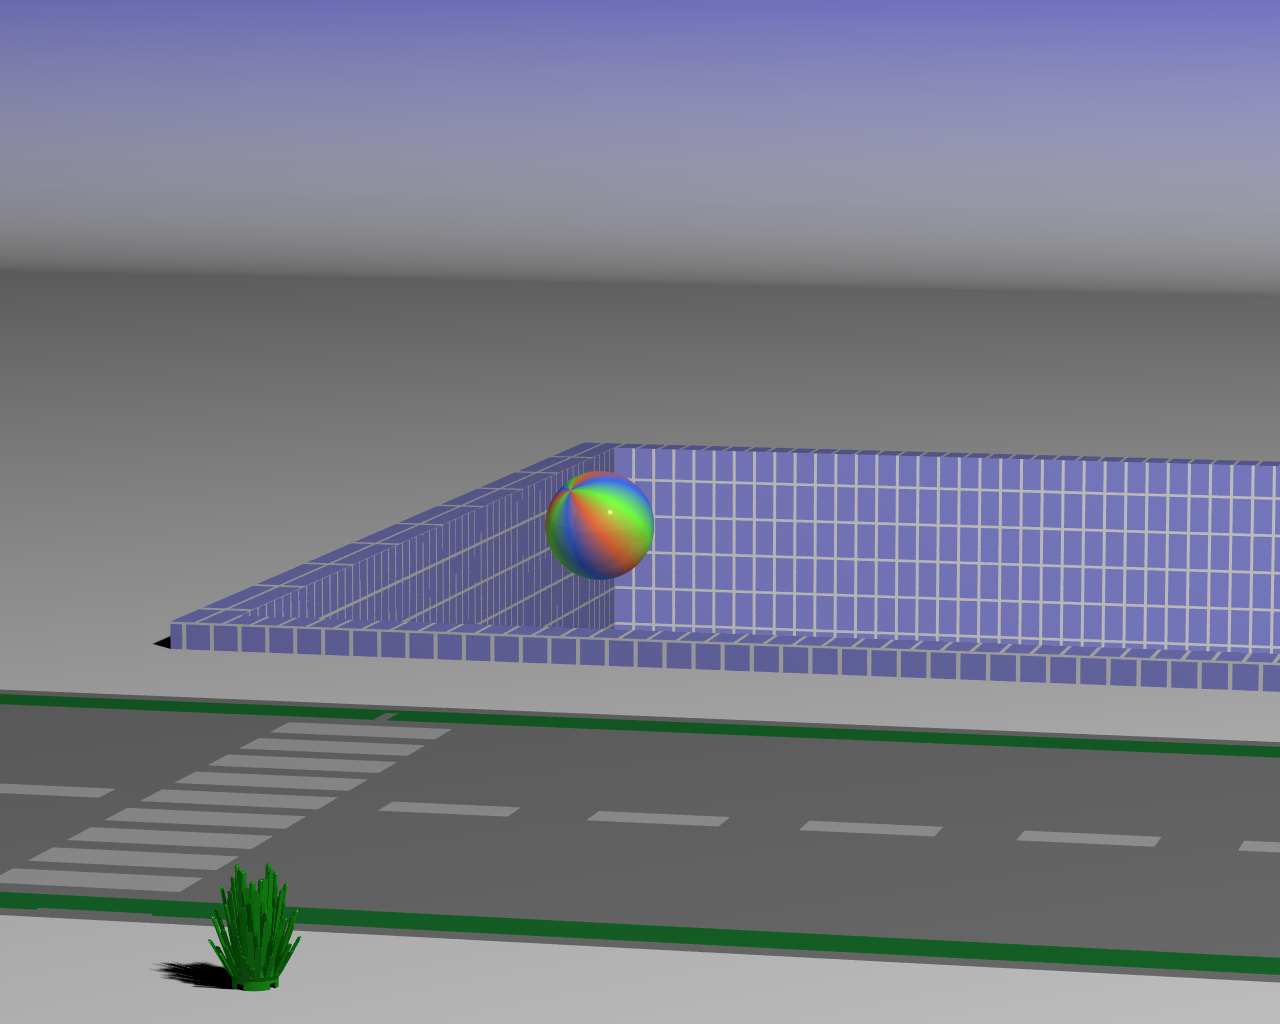
previously had a lego-floor bottom,
bottom tiled at a depth of 65.
#declare RHIT=0.25;
#declare WHit=0.45;
ripple height
and
wave height
Am I understanding your naming convention? Kinda important to grasping the math
logic.
Ship looks like it sustained damage or landed on the wicked, depraved witch.
Post a reply to this message
Attachments:
Download 'lego_pool.png' (537 KB)
Preview of image 'lego_pool.png'

|
|
| |
| |
|
|
|
|
| |
| |
|
|
"alphaQuad" <alp### [at] earthlinknet> wrote:
> previously had a lego-floor bottom,
>
> bottom tiled at a depth of 65.
>
> #declare RHIT=0.25;
> #declare WHit=0.45;
>
> ripple height
> and
> wave height
>
> Am I understanding your naming convention? Kinda important to grasping the math
> logic.
>
> Ship looks like it sustained damage or landed on the wicked, depraved witch.
OK, my original water pattern was just thrown together using some previously
developed code so it wasn't commented or named with consistency. I have
reworked it with better naming conventions and commenting and have also
optimizified the code somewhat. Note that the dimensions used for the declared
values (PoolSiz, PoolDep, WavHt, WavSpac, RipHt, RipSpac) correspond to the
final scene level dimensions for ease of use.
//START
#declare PoolSiz=216+8; //length of pool sides (square)
#declare PoolDep=75; //depth of pool
#declare WavHt=0.45; //height of waves
#declare WavSpac=30; //spacing of waves
#declare RipHt=0.25; //height of ripples (pool sides)
#declare RipSpac=4; //spacing of ripples
#declare TotDep=PoolDep+WavHt+RipHt; //total water depth
#declare FWav1 = //wave function
function{
pigment{
marble frequency PoolSiz/WavSpac sine_wave
scale 1/5
warp{turbulence 1.5}
scale 5
warp{turbulence 0.5}
}
}
#local FWav2 = function {FWav1(x,y,z).gray*0.5+FWav1(y,x,z).gray*0.5} //wave
function 2
#local FRip1 = //ripple function
function {
pigment{
function{pow(max(min(abs(x*2-1),1)-0.5,0)/(1-0.5),3)}
pigment_map{
[0.0 rgb 0]
[1.0 marble frequency PoolSiz/RipSpac sine_wave]
}
scale 1/5
warp{turbulence 0.05*x}
scale 5
}
}
#local FRip2 = function {FRip1(x,y,z).gray*0.5+FRip1(y,x,z).gray*0.5} //ripple
function 2
#declare WHt=WavHt/TotDep; //relative depth of waves (% total depth)
#declare RHt=RipHt/TotDep; //relative depth of ripples (% total depth)
#local FWat = function {FWav2(x,y,z)*WHt+FRip2(x,y,z)*RHt+(1-WHt-RHt)} //water
surface function
#declare WatHF= //water heightfield
height_field{
function 600,600 {pattern{function{FWat(x,y,z)}}}
smooth
hollow
scale <PoolSiz,TotDep,PoolSiz>
}
#declare WatCol=rgb <0.51373, 0.70588, 0.70588>; //Water colour
#local FadeDis=-60/ln(0.58); //fade distance
#declare MWater= //water material
material{
texture{
pigment{rgbt 1}
finish{conserve_energy diffuse 0.0 ambient 0 reflection{0 1 fresnel on
metallic 0}}
}
interior{
ior 1.33
media{
absorption rgb 1-WatCol //coastal
density{rgb 1/FadeDis}
}
}
}
// water
object{WatHF translate <-8,-76,-8> hollow material { MWater translate
<-10,0,-10>}}
//END
-tgq
Post a reply to this message
|
|
| |
| |
|
|
|
|
| |
| |
|
|
"Trevor G Quayle" <Tin### [at] hotmailcom> wrote:
> The 1/7 value is the grout width value. The tile is 6/7 units and the grout is
> 1/7 units.
>
> Use declare and math to adust tile/grout sizes:
>
> #declare TilSiz= <xdim,ydim,0>; //tile offsetting (tile size plus grout line)
> #declare GrtSiz= gwid; //grout width
>
> texture {
> pigment { uv_mapping
> gradient x
> pigment_map{
> [GrtSiz/(TilSiz.x+GrtSiz) rgb 1]
> [GrtSiz/(TilSiz.x+GrtSiz) gradient y
> colour_map{
> [GrtSiz/(TilSiz.y+GrtSiz) rgb 1]
> [GrtSiz/(TilSiz.y+GrtSiz) rgb <.6,.6,1> ]
> }
> ]
> }
> scale TilSiz
> }
> finish { basic_finish }
> }
>
> This way you can make the tiles bigger (change TilSiz) without changing the
> grout size, or vice versa.
>
> -tgq
when you said "The 1/7 value is the grout width value." , a light sort of went
on ... but there is y grout and and x grout.
the math for the correct y-grout-[scale] due to y-scaling is ... ? puzzling
".5" value which I guessed at, since it looked 2 times too big.
In the real Lego world this is what worked:
#declare TilSiz= <6/7,12/7,1>; //tile offsetting (tile size plus grout line)
#declare GrtSiz= 1/7; //grout width
//0.142857
echof(GrtSiz/(TilSiz.x+GrtSiz)) // 0.14286
cr()
echof(GrtSiz/(TilSiz.y+GrtSiz)) // 0.07143
cr()
#declare tileplaid =
#if (10)
texture {
pigment { uv_mapping
gradient x
pigment_map{
[GrtSiz/(TilSiz.x+GrtSiz) rgb 1]
[GrtSiz/(TilSiz.x+GrtSiz) gradient y
colour_map{
[GrtSiz/(TilSiz.y+GrtSiz) rgb 1]
[GrtSiz/(TilSiz.y+GrtSiz) rgb <.6,.6,1> ]
}
]
}
//scale TilSiz*.01
scale <1/160,1/20,1>*.7
}
finish { basic_finish }
}
#else
texture {
pigment { uv_mapping
gradient x
pigment_map{
[1/7 rgb 1]
[1/7 gradient y
colour_map{
[(1/7)*.5 rgb 1]
[(1/7)*.5 rgb <.6,.6,1> ]
}
]
}
scale <1/160,1/20,1>*.7 // == 0.00625 / .05 = 0.125 1/8
}
finish { basic_finish }
} #end
still had to scale by something else not TilSiz
scale by TilSiz = a grout line half the pool's width and tiles with a greater
xdim
Post a reply to this message
Attachments:
Download 'lego_pool2.png' (169 KB)
Preview of image 'lego_pool2.png'
|
|
| |
| |
|
|
|
|
| |
| |
|
|
"alphaQuad" <alp### [at] earthlinknet> wrote:
>
> when you said "The 1/7 value is the grout width value." , a light sort of went
> on ... but there is y grout and and x grout.
>
> the math for the correct y-grout-[scale] due to y-scaling is ... ? puzzling
> ".5" value which I guessed at, since it looked 2 times too big.
>
> In the real Lego world this is what worked:
>
> #declare TilSiz= <6/7,12/7,1>; //tile offsetting (tile size plus grout line)
> #declare GrtSiz= 1/7; //grout width
> //0.142857
> echof(GrtSiz/(TilSiz.x+GrtSiz)) // 0.14286
> cr()
> echof(GrtSiz/(TilSiz.y+GrtSiz)) // 0.07143
> cr()
> #declare tileplaid =
> #if (10)
> texture {
> pigment { uv_mapping
> gradient x
> pigment_map{
> [GrtSiz/(TilSiz.x+GrtSiz) rgb 1]
> [GrtSiz/(TilSiz.x+GrtSiz) gradient y
> colour_map{
> [GrtSiz/(TilSiz.y+GrtSiz) rgb 1]
> [GrtSiz/(TilSiz.y+GrtSiz) rgb <.6,.6,1> ]
> }
> ]
> }
> //scale TilSiz*.01
> scale <1/160,1/20,1>*.7
> }
> finish { basic_finish }
> }
> #else
> texture {
> pigment { uv_mapping
> gradient x
> pigment_map{
> [1/7 rgb 1]
> [1/7 gradient y
> colour_map{
> [(1/7)*.5 rgb 1]
> [(1/7)*.5 rgb <.6,.6,1> ]
> }
> ]
> }
> scale <1/160,1/20,1>*.7 // == 0.00625 / .05 = 0.125 1/8
> }
> finish { basic_finish }
> } #end
>
>
> still had to scale by something else not TilSiz
> scale by TilSiz = a grout line half the pool's width and tiles with a greater
> xdim
x grout and y grout should be handled just fine the way I showed, as long as you
want it the same tickness for both.
I'm not sure how you are applying the texture, but it's likely the uv mapping
that is causing you an issue as the pattern is not getting scaled as expected
(or rather as wanted...). The scale you are using is 1/160 x 1/20 which is an
8:1 ratio, whereas you are getting the pattern to work by misscaling by a 2:1
ratio. You need to determine how the uv mapping is effecting the pattern and
scale both the x/y of the tiles and have a separate x&y grout scaling that is
based on the proportional scaling that the uv mapping is applying.
-tgq
Post a reply to this message
|
|
| |
| |
|
|
|
|
| |
| |
|
|
"Trevor G Quayle" <Tin### [at] hotmailcom> wrote:
> I'm not sure how you are applying the texture, but it's likely the uv mapping
> that is causing you an issue as the pattern is not getting scaled as expected
texture applied like any other ...
#declare tileplaid =
texture {
pigment { uv_mapping
gradient x
pigment_map{
[1/7 rgb 1][1/7 gradient y
colour_map{
[(1/7)*.5 rgb 1]
[(1/7)*.5 rgb <.6,.6,1> ]
}
]
}
scale <1/160,1/20,1>*.7
}
finish { basic_finish }
}
#declare pool_box =
difference {
box { <-8, -66.5, -8> <232, 0, 232> } // legoworld hole
box { <0, -65, 0> <224, 1, 224> }
texture { tileplaid }
translate <-8,0,-8>
}
union {
object { pool_box }
object { TQ_water2 }
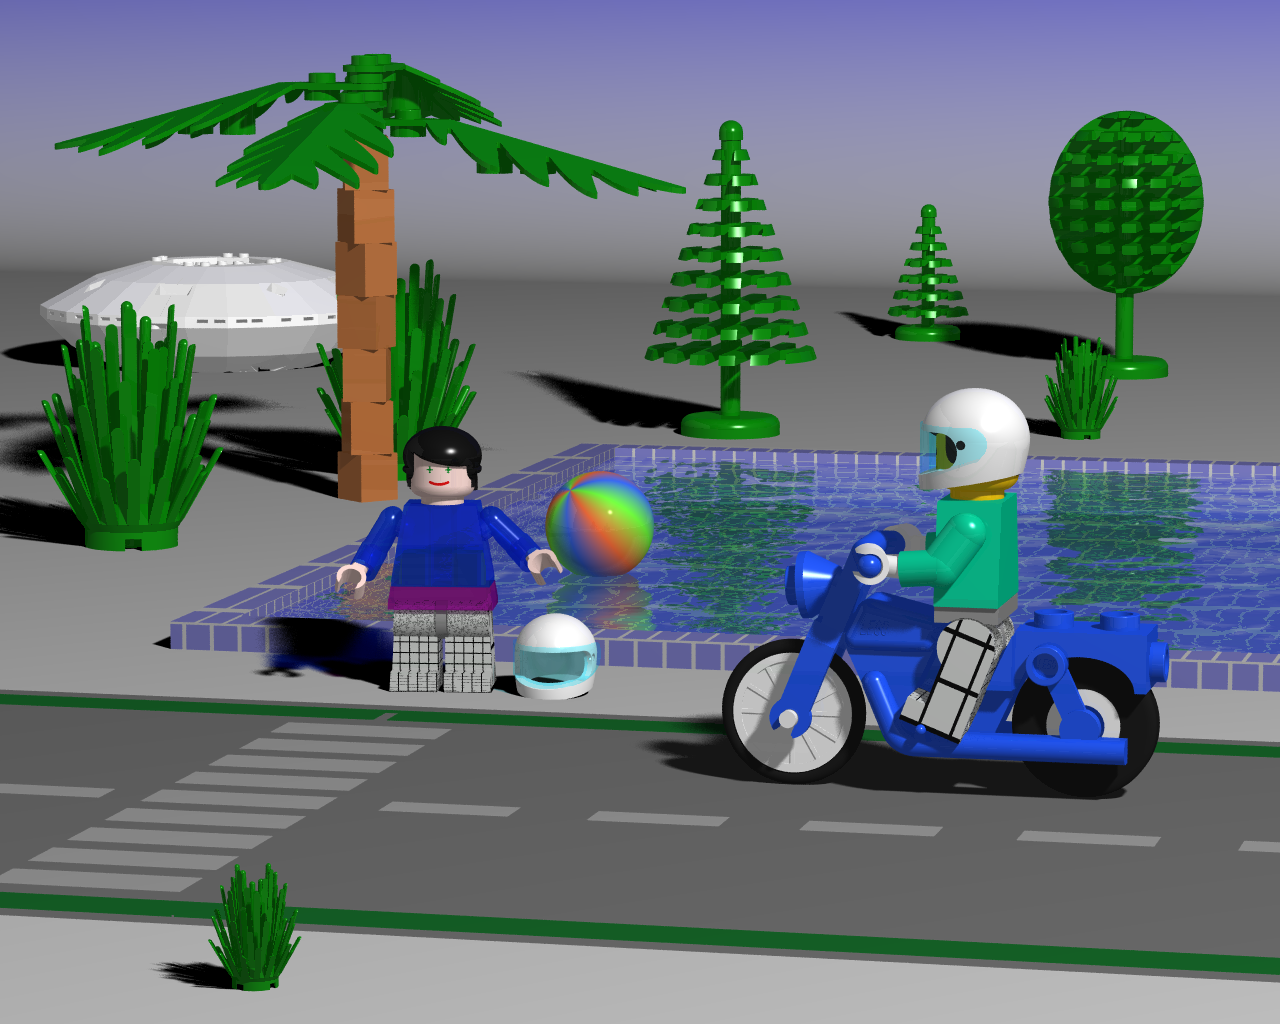
object { beachball scale 8.5 rotate z*45 rotate y*-55 translate <30,6.5,55> }
translate y*4
}
You have been such a fantasic source on this, didn't mean to derail your thread.
I could see someone had a clue on water.
That is the code, 2:1 and 8:1, that made the image which all speaks for itself:
I never expect perfection, but expect imperfection that is for me to... enhance.
I hesitate to say perfect.
Post a reply to this message
|
|
| |
| |
|
|
|
|
| |
| |
|
|
"alphaQuad" <alp### [at] earthlinknet> wrote:
> "Trevor G Quayle" <Tin### [at] hotmailcom> wrote:
>
> > I'm not sure how you are applying the texture, but it's likely the uv mapping
> > that is causing you an issue as the pattern is not getting scaled as expected
>
> texture applied like any other ...
> #declare tileplaid =
> texture {
> pigment { uv_mapping
> gradient x
> pigment_map{
> [1/7 rgb 1][1/7 gradient y
> colour_map{
> [(1/7)*.5 rgb 1]
> [(1/7)*.5 rgb <.6,.6,1> ]
> }
> ]
> }
> scale <1/160,1/20,1>*.7
> }
> finish { basic_finish }
> }
> #declare pool_box =
> difference {
> box { <-8, -66.5, -8> <232, 0, 232> } // legoworld hole
> box { <0, -65, 0> <224, 1, 224> }
> texture { tileplaid }
> translate <-8,0,-8>
> }
> union {
> object { pool_box }
> object { TQ_water2 }
> object { beachball scale 8.5 rotate z*45 rotate y*-55 translate <30,6.5,55> }
> translate y*4
> }
>
>
> You have been such a fantasic source on this, didn't mean to derail your thread.
> I could see someone had a clue on water.
>
> That is the code, 2:1 and 8:1, that made the image which all speaks for itself:
>
> I never expect perfection, but expect imperfection that is for me to... enhance.
> I hesitate to say perfect.
Not a problem. I always like to help. (Unfortunatly my real work suffers when I
get preoccupied elsewhere...)
If you know the size of the pool box, then refer to uv_mapping in the docs to
see how it gets applied. You should be able to work out the proportions and
mathematics from that. I may do some more playing with it later when I get a
chance.
"3.5.7.1 Supported Objects"
This section shows how the texture gets sampled and applied to a box object.
-tgq
Post a reply to this message
|
|
| |
| |
|
|
|
|
| |
| |
|
|
> "Thomas de Groot" <tDOTdegroot@interDOTnlANOTHERDOTnet> wrote:
> > I am not entirely sure if this function is really natural to a
> bathtube or
> > any confined water surface, up to a certain scale.
"alphaQuad" <alp### [at] earthlinknet> wrote:
> I'd love to see someone find something better than f_ridge for the Lego
> pool.
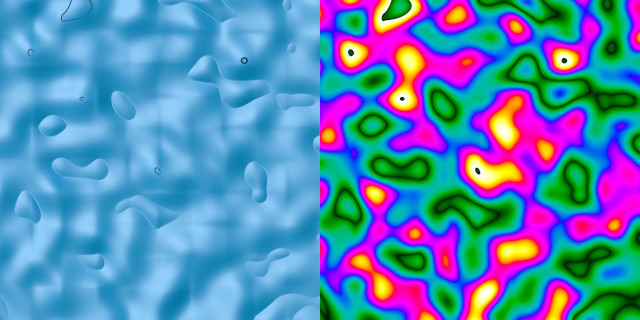
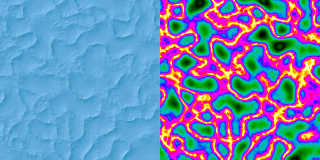
I don't know what your criteria are for the Lego pool, but I'm sure
someone can do better than both f_ridged_mf() and f_ridged(). Please find
attached isocolor and shaded relief illustrations of these functions.
They are:
- waves-ridge1.jpg - f_ridged_mf() as Christoph used it;
- waves-ridge2.jpg - Christoph's usage as I modified it;
- waves-ridge3.jpg - f_ridge() as alphaQuad used it.
They don't exactly look like water waves from this angle.
These function calls appear to be the sort of tool that does its job well
from certain perspective--namely, water waves at typical viewing
angles--but are hardly general solutions.
> I doubt anyone can.
Very fragile generalization.
--
<Insert witty .sig here>
Post a reply to this message
Attachments:
Download 'waves-ridge1.jpg' (104 KB)
Download 'waves-ridge2.jpg' (122 KB)
Download 'waves-ridge3.jpg' (72 KB)
Preview of image 'waves-ridge1.jpg'
Preview of image 'waves-ridge2.jpg'

Preview of image 'waves-ridge3.jpg'

|
|
| |
| |
|
|
|
|
| |
| |
|
|
"Trevor G Quayle" <Tin### [at] hotmailcom> wrote:
> "alphaQuad" <alp### [at] earthlinknet> wrote:
> > "Trevor G Quayle" <Tin### [at] hotmailcom> wrote:
> >
>
> If you know the size of the pool box, then refer to uv_mapping in the docs to
> see how it gets applied. You should be able to work out the proportions and
> mathematics from that. I may do some more playing with it later when I get a
> chance.
>
> "3.5.7.1 Supported Objects"
> This section shows how the texture gets sampled and applied to a box object.
>
> -tgq
OK this took a little work, but should take the guesswork out of tiling the
pool. I've added a few tricks to this as well. The uvmapping you were using
can be adapted to a square shape pool, but if you were to change to a
rectangular shape, it would cause big problems. This pattern will avoid this
and let you have reactangular pools with a consistent tile size and grout size.
You'll also noticed that I offset the grouting by half its size and added a
half grout to the opposite side so the each full tile rectangle is bounded on
all sides by a half width of grout. This makes it work nice at the edges so
that the tile is not butting the edges, but rather grout. Each individual
x/y/z plane pattern is sized independently and then added to the areas
corresponding to the uv mapping of the box. Next step will be to make it as a
single pattern...
-tgq
//START
#declare BSiz=<20,6,10>; //Size of box
#declare TilSiz=<2,1>; //Size of tile (x,y)
#declare Grt=0.1; //Width of grout
#declare TilCol=rgb 0; //Tile colour
#declare GrtCol=rgb 1; // Grout colour
#declare DimX=Grt/TilSiz.u; //Grout scaling x
#declare DimY=Grt/TilSiz.v; //Grout scaling y
#declare DimZ=Grt/TilSiz.v; //Grout scaling z
#declare PX=pigment{ //Tile pattern x plane
gradient x
pigment_map{
[ DimZ/2 GrtCol]
[ DimZ/2 gradient y colour_map{[DimY/2 GrtCol][DimY/2 TilCol][1-DimY/2
TilCol][1-DimY/2 GrtCol]}]
[1-DimZ/2 gradient y colour_map{[DimY/2 GrtCol][DimY/2 TilCol][1-DimY/2
TilCol][1-DimY/2 GrtCol]}]
[1-DimZ/2 GrtCol]
}
scale <TilSiz.u/BSiz.z/4,TilSiz.v/BSiz.y/3>
}
#declare PY=pigment{ //Tile pattern y plane
gradient x
pigment_map{
[ DimX/2 GrtCol]
[ DimX/2 gradient y colour_map{[DimZ/2 GrtCol][DimZ/2 TilCol][1-DimZ/2
TilCol][1-DimZ/2 GrtCol]}]
[1-DimX/2 gradient y colour_map{[DimZ/2 GrtCol][DimZ/2 TilCol][1-DimZ/2
TilCol][1-DimZ/2 GrtCol]}]
[1-DimX/2 GrtCol]
}
scale <TilSiz.u/BSiz.x/4,TilSiz.v/BSiz.z/3>
}
#declare PZ=pigment{ //Tile pattern y plane
gradient x
pigment_map{
[ DimX/2 GrtCol]
[ DimX/2 gradient y colour_map{[DimY/2 GrtCol][DimY/2 TilCol][1-DimY/2
TilCol][1-DimY/2 GrtCol]}]
[1-DimX/2 gradient y colour_map{[DimY/2 GrtCol][DimY/2 TilCol][1-DimY/2
TilCol][1-DimY/2 GrtCol]}]
[1-DimX/2 GrtCol]
}
scale <TilSiz.u/BSiz.x/4,TilSiz.v/BSiz.y/3>
}
#declare BoxUV= //Tile pattern for uv box
pigment{
uv_mapping
gradient x
pigment_map{
[1/4 PX] //Xmin
[1/4 gradient y pigment_map{
[1/3 PY] //Ymin
[1/3 PZ] //Zmax
[2/3 PZ] //Zmax
[2/3 PY] //Ymax
}]
[2/4 gradient y pigment_map{
[1/3 PY] //Ymin
[1/3 PZ] //Zmax
[2/3 PZ] //Zmax
[2/3 PY] //Ymax
}]
[2/4 PX] //Xmax
[3/4 PX] //Xmax
[3/4 PZ] //Zmin
}
}
box{0, BSiz pigment{BoxUV}}
//END
Post a reply to this message
|
|
| |
| |
|
|
|
|
| |
|
|