 |
 |
|
 |
|
 |
|  |
|  |
|
 |
|
 |
|  |
|  |
|
 |
Hello everybody,
Once again, I'm trying my hand at generating a better subsurface
scattering technique. "Better" in this case means faster render times
and smoother results.
The attached image parsed in 5 seconds and rendered in 11 seconds, for a
total of 16 seconds render time! It was rendered with four cores, but
the parsing used only one. (it would be nice if POV used more than one
core for parsing)
For this image the effect was applied to the pigment, and an ambient
value was applied to the finish.
The object is a mesh created in LightWave. I used "povlogo.ttf" as a base.
The SSS can use any object type you can trace() a ray at. Parse times
can get pretty high, and odd artifacts sometimes occur. Flat-sided
objects look better than rounded ones. Higher samples mean less "light"
penetration, and longer parse/render times. (this is opposite from other
SSS techs I've tried in the past)
This technique is based on a proximity (edge-finding) pattern I've been
developing. If you really want, I can go into the gory details about how
it works, but I might have a hard time explaining it...
Questions and/or comments are always welcome~
Sam
Post a reply to this message
Attachments:
Download 'ssstest0_16.jpg' (27 KB)
Preview of image 'ssstest0_16.jpg'

|
 |
|  |
|  |
|
 |
|
 |
|  |
|  |
|
 |
Neat effect!
It is an extension of your SSS technique or a new one?
;-)
Paolo
>stbenge on date 08/08/2008 05:39 wrote:
> Hello everybody,
>
> Once again, I'm trying my hand at generating a better subsurface
> scattering technique. "Better" in this case means faster render times
> and smoother results.
>
> The attached image parsed in 5 seconds and rendered in 11 seconds, for a
> total of 16 seconds render time! It was rendered with four cores, but
> the parsing used only one. (it would be nice if POV used more than one
> core for parsing)
>
> For this image the effect was applied to the pigment, and an ambient
> value was applied to the finish.
>
> The object is a mesh created in LightWave. I used "povlogo.ttf" as a base.
>
> The SSS can use any object type you can trace() a ray at. Parse times
> can get pretty high, and odd artifacts sometimes occur. Flat-sided
> objects look better than rounded ones. Higher samples mean less "light"
> penetration, and longer parse/render times. (this is opposite from other
> SSS techs I've tried in the past)
>
> This technique is based on a proximity (edge-finding) pattern I've been
> developing. If you really want, I can go into the gory details about how
> it works, but I might have a hard time explaining it...
>
> Questions and/or comments are always welcome~
>
> Sam
>
> ------------------------------------------------------------------------
>
Post a reply to this message
|
 |
|  |
|  |
|
 |
|
 |
|  |
|  |
|
 |
stbenge <THI### [at] hotmail com> wrote:
> This technique is based on a proximity (edge-finding) pattern I've been
> developing. If you really want, I can go into the gory details about how
> it works, but I might have a hard time explaining it...
Looks good! How does it do with large variations in scale? Self-shadowing? I
guess the usual transparency/refraction effects are not a problem since it's
just a texture. Reminds me of Blender's SSS--not as accurate, but it looks
very good!
- Ricky com> wrote:
> This technique is based on a proximity (edge-finding) pattern I've been
> developing. If you really want, I can go into the gory details about how
> it works, but I might have a hard time explaining it...
Looks good! How does it do with large variations in scale? Self-shadowing? I
guess the usual transparency/refraction effects are not a problem since it's
just a texture. Reminds me of Blender's SSS--not as accurate, but it looks
very good!
- Ricky
Post a reply to this message
|
 |
|  |
|  |
|
 |
|
 |
|  |
|  |
|
 |
stbenge wrote:
> Hello everybody,
>
> Once again, I'm trying my hand at generating a better subsurface
> scattering technique. "Better" in this case means faster render times
> and smoother results.
>
> The attached image parsed in 5 seconds and rendered in 11 seconds, for a
> total of 16 seconds render time! It was rendered with four cores, but
> the parsing used only one. (it would be nice if POV used more than one
> core for parsing)
>
> For this image the effect was applied to the pigment, and an ambient
> value was applied to the finish.
>
> The object is a mesh created in LightWave. I used "povlogo.ttf" as a base.
>
> The SSS can use any object type you can trace() a ray at. Parse times
> can get pretty high, and odd artifacts sometimes occur. Flat-sided
> objects look better than rounded ones. Higher samples mean less "light"
> penetration, and longer parse/render times. (this is opposite from other
> SSS techs I've tried in the past)
>
> This technique is based on a proximity (edge-finding) pattern I've been
> developing. If you really want, I can go into the gory details about how
> it works, but I might have a hard time explaining it...
>
> Questions and/or comments are always welcome~
Really neat! I've been banging my head on this a lot lately and
achieved only mediocre results with high render times to boot. It would
great to hear how you did it, or see some code, if you feel like giving
an explanation a shot.
--
-The Mildly Infamous Blue Herring
Post a reply to this message
|
 |
|  |
|  |
|
 |
|
 |
|  |
|  |
|
 |
triple_r wrote:
>
> Looks good!
Thank you! It's till resembles wax, but most SSS techniques do.
> How does it do with large variations in scale? Self-shadowing? I
> guess the usual transparency/refraction effects are not a problem since it's
> just a texture. Reminds me of Blender's SSS--not as accurate, but it looks
> very good!
The objects can be scaled to whatever size, although if the desired
result is to have only minimal light penetration over a large area, the
parsing can take quite a while. An object can shadow itself, since a
traced ray stops where it hits.
Sam
Post a reply to this message
|
 |
|  |
|  |
|
 |
|
 |
|  |
|  |
|
 |
Blue Herring wrote:
> Really neat! I've been banging my head on this a lot lately and
> achieved only mediocre results with high render times to boot. It would
> great to hear how you did it, or see some code, if you feel like giving
> an explanation a shot.
Okay, here goes.
Imagine a virtual df3 setup where a 3d grid pattern exists around a
specified object. For this setup I used three planar patterns, each
oriented along the x, y and z axes. I placed loops within the
pigment_maps for each planar pattern so that I could test each "cell"
within the virtual density map.
For each cell a ray is shot from a specified point in space where the
light_source resides. If a ray lands on the object within the cell, that
part of the density pattern is given a white value. If the ray doesn't
hit the object in that cell, the entry is left black.
The result is an approximation of where the light lands on the surface
of the object. Imagine how this would look like as a density pattern. It
doesn't look too great, as there is major stair-stepping present.
To reduce the stair-stepping effect, I go through the above steps at
different sample rates. For instance, I could start off with a density
map with <3,3,3> elements. I could then sample at <4,4,4>, <5,5,5>, and
so on, and average the results to produce a smoother end result. This is
all done automatically, otherwise the setup would be painfully tedious
to use. All these tests are averaged together into one pigment pattern.
The long parse times come when I test an object many times. For the
image I attached in the original post, I tested the object 30 times
starting with <3,2,3> samples and ending with <24,16,24> samples.
Remember, for each cell a call to trace() is performed. That's a lot of
tests! Not only that, but with 30 averaged pigments comes a hit on
render time. For simple pigments this is no problem, but for textures
with texture_maps, the rendering itself can take a long time.
I may try to make this code available. I'll need to write up some
documentation. It would be bundled with the proximity pattern macros, as
the SSS code stems from them.
Sam
Post a reply to this message
|
 |
|  |
|  |
|
 |
|
 |
|  |
|  |
|
 |
Paolo Gibellini wrote:
> Neat effect!
Thanks!
> It is an extension of your SSS technique or a new one?
> ;-)
> Paolo
I've had a few different techniques over the years. This one works on
the principle that light hitting an object is spread out in all
directions from the point of contact. See my reply to Blue Herring if
you want an in-depth explanation.
Sam
Post a reply to this message
|
 |
|  |
|  |
|
 |
|
 |
|  |
|  |
|
 |
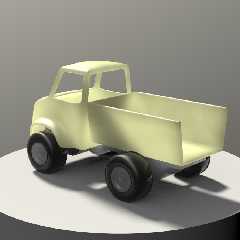
Another test. It's a toy truck I slapped together in LightWave. Parsing
took 12 seconds, rendering took 336 seconds for a total of about 1
minute, 37 seconds. There are two area_lights and two instances of the
SSS pattern which were averaged together.
The effect is only efficient where the object is very translucent, such
as found in cheap plastic like this model.
Sam
Post a reply to this message
Attachments:
Download 'ssstest2.jpg' (31 KB)
Preview of image 'ssstest2.jpg'

|
 |
|  |
|  |
|
 |
|
 |
|  |
|  |
|
 |
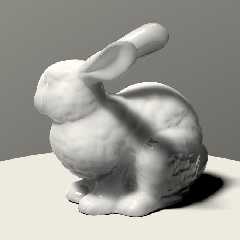
It's the Stanford bunny :) I opened and enhanced it with Blender, and
converted it with PoseRay. It took 28 seconds to parse, with 7-8 used
for parsing the mesh itself.
Sam
Post a reply to this message
Attachments:
Download 'ssstest3.jpg' (27 KB)
Preview of image 'ssstest3.jpg'

|
 |
|  |
|  |
|
 |
|
 |
|  |
|  |
|
 |
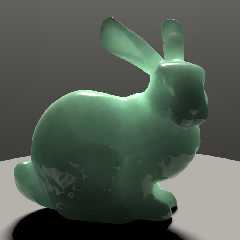
Okay, this is the last one for now.
Parse time:
1 second.... bunny
5 seconds... SSS
Render time:
125 seconds
Total:
2 minutes, 5 seconds
This effect is too general to be useful for much. It's nothing more than
a curiosity at this point, and I think I'll let it sit for a while.
Sam
Post a reply to this message
Attachments:
Download 'ssstest4.jpg' (28 KB)
Preview of image 'ssstest4.jpg'

|
 |
|  |
|  |
|
 |
|
 |
|  |


![]()