 |
|
|
|
|
|
| |
| |
|
|
|
|
| |
| |
|
|
This helps me a lot.
It's far easier for me to understand a lot of what POV-Ray does in visual terms.
http://www.f-lohmueller.de/pov_tut/interior/interior_03e.htm
Post a reply to this message
|
|
| |
| |
|
|
|
|
| |
| |
|
|
On 05/11/2014 20:18, Bald Eagle wrote:
> This helps me a lot.
> It's far easier for me to understand a lot of what POV-Ray does in visual terms.
>
>
> http://www.f-lohmueller.de/pov_tut/interior/interior_03e.htm
>
Indeed it does, for me too. Friedrich Lohmüller's site is a treasure trove.
--
Regards
Stephen
Post a reply to this message
|
|
| |
| |
|
|
|
|
| |
| |
|
|
"Bald Eagle" <cre### [at] netscape net> wrote:
>
> It's not, as I had the screwbase commented out.
> (I'm sure it DOES cast _A_ shadow - but not the one that's slaughtering my
> scene.)
OK, on my simple white room with a single bulb commenting out the screw part
fixed the issue but I can see it may not be a fix for your scene.
> Delving into the simplified scene, I noticed that I probably thought that
> declaring the light source at the origin and using a 3D filament that was
> translated y*3.5 would give me some sort of light source that emanates from the
> actual surface of the filament.
I also did a simple test where I moved the light source up a couple of units and
that fixed the issue in my simple scene.
>
> This is clearly not the case, and not the way looks_like works.
>
> Declaring the light_source at <0, 3.5, 0>, as the point light sources originally
> were, fixed the problem of blotting out the entire lower part of the scene, and
> makes sense given the light sources' proximity to the supporting half-spheres of
> the fixture.
>
> I think that since the lights were positioned _just_ above the fixture, what
> spreading them out to an area light did was move the edges of the light source
> over the edge and allowed them to illuminate underneath.
>
> I've just gotten the fixtures and a sphere to look reasonably like what I want,
> so I'm going to play around with that for a while.
Yes, the area_light idea was more of a workaround than a real solution.
Another thought would be to add no_shadow to any parts of the scene that are
casting this but I suspect that may end up looking unrealistic. I created a
lantern a while back which had a light source inside the lamp and that worked OK
so I am sure it is fixable. maybe if you can post the code to create the entire
light fitting I can have another go (once my PC has finished rendering my
current version of my tc-rtc entry).
Sean net> wrote:
>
> It's not, as I had the screwbase commented out.
> (I'm sure it DOES cast _A_ shadow - but not the one that's slaughtering my
> scene.)
OK, on my simple white room with a single bulb commenting out the screw part
fixed the issue but I can see it may not be a fix for your scene.
> Delving into the simplified scene, I noticed that I probably thought that
> declaring the light source at the origin and using a 3D filament that was
> translated y*3.5 would give me some sort of light source that emanates from the
> actual surface of the filament.
I also did a simple test where I moved the light source up a couple of units and
that fixed the issue in my simple scene.
>
> This is clearly not the case, and not the way looks_like works.
>
> Declaring the light_source at <0, 3.5, 0>, as the point light sources originally
> were, fixed the problem of blotting out the entire lower part of the scene, and
> makes sense given the light sources' proximity to the supporting half-spheres of
> the fixture.
>
> I think that since the lights were positioned _just_ above the fixture, what
> spreading them out to an area light did was move the edges of the light source
> over the edge and allowed them to illuminate underneath.
>
> I've just gotten the fixtures and a sphere to look reasonably like what I want,
> so I'm going to play around with that for a while.
Yes, the area_light idea was more of a workaround than a real solution.
Another thought would be to add no_shadow to any parts of the scene that are
casting this but I suspect that may end up looking unrealistic. I created a
lantern a while back which had a light source inside the lamp and that worked OK
so I am sure it is fixable. maybe if you can post the code to create the entire
light fitting I can have another go (once my PC has finished rendering my
current version of my tc-rtc entry).
Sean
Post a reply to this message
|
|
| |
| |
|
|
|
|
| |
| |
|
|
> Another thought would be to add no_shadow to any parts of the scene that are
> casting this but I suspect that may end up looking unrealistic.
I just ran that through my head a few times, and maybe unioning a no_shadow
object and one with an rgbf value would allow "dialing-in" the amount of shadow
it throws. I don't mind the shadows, but perhaps softening them might have some
benefit.
> I created a
> lantern a while back which had a light source inside the lamp and that worked OK
> so I am sure it is fixable. maybe if you can post the code to create the entire
> light fitting I can have another go (once my PC has finished rendering my
> current version of my tc-rtc entry).
>
> Sean
Thanks Sean,
I'm getting the hang of working with this, though you're welcome to have the
fixtures to play around with. No telling what you may come up with. At some
point I'll get back to working on a mammoth WIP (approx. 400' x 400' facility) I
started a while back, and I'm probably going to need to learn about modeling
light fixtures and probably these "light groups" that I've yet to try....
Maybe radiosity without traditional light_sources is the way to go with that...
I'm looking forward to see where you're taking your interpretation of the topic
- I just today saw all the entries for Part 1. It's inspiring, humbling, and
intimidating all at the same time. :) Hope you're making good progress and
getting the results you want.
I think the multiple layers of shadows in this are really cool - maybe I'll do
something that's composed almost entirely of shadows in the future...
Post a reply to this message
Attachments:
Download 'ceilinglamps.inc.txt' (16 KB)
|
|
| |
| |
|
|
|
|
| |
| |
|
|
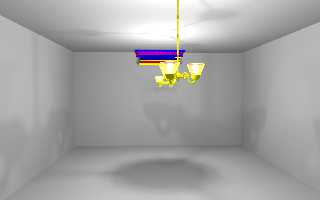
"Bald Eagle" <cre### [at] netscapenet> wrote:
Looks like you have pretty much fixed the issue then, I think you could improve
the lighting by using light_fading and area lights though see attached all I
changed is the light_source to be:
#declare Bulb =
light_source {<0, 3.5, 0> rgb <1, 1, 1>*1
looks_like {
Round_Cone2( <0, -2.4, 0>, 0.95, <0, 0.7, 0>, 1.80, 1 )
texture {LightBulb_Glass}
double_illuminate
//light_source {<0, 3.5, 0> rgb <1, 1, 1>*0.4}
scale 0.8
}
area_light
<-0.5, 0, -0.5> <0.5 0, 0.5> // lights spread
out across this distance (x * z)
4, 4 // total number of lights
in grid (4x*4z = 16 lights)
area_illumination on
adaptive 0 // 0,1,2,3...
jitter // adds random softening
of light
circular // make the shape of the
light circular
orient // orient light
fade_distance 50
fade_power 2
}
Rendered with radiosity on using the basic settings from the insert menu.
have you also thought about using media to make a glow effect where the bulb is,
will slow things down a bit but is a nice effect.
Sean
Post a reply to this message
Attachments:
Download 'lightbulb2.png' (401 KB)
Preview of image 'lightbulb2.png'
|
|
| |
| |
|
|
|
|
| |
| |
|
|
"s.day" <s.d### [at] uelacuk> wrote:
> have you also thought about using media to make a glow effect where the bulb is,
> will slow things down a bit but is a nice effect.
Yes, I might look into that, though given my struggle with a simple light
source, I'm gonna wait until after I finish crafting the rest of the scene
before I pop open another can of hairy media worms...
I tried the area lights, and they look really nice - though 4x4 was too much I
thought, in terms of render time and shadow-removal. Goldilocks seems to like
3x3. :)
I did the following render at 1751 x 1347, (3 times the pixels of 1024x768) no
aa to be able get some detail and zoom in on certain areas of interest.
So now I have the bulbs, the area lights, a decorative border to the hardwood
floor, a true 3D carpet which is parse-time hog (40 sec rather than 15 - I know,
I know - weep for me), and some (not enough) minor fixes.
One of my poplars decided to peek in and give the scene a bit of Art Nouveau
flavor...
I have some more items to craft, textures to add or fix, details to ponder, and
scene elements to pull into perceivable view.
All of the furniture is surely going to take me a few pots of coffee to
decorate.
Sean - could you school me on how to add all of that decoration?
I'm also having a mental block on all of TOK's copious examples of linearly
progressing along a spline. Crayons and sock puppets, please.
Overall, it looks good to ME, but I haven't yet decided to play with the
radiosity settings, or know why I would. Maybe I'll see what I can get let this
chug on over the weekend.
http://postimg.org/image/dj3r5v5np/
Post a reply to this message
|
|
| |
| |
|
|
|
|
| |
| |
|
|
> "Bald Eagle" <cre### [at] netscapenet> wrote:
>
> Looks like you have pretty much fixed the issue then, I think you could improve
> the lighting by using light_fading and area lights though see attached all I
> changed is the light_source to be:
>
> #declare Bulb =
> light_source {<0, 3.5, 0> rgb <1, 1, 1>*1
> looks_like {
> Round_Cone2( <0, -2.4, 0>, 0.95, <0, 0.7, 0>, 1.80, 1 )
> texture {LightBulb_Glass}
> double_illuminate
> //light_source {<0, 3.5, 0> rgb <1, 1, 1>*0.4}
> scale 0.8
> }
> area_light
> <-0.5, 0, -0.5> <0.5 0, 0.5> // lights spread
> out across this distance (x * z)
> 4, 4 // total number of lights
> in grid (4x*4z = 16 lights)
> area_illumination on
> adaptive 0 // 0,1,2,3...
> jitter // adds random softening
> of light
> circular // make the shape of the
> light circular
> orient // orient light
> fade_distance 50
> fade_power 2
> }
>
> Rendered with radiosity on using the basic settings from the insert menu.
>
> have you also thought about using media to make a glow effect where the bulb is,
> will slow things down a bit but is a nice effect.
>
> Sean
>
A small advice on using fading lights:
It's usualy recomended to set fade_distance to the width of the
area_light and adjust the intensity of the light as needed.
In your case, the area_light is 0.5 unit whide, you adjust as follow:
light_source {<0, 3.5, 0> rgb <1, 1, 1>*100*100
area_light 0.5*x 0.5*y
5 5 // prefer to use 5, 9, 17, 33, 65, ...
adaptive 0
circular orient
fade_power 2
fade_distance 1
}
If you use a 33 by 33 array for the area_light, with adaptive 0, it's
not realy slower than 4 by4 and may not require the use of jitter.
Using a small area_light jittered array with antialiasing can slow you
down as the noise caused by the jittering will force antialiasing in
area where it's not otherwise needed.
Post a reply to this message
|
|
| |
| |
|
|
|
|
| |
| |
|
|
Here's my final entry for the contest.
(I'm up against a lot of very talented competition! :) )
I rendered it at 1751 x 1347 with 2-pass radiosity, first with "simple" textures
and at 640 x 480 no aa, then at the large size with real textures and aa 0.3.
The larger size seems to make the fit-to-screen image look MUCH better in my
experience.
I am a bit concerned that the image need to be so small to weigh-in under 350
kB, and the jpg format seems to give it a bit of indistinctness as compared to
the original png. I used Paint.NET to format my image to jpg.
*** Does anyone have any suggestions for maximizing the image size while keeping
it under 350 kB?
Post a reply to this message
Attachments:
Download 'final_copy.jpg' (257 KB)
Preview of image 'final_copy.jpg'
|
|
| |
| |
|
|
|
|
| |
| |
|
|
On 10-12-2014 21:44, Bald Eagle wrote:
> Here's my final entry for the contest.
> (I'm up against a lot of very talented competition! :) )
>
> I rendered it at 1751 x 1347 with 2-pass radiosity, first with "simple" textures
> and at 640 x 480 no aa, then at the large size with real textures and aa 0.3.
>
> The larger size seems to make the fit-to-screen image look MUCH better in my
> experience.
>
> I am a bit concerned that the image need to be so small to weigh-in under 350
> kB, and the jpg format seems to give it a bit of indistinctness as compared to
> the original png. I used Paint.NET to format my image to jpg.
>
> *** Does anyone have any suggestions for maximizing the image size while keeping
> it under 350 kB?
I am not an expert on this but I always use Yve's IC for conversion.
Sometimes I have to reduce the size a little bit - 70 or 80 percent -
but that is all and most times without any visible loss. I don't know
about Paint.NET but you should give IC a try as it is the best
application around (and free).
Good work indeed. You have come a long way from the first wips and I was
a bit worried at first but I like this very much. Well done!
Thomas
Post a reply to this message
|
|
| |
| |
|
|
|
|
| |
| |
|
|
Thomas de Groot <tho### [at] degrootorg> wrote:
> I am not an expert on this but I always use Yve's IC for conversion.
I look it up. I fiddled some, and got IrfanView to get a jpg under the
requisite file size. Much happier now.
> Good work indeed. You have come a long way from the first wips and I was
> a bit worried at first but I like this very much. Well done!
>
> Thomas
Thanks, Thomas.
I was worried too, since I did a lot of things "the hard way" - hopefully I'll
learn more efficient ways to construct complex scene elements with less time &
effort.
Yes, the first wips sort of amount to no more than napkin scribbles... :O
I'm surprised that I got so far, but also have gained the "eyes" to see how much
farther I could go.
Thanks for all of the assistance and encouragement along the way! :)
Post a reply to this message
|
|
| |
| |
|
|
|
|
| |
|
|


