|
|
|
|
|
|
| |
| |
|
|
|
|
| |
| |
|
|
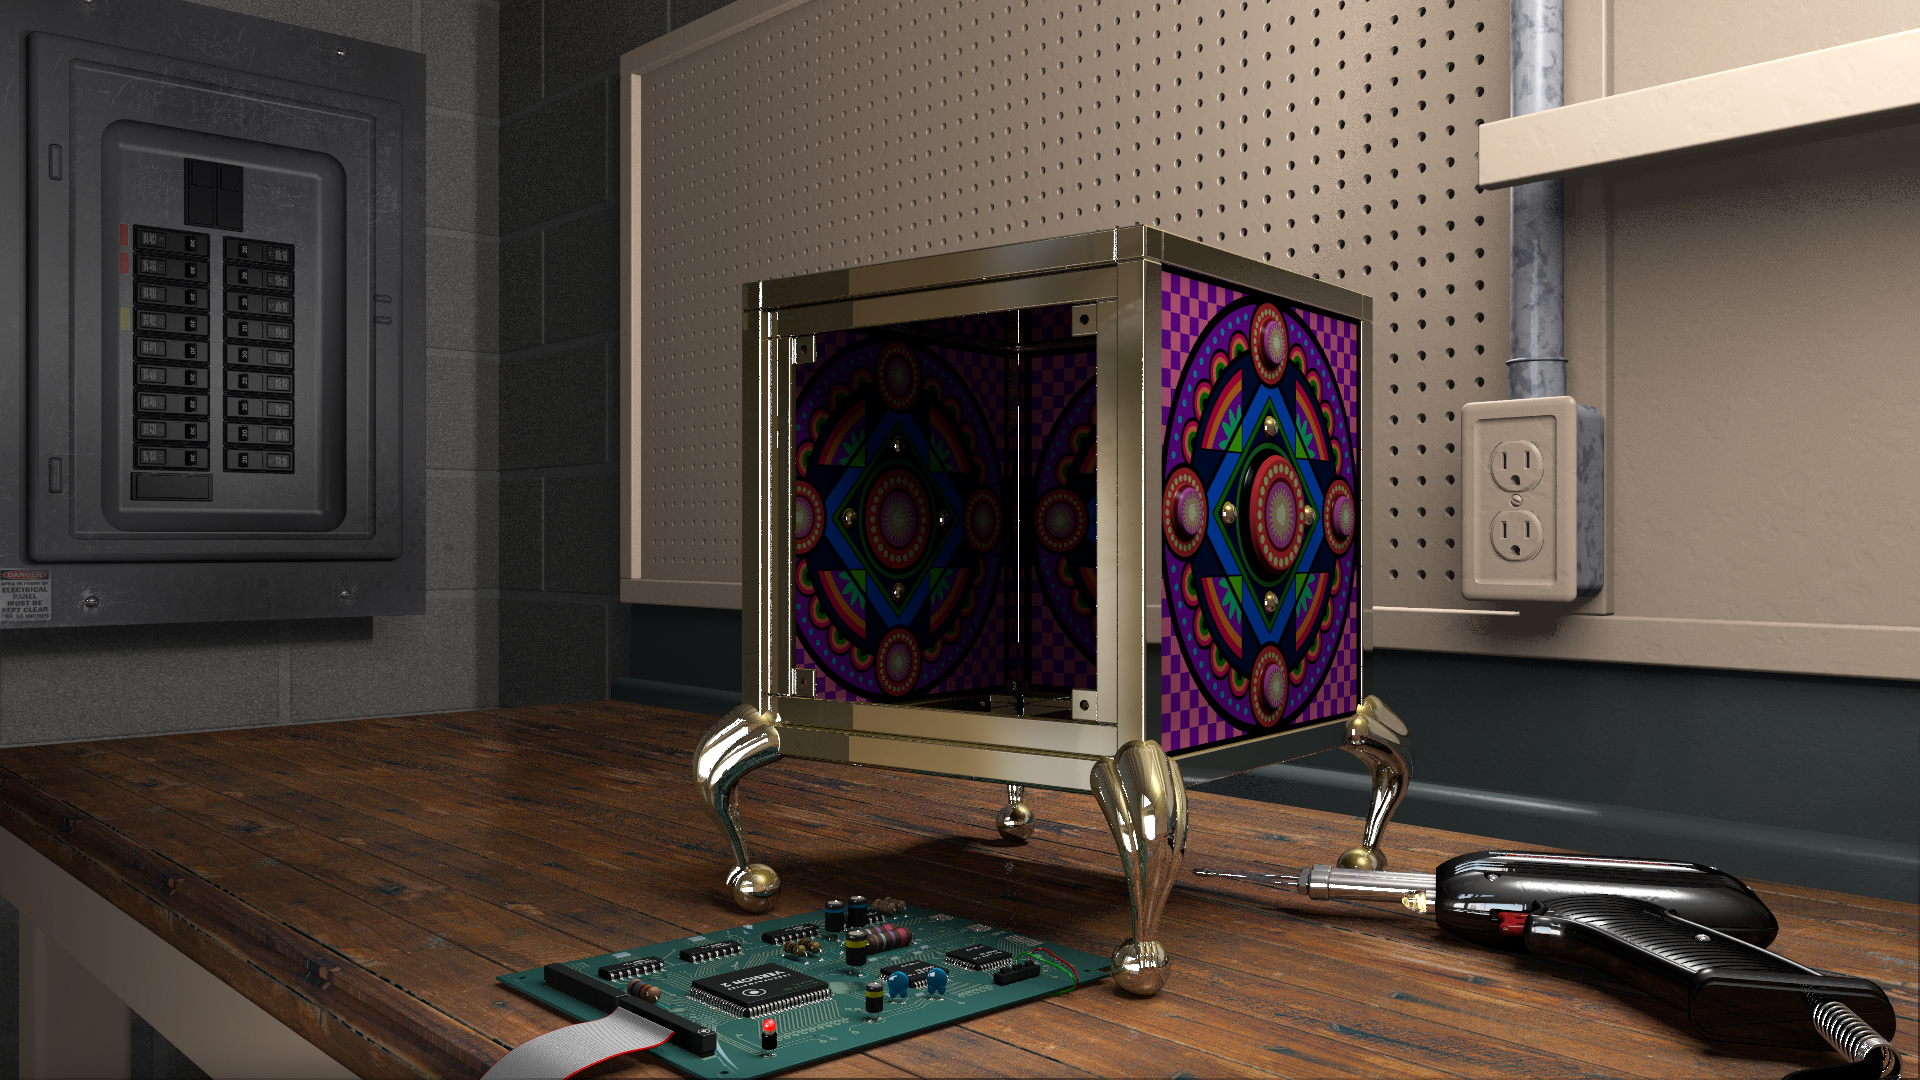
Progress of workbench and wall detail for updated Jack rendering. Added breaker
panel and pegboard. Better material on bench top.
Mike.
Post a reply to this message
Attachments:
Download 'workbench5.png' (3024 KB)
Preview of image 'workbench5.png'
|
|
| |
| |
|
|
|
|
| |
| |
|
|
Op 15/04/2023 om 06:40 schreef Mike Miller:
> Progress of workbench and wall detail for updated Jack rendering. Added breaker
> panel and pegboard. Better material on bench top.
> Mike.
Oh yes!!
--
Thomas
Post a reply to this message
|
|
| |
| |
|
|
|
|
| |
| |
|
|
"Mike Miller" <mil### [at] gmail com> wrote:
> Progress of workbench and wall detail for updated Jack rendering. Added breaker
> panel and pegboard. Better material on bench top.
> Mike.
OK, that's getting ridiculous.
Ridiculously GOOD. :O
That bench top is not "better" - it's amazing, as are the box, soldering gun,
and circuit board, and... and well, everything.
What else is there to do but comb over the image and "nit pick" - in a
constructive way?
The electrical panel has an odd speckly normal to it, that I think ought to be
smoother/glossier.
The cinder blocks are too flat, finely textured, and regularly placed, as is the
mortar. (I know, it's probably just a placeholder wall...)
The pegboard, etc all look great, the only thing you might consider doing is
adding a few paint drips in the finish, and some wear marks arouns the peg
holes, and the electrical outlet sockets / screw.
The galvanized conduit is far too smooth and glossy - maybe use a normal map,
and fine granite normal to give it a more powdery finish. A more pronounced
visual texture disjoint between the conduit and box adapter would also sell it
that wee bit more. Also, don't those types of fixtures have a set-screw
connection?
Also some wear marks on the green paint and yellow paint on the front of the
workbench.
Aside from that, all I can think of is placing all the random bits of work
detritus in the workspace - loose strands of copper wire, bits of trimmed
insulation, tape, zip ties, solder drips, screws, flux, pliers, pencil, ziplock
parts bags, delivery/parts boxes, utility knife ---- depends on how busy/sparse
you want the final look. But you do have a few out of the way places to put
tiny things - the shelf, on top of the outlet - on top of the electrical panel,
and 4' x 2' of pegboard.
This really is damned near photographic. It's nice to have you here/back after
30 years to show off your skills.
Thanks for sharing your scenes and diagrams. Perhaps here and there you can add
some notes to a how-to document and give those of us who don't do anything even
approaching this level of mastery a view intot he start-to-finish workflow, and
the tools and software packages and image-map resources that you use to bring
everything together into this kind of incredibly realistic scene.
Heck, you could probably even do a video series!
- BW com> wrote:
> Progress of workbench and wall detail for updated Jack rendering. Added breaker
> panel and pegboard. Better material on bench top.
> Mike.
OK, that's getting ridiculous.
Ridiculously GOOD. :O
That bench top is not "better" - it's amazing, as are the box, soldering gun,
and circuit board, and... and well, everything.
What else is there to do but comb over the image and "nit pick" - in a
constructive way?
The electrical panel has an odd speckly normal to it, that I think ought to be
smoother/glossier.
The cinder blocks are too flat, finely textured, and regularly placed, as is the
mortar. (I know, it's probably just a placeholder wall...)
The pegboard, etc all look great, the only thing you might consider doing is
adding a few paint drips in the finish, and some wear marks arouns the peg
holes, and the electrical outlet sockets / screw.
The galvanized conduit is far too smooth and glossy - maybe use a normal map,
and fine granite normal to give it a more powdery finish. A more pronounced
visual texture disjoint between the conduit and box adapter would also sell it
that wee bit more. Also, don't those types of fixtures have a set-screw
connection?
Also some wear marks on the green paint and yellow paint on the front of the
workbench.
Aside from that, all I can think of is placing all the random bits of work
detritus in the workspace - loose strands of copper wire, bits of trimmed
insulation, tape, zip ties, solder drips, screws, flux, pliers, pencil, ziplock
parts bags, delivery/parts boxes, utility knife ---- depends on how busy/sparse
you want the final look. But you do have a few out of the way places to put
tiny things - the shelf, on top of the outlet - on top of the electrical panel,
and 4' x 2' of pegboard.
This really is damned near photographic. It's nice to have you here/back after
30 years to show off your skills.
Thanks for sharing your scenes and diagrams. Perhaps here and there you can add
some notes to a how-to document and give those of us who don't do anything even
approaching this level of mastery a view intot he start-to-finish workflow, and
the tools and software packages and image-map resources that you use to bring
everything together into this kind of incredibly realistic scene.
Heck, you could probably even do a video series!
- BW
Post a reply to this message
|
|
| |
| |
|
|
|
|
| |
| |
|
|
"Bald Eagle" <cre### [at] netscapenet> wrote:
> "Mike Miller" <mil### [at] gmailcom> wrote:
> > Progress of workbench and wall detail for updated Jack rendering. Added breaker
> > panel and pegboard. Better material on bench top.
> > Mike.
>
>
> OK, that's getting ridiculous.
>
> Ridiculously GOOD. :O
>
> That bench top is not "better" - it's amazing, as are the box, soldering gun,
> and circuit board, and... and well, everything.
>
> What else is there to do but comb over the image and "nit pick" - in a
> constructive way?
>
> The electrical panel has an odd speckly normal to it, that I think ought to be
> smoother/glossier.
> The cinder blocks are too flat, finely textured, and regularly placed, as is the
> mortar. (I know, it's probably just a placeholder wall...)
> The pegboard, etc all look great, the only thing you might consider doing is
> adding a few paint drips in the finish, and some wear marks arouns the peg
> holes, and the electrical outlet sockets / screw.
> The galvanized conduit is far too smooth and glossy - maybe use a normal map,
> and fine granite normal to give it a more powdery finish. A more pronounced
> visual texture disjoint between the conduit and box adapter would also sell it
> that wee bit more. Also, don't those types of fixtures have a set-screw
> connection?
> Also some wear marks on the green paint and yellow paint on the front of the
> workbench.
>
>
> Aside from that, all I can think of is placing all the random bits of work
> detritus in the workspace - loose strands of copper wire, bits of trimmed
> insulation, tape, zip ties, solder drips, screws, flux, pliers, pencil, ziplock
> parts bags, delivery/parts boxes, utility knife ---- depends on how busy/sparse
> you want the final look. But you do have a few out of the way places to put
> tiny things - the shelf, on top of the outlet - on top of the electrical panel,
> and 4' x 2' of pegboard.
>
>
> This really is damned near photographic. It's nice to have you here/back after
> 30 years to show off your skills.
>
> Thanks for sharing your scenes and diagrams. Perhaps here and there you can add
> some notes to a how-to document and give those of us who don't do anything even
> approaching this level of mastery a view intot he start-to-finish workflow, and
> the tools and software packages and image-map resources that you use to bring
> everything together into this kind of incredibly realistic scene.
>
> Heck, you could probably even do a video series!
>
> - BW
Thanks BW. I really appreciate the feedback. I just updated a few things that
address some of your comments. I do have a lot of odds and ends to add. A slow
build up process...devils in the detail. I'm currently working on the box lid
and hand crack...and just tweaked the outlet and plugged in the soldering gun.
> The electrical panel has an odd speckly normal to it, ...
I agree, I just tweaked the distressed scratches and spattered some staining. It
could still be a bit glossier.
>>The cinder blocks are too flat
I've deepened the mortar but it's still reading to flat.
>>The galvanized conduit is far too smooth and glossy
Yes, just tweaked but could use some work - I'll look at some reference.
>>Perhaps here and there you can add some notes to a how-to document...
It's an eclectic process - but I do have a method. I lean on Blender for a
lot of the CSG. I've programmed a small utility that writes POV formatted code
using the .x3d file - which handles a list of primitives. I'll put together some
docs and screen grabs that explains and post the utility.
best regards,
Mike.
Post a reply to this message
Attachments:
Download 'workbench6.png' (3070 KB)
Preview of image 'workbench6.png'

|
|
| |
| |
|
|
|
|
| |
| |
|
|
"Bald Eagle" <cre### [at] netscapenet> wrote:
> "Mike Miller" <mil### [at] gmailcom> wrote:
>>Progress of workbench and wall detail for updated Jack rendering. Added breaker
>>panel and pegboard. Better material on bench top.
I've posted the current workbench/room 'workbench.zip'. There's grunge maps that
can be tweaked to help age things. I included an updated soldering gun and a
macro to generate springs.
Mike.
Post a reply to this message
|
|
| |
| |
|
|
|
|
| |
| |
|
|
Le 2023-04-15 à 00:40, Mike Miller a écrit :
> Progress of workbench and wall detail for updated Jack rendering. Added breaker
> panel and pegboard. Better material on bench top.
> Mike.
Night & day compared to the original. Massive improvement.
Post a reply to this message
|
|
| |
| |
|
|
|
|
| |
| |
|
|
Le 2023-04-15 à 07:21, Bald Eagle a écrit :
> "Mike Miller" <mil### [at] gmailcom> wrote:
>> Progress of workbench and wall detail for updated Jack rendering. Added breaker
>> panel and pegboard. Better material on bench top.
>> Mike.
>
>
> OK, that's getting ridiculous.
>
> Ridiculously GOOD. :O
>
> That bench top is not "better" - it's amazing, as are the box, soldering gun,
> and circuit board, and... and well, everything.
>
> What else is there to do but comb over the image and "nit pick" - in a
> constructive way?
>
> The electrical panel has an odd speckly normal to it, that I think ought to be
> smoother/glossier.
> The cinder blocks are too flat, finely textured, and regularly placed, as is the
> mortar. (I know, it's probably just a placeholder wall...)
> The pegboard, etc all look great, the only thing you might consider doing is
> adding a few paint drips in the finish, and some wear marks arouns the peg
> holes, and the electrical outlet sockets / screw.
> The galvanized conduit is far too smooth and glossy - maybe use a normal map,
> and fine granite normal to give it a more powdery finish. A more pronounced
> visual texture disjoint between the conduit and box adapter would also sell it
> that wee bit more. Also, don't those types of fixtures have a set-screw
> connection?
> Also some wear marks on the green paint and yellow paint on the front of the
> workbench.
>
>
> Aside from that, all I can think of is placing all the random bits of work
> detritus in the workspace - loose strands of copper wire, bits of trimmed
> insulation, tape, zip ties, solder drips, screws, flux, pliers, pencil, ziplock
> parts bags, delivery/parts boxes, utility knife ---- depends on how busy/sparse
> you want the final look. But you do have a few out of the way places to put
> tiny things - the shelf, on top of the outlet - on top of the electrical panel,
> and 4' x 2' of pegboard.
>
>
> This really is damned near photographic. It's nice to have you here/back after
> 30 years to show off your skills.
>
> Thanks for sharing your scenes and diagrams. Perhaps here and there you can add
> some notes to a how-to document and give those of us who don't do anything even
> approaching this level of mastery a view intot he start-to-finish workflow, and
> the tools and software packages and image-map resources that you use to bring
> everything together into this kind of incredibly realistic scene.
>
> Heck, you could probably even do a video series!
>
> - BW
>
>
>
>
>
I've seen some cinder blocks that where about as regular as this one.
We can assume that the pegboard just received a new coat of paint. Maybe
it's first one.
Post a reply to this message
|
|
| |
| |
|
|
|
|
| |
| |
|
|
"Mike Miller" <mil### [at] gmailcom> wrote:
> Thanks BW. I really appreciate the feedback. I just updated a few things that
> address some of your comments. I do have a lot of odds and ends to add. A slow
> build up process...devils in the detail. I'm currently working on the box lid
> and hand crack...and just tweaked the outlet and plugged in the soldering gun.
The outlet connection looks a lot better, and the plugged-in iron is a good
look. I have a very OLD one of the same brand kicking around somewhere...
Do you direct the placement of the cord with a spline?
> >>The cinder blocks are too flat
> I've deepened the mortar but it's still reading to flat.
If you're using the brick pigment pattern to do that, then you're never really
going to get away from that. You're either going to need to place individual
blocks in order to get the slightly random/realistic look, or write your own
brick pigment function that lets you tweak some of the parameters and add in
some noise.
I'd probably go with isosurface blocks, so you can get the deep pits and voids
that most cinder blocks exhibit, with some sort of box with a noisy normal for
the mortar or another big isosurface. (If you wanted to go that far)
> >>The galvanized conduit is far too smooth and glossy
> Yes, just tweaked but could use some work - I'll look at some reference.
I'd say kill _all_ of the gloss - the galvi usually looks a bit powdery, esp in
a damp enviro, since the oxide "blooms". Also, crackle solid gives a better
simulation of the zinc crystal pattern, although you might want to play with the
stepnoise function we employed in TdG's granite21 texture macro.
IIRC, there are excellent galvanized bucket textures posted in the forums
somewhere.
The screw on those things is usually more of a cylinder than a shallow pan-head,
although a wrong screw type might add that element of a realistic "whatever I
had lying around" homeowner/landlord fix. I'd back the head out and off of the
connector so it doesn't blend in as much, and it's usually an over-long shank
since it's a set-screw.
Not sure if you're just using test render setting for aa, but the box frame is
_super_ glossy, and those bright specular reflections look like they're wreaking
hell with the aa. Seems to be a known problem.
> >>Perhaps here and there you can add some notes to a how-to document...
> It's an eclectic process - but I do have a method. I lean on Blender for a
> lot of the CSG. I've programmed a small utility that writes POV formatted code
> using the .x3d file - which handles a list of primitives. I'll put together some
> docs and screen grabs that explains and post the utility.
> best regards,
> Mike.
That would be quite nice, especially for new computer graphics enthusiasts keen
on learning to make really nice renders, as well as people like me who don't
often venture out from the more technical / geometric realms very often.
Thank you.
Not that it looks like you need any help, but if you need any objects,
functions, patterns, or links to extant stuff (just to save yourself a bit of
time) - I hope you know that all you ever need to do is ask.
- BW
Post a reply to this message
|
|
| |
| |
|
|
|
|
| |
| |
|
|
Alain Martel <kua### [at] videotronca> wrote:
> > "Mike Miller" <mil### [at] gmailcom> wrote:
> >> Progress of workbench and wall detail for updated Jack rendering. Added breaker
> >> panel and pegboard. Better material on bench top.
> >> Mike.
> >
> >
> > OK, that's getting ridiculous.
> >
> > Ridiculously GOOD. :O
> >
> > That bench top is not "better" - it's amazing, as are the box, soldering gun,
> > and circuit board, and... and well, everything.
> >
> > What else is there to do but comb over the image and "nit pick" - in a
> > constructive way?
> >
> > The electrical panel has an odd speckly normal to it, that I think ought to be
> > smoother/glossier.
> > The cinder blocks are too flat, finely textured, and regularly placed, as is the
> > mortar. (I know, it's probably just a placeholder wall...)
> > The pegboard, etc all look great, the only thing you might consider doing is
> > adding a few paint drips in the finish, and some wear marks arouns the peg
> > holes, and the electrical outlet sockets / screw.
> > The galvanized conduit is far too smooth and glossy - maybe use a normal map,
> > and fine granite normal to give it a more powdery finish. A more pronounced
> > visual texture disjoint between the conduit and box adapter would also sell it
> > that wee bit more. Also, don't those types of fixtures have a set-screw
> > connection?
> > Also some wear marks on the green paint and yellow paint on the front of the
> > workbench.
> >
> >
> > Aside from that, all I can think of is placing all the random bits of work
> > detritus in the workspace - loose strands of copper wire, bits of trimmed
> > insulation, tape, zip ties, solder drips, screws, flux, pliers, pencil, ziplock
> > parts bags, delivery/parts boxes, utility knife ---- depends on how busy/sparse
> > you want the final look. But you do have a few out of the way places to put
> > tiny things - the shelf, on top of the outlet - on top of the electrical panel,
> > and 4' x 2' of pegboard.
> >
> >
> > This really is damned near photographic. It's nice to have you here/back after
> > 30 years to show off your skills.
> >
> > Thanks for sharing your scenes and diagrams. Perhaps here and there you can add
> > some notes to a how-to document and give those of us who don't do anything even
> > approaching this level of mastery a view intot he start-to-finish workflow, and
> > the tools and software packages and image-map resources that you use to bring
> > everything together into this kind of incredibly realistic scene.
> >
> > Heck, you could probably even do a video series!
> >
> > - BW
> >
> >
> >
> >
> >
> I've seen some cinder blocks that where about as regular as this one.
> We can assume that the pegboard just received a new coat of paint. Maybe
> it's first one.
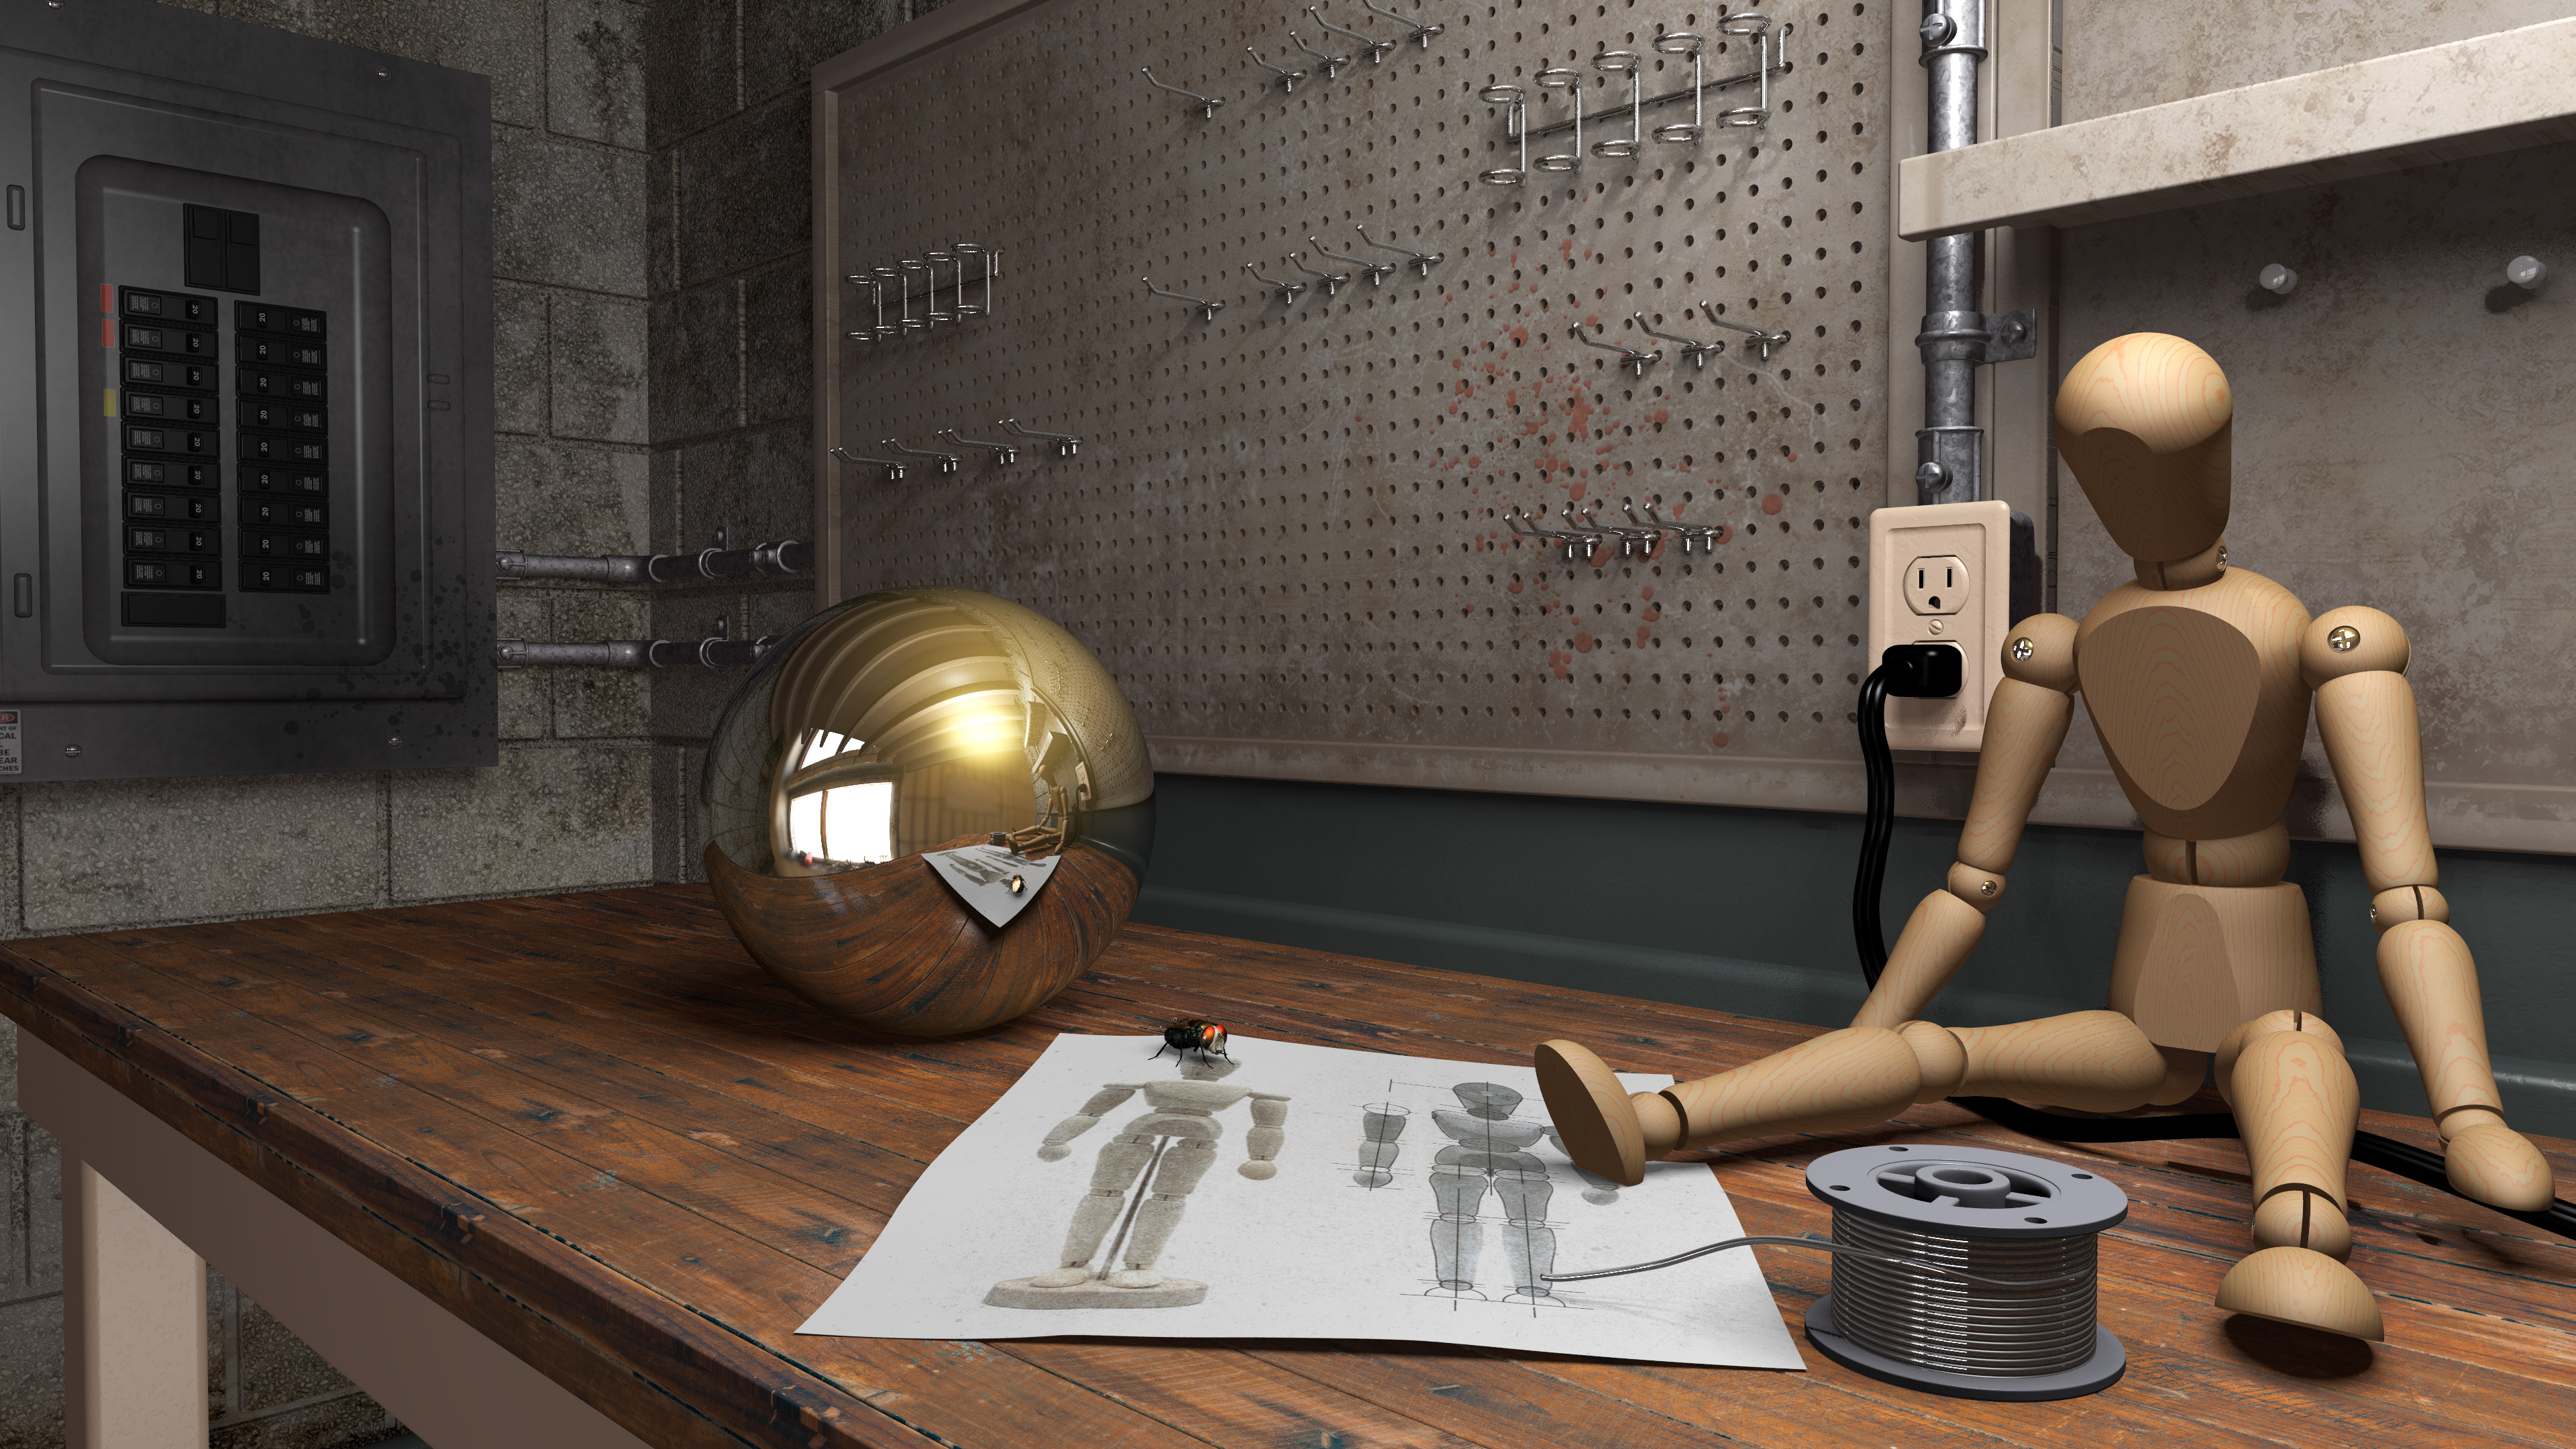
Attached is a progress rendering with more destressed surfaces. I increased the
cmu mortar depth and deepened the texture and grunge. About to add dents and
dirt maps to the remaining trim and table legs. Still tweaking the conduit pipe
material. Need to tweak a few bitmap stretch marks on the cinder blocks.
Miller
Post a reply to this message
Attachments:
Download 'workbench9.jpg' (2258 KB)
Preview of image 'workbench9.jpg'

|
|
| |
| |
|
|
|
|
| |
| |
|
|
> Attached is a progress rendering with more destressed surfaces. I increased the
> cmu mortar depth and deepened the texture and grunge. About to add dents and
> dirt maps to the remaining trim and table legs. Still tweaking the conduit pipe
> material. Need to tweak a few bitmap stretch marks on the cinder blocks.
> Miller
Loving watching the progress you are making on this image, a new masterpiece for
sure. The destressed textures are amazing and all the scenes look fantastic.
My only minor criticism with some of the images would be around the flies. Each
time I see them in the scenes something looks a bit off, sometimes they look a
bit too big/out of place for the rest of the scene.
Sean
Post a reply to this message
|
|
| |
| |
|
|
|
|
| |
|
|