|
|
|
|
|
|
| |
| |
|
|
|
|
| |
| |
|
|
"Samuel B." <stb### [at] hotmail com> wrote:
> Hi everyone,
>
> On the left is a noisy image produced with POV-Ray, and on the right is the same
> image, but denoised in Blender. It was super easy to set up.
>
That's a pretty amazing trick and result. Nicely done. (I still haven't yet
dabbled with Blender, but it's on my 'bucket list'. Along with 100 other
things...)
Aside from the slightly off-color whites in this first denoised image (which you
solved), I see a slight greenish halo around the upper-left emissive sphere. I
guess that's to be expected from the heavy original focal blur and low
blur_samples count. But the result actually looks to my eyes like what might
happen with a real camera lens, using film. So I like it!
And your later image with the normals et al is really nice. com> wrote:
> Hi everyone,
>
> On the left is a noisy image produced with POV-Ray, and on the right is the same
> image, but denoised in Blender. It was super easy to set up.
>
That's a pretty amazing trick and result. Nicely done. (I still haven't yet
dabbled with Blender, but it's on my 'bucket list'. Along with 100 other
things...)
Aside from the slightly off-color whites in this first denoised image (which you
solved), I see a slight greenish halo around the upper-left emissive sphere. I
guess that's to be expected from the heavy original focal blur and low
blur_samples count. But the result actually looks to my eyes like what might
happen with a real camera lens, using film. So I like it!
And your later image with the normals et al is really nice.
Post a reply to this message
|
|
| |
| |
|
|
|
|
| |
| |
|
|
Cave test with height fields. It took a little over 5 & 1/2 minutes to render
using lowish settings and media.
This time I made use of normal and albedo passes in order to preserve the
details. (And as it turns out, the final result is only good when using the same
camera aperture for every pass.) In addition to the denoising, I: corrected the
gamma; added glare; and added a bit of film grain. The scene itself could use
some work :D
Post a reply to this message
Attachments:
Download 'denoise-complex-pov-ray2-5m_32s.jpg' (107 KB)
Preview of image 'denoise-complex-pov-ray2-5m_32s.jpg'

|
|
| |
| |
|
|
|
|
| |
| |
|
|
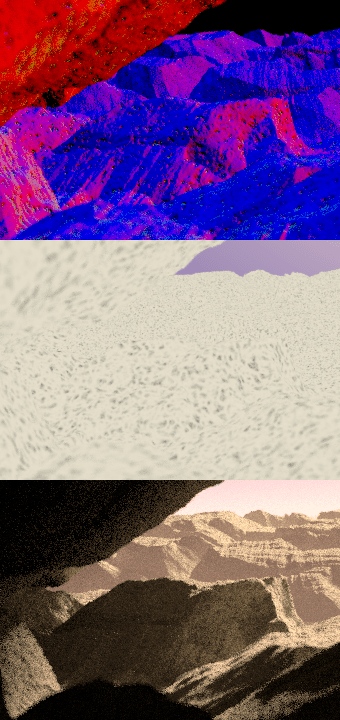
"Samuel B." <stb### [at] hotmailcom> wrote:
> Cave test
Here's an image showing the three passes that came out of POV-Ray:
1) normals
2) albedo
3) full render
I used some #if and #switch statements throughout the code which allowed me to
just run a 3-frame animation to get all the passes.
If you compare the rock's face (on the left) to the previous image I posted, you
can get an idea of how much the normal and albedo data helps the denoiser make
sense of lots of noise.
Post a reply to this message
Attachments:
Download 'denoise-complex-pov-ray2-passes2.jpg' (155 KB)
Preview of image 'denoise-complex-pov-ray2-passes2.jpg'

|
|
| |
| |
|
|
|
|
| |
| |
|
|
"Kenneth" <kdw### [at] gmailcom> wrote:
> That's a pretty amazing trick and result. Nicely done. (I still haven't yet
> dabbled with Blender, but it's on my 'bucket list'. Along with 100 other
> things...)
>
> Aside from the slightly off-color whites in this first denoised image (which you
> solved), I see a slight greenish halo around the upper-left emissive sphere. I
> guess that's to be expected from the heavy original focal blur and low
> blur_samples count. But the result actually looks to my eyes like what might
> happen with a real camera lens, using film. So I like it!
>
> And your later image with the normals et al is really nice.
Hi Kenneth,
Thanks!
The denoiser is doing all the heavy lifting; everything else is pretty easy when
using just one pass.
Learning how to operate Blender might be worth it, even if only for its modeling
capabilities. But it's admittedly not an easy program to get into, mostly due to
the daunting interface. But it all starts to make sense and eventually shows
itself to be a good design choice once you learn the basics, imo :)
Sam
Post a reply to this message
|
|
| |
| |
|
|
From: Alain Martel
Subject: Re: Denoising POV-Ray images in Blender
Date: 15 Jan 2023 12:12:42
Message: <63c4340a@news.povray.org>
|
|
|
| |
| |
|
|
Le 2023-01-13 à 17:33, Samuel B. a écrit :
> Hi everyone,
>
> On the left is a noisy image produced with POV-Ray, and on the right is the same
> image, but denoised in Blender. It was super easy to set up.
>
> The scene was rendered in UberPOV using no_cache radiosity and a count of 1, and
> 8 blur_samples for the camera. No AA. (It rendered in only 14 seconds. The
> denoising in Blender took a little over a second.)
>
> Works nicely, eh? I don't know yet if it will handle media, transparent objects
> and other such things, but this initial result is promising!
>
> Sam
Look like a simple blur operation using a 3x3 block size.
Post a reply to this message
|
|
| |
| |
|
|
|
|
| |
| |
|
|
Alain Martel <kua### [at] videotronca> wrote:
> > Hi everyone,
> >
> > On the left is a noisy image produced with POV-Ray, and on the right is the same
> > image, but denoised in Blender. It was super easy to set up.
> > (...)
>
> Look like a simple blur operation using a 3x3 block size.
Hi Alain,
I don't think it's that simple... Here's an article about it:
https://www.intel.com/content/www/us/en/developer/articles/technical/intel-employs-ml-to-create-graphics.html#gs.mshzmp
I haven't read through the whole thing, but they used machine learning somehow.
My guess is that they fed a neural network image pairs: one completely converged
(noise-free) image, and the same scene, but really noisy. The system eventually
learned that when the noise looks a certain way, it's meant to turn out a
certain way.
Sam
Post a reply to this message
|
|
| |
| |
|
|
|
|
| |
| |
|
|
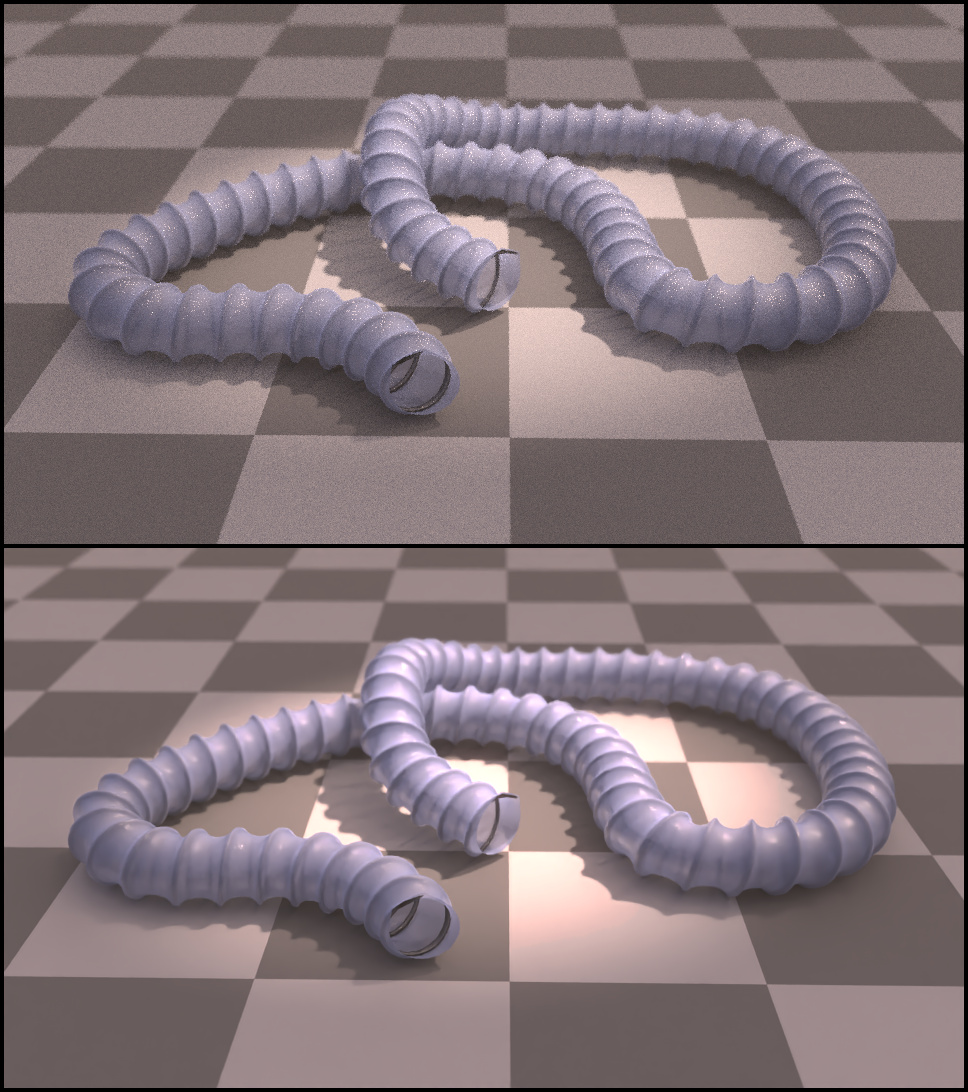
Here's a striking example of how well Intel's denoiser works. The plastic
material uses backside illumination, reflection, refraction, and a tiny granite
normal for roughness. This kind of material needs at least two radiosity bounces
to look decent, so render times can really go through the roof under normal
circumstances. Observe the reflection highlights. The denoiser was able to make
sense of the clusters of white pixels.
Post a reply to this message
Attachments:
Download 'blender-uberpov-ducting-13m_51s.jpg' (332 KB)
Preview of image 'blender-uberpov-ducting-13m_51s.jpg'
|
|
| |
| |
|
|
|
|
| |
| |
|
|
Op 16-1-2023 om 16:22 schreef Samuel B.:
> Here's a striking example of how well Intel's denoiser works. The plastic
> material uses backside illumination, reflection, refraction, and a tiny granite
> normal for roughness. This kind of material needs at least two radiosity bounces
> to look decent, so render times can really go through the roof under normal
> circumstances. Observe the reflection highlights. The denoiser was able to make
> sense of the clusters of white pixels.
This one is particularly impressive, Sam.
--
Thomas
Post a reply to this message
|
|
| |
| |
|
|
|
|
| |
| |
|
|
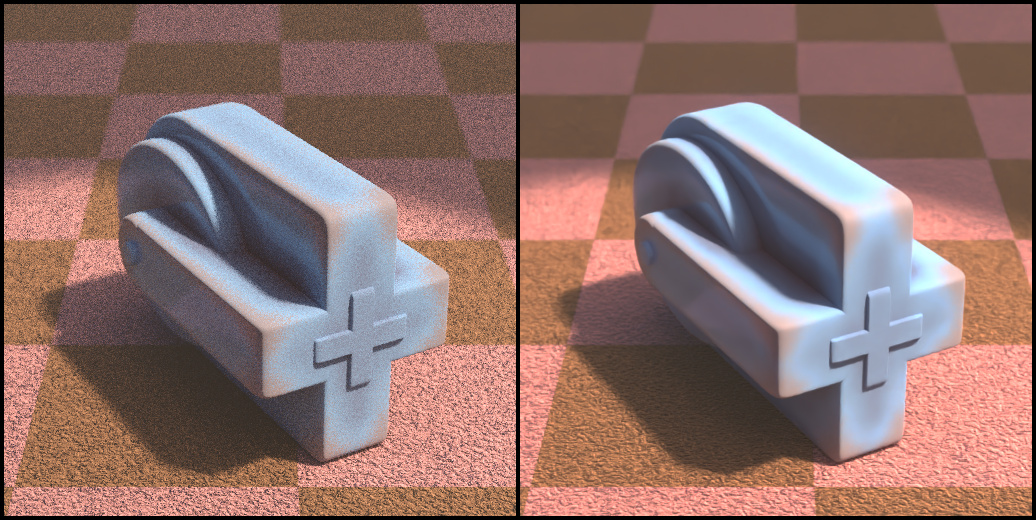
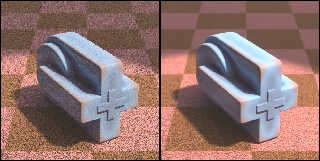
A proximity pattern test. This type of proximity method can be quite noisy at
times, depending on the number of samples used. This object got 12 samples and
the scene took 35 seconds to render using low radiosity and focal blur settings.
Just in case any wants it, here's the proximity macro:
/* Proximity pattern macro
ProxObject = input object
Radius = proximity radius
Samples = number of priximy samples
TurbScale = scale of turbulence
TurbAmt = amount of turbulence
Example: Object_Prox(MyObject, .3, 20, 1000, 100)
*/
#macro Object_Prox(ProxObject, Radius, Samples, TurbScale, TurbAmt)
pigment_pattern{
average
pigment_map{
// fermat spiral-sphere distribution
#local Inc = pi * (3 - sqrt(5));
#local Off = 2 / Samples;
#for(K, 0, Samples-1)
#local Y = K * Off - 1 + (Off / 2);
#local R = sqrt(1 - Y*Y);
#local Phi = K * Inc;
[1
// object pattern with small-scale turbulence
pigment_pattern{
object{ProxObject}
scale TurbScale
warp{turbulence TurbAmt lambda 1}
scale 1/TurbScale
translate <cos(Phi)*R, Y, sin(Phi)*R>*Radius
}
]
#end
}
}
#end
Post a reply to this message
Attachments:
Download 'denoise-prox-test3.jpg' (338 KB)
Preview of image 'denoise-prox-test3.jpg'
|
|
| |
| |
|
|
|
|
| |
| |
|
|
Thomas de Groot <tho### [at] degrootorg> wrote:
> Op 16-1-2023 om 16:22 schreef Samuel B.:
> > Here's a striking example of how well Intel's denoiser works. The plastic
> > material uses backside illumination, reflection, refraction, and a tiny granite
> > normal for roughness. (...)
> This one is particularly impressive, Sam.
> --
> Thomas
Hi Thomas,
Yeah, it's amazing how effective it can be. But writing POV script to output
three different images is a bit of a chore (for a few reasons). It would be cool
a future version of POV-Ray supported denoising natively, as a plugin or
something, so that all the difficult stuff was done behind the scenes.
Sam
Post a reply to this message
|
|
| |
| |
|
|
|
|
| |