|
|
|
|
|
|
| |
| |
|
|
|
|
| |
| |
|
|
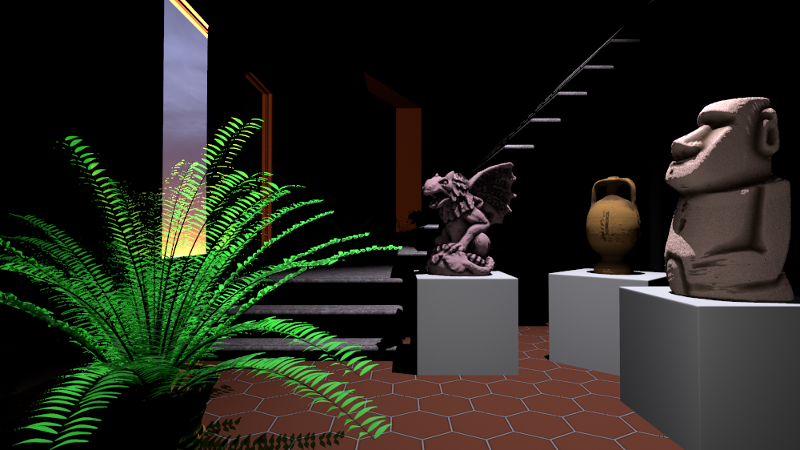
I've been giving Trevors crevice grime macro a try and I think I'm
getting the hang of it. The three objects on the pedestals have an
object light that was used to fill in the areas that the overhead and
mezzanine lights didn't reach. I started getting better results when I
used the location of each objects light as the grime macros "camera
location" instead of the scene camera location.
Oh yeah ... check out the backside diffuse on the fern.
Now a question (the real reason of this post) ... what's up with the
slightly tilted look (back and forth) with the Moai. My camera's look_at
is 180 from it's origin, so it's flat. The angle is default. I'd like to
be able to solve this without a lot of trial and error. My 1st thought
was rotate a little x (cam is at -z) but was wondering if changing the
look_at y vector just a tad was better ... Or maybe I should pull the
camera back and make angle smaller.
Hey if there's a "teaching moment" out there ... I'm all ears.
Jim
PS: don't be giving me the gears about the dark walls ... I'm workin' on
it ;-)
Post a reply to this message
Attachments:
Download 'gallery.png' (319 KB)
Preview of image 'gallery.png'
|
|
| |
| |
|
|
|
|
| |
| |
|
|
Jim Holsenback <jho### [at] povray org> wrote:
> I've been giving Trevors crevice grime macro a try and I think I'm
> getting the hang of it. The three objects on the pedestals have an
> object light that was used to fill in the areas that the overhead and
> mezzanine lights didn't reach. I started getting better results when I
> used the location of each objects light as the grime macros "camera
> location" instead of the scene camera location.
It looks good. Nice to see some usage out of it.
The way the macro works, you may get artifacts doing this depending on how much
the location varies from the angle. Areas that are 'shadowed' by the tracees
would be evident, also the grime pattern will be projected through to the
backside of the object unless methods are used to avoid this.
With 'proper' settings it *should* work just fine and probably best using the
camera location for this reason. However what 'proper' settings are are up to
the user/artists/beholder to figure out.
Generally:
-increase surface offset for meshes to avoid catching the mesh corners. the
size of this required will depend upon the curvature and resolution of the mesh
-try to figure if you want to capture shallow areas or not, for shallower
grooves, use lower angles. I have been using anything from 5-20deg depending on
what I want
- try to figure the groove size you want. This is going to be relative to the
model size again. I have been using ~2-10% of the object height.
For example, for my buddha:
object height = 200
recursion level min=2
recursion level max=4
resolution = 1000 for 1920x1080 final image
I also have truned on linera interpolation
for crevices:
control angle = 5deg
control depth = 20
offset = 0.05
for edges:
control depth = -20deg
control depth = 15
offset = -0.01
I will probably be posting an update version soon, which I have added a some
optimisation and added features.
> Now a question (the real reason of this post) ... what's up with the
> slightly tilted look (back and forth) with the Moai. My camera's look_at
> is 180 from it's origin, so it's flat. The angle is default. I'd like to
> be able to solve this without a lot of trial and error. My 1st thought
> was rotate a little x (cam is at -z) but was wondering if changing the
> look_at y vector just a tad was better ... Or maybe I should pull the
> camera back and make angle smaller.
What you are seeing is probably perspective distortion. For example look at how
the shape of the floor tiles looks at the corners of the image vs the center.
The way to minimize this is to pull your camera back and tighten the view angle,
nuch like zooming in real photography.
>
> Hey if there's a "teaching moment" out there ... I'm all ears.
>
> Jim
>
> PS: don't be giving me the gears about the dark walls ... I'm workin' on
> it ;-)
-tgq org> wrote:
> I've been giving Trevors crevice grime macro a try and I think I'm
> getting the hang of it. The three objects on the pedestals have an
> object light that was used to fill in the areas that the overhead and
> mezzanine lights didn't reach. I started getting better results when I
> used the location of each objects light as the grime macros "camera
> location" instead of the scene camera location.
It looks good. Nice to see some usage out of it.
The way the macro works, you may get artifacts doing this depending on how much
the location varies from the angle. Areas that are 'shadowed' by the tracees
would be evident, also the grime pattern will be projected through to the
backside of the object unless methods are used to avoid this.
With 'proper' settings it *should* work just fine and probably best using the
camera location for this reason. However what 'proper' settings are are up to
the user/artists/beholder to figure out.
Generally:
-increase surface offset for meshes to avoid catching the mesh corners. the
size of this required will depend upon the curvature and resolution of the mesh
-try to figure if you want to capture shallow areas or not, for shallower
grooves, use lower angles. I have been using anything from 5-20deg depending on
what I want
- try to figure the groove size you want. This is going to be relative to the
model size again. I have been using ~2-10% of the object height.
For example, for my buddha:
object height = 200
recursion level min=2
recursion level max=4
resolution = 1000 for 1920x1080 final image
I also have truned on linera interpolation
for crevices:
control angle = 5deg
control depth = 20
offset = 0.05
for edges:
control depth = -20deg
control depth = 15
offset = -0.01
I will probably be posting an update version soon, which I have added a some
optimisation and added features.
> Now a question (the real reason of this post) ... what's up with the
> slightly tilted look (back and forth) with the Moai. My camera's look_at
> is 180 from it's origin, so it's flat. The angle is default. I'd like to
> be able to solve this without a lot of trial and error. My 1st thought
> was rotate a little x (cam is at -z) but was wondering if changing the
> look_at y vector just a tad was better ... Or maybe I should pull the
> camera back and make angle smaller.
What you are seeing is probably perspective distortion. For example look at how
the shape of the floor tiles looks at the corners of the image vs the center.
The way to minimize this is to pull your camera back and tighten the view angle,
nuch like zooming in real photography.
>
> Hey if there's a "teaching moment" out there ... I'm all ears.
>
> Jim
>
> PS: don't be giving me the gears about the dark walls ... I'm workin' on
> it ;-)
-tgq
Post a reply to this message
|
|
| |
| |
|
|
|
|
| |
| |
|
|
Jim Holsenback <jho### [at] povrayorg> wrote:
> I've been giving Trevors crevice grime macro a try and I think I'm
> getting the hang of it.
Trevor has done a really great job with that. His method shows none of the
typical artifacts associated with other types of inside/outside edge-detection
(like proximity patterns).
> Oh yeah ... check out the backside diffuse on the fern.
Most definitely a great feature (C. Lipka? Thanks again!). It's a lot better
than the double_illuminate feature (which was actually a surface normal bug
way-back- hen).
> PS: don't be giving me the gears about the dark walls ... I'm workin' on
> it ;-)
Hey, what's wrong with the... oh, never mind :P
Nice usage of a 3rd-party code-base, Jim. I look at some of my contributions,
and I wonder how *anyone* can use them :P
~Sam
P.S. This web-based newsgroup unmemory is really grating...
Post a reply to this message
|
|
| |
| |
|
|
|
|
| |
| |
|
|
On 04/09/2011 09:25 PM, Trevor G Quayle wrote:
> Jim Holsenback<jho### [at] povrayorg> wrote:
>> I've been giving Trevors crevice grime macro a try and I think I'm
>> getting the hang of it. The three objects on the pedestals have an
>> object light that was used to fill in the areas that the overhead and
>> mezzanine lights didn't reach. I started getting better results when I
>> used the location of each objects light as the grime macros "camera
>> location" instead of the scene camera location.
>
> It looks good. Nice to see some usage out of it.
Each model had slightly different requirements and I'd already caught
onto the angle parameter, but thanks for the follow up comments ... that
show get me going with fine tuning for the look I'm after.
>> Now a question (the real reason of this post) ... what's up with the
>> slightly tilted look (back and forth) with the Moai. My camera's look_at
>> is 180 from it's origin, so it's flat. The angle is default. I'd like to
>> be able to solve this without a lot of trial and error. My 1st thought
>> was rotate a little x (cam is at -z) but was wondering if changing the
>> look_at y vector just a tad was better ... Or maybe I should pull the
>> camera back and make angle smaller.
>
> What you are seeing is probably perspective distortion. For example look at how
> the shape of the floor tiles looks at the corners of the image vs the center.
> The way to minimize this is to pull your camera back and tighten the view angle,
> nuch like zooming in real photography.
Yep ... I'm debating on getting rid of the wall behind the camera and
maybe the light from the environment map will help blend the overall
lighting ... I hate it when I answer my own question after posting ...
one of those delayed brain farts I guess ;-)
Post a reply to this message
|
|
| |
| |
|
|
|
|
| |
| |
|
|
On 04/09/2011 10:53 PM, Samuel Benge wrote:
> Jim Holsenback<jho### [at] povrayorg> wrote:
>> I've been giving Trevors crevice grime macro a try and I think I'm
>> getting the hang of it.
>
> Trevor has done a really great job with that. His method shows none of the
> typical artifacts associated with other types of inside/outside edge-detection
> (like proximity patterns).
>
>> Oh yeah ... check out the backside diffuse on the fern.
>
> Most definitely a great feature (C. Lipka? Thanks again!). It's a lot better
> than the double_illuminate feature (which was actually a surface normal bug
> way-back- hen).
besides the diffuse attribute I varied the filter value of the of the
leaf pigment to pick up the right about of sun light going through them
>
>> PS: don't be giving me the gears about the dark walls ... I'm workin' on
>> it ;-)
>
> Hey, what's wrong with the... oh, never mind :P
since I'm using all spots for lighting, some of the wall surfaces aren't
getting hit. maybe more bloom on the mezzanine light will help but I
think it's out as far as it should be now ... I think I need another
light source hitting that dark corner near the window wall.
>
> Nice usage of a 3rd-party code-base, Jim. I look at some of my contributions,
> and I wonder how *anyone* can use them :P
Thanks ... LOL if *I* can get some mileage out of some of your code,
then I pretty sure others have as well.
Post a reply to this message
|
|
| |
| |
|
|
|
|
| |
| |
|
|
> On 04/09/2011 09:25 PM, Trevor G Quayle wrote:
>> Jim Holsenback<jho### [at] povrayorg> wrote:
>>> I've been giving Trevors crevice grime macro a try and I think I'm
>>> getting the hang of it. The three objects on the pedestals have an
>>> object light that was used to fill in the areas that the overhead and
>>> mezzanine lights didn't reach. I started getting better results when I
>>> used the location of each objects light as the grime macros "camera
>>> location" instead of the scene camera location.
>>
>> It looks good. Nice to see some usage out of it.
>
> Each model had slightly different requirements and I'd already caught
> onto the angle parameter, but thanks for the follow up comments ... that
> show get me going with fine tuning for the look I'm after.
>
>>> Now a question (the real reason of this post) ... what's up with the
>>> slightly tilted look (back and forth) with the Moai. My camera's look_at
>>> is 180 from it's origin, so it's flat. The angle is default. I'd like to
>>> be able to solve this without a lot of trial and error. My 1st thought
>>> was rotate a little x (cam is at -z) but was wondering if changing the
>>> look_at y vector just a tad was better ... Or maybe I should pull the
>>> camera back and make angle smaller.
>>
>> What you are seeing is probably perspective distortion. For example
>> look at how
>> the shape of the floor tiles looks at the corners of the image vs the
>> center.
>> The way to minimize this is to pull your camera back and tighten the
>> view angle,
>> nuch like zooming in real photography.
>
> Yep ... I'm debating on getting rid of the wall behind the camera and
> maybe the light from the environment map will help blend the overall
> lighting ... I hate it when I answer my own question after posting ...
> one of those delayed brain farts I guess ;-)
You can make that wall no_image or use interior_texture with a rgbt 1
pigment.
Alain
Post a reply to this message
|
|
| |
| |
|
|
|
|
| |
| |
|
|
On 04/09/2011 09:25 PM, Trevor G Quayle wrote:
> Generally:
> -increase surface offset for meshes to avoid catching the mesh corners. the
> size of this required will depend upon the curvature and resolution of the mesh
>
> -try to figure if you want to capture shallow areas or not, for shallower
> grooves, use lower angles. I have been using anything from 5-20deg depending on
> what I want
>
> - try to figure the groove size you want. This is going to be relative to the
> model size again. I have been using ~2-10% of the object height.
>
> For example, for my buddha:
> object height = 200
> recursion level min=2
> recursion level max=4
> resolution = 1000 for 1920x1080 final image
> I also have truned on linera interpolation
>
> for crevices:
> control angle = 5deg
> control depth = 20
> offset = 0.05
>
> for edges:
> control depth = -20deg
> control depth = 15
> offset = -0.01
>
>
>
> I will probably be posting an update version soon, which I have added a some
> optimisation and added features.
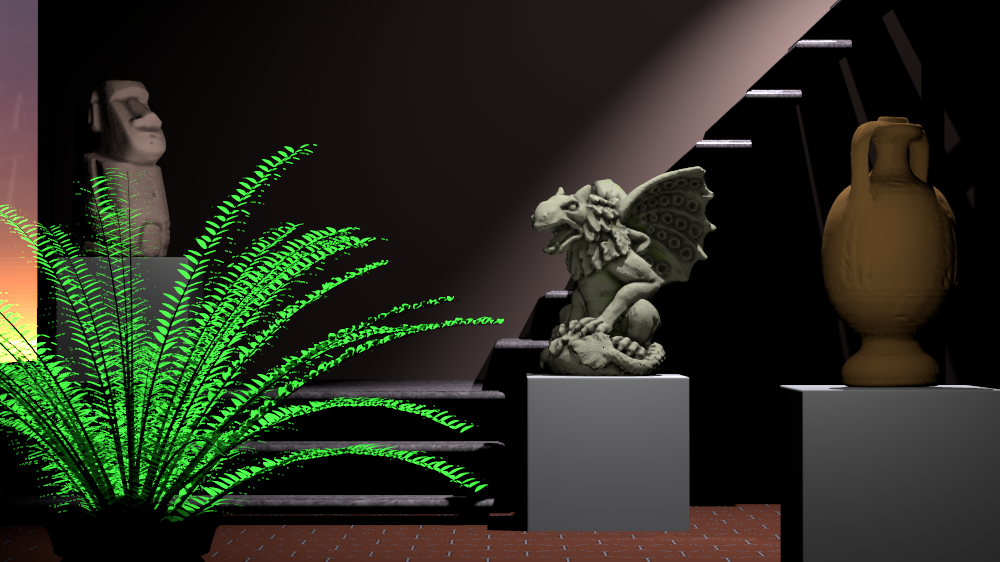
Trevor, the above info would make a great addition to your next update,
it really helped me out with getting my setup correct.
The gargoyle is my favorite, the amphora turned out neat (very subtle)
... some of the shading on it comes from edge detect as the spots
orbiting the objects are shadowless, they just fill in where the
overhead center, the mezzanine, and the sun set lights didn't hit. I
also seem to be getting good mileage from have the orbiting object
lights as the cam position for the edge/crevice detect.
Thanks for the addition to my toolbox :-)
Jim
Post a reply to this message
Attachments:
Download 'work.png' (518 KB)
Preview of image 'work.png'
|
|
| |
| |
|
|
|
|
| |