|
|
|
|
|
|
| |
| |
|
|
|
|
| |
| |
|
|
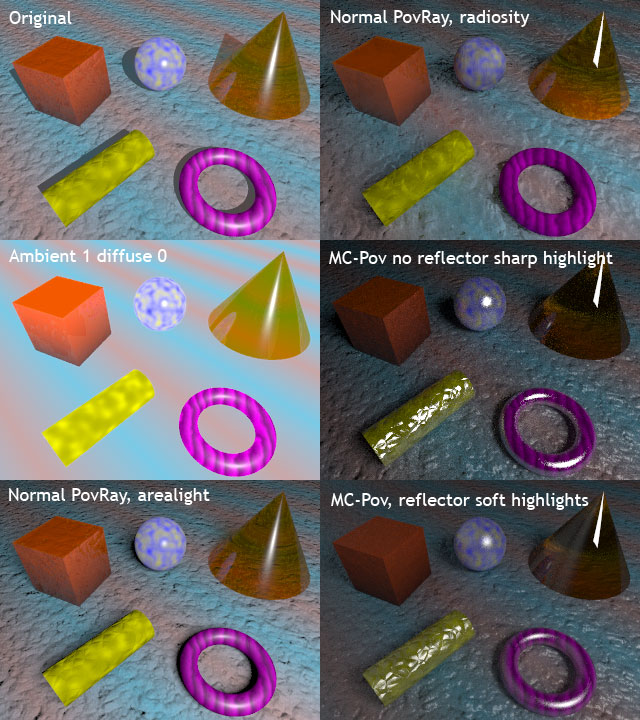
/*
Hi How Camp
The problem of lightning has its origin in the techniques of CGI-Lightning!
Means: Years ago there was no way to simulate light that correct, as it is in
nature. And it's still not possible - but you can come very close to it with in
these days.
Studio-light often tries to simulate daylight by using special techniques
insight of the studio.
The result was to have _very_ special techniques in CGI-lightning: Simulating
light with a program, that can not offer you _real_ working light-simulation
makes it twice-complicate just to get a good looking studio-situation. Using a
studio-situation to make a good looking light-situation then is the next step to
make.
First is to understand the classic limitations and then making the decision,
using the classic way, ore the classic way with further techniques, or using
progressive techniques.
First way means: Hard setup for the artists, but fast render-time.
Second way means: _Much_ easier setup, slower render-time (radiosity)
Third way means: Easy setup as well, very slow rendering, but very accurate
lighting-simulation. (Path-tracing, by using MC-Pov)
Best start is to take a look of the problems in the classic way of light
simulation (the classic way of ray-tracing).
Lets take a look of whats NOT possible:
- Light comes _ONLY_ from out of the light-source! In real environment it comes
from _everywhere_ that is visible to your eye, or to the camera, because the
light-rays that makes an object visible could light up other objects as well if
not going into your eye!
- When having _NO_ light in the shadows (because these areas are somehow covert
from the light-sources) that means: Totally blackness! to avoid this, these
areas can be lighten up, using the "ambient" keyword. What happens then is a so
called "self-illumination" within that areas. Actually there NOT illuminating
the scene, there JUST illuminating "to the camera".
These "tool" is actually the MOST artificial looking problem in lighning!
Your scene contains objects, heaving the "ambient" setting set to "0.1" try out,
to set it to "0" and using other light-sources (very small values in power,
using light fading and make it "shadowless". With this technique, you can try to
setup reflecting light, coming from important, and big surfaces, illuminating
other objects.
This technique means very much work, but a better result as when setting the
ambient higher then zero.
In a photo-studio, reflectors are often used.
When no light is simulated, coming from objects, you have to use the same
technique of shadowless and fading light-sources to illuminate special areas.
A basic rule is: Only the main light has a shadow. More then one main shadow is
something, a professional photographer would never except. (For a normal setup)
You see this is a very hard job to make.
When using ambient, higher then zero, try out to bring negative lights into
special eras, like insight mouth and nose. As well, use no-shadow, and fading
here!
A much easier thing might be to set all your ambients to zero, than try out
different radiosity settings from the "rad_def.inc" file. For this test, use
only one light-source in the beginning.
This is, what is being tried in every photo-studio to simulate, when using lambs
in a setup: The sun! This is your main-light. Other lights coming from other
object (we _don't_ have two suns, or more up in the sky ;)
When the result is good, try to make the environment a little cloudy, by using
an area-light instead of a point- or spotlight. In most cases, this looks more
friendly.
You can use objects as light-sources, when using radiosity, or when using
MC-Pov. THIS time, when using the ambient keyword, and using radiosity, or
MC-Pov the object will REALY self-illuminate AND lightning other objects as well
as a normal light-source.
This is good for soft shadows.
Another big problem are the surfaces, because the highlights on an object is
separated from the shape of the light, and the reflection of the finish. Means:
It is possible, making a very blurry highlight, but still a clean, reflective
surface. In normal cases, this is not possible. A soft highlight means a rugh
surface and that means a blurry reflection!
In this example, I try to bring the most popular tricks.
Best regards,
Holger :)
*/
//#######################################################################################
#declare Scenetype=0; // 0=PovRay no Radiosyty (area_light)
// 1=PovRay with Radiosity (no blurry reflection,
because of allredy existing normals)
// 2=MC-POV (Blurry reflection)
//########################## LightSoftness effects the size of the ligtsource
####################
#declare LightSoftness=6;
//########################## The reflector makes the environment more friendly
#######
#declare Reflector=off;
//#######################################################################################
// Only works in MC-Pov mode. These are settings for all objects eccept the
cone
#declare LightSoftness_onSurfaces=25;//smaller = more blurry
#declare LightIntensity_onSurfaces=.25;
// For the ground
#declare LightSoftness_onSurfaces_on_floor=10;
#declare LightIntensity_onSurfaces_on_floor=.1;
//#######################################################################################
/*
When using Scenetype=1 no Highlights will be shown, because of no
blurry reflection in the scene.
Blurry reflection with PovRay is only availiable, when
no other normals are used (or I don't know how to...)
Only the cone has a hilight (normal reflection..)
(Lightsources will not be shown to the camera, or reflections, only
objects does)
*/
//########################## have fun
###########################################
#include "colors.inc"
#include "glass.inc"
#include "rad_def.inc"
#if (Scenetype=2) #version unofficial megapov 1.21 #else #version 3.6;#end
global_settings {
assumed_gamma 1.0
max_trace_level 10
#if (Scenetype=1) radiosity {Rad_Settings(Radiosity_IndoorLQ,on,off)}#end//HQ
was to slow for my taste
#if (Scenetype=2)
max_trace_level 8
montecarlo
{
mc_rand_seed
mc_max_diffuse_bounce 3
mc_pixel_refresh_ratio 1
}
#end
}
#default{pigment{color rgb 1}finish{ambient 0 diffuse 1
#if (Scenetype=2)
montecarlo{mc_diffuse{1 1 1}}
#end
}}
#if (Scenetype=0)
light_source {
0*x
color rgb 30
area_light
<LightSoftness,0,0><0,0,LightSoftness>
4,4
adaptive 0
jitter
circular
orient
rotate <-20,15,0>
translate <5, 10, -10>
fade_distance 2
fade_power 2.2
}
#end
#if (Scenetype=0) #else
box{<LightSoftness,-.1,-.1><.1,.1,LightSoftness>
#if (Scenetype=2)
montecarlo{mc_portal{1 1 1 1}}
#end
pigment{color rgb 1}
finish{ambient 10
}
rotate <-20,15,0>
translate <5, 10, -10>
}
#end
camera {
location <0, 5, -5>
look_at <0, 0, 0>
}
#if (Reflector)
plane{
x,-15
pigment{color rgb 6}
rotate y*10
}
#end
plane {
y, -1
texture {
pigment {
gradient x
color_map {
[0.0 rgb <0.6, 0.4, 0.4>]
[0.5 rgb <0.2, 0.6, 0.8>]
[1.0 rgb <0.6, 0.4, 0.4>]
}
scale 4
rotate -45*y
}
#if (Scenetype=2)finish{reflection LightIntensity_onSurfaces_on_floor
montecarlo{mc_reflect{1 1 1 LightSoftness_onSurfaces_on_floor}}}#end
normal{
granite 0.6
scale 1.75
}
}
}
box {
-1, 1
scale <1,0.999,1>
texture{
pigment {
gradient y
color_map {
[0.0 rgb <0.9, 0.1, 0>/8]
[1.0 rgb <0.9, 0.1, 0>]
}
scale 2
translate -y
}
finish {
brilliance 1.0
phong 0.5
phong_size 40
specular 0.5
roughness 0.05
metallic 1
reflection {
0.5
1.0
fresnel on
falloff 1.0
exponent 1.0
metallic 0.9
}
#if (Scenetype=2)reflection LightIntensity_onSurfaces
montecarlo{mc_reflect{1 1 1 LightSoftness_onSurfaces}}#end
conserve_energy
}
normal {
granite 0.15
scale 2
}
}
rotate 25*y
translate <-3.25,0,2>
}
sphere {
0,1
texture {
pigment {
bozo
color_map {
[0.0 rgb <1,1,0>]
[1.0 rgb <0,0,2>]
}
scale 0.2
}
finish {
phong 0.25
phong_size 70
specular 0.65
roughness 0.005
brilliance 0.4
#if (Scenetype=2)reflection LightIntensity_onSurfaces
montecarlo{mc_reflect{1 1 1 LightSoftness_onSurfaces}}#end
}
}
translate <0,0,3>
}
torus {
1.0,
0.25
texture {
pigment {
gradient x
color_map {
[0.0 rgb <1,0,1>/1]
[0.3 rgb <1,0,1>/4]
[0.6 rgb <1,0,1>/2]
[1.0 rgb <1,0,1>/1]
}
scale 0.25
warp {
turbulence 0.25*x
}
}
finish {
phong 0.5
phong_size 25
specular 0.15
conserve_energy
diffuse 0.8
brilliance 1.0
#if (Scenetype=2)reflection LightIntensity_onSurfaces montecarlo{mc_reflect{1
1 1 LightSoftness_onSurfaces}}#end
}
}
translate <1.75,-0.75,-1.75>
}
cone {
-y,2,
2*y,0
material {
texture {
pigment {
color Col_Glass_Orange
}
finish {F_Glass3 ambient 0
}
}
interior {I_Glass}
}
translate <4,0,3>
}
cylinder {
<-2,-0.5,-2>, <0,-0.5,0>, 0.5
texture {
pigment {
dents
color_map {
[0.0 rgb <1,1,0>/2]
[0.5 rgb <1,1,0>]
[1.0 rgb <1,1,0>/2]
}
scale 1/4
}
normal {
crackle 1.5
scale 1/4
}
#if (Scenetype=2)finish{reflection LightIntensity_onSurfaces
montecarlo{mc_reflect{1 1 1 LightSoftness_onSurfaces}}}#end
}
translate <-1,0,-1>/2
}
Post a reply to this message
Attachments:
Download 'light-chalange_settings.jpg' (132 KB)
Preview of image 'light-chalange_settings.jpg'

|
|
| |
| |
|
|
|
|
| |
| |
|
|
Christian Froeschlin <chr### [at] chrfr de> wrote:
> I wasn't quite sure whether not changing the objects meant
> you couldn't add any object to the scene. Using radiosity is
> a bit sad if the environment is completely black, so I added
> a blueish dome with ambient > 0 around the scene, which I
> suppose is still in the spirit of lighting the thing.
This makes sense -- and I appreciate you doing so. My use of radiosity usually
results in poor-to-average results, so I appreciate hearing ideas like this. de> wrote:
> I wasn't quite sure whether not changing the objects meant
> you couldn't add any object to the scene. Using radiosity is
> a bit sad if the environment is completely black, so I added
> a blueish dome with ambient > 0 around the scene, which I
> suppose is still in the spirit of lighting the thing.
This makes sense -- and I appreciate you doing so. My use of radiosity usually
results in poor-to-average results, so I appreciate hearing ideas like this.
Post a reply to this message
|
|
| |
| |
|
|
|
|
| |
| |
|
|
Wow, thanks for your detailed analysis! You've got some great points, here.
"H. Karsten" <h-karsten()web.de> wrote:
> First is to understand the classic limitations and then making the decision,
> using the classic way, ore the classic way with further techniques, or using
> progressive techniques.
Yes, I agree. I've been trying to study basic lighting from a beginner's
photography standpoint (three-point lighting, etc.) but I don't always see good
results when translating this to my scenes.
> Your scene contains objects, heaving the "ambient" setting
> set to "0.1" try out, to set it to "0" and using other
> light-sources (very small values in power, using light fading
> and make it "shadowless". With this technique, you can try to
> setup reflecting light, coming from important, and big
> surfaces, illuminating other objects.
If I understand you correctly, the 'reflecting lights' are shadowless light
sources with low values that emulate inter-reflected light from other objects?
For example, if I have a scene with a red car, I might place a red shadowless
light near the car to 'help' cast scattered light...? It seems you'd have to be
careful not to allow the light to shine back on the object you're emulating.
(Or, perhaps I've misunderstood what you're trying to get across.)
> A basic rule is: Only the main light has a shadow. More then
> one main shadow is something, a professional photographer
> would never except. (For a normal setup)
Interesting! So, in a real photography setting, how do you add a light source
that doesn't cast a shadow?
Thanks for all your comments!
Post a reply to this message
|
|
| |
| |
|
|
|
|
| |
| |
|
|
Am 16.06.2010 06:46, schrieb H. Karsten:
> (Path-tracing, by using MC-Pov)
You may notice that the MC-Pov results are darker than the
POV-Ray+radiosity results.
This is actually due to a bug in MC-Pov, as I demonstrated in
<news://news.povray.org:119/4b093e4b@news.povray.org>, which causes the
diffuse brightness of objects to be reduced by an estimated 50%.
Post a reply to this message
|
|
| |
| |
|
|
|
|
| |
| |
|
|
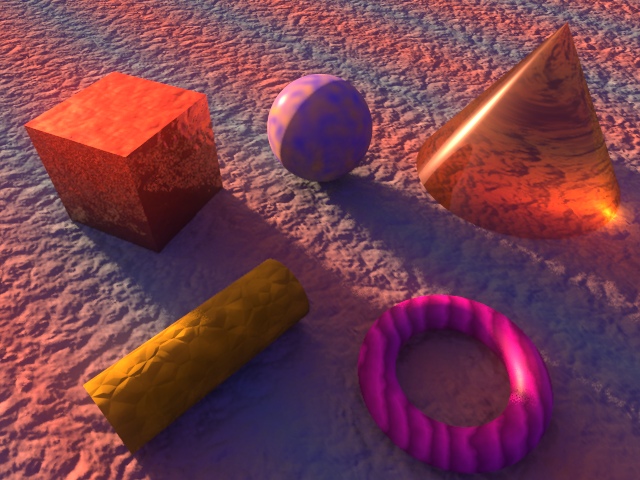
"How Camp" wrote:
> I've used POV for a long time, but I find lighting to be one of my biggest
> challenges in scene development. I thought it might be interesting to get some
> examples from the community on creative ways to light a scene:
>
> Below is a primitive scene (no pun intended) with only a basic light source.
> With the restriction that you aren't allowed to change the camera or the objects
> (including their mundane textures), what creative lighting solutions can you
> come up with to make this image more interesting?
>
I find it a challenge, too, and usually just use a primary light source low in
the scene to give the image a sense of depth. I tend to use a bit of radiosity
to smooth shadows, and add small fill-in lights where needed, often near the
camera's position. I find aggressive antialiasing can hide many sins. (This
image has +A0.05 +R4, though +R2 or 3 and a larger +A0.1 is usually all that is
needed.)
But to me, the interest in a scene comes more from it's ability to tell a story.
Usually the stories are very simple, and need not be the same story for
everyone viewing the image. My father was a semi-professional photographer and
I grew up learning the basics: that framing is by far the most important skill
to master. In a real world, if you look hard enough you can find a good shot
anywhere. Lighting and lens tricks can certainly improve the quality of a
photograph and help bring the the story to life.
Of course, POV-Ray does not capture the real world, but it does not eliminate
the need to tell a story. The first thing I had to do was figure out a plot for
the provided scene, without reframing it. I saw representations of the elements
Earth, Air, and Fire and decided there was magic happening, but it's incomplete.
The two objects in the foreground don't quite fit. It's the basic story of the
search for completion (to me).
My radiosity skills are near to nonexistent, but I decided to try lighting the
scene by using the cone as a light source. I cheated a bit by adding no_image
no_shadow objects to the looks_like of the lights used, and added a similar
large sphere around the scene to contain some absorbing media and tone down the
ambient contribution of the plane in the distance. Due to my ignorance, for the
textures to (almost) work, I ended up jacking up almost all of the radiosity
values to near their highest quality (except recursion_limit, which is 2), and
the scene took about forever to render.
With that said, I don't think I was fully successful telling this story, but I
learned a few things, which is almost as good.
~Waggy
Post a reply to this message
Attachments:
Download 'lightchallenge_2010-06-14_1.png' (366 KB)
Preview of image 'lightchallenge_2010-06-14_1.png'
|
|
| |
| |
|
|
|
|
| |
| |
|
|
> I've used POV for a long time, but I find lighting to be one of my biggest
> challenges in scene development. I thought it might be interesting to get some
> examples from the community on creative ways to light a scene:
>
> Below is a primitive scene (no pun intended) with only a basic light source.
> With the restriction that you aren't allowed to change the camera or the objects
> (including their mundane textures), what creative lighting solutions can you
> come up with to make this image more interesting?
>
>
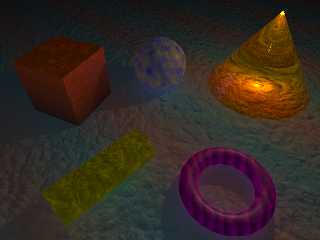
With:
#declare Area = 4;
#declare Th=0; #declare Steps = 30;
#declare Offset = -37;
#while(Th<360)
light_source{<0, 9, -100> CHSL2RGB(<Th, 0.84, 2.5/Steps,0,0>)
area_light Area*x Area*y 17 17 adaptive 0 circular jitter
rotate (Th+Offset)*y}
#declare Th = Th + 360/Steps;
#end
background{rgb<0.12,0.21, 0.9>*0.7}
That's a ring of 30 coloured lights
Alain
Post a reply to this message
Attachments:
Download 'light chalenge.jpg' (76 KB)
Preview of image 'light chalenge.jpg'
|
|
| |
| |
|
|
|
|
| |
| |
|
|
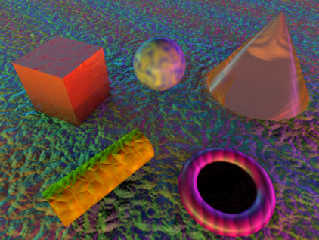
"How Camp" <hac### [at] gmailcom> wrote:
> what creative lighting solutions can you
> come up with to make this image more interesting?
Fun idea! Here's my try:
global_settings{
radiosity{
count 100
error_bound .1
pretrace_start .08 pretrace_end .02
nearest_count 5
recursion_limit 1
normal on
brightness 1
gray_threshold 0
adc_bailout 1/256
}
photons{ count 12550 }
ambient_light 0
}
#declare l_pos = <-1, .25, 1>;
#declare l_res = 2;
#declare rgb_sun = <1,.3,.15>*4;
#declare rgb_sky = <.1,.025,.2>;
light_source {
l_pos*100000, rgb_sun
area_light x*8000, z*8000, l_res, l_res
jitter adaptive 2
circular orient
}
#include "transforms.inc"
sky_sphere{
pigment{
spherical
scale 2
translate y
Point_At_Trans(l_pos)
poly_wave 4
color_map{
[0 rgb rgb_sky]
[1 rgb rgb_sun]
}
}
}
The radiosity stuff is straightforward.
For outdoor scenes I almost always have a sky_sphere with a spherical pigment
influenced by the sun's position and color. This is to simulate scattered light
in the atmosphere, and helps give the radiosity something like a real sky to
work with.
Apart from what you see in the attached code, I added photons to the cone and
shifted the plane up slightly because of a coincident surfaces problem with it
and the cone. Then I added some post-processing light blooming to balance the
colors a bit after everything else.
Sam
Post a reply to this message
Attachments:
Download 'lightingchallenge.jpg' (143 KB)
Preview of image 'lightingchallenge.jpg'

|
|
| |
| |
|
|
|
|
| |
| |
|
|
Am 16.06.2010 20:29, schrieb Samuel Benge:
> "How Camp"<hac### [at] gmailcom> wrote:
>> what creative lighting solutions can you
>> come up with to make this image more interesting?
>
> Fun idea! Here's my try:
To me, the best one so far.
Post a reply to this message
|
|
| |
| |
|
|
|
|
| |
| |
|
|
How Camp wrote:
> This makes sense -- and I appreciate you doing so. My use of
> radiosity usually results in poor-to-average results, so I appreciate
> hearing ideas like this.
I'm not a very proficient user of it myself and I don't have the
patience and/or the machine to use it with high quality settings,
but povray comes with an include file rad_def.inc which contains
some useful presets. I sometimes use it to add some low quality
radiosity (with reduced brightness so the artefacts are not too
obvious) to a scene mostly using conventional light_sources.
Which reminds me I forgot to include the code:
#include "rad_def.inc"
// STRICT == 1 --> only change lighting using 3.6 functionality
// STRICT == 0 --> also change related settings such as focal_blur
// and using area_illumination from 3.7
#declare STRICT = 1;
#declare USE_AREA_LIGHT = 1;
#declare USE_AREA_ILLU = 0;
#declare USE_PHOTONS = 1;
#declare USE_FOCAL_BLUR = 0;
#declare USE_RADIOSITY = 1;
#declare USE_MEDIA = 0;
#if (STRICT=1)
#version 3.6;
#declare USE_FOCAL_BLUR = 0;
#declare USE_AREA_ILLU = 0;
#else
#if (version < 3.7)
#declare USE_AREA_ILLU = 0;
#end
#end
global_settings
{
assumed_gamma 1.0
max_trace_level 10
ambient_light 0.01
#if (USE_RADIOSITY=1)
radiosity {Rad_Settings(Radiosity_Fast, off, off)}
#end
#if (USE_PHOTONS=1)
photons {count 100000}
#end
}
#if (USE_RADIOSITY=1)
// Use sky sphere
sphere
{
0,200 hollow
pigment {color 100*<0.5,0.6,0.8>}
finish {diffuse 0 ambient 0.05}
}
#end
light_source
{
<6, 5, -2>
//color rgb 1
color rgb 6*<0.7,0.7,1>
fade_power 2 fade_distance 2
#if (USE_AREA_LIGHT=1)
area_light 1.5*x,1.5*y,9,9 circular orient
#if (USE_AREA_ILLU=1)
area_illumination
#end
#end
}
light_source
{
<-100, 15, -100> color rgb 0.1*<1.5,0.3,0>
}
#if (USE_MEDIA=1)
// actually looks quite crappy
box
{
<-10,-1,-5>,<10,10,10>
hollow
pigment {color rgbt 1}
interior
{
media
{
scattering {1,color rgb 0.01}
density {granite color_map {[0 rgb 0] [1 rgb 1]}}
}
}
}
#end
// ----------------------------------------
// Basically, everything below here should
// remain the same
// ----------------------------------------
#include "colors.inc"
#include "glass.inc"
camera
{
location <0, 5, -5>
look_at <0, 0, 0>
#if (STRICT=0)
#if (USE_FOCAL_BLUR=1)
// focus on the cone
focal_point <3,1,2>
aperture 0.8
blur_samples 25
#end
#end
}
plane {
y, -1
texture {
pigment {
gradient x
color_map {
[0.0 rgb <0.6, 0.4, 0.4>]
[0.5 rgb <0.2, 0.6, 0.8>]
[1.0 rgb <0.6, 0.4, 0.4>]
}
scale 4
rotate -45*y
}
normal {
granite
0.6
scale 1.75
}
}
}
box {
-1, 1
scale <1,0.999,1>
photons {collect off}
texture{
pigment {
gradient y
color_map {
[0.0 rgb <0.9, 0.1, 0>/8]
[1.0 rgb <0.9, 0.1, 0>]
}
scale 2
translate -y
}
finish {
ambient 0.1
diffuse 0.6
brilliance 1.0
phong 0.5
phong_size 40
specular 0.5
roughness 0.05
metallic 1
reflection {
0.5
1.0
fresnel on
falloff 1.0
exponent 1.0
metallic 0.9
}
conserve_energy
}
normal {
granite 0.15
scale 2
}
}
rotate 25*y
translate <-3.25,0,2>
}
sphere {
0, 1
photons {collect off}
texture {
pigment {
bozo
color_map {
[0.0 rgb <1,1,0>]
[1.0 rgb <0,0,2>]
}
scale 0.2
}
finish {
ambient 0.1
brilliance 0.4
phong 0.25
phong_size 70
specular 0.65
roughness 0.005
}
}
translate <0,0,3>
}
torus {
1.0,
0.25
photons {collect off}
texture {
pigment {
gradient x
color_map {
[0.0 rgb <1,0,1>/1]
[0.3 rgb <1,0,1>/4]
[0.6 rgb <1,0,1>/2]
[1.0 rgb <1,0,1>/1]
}
scale 0.25
warp {
turbulence 0.25*x
}
}
finish {
ambient 0.1
diffuse 0.8
brilliance 1.0
phong 0.5
phong_size 25
specular 0.15
conserve_energy
}
}
translate <1.75,-0.75,-1.75>
}
cone {
-y,2,
2*y,0
photons {target refraction on reflection off collect off}
material {
texture {
pigment {
color Col_Glass_Orange
}
finish {F_Glass3}
}
interior {I_Glass}
}
translate <4,0,3>
}
cylinder {
<-2,-0.5,-2>, <0,-0.5,0>, 0.5
photons {collect off}
texture {
pigment {
dents
color_map {
[0.0 rgb <1,1,0>/2]
[0.5 rgb <1,1,0>]
[1.0 rgb <1,1,0>/2]
}
scale 1/4
}
normal {
crackle 1.5
scale 1/4
}
}
translate <-1,0,-1>/2
}
Post a reply to this message
|
|
| |
| |
|
|
|
|
| |
| |
|
|
clipka wrote:
> Am 16.06.2010 20:29, schrieb Samuel Benge:
>> "How Camp"<hac### [at] gmailcom> wrote:
>>> what creative lighting solutions can you
>>> come up with to make this image more interesting?
>>
>> Fun idea! Here's my try:
>
> To me, the best one so far.
yes agree. I never seem to get around to trying
out the light blooming stuff. I wonder if the warm
atmosphere is due to that or the choice of colors.
Post a reply to this message
|
|
| |
| |
|
|
|
|
| |
|
|