|
|
|
|
|
|
| |
| |
|
|
|
|
| |
| |
|
|
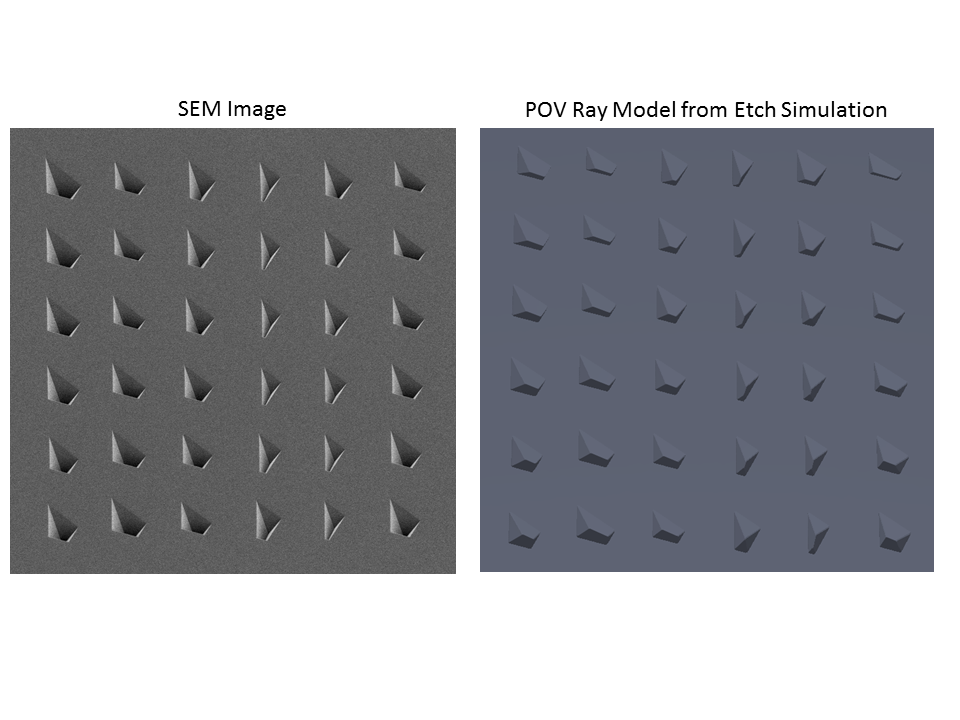
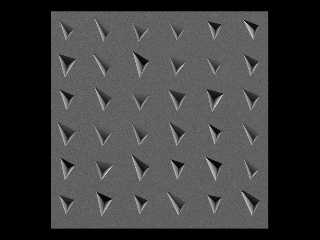
Dear POV-ray users,
I am very new at raytracing and would greatly appreciate some help improving my
first effort. I am working on a POV ray model of an etched silicon wafer. I have
attached an image with a microscopy image of the "real" etched silicon wafer
(the pyramid pits are the etched areas) on the left and my POV ray model on the
right. The POV ray model is built from a mesh which was constructed from the
point cloud export from our etch simulation software.
Anyway, below is the POV ray code I am currently using (I didn't include the
mesh, it is really big - I can send it to you if you ask). I would like to make
the POV ray image look more 3D, more specifically I would like the pyramids to
look like they go into the surface whereas now most people think they come out
of the surface. The microscopy image does a good job of this.
I have explored different light positions (and multiple ones)) and lots of
different finish attributes but nothing is really working very well. Your help
is most appreciated.
Regards,
Kevin
### POV ray code begin ###
global_settings {
ambient_light rgb <1,1,1>
assumed_gamma 1.0
max_trace_level 10
}
background { color White }
#declare Tex_Silicon =
texture {
pigment {color rgb <0.16, 0.18, 0.25>}
normal {bumps 0.001}
finish {
ambient 0.2
brilliance 0.9
diffuse 0.6
//specular 0.3
roughness 0.001
}
}
#declare Material_0=material{
texture {Tex_Silicon }
}
camera {
location <-5.00000, 55, 0.000000>
look_at <0.000000, 0.000000, 0.000000>
right x*image_width/image_height
}
light_source {
<-200,250,0> //<+up and -down, height, -right and +left>
color White
area_light <20, 0, 0>, <0, 0, 20>, 15, 15
adaptive 1
jitter
}
object{Object_0 material{Material_0}}
Post a reply to this message
Attachments:
Download 'fig1_sem-pov_comparison.png' (236 KB)
Preview of image 'fig1_sem-pov_comparison.png'

|
|
| |
| |
|
|
|
|
| |
| |
|
|
Am 11.02.2013 00:08, schrieb kmcpeak:
> Anyway, below is the POV ray code I am currently using (I didn't include the
> mesh, it is really big - I can send it to you if you ask). I would like to make
> the POV ray image look more 3D, more specifically I would like the pyramids to
> look like they go into the surface whereas now most people think they come out
> of the surface. The microscopy image does a good job of this.
"If it doesn't look right, try radiosity"
(old chinese wisdom)
Post a reply to this message
|
|
| |
| |
|
|
|
|
| |
| |
|
|
"kmcpeak" <kmc### [at] ethz ch> wrote:
> Anyway, below is the POV ray code I am currently using (I didn't include the
> mesh, it is really big - I can send it to you if you ask). I would like to make
> the POV ray image look more 3D, more specifically I would like the pyramids to
> look like they go into the surface whereas now most people think they come out
> of the surface. The microscopy image does a good job of this.
>
> I have explored different light positions (and multiple ones)) and lots of
> different finish attributes but nothing is really working very well. Your help
> is most appreciated.
Have you tried positioning the light source above the scene? (I've noticed that
Martian craters tend to look like bumps when the Sun is below the image.)
E.g. light_source { <200,250,0> ... }
P.S. area_light doesn't gain you anything as this scene is, although that might
change if you make the scene more complex. ch> wrote:
> Anyway, below is the POV ray code I am currently using (I didn't include the
> mesh, it is really big - I can send it to you if you ask). I would like to make
> the POV ray image look more 3D, more specifically I would like the pyramids to
> look like they go into the surface whereas now most people think they come out
> of the surface. The microscopy image does a good job of this.
>
> I have explored different light positions (and multiple ones)) and lots of
> different finish attributes but nothing is really working very well. Your help
> is most appreciated.
Have you tried positioning the light source above the scene? (I've noticed that
Martian craters tend to look like bumps when the Sun is below the image.)
E.g. light_source { <200,250,0> ... }
P.S. area_light doesn't gain you anything as this scene is, although that might
change if you make the scene more complex.
Post a reply to this message
|
|
| |
| |
|
|
|
|
| |
| |
|
|
> Dear POV-ray users,
>
> I am very new at raytracing and would greatly appreciate some help improving my
> first effort. I am working on a POV ray model of an etched silicon wafer. I have
> attached an image with a microscopy image of the "real" etched silicon wafer
> (the pyramid pits are the etched areas) on the left and my POV ray model on the
> right. The POV ray model is built from a mesh which was constructed from the
> point cloud export from our etch simulation software.
>
> Anyway, below is the POV ray code I am currently using (I didn't include the
> mesh, it is really big - I can send it to you if you ask). I would like to make
> the POV ray image look more 3D, more specifically I would like the pyramids to
> look like they go into the surface whereas now most people think they come out
> of the surface. The microscopy image does a good job of this.
>
> I have explored different light positions (and multiple ones)) and lots of
> different finish attributes but nothing is really working very well. Your help
> is most appreciated.
>
> Regards,
> Kevin
>
> ### POV ray code begin ###
>
> global_settings {
> ambient_light rgb <1,1,1>
> assumed_gamma 1.0
> max_trace_level 10
> }
>
> background { color White }
>
> #declare Tex_Silicon =
> texture {
> pigment {color rgb <0.16, 0.18, 0.25>}
> normal {bumps 0.001}
> finish {
> ambient 0.2
> brilliance 0.9
> diffuse 0.6
> //specular 0.3
> roughness 0.001
> }
> }
>
> #declare Material_0=material{
> texture {Tex_Silicon }
> }
>
> camera {
> location <-5.00000, 55, 0.000000>
> look_at <0.000000, 0.000000, 0.000000>
> right x*image_width/image_height
> }
>
> light_source {
> <-200,250,0> //<+up and -down, height, -right and +left>
> color White
> area_light <20, 0, 0>, <0, 0, 20>, 15, 15
> adaptive 1
> jitter
> }
>
> object{Object_0 material{Material_0}}
>
>
>
You use quite a high ambient, try ambient 0 in your finish.
I find that using a brilliance of less that 1 tend to give unconvincing
results unless you want to simulate something like velvet or some
fabrics. Try with brilliance 1.5 or more.
You may need to uncomment and increase the specular amount.
You may make your pigment slightly lighter, especialy if you reduce the
ambient to zero.
Note: Brilliance 0 render the illumination independent from the
direction of the incident light, you get full illumination if any light
reatch a point, or no illumination if oriented away from the light. Low
brilliance is good to give some object a cartoonish aspect.
Alain
Post a reply to this message
|
|
| |
| |
|
|
|
|
| |
| |
|
|
"kmcpeak" <kmc### [at] ethzch> wrote:
> I would like to make
> the POV ray image look more 3D, more specifically I would like the pyramids to
> look like they go into the surface whereas now most people think they come out
> of the surface. The microscopy image does a good job of this.
Hi kmcpeak,
Notice in the SEM(?) image how the pyramids become darker the farther in they
go. This makes their true orientations almost unmistakable. A large area_light
in your scene should help, or radiosity, as clipka said.
Also, in your rendered image, the pyramids seem to be coming out of the surface
partly because of where your light_source is situated. People tend to assume
that light is always coming from above, thus when viewing your image they think
the pyramids are protruding instead of intruding. Try repositioning your
light_source above (+y, +z) the scene, as it is in the micrograph.
With those two things taken care of, there should be no doubt when people view
your image.
Sam
Post a reply to this message
|
|
| |
| |
|
|
|
|
| |
| |
|
|
"Samuel Benge" <stb### [at] hotmailcom> wrote:
> "kmcpeak" <kmc### [at] ethzch> wrote:
> > I would like to make
> > the POV ray image look more 3D, more specifically I would like the pyramids to
> > look like they go into the surface whereas now most people think they come out
> > of the surface. The microscopy image does a good job of this.
>
> Hi kmcpeak,
>
> Notice in the SEM(?) image how the pyramids become darker the farther in they
> go. This makes their true orientations almost unmistakable. A large area_light
> in your scene should help, or radiosity, as clipka said.
>
> Also, in your rendered image, the pyramids seem to be coming out of the surface
> partly because of where your light_source is situated. People tend to assume
> that light is always coming from above, thus when viewing your image they think
> the pyramids are protruding instead of intruding. Try repositioning your
> light_source above (+y, +z) the scene, as it is in the micrograph.
>
> With those two things taken care of, there should be no doubt when people view
> your image.
>
> Sam
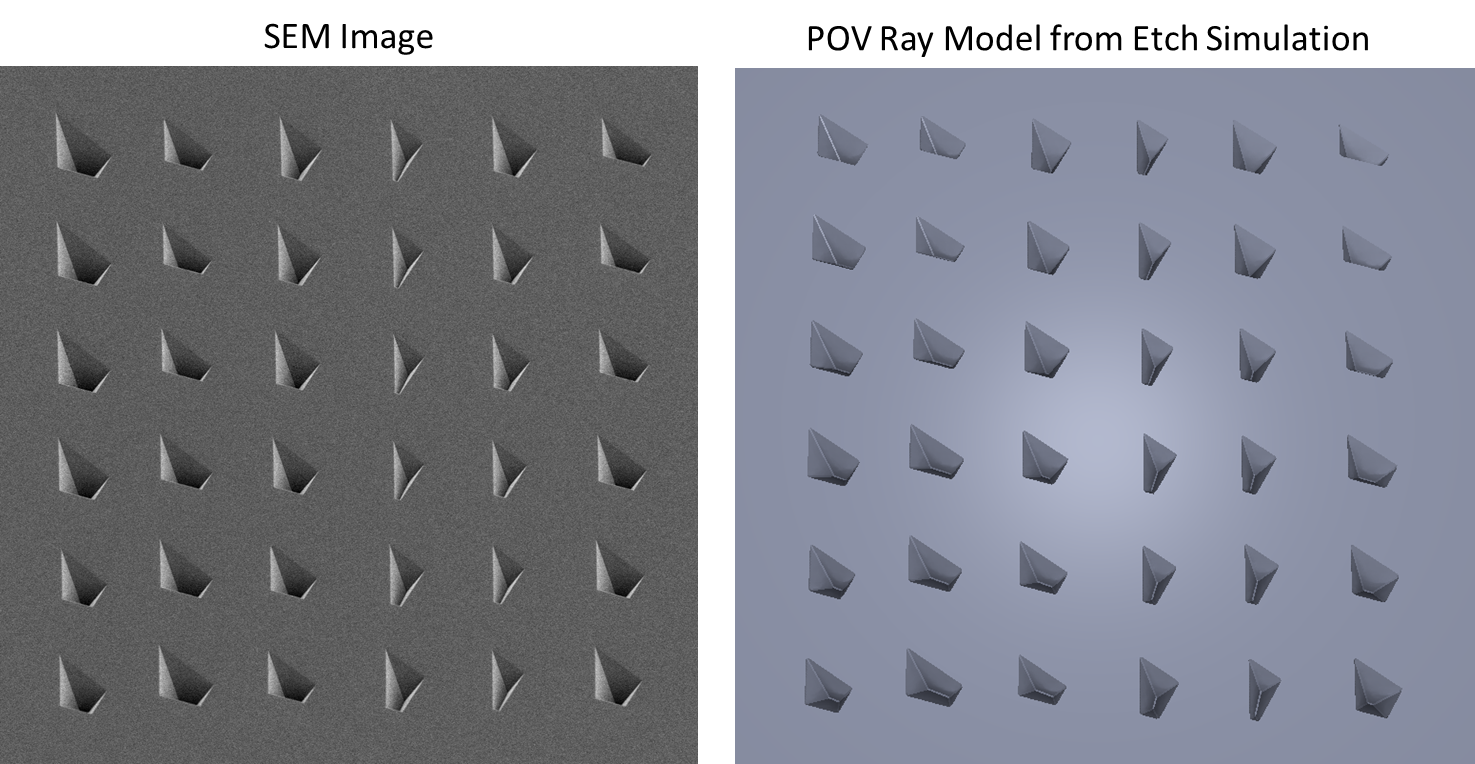
Thank you all for your help! I added radiosity, moved the light source above the
scene, increased brilliance to 1.5 (I tried larger values as well) and added a
bit of specular. I also tried an area_light but as Cousin Ricky pointed out it
doesn't seem to make a difference.
Attached is the best so far. It is definitely better than my previous effort but
I don't seem to be able to get the sides of the pyramids closest to the silicon
surface to have highlights, like they do in the microscopy image. I think this
is key to the 3d look.
Code is below (sans mesh) and image attached:
#include "colors.inc"
#include "rad_def.inc"
global_settings{
radiosity
{
Rad_Settings(Radiosity_Final,off,off) // I tried all the different macro
quality settings
}
}
background { color White }
#declare Tex_Silicon =
texture {
pigment {color rgb <0.46, 0.48, 0.55>}
//normal {bumps 0.1}
finish {
ambient 0
brilliance 1.5 // tried as high as 5
//diffuse 0.9
specular 0.15
roughness 0.01
}
}
#declare Material_0=material{
texture {Tex_Silicon }
}
camera {
location <-5.00000, 55, 0.000000>
look_at <0.000000, 0.000000, 0.000000>
right x*image_width/image_height
}
light_source {
<0,100,0> //<+up and -down, height, -right and +left>
color White
area_light <20, 0, 0>, <0, 0, 20>, 10, 10
adaptive 1
jitter
}
object{Object_0 material{Material_0}}
Post a reply to this message
Attachments:
Download 'fig1_sem-pov_comparison.png' (657 KB)
Preview of image 'fig1_sem-pov_comparison.png'
|
|
| |
| |
|
|
|
|
| |
| |
|
|
On 12/02/2013 8:08 PM, kmcpeak wrote:
> Attached is the best so far. It is definitely better than my previous effort but
> I don't seem to be able to get the sides of the pyramids closest to the silicon
> surface to have highlights, like they do in the microscopy image. I think this
> is key to the 3d look.
Try rounding the edges of the pyramids. That will give the light
something to bounce off of, back to the camera. Remember, nothing is
mathematically smooth or has perfectly straight edges.
--
Regards
Stephen
Post a reply to this message
|
|
| |
| |
|
|
|
|
| |
| |
|
|
kmcpeak wrote:
> Thank you all for your help! I added radiosity, moved the light source above the
> scene,
are you sure? The lower sides of the holes still seem to be darker.
It appears to me that your camera is looking "down" from positive y
axis, and I'm not really sure what the default camera rotation is then.
You might wish to specify an explicit "up" vector for the camera.
Just for fun, you can also take you existing image and rotate it 180
degree in an image processing program to evaluate the effect.
> I also tried an area_light but as Cousin Ricky pointed out it doesn't seem to make a
difference.
It might when used with the area_illumination keyword (requires 3.7 RC)
> I don't seem to be able to get the sides of the pyramids closest to the silicon
> surface to have highlights,
This may depend on how "rounded" the edges of the holes are modelled
in the mesh. If there is just a mathematically perfect angle they will
not show a highlight.
Post a reply to this message
|
|
| |
| |
|
|
|
|
| |
| |
|
|
On 02/12/2013 03:08 PM, kmcpeak wrote:
> "Samuel Benge" <stb### [at] hotmailcom> wrote:
>> "kmcpeak" <kmc### [at] ethzch> wrote:
>>> I would like to make
>>> the POV ray image look more 3D, more specifically I would like the pyramids to
>>> look like they go into the surface whereas now most people think they come out
>>> of the surface. The microscopy image does a good job of this.
>>
>> Hi kmcpeak,
>>
>> Notice in the SEM(?) image how the pyramids become darker the farther in they
>> go. This makes their true orientations almost unmistakable. A large area_light
>> in your scene should help, or radiosity, as clipka said.
>>
>> Also, in your rendered image, the pyramids seem to be coming out of the surface
>> partly because of where your light_source is situated. People tend to assume
>> that light is always coming from above, thus when viewing your image they think
>> the pyramids are protruding instead of intruding. Try repositioning your
>> light_source above (+y, +z) the scene, as it is in the micrograph.
>>
>> With those two things taken care of, there should be no doubt when people view
>> your image.
>>
>> Sam
>
> Thank you all for your help! I added radiosity, moved the light source above the
> scene, increased brilliance to 1.5 (I tried larger values as well) and added a
> bit of specular. I also tried an area_light but as Cousin Ricky pointed out it
> doesn't seem to make a difference.
>
> Attached is the best so far. It is definitely better than my previous effort but
> I don't seem to be able to get the sides of the pyramids closest to the silicon
> surface to have highlights, like they do in the microscopy image. I think this
> is key to the 3d look.
>
> Code is below (sans mesh) and image attached:
>
> #include "colors.inc"
> #include "rad_def.inc"
>
> global_settings{
> radiosity
> {
> Rad_Settings(Radiosity_Final,off,off) // I tried all the different macro
> quality settings
> }
> }
>
> background { color White }
>
> #declare Tex_Silicon =
> texture {
> pigment {color rgb <0.46, 0.48, 0.55>}
> //normal {bumps 0.1}
> finish {
> ambient 0
> brilliance 1.5 // tried as high as 5
> //diffuse 0.9
> specular 0.15
> roughness 0.01
> }
> }
>
> #declare Material_0=material{
> texture {Tex_Silicon }
> }
>
> camera {
> location <-5.00000, 55, 0.000000>
> look_at <0.000000, 0.000000, 0.000000>
> right x*image_width/image_height
> }
>
> light_source {
> <0,100,0> //<+up and -down, height, -right and +left>
> color White
> area_light <20, 0, 0>, <0, 0, 20>, 10, 10
> adaptive 1
> jitter
> }
>
> object{Object_0 material{Material_0}}
>
>
>
The specular/roughness seems a bit off (look at the pyramid edges) ..
another idea might be to play around with light fading:
http://wiki.povray.org/content/Reference:Light_Source#Light_Fading
BTW: looks much better than first attempt
Post a reply to this message
|
|
| |
| |
|
|
|
|
| |
| |
|
|
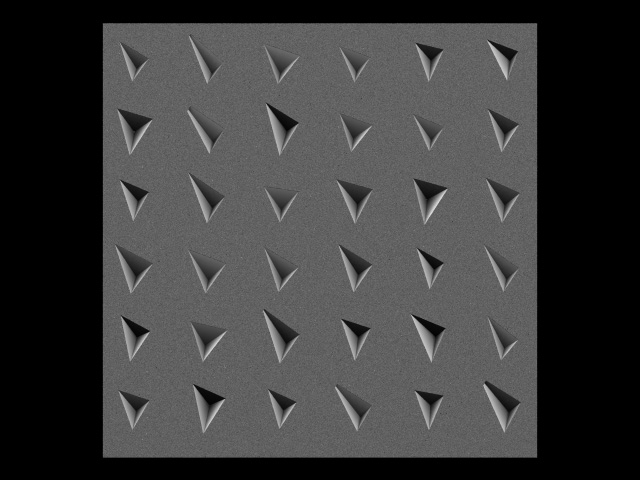
I cobbled together a scene similar to the one posted, and it's really hard to
get that SEM 'look.' Even more irritating is that the indents almost always look
like bumps. I tried lights, radiosity with no lights, a radiosity 'ring' around
the object, no_shadow, etc. This is the closest I've gotten--and it still looks
somewhat ambiguous.
There's something intrinsic to electron microscope and SEM images that might
make recreating the look with a 'standard' lighting setup difficult.
Most such images appear to have 'lighting' that *surrounds* the object--except
in the front. And no shadows, in the usual meaning. They almost look like
photographic negatives. (I found one image--a really cool one of an ant--and
'inverted' it in Photoshop; the result looks like it's lit with a SINGLE light
source, shining directly from the camera position...and with a rapid fall-off of
light on all the side/slanting surfaces.) How to get the reverse of that with
'positive' lighting may not be so easy. For example, it's hard to get regular
light sources to 'fall off' in brightness in just such a way as those SEM
indents show. If the object was like an ant--in other words, a detailed 3D model
in space--then maybe a radiosity set-up might work, using a white HEMISPHERE
behind the model as the only 'light source.' But a simple planar surface--like
the OP's model--can't take advantage of that.
So my final idea was kind of a cheat: to color the planar surface with a
gradient y pigment, receding into the surface--somewhat dark at the very
surface, then immediately lighter, then falling to darkness again to the bottom
of the pits. And using two area lights to either side.
Post a reply to this message
Attachments:
Download 'sem_image_trial.jpg' (81 KB)
Preview of image 'sem_image_trial.jpg'
|
|
| |
| |
|
|
|
|
| |
|
|