|
 |
"Samuel Benge" <stb### [at] hotmail com> wrote:
> "kmcpeak" <kmc### [at] ethzch> wrote:
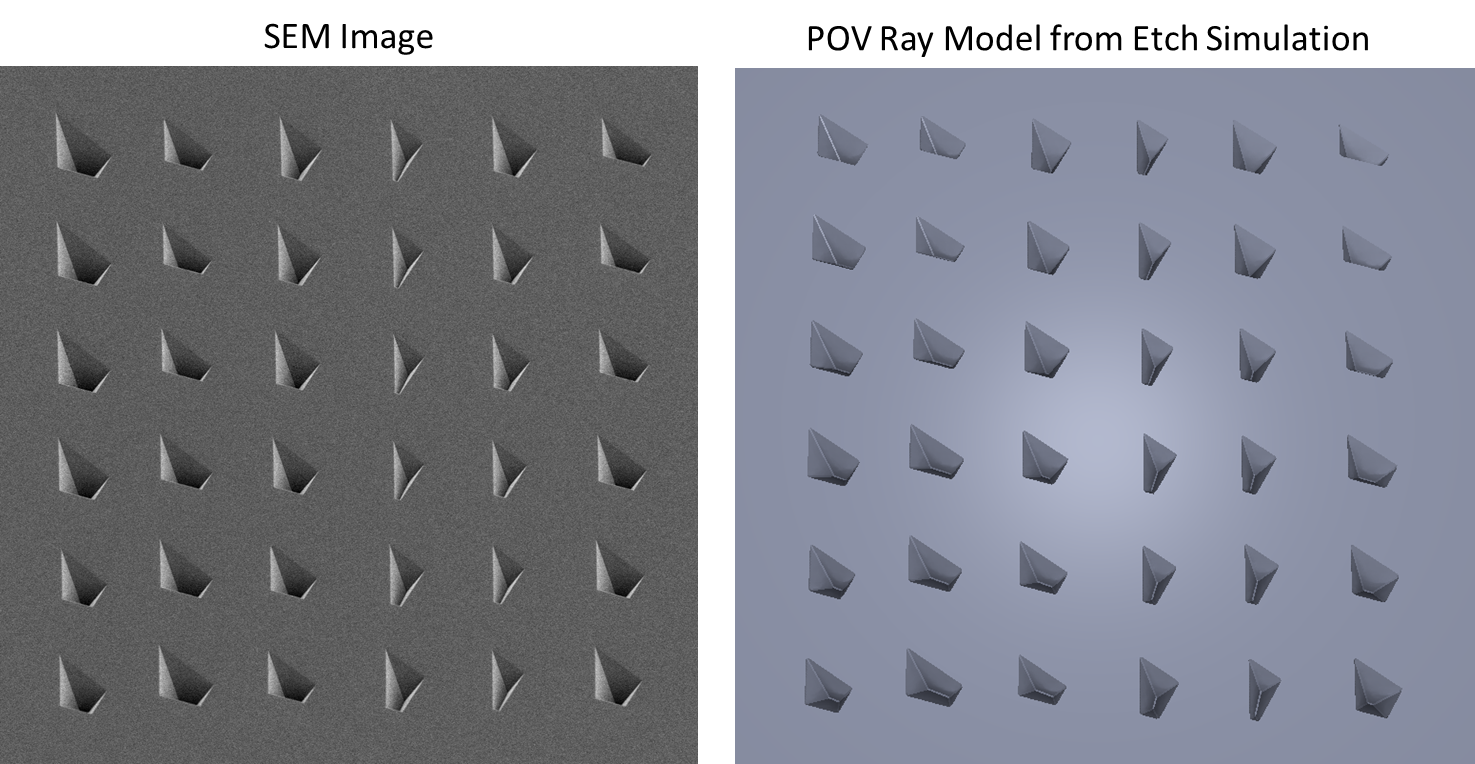
> > I would like to make
> > the POV ray image look more 3D, more specifically I would like the pyramids to
> > look like they go into the surface whereas now most people think they come out
> > of the surface. The microscopy image does a good job of this.
>
> Hi kmcpeak,
>
> Notice in the SEM(?) image how the pyramids become darker the farther in they
> go. This makes their true orientations almost unmistakable. A large area_light
> in your scene should help, or radiosity, as clipka said.
>
> Also, in your rendered image, the pyramids seem to be coming out of the surface
> partly because of where your light_source is situated. People tend to assume
> that light is always coming from above, thus when viewing your image they think
> the pyramids are protruding instead of intruding. Try repositioning your
> light_source above (+y, +z) the scene, as it is in the micrograph.
>
> With those two things taken care of, there should be no doubt when people view
> your image.
>
> Sam
Thank you all for your help! I added radiosity, moved the light source above the
scene, increased brilliance to 1.5 (I tried larger values as well) and added a
bit of specular. I also tried an area_light but as Cousin Ricky pointed out it
doesn't seem to make a difference.
Attached is the best so far. It is definitely better than my previous effort but
I don't seem to be able to get the sides of the pyramids closest to the silicon
surface to have highlights, like they do in the microscopy image. I think this
is key to the 3d look.
Code is below (sans mesh) and image attached:
#include "colors.inc"
#include "rad_def.inc"
global_settings{
radiosity
{
Rad_Settings(Radiosity_Final,off,off) // I tried all the different macro
quality settings
}
}
background { color White }
#declare Tex_Silicon =
texture {
pigment {color rgb <0.46, 0.48, 0.55>}
//normal {bumps 0.1}
finish {
ambient 0
brilliance 1.5 // tried as high as 5
//diffuse 0.9
specular 0.15
roughness 0.01
}
}
#declare Material_0=material{
texture {Tex_Silicon }
}
camera {
location <-5.00000, 55, 0.000000>
look_at <0.000000, 0.000000, 0.000000>
right x*image_width/image_height
}
light_source {
<0,100,0> //<+up and -down, height, -right and +left>
color White
area_light <20, 0, 0>, <0, 0, 20>, 10, 10
adaptive 1
jitter
}
object{Object_0 material{Material_0}} com> wrote:
> "kmcpeak" <kmc### [at] ethzch> wrote:
> > I would like to make
> > the POV ray image look more 3D, more specifically I would like the pyramids to
> > look like they go into the surface whereas now most people think they come out
> > of the surface. The microscopy image does a good job of this.
>
> Hi kmcpeak,
>
> Notice in the SEM(?) image how the pyramids become darker the farther in they
> go. This makes their true orientations almost unmistakable. A large area_light
> in your scene should help, or radiosity, as clipka said.
>
> Also, in your rendered image, the pyramids seem to be coming out of the surface
> partly because of where your light_source is situated. People tend to assume
> that light is always coming from above, thus when viewing your image they think
> the pyramids are protruding instead of intruding. Try repositioning your
> light_source above (+y, +z) the scene, as it is in the micrograph.
>
> With those two things taken care of, there should be no doubt when people view
> your image.
>
> Sam
Thank you all for your help! I added radiosity, moved the light source above the
scene, increased brilliance to 1.5 (I tried larger values as well) and added a
bit of specular. I also tried an area_light but as Cousin Ricky pointed out it
doesn't seem to make a difference.
Attached is the best so far. It is definitely better than my previous effort but
I don't seem to be able to get the sides of the pyramids closest to the silicon
surface to have highlights, like they do in the microscopy image. I think this
is key to the 3d look.
Code is below (sans mesh) and image attached:
#include "colors.inc"
#include "rad_def.inc"
global_settings{
radiosity
{
Rad_Settings(Radiosity_Final,off,off) // I tried all the different macro
quality settings
}
}
background { color White }
#declare Tex_Silicon =
texture {
pigment {color rgb <0.46, 0.48, 0.55>}
//normal {bumps 0.1}
finish {
ambient 0
brilliance 1.5 // tried as high as 5
//diffuse 0.9
specular 0.15
roughness 0.01
}
}
#declare Material_0=material{
texture {Tex_Silicon }
}
camera {
location <-5.00000, 55, 0.000000>
look_at <0.000000, 0.000000, 0.000000>
right x*image_width/image_height
}
light_source {
<0,100,0> //<+up and -down, height, -right and +left>
color White
area_light <20, 0, 0>, <0, 0, 20>, 10, 10
adaptive 1
jitter
}
object{Object_0 material{Material_0}}
Post a reply to this message
Attachments:
Download 'fig1_sem-pov_comparison.png' (657 KB)
Preview of image 'fig1_sem-pov_comparison.png'
|
|