|
|
|
|
|
|
| |
| |
|
|
|
|
| |
| |
|
|
Patrick Dugan wrote:
>
> That type would certainly be close. I am looking for a more "slate
> like"/"platey" appearance but that might get me started.
> Can you be more specific about the function? I have tried the function but
> simply end up with a "rounded box." I tried:
>
> isosurface {
> function {f_rounded_box(x,y,z, 0.25, 0.25, 0.25, 0.25) }
> pigment{Red}
> scale 0.5
> }
>
> I'm no math whiz so I'm really not certain what the last four values should
> really be. I've tried various values but always end up with a simple
> rounded box. How do you get yours to look so randomish? I even tried using
> [...]
When looking for 'f_rounded_box' in the docs you get:
f_rounded_box(x,y,z, P0, P1, P2, P3).
The Rounded Box is defined in a cube from <-1, -1, -1> to <1, 1, 1>.
By changing the " Scale" parameters, the size can be adjusted,
without affecting the Radius of curvature.
P0 : Radius of curvature. Zero gives square corners, 0.1 gives corners
that match "sphere {0, 0.1}"
P1 : Scale x
P2 : Scale y
P3 : Scale z
If you add/subtract a noise function to the box this should probably
achieve what you want, something like:
f_rounded_box(...) - f_noise3d(x, y, z)*0.2
(see docs section 3.6.3.6)
And you should add an appropriate container and max_gradient to the
isosurface.
Christoph
--
POV-Ray tutorials, IsoWood include,
TransSkin and more: http://www.tu-bs.de/~y0013390/
Last updated 18 Mar. 2002 _____./\/^>_*_<^\/\.______
Post a reply to this message
|
|
| |
| |
|
|
|
|
| |
| |
|
|
Well I have read the tutorials and attempted to create "something" that I
was pretty certain
would make a rough box shape. Instead it is perfectly square. For example:
isosurface {
function { f_rounded_box(x,y,z,0,1,1,1) - f_noise3d(x*5, y*5, z*5)*
0.25 }
pigment{Red}
scale 0.2
}
I wanted a sharp cornered rounded box with some turbulence to it. I felt the
second function
f_noise3d(x*5, y*5, z*5)* 0.25
(shown in the tutorial under the sphere example) should do what I wanted.
From the tutorial it
seemed to be the most likely function, but it apparently isn't.
"Christoph Hormann" <chr### [at] gmx de> wrote in message
news:3C9CACC2.D0857FB6@gmx.de...
>
>
> Patrick Dugan wrote:
> >
> > How do/can you make a isosurface box that has a "rough" surface?
>
> Have a look at:
>
> http://www-public.tu-bs.de:8080/~y0013390/pov/wtunnel.html
>
> for an example (note this is megapov syntax).
>
> The isosurface tutorial in the Povray 3.5 docs should also give sufficient
> explanation how to add 'roughness' to a shape.
>
> Christoph
>
> --
> POV-Ray tutorials, IsoWood include,
> TransSkin and more: http://www.tu-bs.de/~y0013390/
> Last updated 18 Mar. 2002 _____./\/^>_*_<^\/\.______ de> wrote in message
news:3C9CACC2.D0857FB6@gmx.de...
>
>
> Patrick Dugan wrote:
> >
> > How do/can you make a isosurface box that has a "rough" surface?
>
> Have a look at:
>
> http://www-public.tu-bs.de:8080/~y0013390/pov/wtunnel.html
>
> for an example (note this is megapov syntax).
>
> The isosurface tutorial in the Povray 3.5 docs should also give sufficient
> explanation how to add 'roughness' to a shape.
>
> Christoph
>
> --
> POV-Ray tutorials, IsoWood include,
> TransSkin and more: http://www.tu-bs.de/~y0013390/
> Last updated 18 Mar. 2002 _____./\/^>_*_<^\/\.______
Post a reply to this message
|
|
| |
| |
|
|
|
|
| |
| |
|
|
Patrick Dugan wrote:
>
> [...}
> isosurface {
> function { f_rounded_box(x,y,z,0,1,1,1) - f_noise3d(x*5, y*5, z*5)*
> 0.25 }
> pigment{Red}
> scale 0.2
> }
>
> [...]
> From the tutorial it
> seemed to be the most likely function, but it apparently isn't.
As said in the other post you need an appropriate container object. In
your example all surfaces are outside the (default) container, therefore
you only see the container itself.
Christoph
--
POV-Ray tutorials, IsoWood include,
TransSkin and more: http://www.tu-bs.de/~y0013390/
Last updated 18 Mar. 2002 _____./\/^>_*_<^\/\.______
Post a reply to this message
|
|
| |
| |
|
|
|
|
| |
| |
|
|
I tried:
isosurface {
function { f_rounded_box(x,y,z,0,1,1,1) - f_noise3d(x, y, z)* 0.25 }
contained_by { box { -1 , 1} }
pigment{Red}
scale 0.2
}
but this yields a perfectly square box. No roughness at all. Would the
max_gradient make or break this?
"Christoph Hormann" <chr### [at] gmxde> wrote in message
news:3C9CB5CA.CA4992BB@gmx.de...
>
>
> Patrick Dugan wrote:
> >
> > That type would certainly be close. I am looking for a more "slate
> > like"/"platey" appearance but that might get me started.
> > Can you be more specific about the function? I have tried the function
but
> > simply end up with a "rounded box." I tried:
> >
> > isosurface {
> > function {f_rounded_box(x,y,z, 0.25, 0.25, 0.25, 0.25) }
> > pigment{Red}
> > scale 0.5
> > }
> >
> > I'm no math whiz so I'm really not certain what the last four values
should
> > really be. I've tried various values but always end up with a simple
> > rounded box. How do you get yours to look so randomish? I even tried
using
> > [...]
>
> When looking for 'f_rounded_box' in the docs you get:
>
> f_rounded_box(x,y,z, P0, P1, P2, P3).
> The Rounded Box is defined in a cube from <-1, -1, -1> to <1, 1, 1>.
> By changing the " Scale" parameters, the size can be adjusted,
> without affecting the Radius of curvature.
>
> P0 : Radius of curvature. Zero gives square corners, 0.1 gives corners
> that match "sphere {0, 0.1}"
> P1 : Scale x
> P2 : Scale y
> P3 : Scale z
>
> If you add/subtract a noise function to the box this should probably
> achieve what you want, something like:
>
> f_rounded_box(...) - f_noise3d(x, y, z)*0.2
>
> (see docs section 3.6.3.6)
>
> And you should add an appropriate container and max_gradient to the
> isosurface.
>
> Christoph
>
> --
> POV-Ray tutorials, IsoWood include,
> TransSkin and more: http://www.tu-bs.de/~y0013390/
> Last updated 18 Mar. 2002 _____./\/^>_*_<^\/\.______
Post a reply to this message
|
|
| |
| |
|
|
|
|
| |
| |
|
|
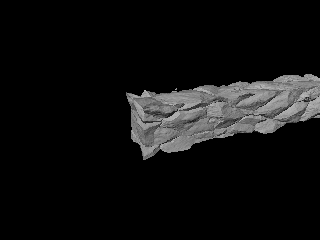
"Patrick Dugan" <pat### [at] netinsnet> wrote in message
news:3c9c9e4e@news.povray.org...
> How do/can you make a isosurface box that has a "rough" surface?
> I have a (poor) image I made by hand of a "turbulent" box shape.
Basically
> I am trying to
> make boxes that look like randomly made rectangular stones that have been
> placed within
> a stone wall (like a fireplace) but have been chipped to be somewhat
> rectangular so they
> can be placed somewhat close together.
I was just doing that too after talking to Tom about stone walls and
talking to my lovely wife about the stone wall we want in the front yard.
Here's what I've got so far, there are some odd things in it from left over
experiments but I think the basics are there. Hopefully it doesn't wrap
funny...
////////////// Camera //////////////////////
camera { //
right < 1.333, 0.0, 0.0 > //
up < 0.0, 1.0, 0.0 > //
direction < 0.0, 0.0, 1.0 > //
location < 3.0, 3.0, 7.0 >
look_at < 0.0, 0.0, 0.0 > //
} //
////////////// end Camera //////////////////
/////////////// Light ////////////////
light_source { < 1000.0, 1000.0, 1000.0 >
color rgb < 1.0, 1.0, 1.0 > }
#declare Rock=function{
pigment{
crackle
turbulence 0.25
color_map { [0 rgb 1] [1 rgb 0] }
scale < 0.5, 0.25, 0.5 >*3
}
}
#declare Wall1 = function { max((x*x*x-1),(y*y-1),(z*z-1)) }
#declare RockWall =
isosurface {
function {
Wall1(x,y,z)
+Rock(x,y,z).x
*0.5
}
contained_by { box { <-8.0,-1.5,-1.5 >,
< 8.0, 1.5, 1.5 > }
accuracy 0.0001
max_gradient 25
pigment { rgb 1 }
finish { ambient 0.125 }
translate < 0.0, 0.0, 0.0 >
}
object { RockWall }
Post a reply to this message
Attachments:
Download 'RockWall02.jpg' (15 KB)
Preview of image 'RockWall02.jpg'

|
|
| |
| |
|
|
|
|
| |
| |
|
|
Yes! Thank you!
isosurface {
function { f_rounded_box(x,y,z,0,0.75,0.75,0.75) - f_noise3d(x, y, z)*
0.25 }
contained_by { box { -1 , 1} }
max_gradient 0.5
pigment{Red}
scale 0.2
}
I made the function smaller than the box and finally got something like I
want.
(I'm sorry I'm so dense about this.)
"Christoph Hormann" <chr### [at] gmxde> wrote in message
news:3C9CB8C2.E4D0FC55@gmx.de...
>
>
> Patrick Dugan wrote:
> >
> > [...}
> > isosurface {
> > function { f_rounded_box(x,y,z,0,1,1,1) - f_noise3d(x*5, y*5, z*5)*
> > 0.25 }
> > pigment{Red}
> > scale 0.2
> > }
> >
> > [...]
> > From the tutorial it
> > seemed to be the most likely function, but it apparently isn't.
>
> As said in the other post you need an appropriate container object. In
> your example all surfaces are outside the (default) container, therefore
> you only see the container itself.
>
> Christoph
>
> --
> POV-Ray tutorials, IsoWood include,
> TransSkin and more: http://www.tu-bs.de/~y0013390/
> Last updated 18 Mar. 2002 _____./\/^>_*_<^\/\.______
Post a reply to this message
|
|
| |
| |
|
|
|
|
| |
| |
|
|
I tweaked it some more and finally got this:
isosurface {
function { f_rounded_box(x,y,z,0,0.85,0.85,0.85) - f_noise3d(x*5, y*5,
z*5)* 0.05 }
contained_by { box { -1 , 1} }
max_gradient 25
pigment {
gradient y
color_map {
[0.00 color Gray90]
[0.20 color Gray30]
[0.40 color Gray80]
[0.60 color Gray20]
[0.80 color Gray10]
[1.00 color Gray80]
}
turbulence 0.75
scale <1,0.1,1>
}
finish {ambient 0.4}
scale <0.3,0.1,0.3>
}
That was the look I was trying to achieve. Thanks for your help!
"Christoph Hormann" <chr### [at] gmxde> wrote in message
news:3C9CB8C2.E4D0FC55@gmx.de...
>
>
> Patrick Dugan wrote:
> >
> > [...}
> > isosurface {
> > function { f_rounded_box(x,y,z,0,1,1,1) - f_noise3d(x*5, y*5, z*5)*
> > 0.25 }
> > pigment{Red}
> > scale 0.2
> > }
> >
> > [...]
> > From the tutorial it
> > seemed to be the most likely function, but it apparently isn't.
>
> As said in the other post you need an appropriate container object. In
> your example all surfaces are outside the (default) container, therefore
> you only see the container itself.
>
> Christoph
>
> --
> POV-Ray tutorials, IsoWood include,
> TransSkin and more: http://www.tu-bs.de/~y0013390/
> Last updated 18 Mar. 2002 _____./\/^>_*_<^\/\.______
Post a reply to this message
|
|
| |
| |
|
|
|
|
| |
| |
|
|
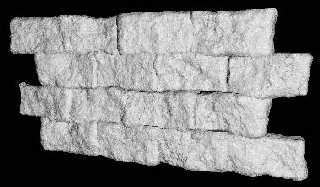
this is the code i used. scaling the wrinkles pigment gives different
'smoothness' of bricks. i guess granite or bumps would do just as well.
the random seed also makes sure every brick is different. you could also
try messing around with the gray value.
john
/////
#declare f_rounded_box = function { internal(60) }
#declare rndm = seed(14577);
#macro aBrick(Seed)
#local W1 = function { pigment {wrinkles scale 2.5 translate
<Seed,Seed,Seed> } }
isosurface {
function { f_rounded_box(x,y,z,0.01,1.5,0.7,0.3) - W1(x,y,z).gray*0.65 }
threshold 0
max_gradient 1.7
accuracy 0.01
contained_by { box {<-2,-1,-1>,<2,1,0>} }
scale 10
pigment { rgb 0.975 }
finish { ambient 0.1 diffuse 0.8 reflection { 0 }specular 0.1 roughness
0.005 }
}
#end
#declare yC = 0;
#while(yC < 50)
#declare xC = -50;
#while(xC < 50)
object { aBrick(rand(rndm)*999999) translate <xC,yC,0> }
object { aBrick(rand(rndm)*999999) translate <xC-16.5,yC+18,0> }
#declare xC = xC + 33;
#end
#declare yC = yC + 36;
#end
camera {
location <50,50,-150>
look_at <0,25,0>
}
light_source { <100,50,-200> rgb 1 }
///////
"Patrick Dugan" <pat### [at] netinsnet> wrote in message
news:3c9cddec@news.povray.org...
> I tweaked it some more and finally got this:
>
> isosurface {
> function { f_rounded_box(x,y,z,0,0.85,0.85,0.85) - f_noise3d(x*5,
y*5,
> z*5)* 0.05 }
> contained_by { box { -1 , 1} }
> max_gradient 25
> pigment {
> gradient y
> color_map {
> [0.00 color Gray90]
> [0.20 color Gray30]
> [0.40 color Gray80]
> [0.60 color Gray20]
> [0.80 color Gray10]
> [1.00 color Gray80]
> }
> turbulence 0.75
> scale <1,0.1,1>
> }
> finish {ambient 0.4}
> scale <0.3,0.1,0.3>
> }
>
> That was the look I was trying to achieve. Thanks for your help!
>
>
> "Christoph Hormann" <chr### [at] gmxde> wrote in message
> news:3C9CB8C2.E4D0FC55@gmx.de...
> >
> >
> > Patrick Dugan wrote:
> > >
> > > [...}
> > > isosurface {
> > > function { f_rounded_box(x,y,z,0,1,1,1) - f_noise3d(x*5, y*5,
z*5)*
> > > 0.25 }
> > > pigment{Red}
> > > scale 0.2
> > > }
> > >
> > > [...]
> > > From the tutorial it
> > > seemed to be the most likely function, but it apparently isn't.
> >
> > As said in the other post you need an appropriate container object. In
> > your example all surfaces are outside the (default) container, therefore
> > you only see the container itself.
> >
> > Christoph
> >
> > --
> > POV-Ray tutorials, IsoWood include,
> > TransSkin and more: http://www.tu-bs.de/~y0013390/
> > Last updated 18 Mar. 2002 _____./\/^>_*_<^\/\.______
>
>
Post a reply to this message
Attachments:
Download 'wall.jpg' (19 KB)
Preview of image 'wall.jpg'
|
|
| |
| |
|
|
|
|
| |
| |
|
|
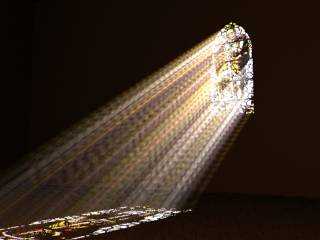
i had to set the light source to be a really high rgb value. for some
reason i had to also put a plane behind the stain glass or it just came out
looking dull. heres a 'makeshift' bit of code.
john
////////
global_settings {
ambient_light rgb 0.0
max_trace_level 10
radiosity {
pretrace_start 0.08
pretrace_end 0.02
count 100
nearest_count 8
error_bound 1.15
recursion_limit 6
low_error_factor 0.6
adc_bailout 1/255
gray_threshold 0.05
minimum_reuse 0.015
brightness 0.125
max_sample -1
normal on
}
}
media {
intervals 50
scattering { 2, rgb 0.005 }
samples 1, 5
confidence 0.95
variance 1/128
ratio 0.9
}
#declare Dull = finish { ambient 0.05 diffuse 0.3 reflection 0.0 specular 1
roughness 0.001 }
#declare Cutty =
union {
box {<-15,-40,-2>,<15,0,2>}
intersection {
cylinder {<-10,0,-2>,<-10,0,2>,25}
cylinder {<10,0,-2.1>,<10,0,2.1>,25}
}
}
difference {
box {<-210,-110,31>,<210,130,-340>}
box {<-200,-50,29>,<200,125,-330>}
object { Cutty translate <0,40,30> }
pigment { rgb 1 }
finish {
ambient 0.1
diffuse 0.8
reflection { 0 }
specular 0.1
roughness 0.005
}
normal { granite 0.2 scale 1 }
}
box {<-16,-1,30.5>,<16,70,30.6>
pigment {
image_map { gif "bruce4.gif" interpolate 2 filter all 0.6}
translate <-0.5,0,0>
scale <32,75,1>*0.8
}
finish { Dull }
}
camera {
perspective
location <85,-30,-190>
direction <0,0,1.5>
look_at <-55,0,30>
}
light_source { <0,60,-260> rgb <1,0.5,0.2>*0.4 media_interaction off }
light_source { <0,1200,2000> rgb 25 }
background { rgb 1 }
plane {<0,0,1>,2100 hollow pigment { rgb 0.05 } finish { Dull }}
/////////////////// the end
"Alastair Murray" <ala### [at] hotmailcom> wrote in message
news:3c9cab9b$1@news.povray.org...
> How did you get the light to shine through the dust like that?
>
> Sources would be incredibly useful.
>
>
> "John & Amy Robinson" <jro### [at] columbusrrcom> wrote in message
> news:3c9ca1c3$1@news.povray.org...
> >
> > "Patrick Dugan" <pat### [at] netinsnet> wrote in message
> > news:3c9c9e4e@news.povray.org...
> > > How do/can you make a isosurface box that has a "rough" surface?
> > > I have a (poor) image I made by hand of a "turbulent" box shape.
> > Basically
> > > I am trying to
> > > make boxes that look like randomly made rectangular stones that have
> been
> > > placed within
> > > a stone wall (like a fireplace) but have been chipped to be somewhat
> > > rectangular so they
> > > can be placed somewhat close together.
> > >
> > >
> > >
> > >
> > >
> > >
> > >
> > i used the f_rounded_box function for the walls in this image
> > http://www.fishinglog.com/Art/bigThe%20Keep.html
> >
> >
> >
> >
>
>
Post a reply to this message
Attachments:
Download 'light.jpg' (9 KB)
Preview of image 'light.jpg'
|
|
| |
| |
|
|
|
|
| |
| |
|
|
Bill, that looks about perfect for the type of walls you see along highways (where
they've cut through hills). Evaluating the
pigment
properly might be problematical, but I think there's a use for what you have here.
Salute,
Grim
Post a reply to this message
|
|
| |
| |
|
|
|
|
| |
|
|