|
 |
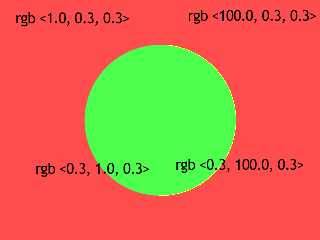
Look at the yellow one. It's the same.
"Slime" <fak### [at] email address> wrote:
> You could try turning on
> jittering (+J I think) which might help. You could also try AA method 2
> (+AM2) or, again, higher sampling count on the AA'ed pixels (+R4 or even
> +R5).
>
> - Slime
> [ http://www.slimeland.com/ ]
The whole scene: (Basically all things from the insert menu)
#include "colors.inc"
#include "metals.inc"
#include "transforms.inc"
#declare licht1 = 100/100; // arealight 1 in Prozent geteilt durch 100:
x/100
#declare licht2 = 100/100; // arealight 2
#declare licht3 = 100/100; // Spotlight 1
#declare licht4 = 100/100; // Spotlight 2
#declare text_font001 = "cyrvetic.ttf"
#if (licht1>0)
// An area light (creates soft shadows)
// WARNING: This special light can significantly slow down rendering times!
light_source {
0*x // light's position (translated below)
color rgb 0.3*licht1 // light's color
area_light
<8, 0, 0> <0, 0, 8> // lights spread out across this distance (x * z)
4, 4 // total number of lights in grid (4x*4z = 16 lights)
adaptive 0 // 0,1,2,3...
jitter // adds random softening of light
circular // make the shape of the light circular
orient // orient light
translate <40, 80, -40> // <x y z> position of light
}
#end
#if (licht2>0)
// An area light (creates soft shadows)
// WARNING: This special light can significantly slow down rendering times!
light_source {
0*x // light's position (translated below)
color rgb 0.8 *licht2 // light's color
area_light
<8, 0, 0> <0, 0, 8> // lights spread out across this distance (x * z)
4, 4 // total number of lights in grid (4x*4z = 16 lights)
adaptive 0 // 0,1,2,3...
jitter // adds random softening of light
circular // make the shape of the light circular
orient // orient light
translate <-40, 80, 40> // <x y z> position of light
}
#end
#if (licht3>0)
// create a point "spotlight" (conical directed) light source
light_source {
0*x // light's position (translated below)
color rgb <1,1,1>*licht3 // light's color
spotlight // this kind of light source
translate <40, 81, -40> // <x y z> position of light
point_at <0, 0, 0> // direction of spotlight
radius 5 // hotspot (inner, in degrees)
tightness 50 // tightness of falloff (1...100) lower is softer,
higher is tighter
falloff 8 // intensity falloff radius (outer, in degrees)
}
#end
#if (licht4>0)
// create a point "spotlight" (conical directed) light source
light_source {
0*x // light's position (translated below)
color rgb <1,1,1>*licht4 // light's color
spotlight // this kind of light source
translate <40, 81, -40> *< -1,1,1> // <x y z> position of light
point_at <0, 0, 0> // direction of spotlight
radius 1 // hotspot (inner, in degrees)
tightness 50 // tightness of falloff (1...100) lower is softer,
higher is tighter
falloff 1.2 // intensity falloff radius (outer, in degrees)
}
#end
camera {
// location <0.0, 6.0, -0.0> *<1.4,3,3>
location <1.0, 2.0, -5.0> *<1.4,3,1> +y*1 scale 0.022
look_at <0.0, 0.0, 0.04>
translate <0.04,0.003,0>
right x*image_width/image_height
angle 55
}
// An infinite planar surface
// plane {<A, B, C>, D } where: A*x + B*y + C*z = D
plane {
y, // <X Y Z> unit surface normal, vector points "away from surface"
0 // distance from the origin in the direction of the surface normal
hollow on // has an inside pigment?
pigment { color rgb <1.0,1.0,1.0> }
// pigment { color rgb <0.7,0.5,0.3> }
// texture { T_Wood12 finish{phong 0.4} rotate y*90 scale 0.2}
}
// Zu zeigendes Object/Macro
//
//
#macro pen (pr,pml,peakl,number_of_sides,maintex,peaktex,minetex)
// pr = penradius; pml = pen main part length; peakl = whole peak's length;
// number_of_sides = number_of_sides;
// maintex / peaktex / minetex = texture of main part / peak / mine
#local mineradius = pr/3.8;
#local plane_x = cos( 2*pi/number_of_sides / 2 ) * pr;
#local i=0;
intersection{
union{ cylinder {0 <0,pml,0> pr }
cone{ <0,peakl/10,0> pr*11/10 <0,-peakl,0> 0
texture { gradient y
texture_map {
[ 0.0 minetex ]
[ 0.3 minetex ]
[ 0.35 peaktex scale peakl/2]
[ 1.0 peaktex scale peakl/2]
}
scale peakl
}
}
}
#while (i<number_of_sides)
plane { x, plane_x
rotate y*i*360/number_of_sides
}
#local i=i+1;
#end
texture {
function{sqrt(x*x+z*z)}
texture_map {
[ 0.0 maintex ]
[ 0.935 maintex ]
[ 0.945 minetex ]
[ 1.0 minetex ]
}
scale pr
}
rotate z*-90
}
#end
//
object { pen(0.0025,0.14,0.009,6,T_Brass_2B,T_Wood10,pigment{Red})
// texture { T_Wood12 }
// T_Chrome_1A
Rotate_Around_Trans (-y*30, <0.05, 0, 0>)
translate y*0.01
} address> wrote:
> You could try turning on
> jittering (+J I think) which might help. You could also try AA method 2
> (+AM2) or, again, higher sampling count on the AA'ed pixels (+R4 or even
> +R5).
>
> - Slime
> [ http://www.slimeland.com/ ]
The whole scene: (Basically all things from the insert menu)
#include "colors.inc"
#include "metals.inc"
#include "transforms.inc"
#declare licht1 = 100/100; // arealight 1 in Prozent geteilt durch 100:
x/100
#declare licht2 = 100/100; // arealight 2
#declare licht3 = 100/100; // Spotlight 1
#declare licht4 = 100/100; // Spotlight 2
#declare text_font001 = "cyrvetic.ttf"
#if (licht1>0)
// An area light (creates soft shadows)
// WARNING: This special light can significantly slow down rendering times!
light_source {
0*x // light's position (translated below)
color rgb 0.3*licht1 // light's color
area_light
<8, 0, 0> <0, 0, 8> // lights spread out across this distance (x * z)
4, 4 // total number of lights in grid (4x*4z = 16 lights)
adaptive 0 // 0,1,2,3...
jitter // adds random softening of light
circular // make the shape of the light circular
orient // orient light
translate <40, 80, -40> // <x y z> position of light
}
#end
#if (licht2>0)
// An area light (creates soft shadows)
// WARNING: This special light can significantly slow down rendering times!
light_source {
0*x // light's position (translated below)
color rgb 0.8 *licht2 // light's color
area_light
<8, 0, 0> <0, 0, 8> // lights spread out across this distance (x * z)
4, 4 // total number of lights in grid (4x*4z = 16 lights)
adaptive 0 // 0,1,2,3...
jitter // adds random softening of light
circular // make the shape of the light circular
orient // orient light
translate <-40, 80, 40> // <x y z> position of light
}
#end
#if (licht3>0)
// create a point "spotlight" (conical directed) light source
light_source {
0*x // light's position (translated below)
color rgb <1,1,1>*licht3 // light's color
spotlight // this kind of light source
translate <40, 81, -40> // <x y z> position of light
point_at <0, 0, 0> // direction of spotlight
radius 5 // hotspot (inner, in degrees)
tightness 50 // tightness of falloff (1...100) lower is softer,
higher is tighter
falloff 8 // intensity falloff radius (outer, in degrees)
}
#end
#if (licht4>0)
// create a point "spotlight" (conical directed) light source
light_source {
0*x // light's position (translated below)
color rgb <1,1,1>*licht4 // light's color
spotlight // this kind of light source
translate <40, 81, -40> *< -1,1,1> // <x y z> position of light
point_at <0, 0, 0> // direction of spotlight
radius 1 // hotspot (inner, in degrees)
tightness 50 // tightness of falloff (1...100) lower is softer,
higher is tighter
falloff 1.2 // intensity falloff radius (outer, in degrees)
}
#end
camera {
// location <0.0, 6.0, -0.0> *<1.4,3,3>
location <1.0, 2.0, -5.0> *<1.4,3,1> +y*1 scale 0.022
look_at <0.0, 0.0, 0.04>
translate <0.04,0.003,0>
right x*image_width/image_height
angle 55
}
// An infinite planar surface
// plane {<A, B, C>, D } where: A*x + B*y + C*z = D
plane {
y, // <X Y Z> unit surface normal, vector points "away from surface"
0 // distance from the origin in the direction of the surface normal
hollow on // has an inside pigment?
pigment { color rgb <1.0,1.0,1.0> }
// pigment { color rgb <0.7,0.5,0.3> }
// texture { T_Wood12 finish{phong 0.4} rotate y*90 scale 0.2}
}
// Zu zeigendes Object/Macro
//
//
#macro pen (pr,pml,peakl,number_of_sides,maintex,peaktex,minetex)
// pr = penradius; pml = pen main part length; peakl = whole peak's length;
// number_of_sides = number_of_sides;
// maintex / peaktex / minetex = texture of main part / peak / mine
#local mineradius = pr/3.8;
#local plane_x = cos( 2*pi/number_of_sides / 2 ) * pr;
#local i=0;
intersection{
union{ cylinder {0 <0,pml,0> pr }
cone{ <0,peakl/10,0> pr*11/10 <0,-peakl,0> 0
texture { gradient y
texture_map {
[ 0.0 minetex ]
[ 0.3 minetex ]
[ 0.35 peaktex scale peakl/2]
[ 1.0 peaktex scale peakl/2]
}
scale peakl
}
}
}
#while (i<number_of_sides)
plane { x, plane_x
rotate y*i*360/number_of_sides
}
#local i=i+1;
#end
texture {
function{sqrt(x*x+z*z)}
texture_map {
[ 0.0 maintex ]
[ 0.935 maintex ]
[ 0.945 minetex ]
[ 1.0 minetex ]
}
scale pr
}
rotate z*-90
}
#end
//
object { pen(0.0025,0.14,0.009,6,T_Brass_2B,T_Wood10,pigment{Red})
// texture { T_Wood12 }
// T_Chrome_1A
Rotate_Around_Trans (-y*30, <0.05, 0, 0>)
translate y*0.01
}
Post a reply to this message
|
|
|
|
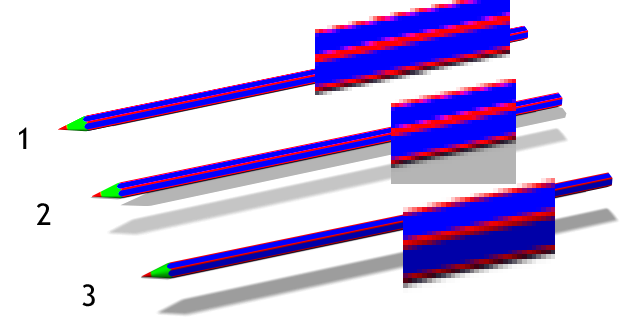
Here is your image. My suspicion was that the background was so bright that
it was "drowning out" the pen colors along the edges. To a small extent this
was true. As you point out, the problem still occurs to some degree with a
background which is not too bright.
I had to change your textures to solid red, green and blue because they were
causing parse errors; not sure why. The images were rendered with the
settings +A0.1 +R4 +AM2 +J to make sure AA'ing was doing the best job it
could.
In the image, pen 1 is your original image. Pen 2 is the same image with the
plane's color set to rgb 0.63 (which is just bright enough to keep the
background white). Pen 3 is the same image with the third light source
intensity set to 0.75 and the fourth light source turned off (which creates
just enough light intensity to keep the background white, and has the effect
of not making the pen so bright).
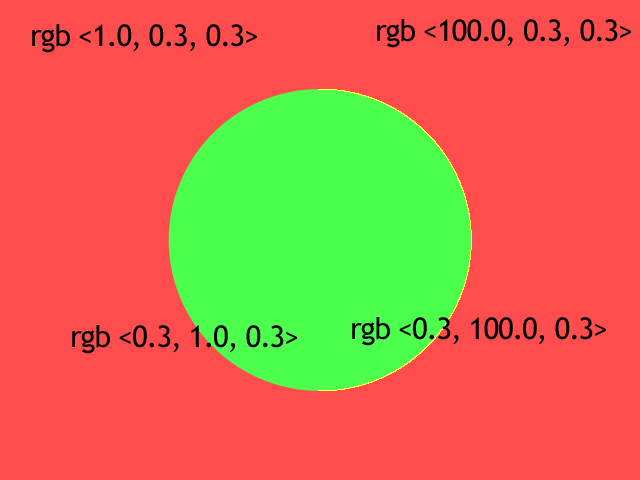
The change made in POV-Ray 3.6 that I suspected was causing your problem is
that sample values are not clamped to the range [0,1] before being averaged
to antialias. This creates the effect that with bright objects, the
antialiasing favors the brighter objects and tends to color pixels that
color. As an example of this effect, see the other image I posted. In the
image with overly bright color values, the antialiasing has no visual
effect. Notice that the pixels which would have been antialiased instead are
completely washed out in the red and green channels and are therefore
yellow.
In my opinion, pen #3 is the one with the best antialiasing. This is because
the background is not any brighter than rgb <1,1,1>, and the pen itself does
not have any overly bright color channels, so the AA'ing is doing its job.
With pen #1 (the original), both the pen and background have color values
slightly greater than 1. This causes the effect that my other image
displays; not to such a large degree, but to some degree nonetheless. Notice
the pointy part of the pen; this happens to suffer the most.
With pen #2, the background is now about rgb <1,1,1>, but the pen is still
washed out to some degree, so the antialiasing still isn't perfect because
the redness of the edge of the pen is favored in the sample averaging.
With pen #3, as I mentioned, nothing is washed out so the AA'ing is best
there (if you agree with my assessment).
You pointed out that the problem occurs with other background colors, too. I
believe this is because the pen itself is very bright because there is so
mugh light hitting it.
If you're still not happy with the result, then that's probably because
AA'ing can't really do a perfect job anyway. You're still working with
pixels so you can't get a perfectly smooth effect. I believe image #3 is as
good as it gets without a physically higher resolution (more and smaller
pixels on your monitor).
FYI, this change in POV-Ray 3.6 was made, I believe, because people
complained that their starfields with stars smaller than pixels weren't
working with AA'ing. I mentioned that the change was not worth the effects
it would have on regular scenes with bright objects and I stand by that
opinion.
- Slime
[ http://www.slimeland.com/ ]
Post a reply to this message
Attachments:
Download 'pens.png' (40 KB)
Download 'redgreenaa.png' (21 KB)
Preview of image 'pens.png'
Preview of image 'redgreenaa.png'
|
|