|
|
|
|
|
|
| |
| |
|
|
|
|
| |
| |
|
|
Just playing around trying to add a Pov CSG object (the tripod) into a photo.
Pretty pleased with the effect but I am wondering if there is an official method
of doing something like this to get better results?
I googled it and found some interesting information by Robert McGregor that I
just I didn't understand ;-)
Then I found someone who (can't recall who) mentioned using no_object to create
a scene with just the shadows which I could then merge (using code from Robert's
method) to render combine the shadow and image data.
I really have no idea what I am doing here but it seemed to work better than
expected. I could probably improve it by adding steps to my shadow scene so the
shadow raises but I would then have to lift up one of the Tripod legs as they
are currently all at the same level and as the Tripod is a CSG model that would
be a lot more effort than I have time for.
Post a reply to this message
Attachments:
Download 'composite_test.jpg' (401 KB)
Preview of image 'composite_test.jpg'

|
|
| |
| |
|
|
|
|
| |
| |
|
|
> Just playing around trying to add a Pov CSG object (the tripod) into a photo.
>
> Pretty pleased with the effect but I am wondering if there is an official method
> of doing something like this to get better results?
>
> I googled it and found some interesting information by Robert McGregor that I
> just I didn't understand ;-)
>
> Then I found someone who (can't recall who) mentioned using no_object to create
> a scene with just the shadows which I could then merge (using code from Robert's
> method) to render combine the shadow and image data.
>
> I really have no idea what I am doing here but it seemed to work better than
> expected. I could probably improve it by adding steps to my shadow scene so the
> shadow raises but I would then have to lift up one of the Tripod legs as they
> are currently all at the same level and as the Tripod is a CSG model that would
> be a lot more effort than I have time for.
>
Well done. Those shadows are quite credible.
Post a reply to this message
|
|
| |
| |
|
|
|
|
| |
| |
|
|
"s.day" <s.d### [at] uel acuk> wrote:
> Just playing around trying to add a Pov CSG object (the tripod) into a photo.
Very cool! :)
> Then I found someone who (can't recall who) mentioned using no_object to create
> a scene with just the shadows which I could then merge (using code from Robert's
> method) to render combine the shadow and image data.
Thanks for the reminder - I had a no_shadow method you might be
interested in too:
http://news.povray.org/povray.advanced-users/thread/%3C6090c6ac%241%40news.povray.org%3E/?mtop=434002
> I really have no idea what I am doing here but it seemed to work better than
> expected. I could probably improve it by adding steps to my shadow scene so the
> shadow raises but I would then have to lift up one of the Tripod legs as they
> are currently all at the same level and as the Tripod is a CSG model that would
> be a lot more effort than I have time for.
"by adding steps to my shadow scene so the shadow raises"...?
You mean so that you get self-shadowing of the legs?
Can you just add some sort of shell of the legs (scale 1.0001) over the actual
legs and use a y gradient between rgb shadowVal and rgbt1 to fake the
self-shadowing?
Or maybe just shift the actual leg geometry a bit toward the camera and use the
same pigment gradient as a shadow overlay.
Or something like that.. acuk> wrote:
> Just playing around trying to add a Pov CSG object (the tripod) into a photo.
Very cool! :)
> Then I found someone who (can't recall who) mentioned using no_object to create
> a scene with just the shadows which I could then merge (using code from Robert's
> method) to render combine the shadow and image data.
Thanks for the reminder - I had a no_shadow method you might be
interested in too:
http://news.povray.org/povray.advanced-users/thread/%3C6090c6ac%241%40news.povray.org%3E/?mtop=434002
> I really have no idea what I am doing here but it seemed to work better than
> expected. I could probably improve it by adding steps to my shadow scene so the
> shadow raises but I would then have to lift up one of the Tripod legs as they
> are currently all at the same level and as the Tripod is a CSG model that would
> be a lot more effort than I have time for.
"by adding steps to my shadow scene so the shadow raises"...?
You mean so that you get self-shadowing of the legs?
Can you just add some sort of shell of the legs (scale 1.0001) over the actual
legs and use a y gradient between rgb shadowVal and rgbt1 to fake the
self-shadowing?
Or maybe just shift the actual leg geometry a bit toward the camera and use the
same pigment gradient as a shadow overlay.
Or something like that..
Post a reply to this message
|
|
| |
| |
|
|
|
|
| |
| |
|
|
"Bald Eagle" <cre### [at] netscapenet> wrote:
> Thanks for the reminder - I had a no_shadow method you might be
> interested in too:
>
http://news.povray.org/povray.advanced-users/thread/%3C6090c6ac%241%40news.povray.org%3E/?mtop=434002
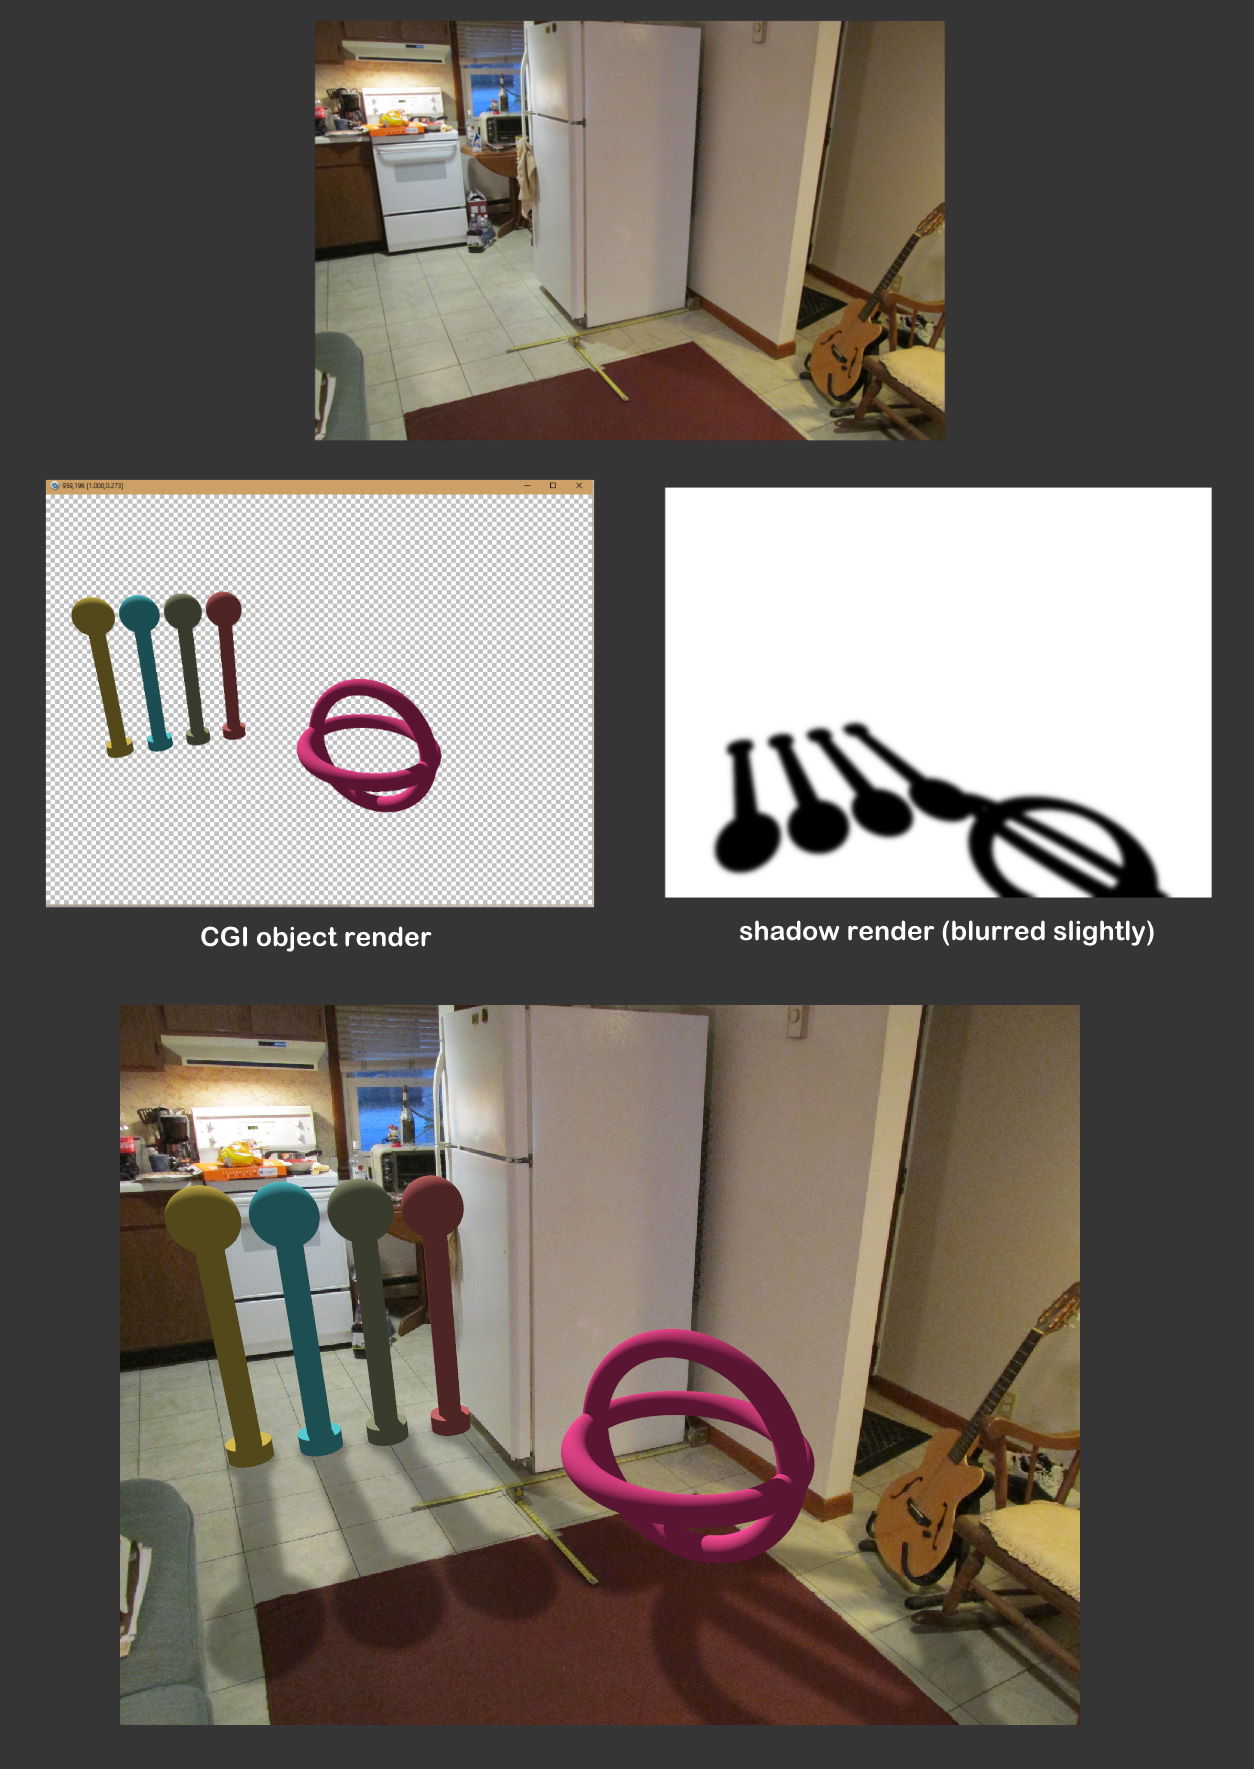
Thanks, that is an interesting approach I had not seen. My image was created by
rendering 2 images, the first just has the tripods with "no_image" set on the
tripods and a box where the ground would be to get the shadow. I tried to keep
the background similar in colour but didn't put that much effort in because as
long as it wasn't too different it had little effect on the end result.
I then had to edit that in an image editing app to tidy up the shadows a bit
(where the feet were just to lose the shadow that would be under the tripods
feet.
Attached is a scaled down copy of the edit image used.
Then I render the scene with the background and the tripods which gives a high
quality copy but without the shadows.
Finally take both images and render them using the scene below (Thanks to Robert
McGregor), I modified the final line of Robert's code to scale by
image_width/image_height but don't think I changed anything else.
#version 3.7;
global_settings { assumed_gamma 1 }
camera {
orthographic
location <0, 0, -1>
look_at <0, 0, 0>
right x*image_width/image_height
}
#declare DT_AO = 1; // the ambient occlusion map
#declare DT_Normal = 2; // the normal render map
#declare DT_Mult = 3; // the multiplied AO*Normal map
//#declare Display_Type = DT_AO;
//#declare Display_Type = DT_Normal;
#declare Display_Type = DT_Mult;
#declare p1 = pigment {
image_map { png "tripod_shadow.png" interpolate 2 map_type 0 once }
translate -0.5
}
#declare p2 = pigment {
image_map { png "tripod_objects.png" interpolate 2 map_type 0 once }
translate -0.5
}
#declare fp1 = function { pigment { p1 } };
#declare fp2 = function { pigment { p2 } };
#declare RED = pigment {
function { fp1(x,y,z).red * fp2(x,y,z).red }
color_map { [0 rgb 0][1 rgb <1,0,0>] }
}
#declare GREEN = pigment {
function { fp1(x,y,z).green * fp2(x,y,z).green }
color_map { [0 rgb 0][1 rgb <0,1,0>] }
}
#declare BLUE = pigment {
function { fp1(x,y,z).blue * fp2(x,y,z).blue }
color_map { [0 rgb 0][1 rgb <0,0,1>] }
}
#declare p3 = pigment {
average
pigment_map {
[1 RED]
[1 GREEN]
[1 BLUE]
}
}
plane { z, 0
hollow
#switch (Display_Type)
#case (DT_AO)
pigment { p1 }
finish { ambient 1 diffuse 0 }
#break
#case (DT_Normal)
pigment { p2 }
finish { ambient 1 diffuse 0 }
#break
#case (DT_Mult)
pigment { p3 }
finish { ambient 3 diffuse 0 }
#break
#end
scale <image_width/image_height, 1, 1>
}
Post a reply to this message
Attachments:
Download 'tripod_shadow.jpg' (20 KB)
Preview of image 'tripod_shadow.jpg'
|
|
| |
| |
|
|
|
|
| |
| |
|
|
Well done.
I think the foremost left leg should be behind the branch of the tree, but I
understand that would be difficult.
BaldEagle recently gave a link to a paper describing exactly how to do what
you're trying to do. Have a look at "Rendering Synthetic Objects into Legacy
Photographs" in this message:
http://news.povray.org/povray.advanced-users/message/%3Cweb.60d86ce893de9b141f9dae3025979125%40news.povray.org%3E/#%3Cw
eb.60d86ce893de9b141f9dae3025979125%40news.povray.org%3E
Pascal
"s.day" <s.d### [at] uelacuk> wrote:
> Just playing around trying to add a Pov CSG object (the tripod) into a photo.
>
> Pretty pleased with the effect but I am wondering if there is an official method
> of doing something like this to get better results?
>
> I googled it and found some interesting information by Robert McGregor that I
> just I didn't understand ;-)
>
> Then I found someone who (can't recall who) mentioned using no_object to create
> a scene with just the shadows which I could then merge (using code from Robert's
> method) to render combine the shadow and image data.
>
> I really have no idea what I am doing here but it seemed to work better than
> expected. I could probably improve it by adding steps to my shadow scene so the
> shadow raises but I would then have to lift up one of the Tripod legs as they
> are currently all at the same level and as the Tripod is a CSG model that would
> be a lot more effort than I have time for.
Post a reply to this message
|
|
| |
| |
|
|
|
|
| |
| |
|
|
"s.day" <s.d### [at] uelacuk> wrote:
> Just playing around trying to add a Pov CSG object (the tripod) into a photo.
>
> Pretty pleased with the effect but I am wondering if there is an official method
> of doing something like this to get better results?
>
That's really nicely done. And your tripod is a great model.
I've been wanting to figure out such a 'fake shadowing' idea for years, but
never got around to it. You're example spurred me on.
BTW, I may have missed the post from Robert McGregor that you mentioned. Do you
have a link to that?
Before seeing your own explanation of the process, I likewise started tinkering
with an image-to-function approach-- specifically *multiplying* two image
functions like you did. The idea being that the pure white areas in the 'shadow'
image/function could be considered as 'multiplying by 1.0' (unity), whereas the
darker shadows themselves would be < 1.0. Multiplied by the background
photo/function, that should produce shadows (or more specifically, less
brightness) in those areas of the photo. It worked!
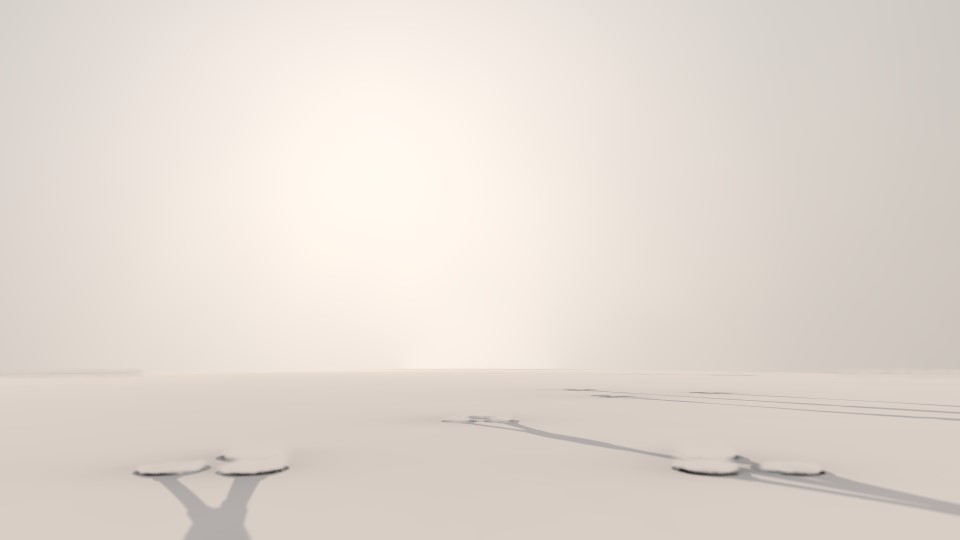
Like you, I initially rendered two images--
1) the *deep* shadow pass with no fill light (and no_image for the CGI objects),
using a ground plane and an additional vertical background plane. I made both
of those 'ultra white', using finish{...diffuse 2); otherwise, at least the
ground plane would be slightly gray-ish due to the raking angle of the main
light_source. I think I see that in your own shadow render. The idea is that the
NON-shadowed areas should be PURE white, for later function use/multiplication.
This works OK because the rendered image itself 'clips' the white values to a
max of 255/255.
2) the 'hero' pass for the CGI objects, with proper lighting and a transparent
background. I used a simple background{rgbt 1} for that-- plus Use_Alpha in my
...INI file, of course-- and eliminated the white planes.
My final step was compositing the images, in POV-ray-- using a slightly
different method from yours. And I eliminated the extra step of matting-out the
shadows *under* the objects (like your tripod's feet) by simply pasting-on the
'hero' texture as the final texture for my box object; the CGI objects then hide
their own base shadows.
For the compositing step, here's a simple method to vary the shadow 'density' in
the final image. Instead of this simple form for the shadow-image function...
function{pigment{image_map{png "shadow image.png"}}}
..... use an averaged pigment_map:
function{
pigment{
average
pigment_map{
[1 image_map{png "shadow image.png"}]
[1.5 rgb 1] // or whatever, for the 'weight'. Adds more
// white to the average.
}}}
This can easily make the shadows 'whiter' for the subsequent function
multiplication-- resulting in less-dense shadows.
Some finer points:
Your code has...
#case (DT_Mult)
pigment { p3 }
finish { ambient 3 diffuse 0 }
#break
.....for the final color-photo. I instead multiply the separate r-g-b color
functions by 3, same result. It's because the 'averaging' process for those
functions reduces each color contribution to 1/3. If each was at 1 instead of
3, the final photo would reproduce as only 1/3rd of its original brightness. But
using ambient 3 works just as well.
Making the plane object(s) 'ultra white' in my shadow render has a downside:
Antialiasing begins to fail when colors go over 1.0 (255/255). But I worked
around that by slightly blurring the shadow-image render in one of my
image-editing apps, as an intermediate step... shadows are usually a bit blurry
anyway ;-)
And the fun begins when the background photo has objects/shapes in it that need
to be reproduced for the shadow pass-- simplified shapes for the shadows to fall
over.
-------------
#declare SHADOW_FUNC =
function{
pigment{
average
pigment_map{
[1 image_map{png "shadow render.png" once interpolate 2}]
[.8 rgb 1] // or whatever
}
}
}
#declare PHOTO_FUNC = // the background photo
function{pigment{image_map{jpeg "background photo.jpg"}}}
#declare RED_CHANNEL =
pigment{function{PHOTO_FUNC(x,y,z).red * SHADOW_FUNC(x,y,z).red}};
#declare GREEN_CHANNEL =
pigment{function{PHOTO_FUNC(x,y,z).green * SHADOW_FUNC(x,y,z).green}};
#declare BLUE_CHANNEL =
pigment{function{PHOTO_FUNC(x,y,z).blue * SHADOW_FUNC(x,y,z).blue}};
// The shadow image is essentially grayscale, so I could have used .gray for
// it here; but that's an extra internal computational step...
// inefficient!! :-O
#declare FINAL_PIGMENT = // the background photo with shadows
pigment{
average
pigment_map{
[1 RED_CHANNEL color_map{[0 rgb 0] [1 rgb <3,0,0>]}] // 3, not 1
[1 GREEN_CHANNEL color_map{[0 rgb 0] [1 rgb <0,3,0>]}] // ditto
[1 BLUE_CHANNEL color_map{[0 rgb 0] [1 rgb <0,0,3>]}] // ditto
}
}
// The compositing step...
box{0,<1,1,.01>
texture{pigment{FINAL_PIGMENT} finish{ambient 1 emission 0 diffuse 0}}
texture{ // This one simply overlays onto the FINAL_PIGMENT
pigment{image_map{png "CGI render.png" } }
finish{ambient 1 emission 0 diffuse 0}
}
}
Post a reply to this message
Attachments:
Download 'fake_shadow_composite_kw.jpg' (246 KB)
Preview of image 'fake_shadow_composite_kw.jpg'
|
|
| |
| |
|
|
|
|
| |
| |
|
|
Two points :
1)The shadows should be sharp close to the objects and fuzzy farther
from them : Use an actual area_light instead of blurring the image of
the shadows.
2) MUCH more importantly, your shadows don't diverge enough. The shadows
seems to come from the light above the stove, but diverge as if that
light was about three to four times farther, beyond the wall and above
the ceiling. Try to locate your light_source at about the same relative
position as the real light.
Another thing is those two lights to the right as shown in the original
photo. Look at the wall behind the fridge casting a shadow on the fridge
as well as at the guitar ans rocking chair showing two distinct shadows.
Post a reply to this message
|
|
| |
| |
|
|
|
|
| |
| |
|
|
Alain Martel <kua### [at] videotronca> wrote:
>
>
> Two points :
> 1)The shadows should be sharp close to the objects and fuzzy farther
> from them : Use an actual area_light instead of blurring the image of
> the shadows.
Yes, that's a much better idea; and I agree about the 'sharp to fuzzy' change; I
wasn't sure how to create that. An area_light is the solution, of course.
>
> 2) MUCH more importantly, your shadows don't diverge enough. The shadows
> seems to come from the light above the stove, but diverge as if that
> light was about three to four times farther...
Very true. I was lazy. :-( And there are actually multiple light sources and
positions in the real photo, as you mention. I thought about trying to reproduce
those, but this was just a quick-and-dirty test, to confirm the general idea.
Strangely, I could not find a better personal photo to use, that would clearly
show this shadowing trick. But I'll probably find a dozen better ones tonight
;-[
Post a reply to this message
|
|
| |
| |
|
|
|
|
| |
| |
|
|
"BayashiPascal" <bai### [at] gmailcom> wrote:
>
> BaldEagle recently gave a link to a paper describing exactly how to do what
> you're trying to do. Have a look at "Rendering Synthetic Objects into Legacy
> Photographs" in this message:
That's a very interesting paper that I don't think I had seen before. Thanks for
the link (and to Bald Eagle too.)
Post a reply to this message
|
|
| |
| |
|
|
|
|
| |
| |
|
|
Il 23/08/2021 15:15, s.day ha scritto:
> Just playing around trying to add a Pov CSG object (the tripod) into
a photo.
>
> Pretty pleased with the effect but I am wondering if there is an
official method
> of doing something like this to get better results?
>
> I googled it and found some interesting information by Robert
McGregor that I
> just I didn't understand ;-)
>
> Then I found someone who (can't recall who) mentioned using no_object
to create
> a scene with just the shadows which I could then merge (using code
from Robert's
> method) to render combine the shadow and image data.
>
> I really have no idea what I am doing here but it seemed to work
better than
> expected. I could probably improve it by adding steps to my shadow
scene so the
> shadow raises but I would then have to lift up one of the Tripod legs
as they
> are currently all at the same level and as the Tripod is a CSG model
that would
> be a lot more effort than I have time for.
>
A nice scene!
Paolo
Post a reply to this message
|
|
| |
| |
|
|
|
|
| |
|
|