|
|
|
|
|
|
| |
| |
|
|
|
|
| |
| |
|
|
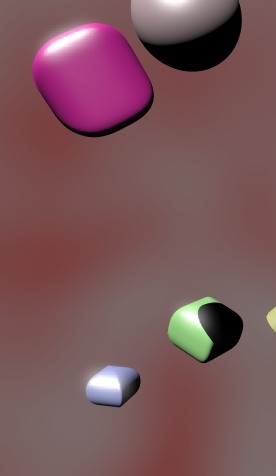
I've cropped the part of the image where the effect
isn't that obvious. When you look at the edge of
the superellipsoid in the upper left corner, you'll
notice the highlight "bleeding" into the background.
Even more obvious is on the green superellipsoid,
where the highlight bleeds into the shadow.
I think it adds a nice touch to the image, even though
the parsing times are... ehm... Quiet high (depending
on amount of objects to be tested and resolution).
Here's a quick overview over the macros:
The first one shoots trace() at the scenery and tries to
hit objects which were given via an array. When an
object is hit, the specularity (given by another array, using
the values you'd normally hand as specular and roughness)
is calculated and saved for that pixel. The results are saved
to disk.
Then, you may choose varying paths:
1. Display the specular-data as triangles in front of camera
(no antialiasing possible then).
2. Use a macro to just display the specularity data as gray-shaded
image (white=highlight, black=no highlight), [modify the resulting
image via a paint programm] and display the image back onto
the screen via another maco (antialiasing possible)
3. Use a macro to blur the specularity data. This blurring keeps the
old data retained and adds the blurred data to a new file. Highlights
won't get blurred away. Display the new data. (no antialiasing)
4. Use macro to blur, but then output blurred data to gray-shaded
image. Use image for display (antialiasing)
I have yet to write a macro which may take image and generate
data off of that (though I see no reason why anyone would want
that, I do want the "system" to be complete: there's data to
image converter, so I need a reverse effect).
One thing I noticed, due to color-clipping and gamma-issues,
results will vary when comparing using data vs image. Still, this
blinding effect adds to the realism of the image (IMHO), because
it occurs in camera's and the human eye. Now on to some
lens flares, and I should be able to modify the image to look
like a photo... :-)
--
Tim Nikias v2.0
Homepage: http://www.digitaltwilight.de/no_lights
Email: Tim### [at] gmx de de
Post a reply to this message
|
|
| |
| |
|
|
|
|
| |
| |
|
|
Well, doh! :-)
--
Tim Nikias v2.0
Homepage: http://www.digitaltwilight.de/no_lights
Email: Tim### [at] gmxde
Post a reply to this message
Attachments:
Download 'closeup.jpg' (30 KB)
Preview of image 'closeup.jpg'
|
|
| |
| |
|
|
|
|
| |
| |
|
|
Just figured that I can also get the specularity-image
by placing all objects without texture aside of the
specular finish, no background etc... Thus I get
black image with specularity. Well...
Wanted a go at that kind of system (accessing all pixels).
Even though the purpose now defies itself somewhat,
I still have the algorithm for accessing the pixels etc. Might
come in handy at some time.
Why go the short way, when there's a long one, eh? :-(
--
Tim Nikias v2.0
Homepage: http://www.digitaltwilight.de/no_lights
Email: Tim### [at] gmxde
> I've cropped the part of the image where the effect
> isn't that obvious. When you look at the edge of
> the superellipsoid in the upper left corner, you'll
> notice the highlight "bleeding" into the background.
> Even more obvious is on the green superellipsoid,
> where the highlight bleeds into the shadow.
> I think it adds a nice touch to the image, even though
> the parsing times are... ehm... Quiet high (depending
> on amount of objects to be tested and resolution).
>
> Here's a quick overview over the macros:
> The first one shoots trace() at the scenery and tries to
> hit objects which were given via an array. When an
> object is hit, the specularity (given by another array, using
> the values you'd normally hand as specular and roughness)
> is calculated and saved for that pixel. The results are saved
> to disk.
> Then, you may choose varying paths:
> 1. Display the specular-data as triangles in front of camera
> (no antialiasing possible then).
> 2. Use a macro to just display the specularity data as gray-shaded
> image (white=highlight, black=no highlight), [modify the resulting
> image via a paint programm] and display the image back onto
> the screen via another maco (antialiasing possible)
> 3. Use a macro to blur the specularity data. This blurring keeps the
> old data retained and adds the blurred data to a new file. Highlights
> won't get blurred away. Display the new data. (no antialiasing)
> 4. Use macro to blur, but then output blurred data to gray-shaded
> image. Use image for display (antialiasing)
>
> I have yet to write a macro which may take image and generate
> data off of that (though I see no reason why anyone would want
> that, I do want the "system" to be complete: there's data to
> image converter, so I need a reverse effect).
>
> One thing I noticed, due to color-clipping and gamma-issues,
> results will vary when comparing using data vs image. Still, this
> blinding effect adds to the realism of the image (IMHO), because
> it occurs in camera's and the human eye. Now on to some
> lens flares, and I should be able to modify the image to look
> like a photo... :-)
>
> --
> Tim Nikias v2.0
> Homepage: http://www.digitaltwilight.de/no_lights
> Email: Tim### [at] gmxde
>
>
Post a reply to this message
|
|
| |
| |
|
|
|
|
| |
| |
|
|
Is this what happens by combining a blurred image with it's original in
photopaint? MegaPOV0.7 had this feature too, I think. It was part of the
postprocessing patch. Too bad it was lost.
Regards,
Hugo
Post a reply to this message
|
|
| |
| |
|
|
|
|
| |
| |
|
|
AFAIK MegaPOV took high rgb-values and
use those to determine where to use the blurred
image on top of the original one.
Even though the per-pixel-processing part is kinda
redundant, the idea was to take light which is directly
reflected from a lightsource to the camera (the
specular highlights) and blur those as an overlay for the
image without specular highlights. Thus, highlights will
look like they're glowing.
So its similiar, but not altogether the same. And
I might add that I find hard-coded post-processing
steps (as in MegaPOV) not as flexible as those
scripted by oneself. These I can modify to my liking.
--
Tim Nikias v2.0
Homepage: http://www.digitaltwilight.de/no_lights
Email: Tim### [at] gmxde
> Is this what happens by combining a blurred image with it's original in
> photopaint? MegaPOV0.7 had this feature too, I think. It was part of the
> postprocessing patch. Too bad it was lost.
>
> Regards,
> Hugo
>
>
Post a reply to this message
|
|
| |
| |
|
|
|
|
| |
| |
|
|
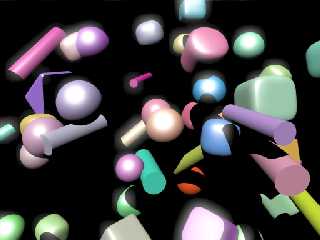
Here's a pic from the quick way:
1. Render image with only black background/textures,
and only leave specular in finish...
2. Modify that image via Paint-Program of Choice
3. Layer the image back ontop of the scene, this
time with everything but specular on.
Works fine for antialiasing, doesn't work with
focal blur (I'll create some workaround), and
depending on complexity of scene takes just
about 30 seconds...
My macros could do it an hour...
(What a waste of time...:-(
Still looks nice as an effect though.
--
Tim Nikias v2.0
Homepage: http://www.digitaltwilight.de/no_lights
Email: Tim### [at] gmxde
Post a reply to this message
Attachments:
Download 'bhl.jpg' (80 KB)
Preview of image 'bhl.jpg'
|
|
| |
| |
|
|
|
|
| |
| |
|
|
i think it is worth waiting an hour, because it looks much better to my
opinion. (can't realy figure out why)
JWV
"Tim Nikias v2.0" <tim### [at] gmxde> wrote in message
news:3eef46d8@news.povray.org...
> Here's a pic from the quick way:
> 1. Render image with only black background/textures,
> and only leave specular in finish...
> 2. Modify that image via Paint-Program of Choice
> 3. Layer the image back ontop of the scene, this
> time with everything but specular on.
>
> Works fine for antialiasing, doesn't work with
> focal blur (I'll create some workaround), and
> depending on complexity of scene takes just
> about 30 seconds...
>
> My macros could do it an hour...
> (What a waste of time...:-(
>
> Still looks nice as an effect though.
>
> --
> Tim Nikias v2.0
> Homepage: http://www.digitaltwilight.de/no_lights
> Email: Tim### [at] gmxde
>
>
>
Post a reply to this message
|
|
| |
| |
|
|
|
|
| |
| |
|
|
Well, this was the 30 second version...
--
Tim Nikias v2.0
Homepage: http://www.digitaltwilight.de/no_lights
Email: Tim### [at] gmxde
> i think it is worth waiting an hour, because it looks much better to my
> opinion. (can't realy figure out why)
>
> JWV
>
>
Post a reply to this message
|
|
| |
| |
|
|
|
|
| |
| |
|
|
It looks good, and is pretty simple to do.
Incidentally, if you're interested, the way to get a more "real world" version
of this would be to render the scene much darker usign 48-bit colour so that
bright things don't just flatten out to white. Then process that to two
different images, using colour curves that simulate film colour response. One of
the images should be processed with a curve that picks out just the bright
things. Then you blur that image and add it to the first.
The advantage with this technique is it will pick up on any bright thing, not
just specular highlights. Also if you replace the blur stage with a series of
more complex transformations you can emulate a very realistic lens flare effect.
But personally I haven't played with those techniques because I don't want to
learn skills I can't use in the IRTC! Maybe one day I'll write all of this into
a povray patch...
--
Tek
http://www.evilsuperbrain.com
"Tim Nikias v2.0" <tim### [at] gmxde> wrote in message
news:3eef46d8@news.povray.org...
> Here's a pic from the quick way:
> 1. Render image with only black background/textures,
> and only leave specular in finish...
> 2. Modify that image via Paint-Program of Choice
> 3. Layer the image back ontop of the scene, this
> time with everything but specular on.
>
> Works fine for antialiasing, doesn't work with
> focal blur (I'll create some workaround), and
> depending on complexity of scene takes just
> about 30 seconds...
>
> My macros could do it an hour...
> (What a waste of time...:-(
>
> Still looks nice as an effect though.
>
> --
> Tim Nikias v2.0
> Homepage: http://www.digitaltwilight.de/no_lights
> Email: Tim### [at] gmxde
>
>
>
Post a reply to this message
|
|
| |
| |
|
|
|
|
| |
| |
|
|
Sounds fairly interesting. But you're right, I don't
want to create and use techniques which can't be
done with pure POVing. Since I think it is okay to
reuse and image processed by POV-Ray, I'm
thinking of ways to blur the image via POV-Ray before
applying it as a transparent quad which will
be positioned to cover the image area.
The only problem is with focal blur. The only method I
see for that is to render both images (specular and
normal) with focal-blur, then blur the specular image
and position both images as textured quads in front
of the camera. Thats compositing via POV-Ray.
So, all in all, it should be close enough to the non-post-
processed, as you're working only with POV-Ray,
and if that gets ruled out, I don't know how 3D-Studio
Max's Lens flare (just as an example) gets allowed...
--
Tim Nikias v2.0
Homepage: http://www.digitaltwilight.de/no_lights
Email: Tim### [at] gmxde
> It looks good, and is pretty simple to do.
>
> Incidentally, if you're interested, the way to get a more "real world"
version
> of this would be to render the scene much darker usign 48-bit colour so
that
> bright things don't just flatten out to white. Then process that to two
> different images, using colour curves that simulate film colour response.
One of
> the images should be processed with a curve that picks out just the bright
> things. Then you blur that image and add it to the first.
>
> The advantage with this technique is it will pick up on any bright thing,
not
> just specular highlights. Also if you replace the blur stage with a series
of
> more complex transformations you can emulate a very realistic lens flare
effect.
>
> But personally I haven't played with those techniques because I don't want
to
> learn skills I can't use in the IRTC! Maybe one day I'll write all of this
into
> a povray patch...
>
> --
> Tek
> http://www.evilsuperbrain.com
>
> "Tim Nikias v2.0" <tim### [at] gmxde> wrote in message
> news:3eef46d8@news.povray.org...
> > Here's a pic from the quick way:
> > 1. Render image with only black background/textures,
> > and only leave specular in finish...
> > 2. Modify that image via Paint-Program of Choice
> > 3. Layer the image back ontop of the scene, this
> > time with everything but specular on.
> >
> > Works fine for antialiasing, doesn't work with
> > focal blur (I'll create some workaround), and
> > depending on complexity of scene takes just
> > about 30 seconds...
> >
> > My macros could do it an hour...
> > (What a waste of time...:-(
> >
> > Still looks nice as an effect though.
> >
> > --
> > Tim Nikias v2.0
> > Homepage: http://www.digitaltwilight.de/no_lights
> > Email: Tim### [at] gmxde
> >
> >
> >
>
>
Post a reply to this message
|
|
| |
| |
|
|
|
|
| |
|
|