|
|
|
|
|
|
| |
| |
|
|
|
|
| |
| |
|
|
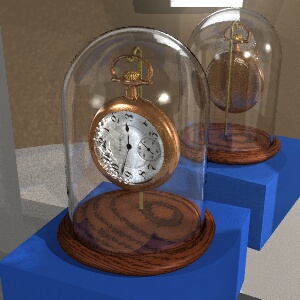
I used the photon mapping on my pocket watch picture. Having some
trouble adjusting for the right effect but then what else is new. Think
much of my difficulties are with the refractive and reflective surfaces
of the objects themselves. Then again it could be the 'autostop' angle
setting I haven't gotten exactly right either. I tried
'photons_pass_through' on the dome in a test run and got error messages
saying: "can't use pass through on refractive and high density, turning
refraction off", or something to that affect.
The two main lights have photons{reflection on refraction off}, the
watch metal has density 0.2 and reflection on only also. The dome glass
is using refraction only with density 0.2 and the watch crystal is
refraction only with density 0.15. The mirror is using reflection on and
density 0.2.
Here's the global photon_map settings:
gather 23,123
radius .12,3,.23
jitter .3
autostop 6
Main thing that doesn't seem right is the wrinkles caustics of the watch
crystal on the left hand side. There was a worse case covering more of
it before when the gather was set much lower but I don't understand the
wrinkling effect much. Think it may be the normal on the dome. It seems
to be defying my constant adjustments thus far anyway. The normal is
supposed to be large scale and yet small perturbation. Still working on
that.
Oh, and wouldn't be complete without some stats:
Win95 OSR2, 233MMX Intel Pentium, 256K L2 cache, 64M sdram, 256M swap
file (permanent).
300x300 pixel res.
AA 0.3 AAdepth 2 Jitter 0.0
43 seconds to parse.
1h 28m 26s total render time.
Just less than 6 megabytes peak memory used.
All in all a very usable new "feature", thankyou so much Nathan.
--
omniVERSE: beyond the universe
http://members.aol.com/inversez/POVring.htm
mailto:inv### [at] aol com?PoV com?PoV
Post a reply to this message
Attachments:
Download 'pm3pw.jpg' (39 KB)
Preview of image 'pm3pw.jpg'

|
|
| |
| |
|
|
|
|
| |
| |
|
|
First, I'd like to say that I really like this watch scene. Below I've
written a bunch of tips for this scene, but anyone interested in the
photon mapping patch should read them, since they clarify a few things
where my documentation is lacking.
Bob Hughes wrote:
>
> I used the photon mapping on my pocket watch picture. Having some
> trouble adjusting for the right effect but then what else is new. Think
> much of my difficulties are with the refractive and reflective surfaces
> of the objects themselves. Then again it could be the 'autostop' angle
> setting I haven't gotten exactly right either. I tried
> 'photons_pass_through' on the dome in a test run and got error messages
> saying: "can't use pass through on refractive and high density, turning
> refraction off", or something to that affect.
The photons_pass_through option was designed for situations where you want
to shoot photons at an object, but there is another object between the
light and the target object. Normally, photons are discarded if they don't
hit their target object directly. In this example, if you try to shoot
photons at the watch without specifying photons_pass_through for the
dome, none of the photons that are shot at the watch will get there. They
will all hit the dome first and be discarded.
Just shoot photons at the watch (by specifying a density), and just specify
photons_pass_through for the dome:
photons { photons_pass_through ignore_photons } // ignore is used to
// speed things up
> The two main lights have photons{reflection on refraction off}, the
This isn't really necessary. I'll have more documentation on this in
the future, but for now imagine this:
Let's say you have a scene with three lights and three lenses (I made
this scene once, and I'll use it for a demo scene). Now, the three
lights are set up like this:
light_source { loc1, color Red photons{refraction on}}
light_source { loc2, color Green }
light_source { loc3, color Blue photons{refraction off}}
The three lenses are set up like this:
object { Lens1 photons { density 0.02*phd refraction on} }
object { Lens2 photons { density 0.02*phd } }
object { Lens3 photons { density 0.02*phd refraction off} }
Now, from the first lens, you'll see caustics from the red and green lights.
From the second lens, you'll only see caustics from the red light.
And you won't see any caustics from the third lens.
So if you turn on refraction in your object, you don't have to for the
lights. I hope this is kind of clear.
> watch metal has density 0.2 and reflection on only also. The dome glass
> is using refraction only with density 0.2 and the watch crystal is
> refraction only with density 0.15. The mirror is using reflection on and
> density 0.2.
The mirror's reflection looks good.
Don't use a density with the dome (it's not worth it... and if you really
want to, then don't shoot anything at the watch... the photons that go
through the dome will hit the watch).
> Here's the global photon_map settings:
>
> gather 23,123
> radius .12,3,.23
> jitter .3
> autostop 6
Jitter could go up to 0.4 (that will be the default in the next version).
Autostop angle is in degrees. If it doesn't stop shooting photons too
soon, then you've found a good value.
For the gather radius, I'd suggest:
radius 0.12, 2, 0.12
If the gather size is too small, go to something like:
radius 0.2, 2, 0.2
> Main thing that doesn't seem right is the wrinkles caustics of the watch
> crystal on the left hand side. There was a worse case covering more of
> it before when the gather was set much lower but I don't understand the
> wrinkling effect much. Think it may be the normal on the dome. It seems
> to be defying my constant adjustments thus far anyway. The normal is
> supposed to be large scale and yet small perturbation. Still working on
> that.
It looks like you've got a lot of variation in the normal for the watch
metal's surface. That could lead to what you see. A higher photon
density (and smaller gather radius) might help this (as could decreasing
the amount that the normal is perturbed).
> Oh, and wouldn't be complete without some stats:
>
> Win95 OSR2, 233MMX Intel Pentium, 256K L2 cache, 64M sdram, 256M swap
> file (permanent).
> 300x300 pixel res.
> AA 0.3 AAdepth 2 Jitter 0.0
> 43 seconds to parse.
> 1h 28m 26s total render time.
> Just less than 6 megabytes peak memory used.
Looks kind of missproportonate pre/regular processing (too few photons used).
I'd suggest you to to multiply all of your densities and gather radii by a
variable and then adjust that variable to get more or less photons.
> All in all a very usable new "feature", thankyou so much Nathan.
You're welcome. I hope these tips make it work better for you for this and
future scenes.
Now that I look at the scene more closely, I can see some splotchiness on
the far wall (viewed in the mirror). You may wish to increase the gather
radius (relative to the photon-shooting density) to avoid this.
-Nathan
Post a reply to this message
|
|
| |
| |
|
|
|
|
| |
| |
|
|
Gee, I was hoping for some genuine Nathan Kopp suggestions and I got a
bunch!
Bear with me a moment though; if anything, could you clarify one thing
for me (and anyone else) if at all possible?
The 'gather' is relative to the 'density' but how so? If say you had
gather 0.1 and density 0.1 what is happening when gather is
increased/decreased? I read the html help but came out of it lost, I
just get dumb sometimes so that could be it too.
I take it that as the density value gets smaller photons increase in
number (saturation? pretty much straight-forward there), and as gather
increases---well, there's the end to my understanding so far, reason I
asked.
You've just increased my knowledge 10-fold besides, greatly appreciated.
Nathan Kopp wrote:
>
> First, I'd like to say that I really like this watch scene. Below I've
> written a bunch of tips for this scene, but anyone interested in the
> photon mapping patch should read them, since they clarify a few things
> where my documentation is lacking.
>
> The photons_pass_through option was designed for situations where you want
> to shoot photons at an object, but there is another object between the
> light and the target object. Normally, photons are discarded if they don't
> hit their target object directly. In this example, if you try to shoot
> photons at the watch without specifying photons_pass_through for the
> dome, none of the photons that are shot at the watch will get there. They
> will all hit the dome first and be discarded.
>
> Just shoot photons at the watch (by specifying a density), and just specify
> photons_pass_through for the dome:
> photons { photons_pass_through ignore_photons } // ignore is used to
> // speed things up
>
> > The two main lights have photons{reflection on refraction off}
>
> This isn't really necessary. I'll have more documentation on this in
> the future, but for now imagine this:
> Let's say you have a scene with three lights and three lenses (I made
> this scene once, and I'll use it for a demo scene). Now, the three
> lights are set up like this:
>
> light_source { loc1, color Red photons{refraction on}}
> light_source { loc2, color Green }
> light_source { loc3, color Blue photons{refraction off}}
>
> The three lenses are set up like this:
>
> object { Lens1 photons { density 0.02*phd refraction on} }
> object { Lens2 photons { density 0.02*phd } }
> object { Lens3 photons { density 0.02*phd refraction off} }
>
> Now, from the first lens, you'll see caustics from the red and green lights.
> From the second lens, you'll only see caustics from the red light.
> And you won't see any caustics from the third lens.
>
> So if you turn on refraction in your object, you don't have to for the
> lights. I hope this is kind of clear.
>
> > watch metal has density 0.2 and reflection on only also. The dome glass
> > is using refraction only with density 0.2 and the watch crystal is
> > refraction only with density 0.15. The mirror is using reflection on and
> > density 0.2.
>
> The mirror's reflection looks good.
> Don't use a density with the dome (it's not worth it... and if you really
> want to, then don't shoot anything at the watch... the photons that go
> through the dome will hit the watch).
>
> > Here's the global photon_map settings:
> >
> > gather 23,123
> > radius .12,3,.23
> > jitter .3
> > autostop 6
>
> Jitter could go up to 0.4 (that will be the default in the next version).
> Autostop angle is in degrees. If it doesn't stop shooting photons too
> soon, then you've found a good value.
>
> For the gather radius, I'd suggest:
> radius 0.12, 2, 0.12
>
> If the gather size is too small, go to something like:
> radius 0.2, 2, 0.2
>
> It looks like you've got a lot of variation in the normal for the watch
> metal's surface. That could lead to what you see. A higher photon
> density (and smaller gather radius) might help this (as could decreasing
> the amount that the normal is perturbed).
>
> > Oh, and wouldn't be complete without some stats:
> >
> > Win95 OSR2, 233MMX Intel Pentium, 256K L2 cache, 64M sdram, 256M swap
> > file (permanent).
> > 300x300 pixel res.
> > AA 0.3 AAdepth 2 Jitter 0.0
> > 43 seconds to parse.
> > 1h 28m 26s total render time.
> > Just less than 6 megabytes peak memory used.
>
> Looks kind of missproportonate pre/regular processing (too few photons used).
> I'd suggest you to to multiply all of your densities and gather radii by a
> variable and then adjust that variable to get more or less photons.
>
> Now that I look at the scene more closely, I can see some splotchiness on
> the far wall (viewed in the mirror). You may wish to increase the gather
> radius (relative to the photon-shooting density) to avoid this.
>
> -Nathan
--
omniVERSE: beyond the universe
http://members.aol.com/inversez/POVring.htm
mailto:inv### [at] aolcom?PoV
Post a reply to this message
|
|
| |
| |
|
|
|
|
| |
| |
|
|
You've got the density thing right. Smaller value for density means smaller
distance between photons that are shot means more photons.
Now, once you have photons depostited on the surface, you need to gather
them. To speed up the search for photons, you look only in an area close to
the intersection. The algorithm will need to process all photons within
the radius you specify, so if you use something too big, it will take a
long time to render. However, if you choose something too small, the
scene will look splotchy, since you won't get enough photons.
(It doesn't really process all photons withing the specified radius, but
it will process a large number of them.)
You want to gather at least 20 photons (30+ is probably better)... so if you
estimate that there are 30 photons in a circle with radius 0.1, you should
set your gather radius to 0.1.
If you use something like this,
gather 20,100
raidus 0.1, 2, 0.1
then it will gather first using a radius of 0.1. Then, if it fails to get 20
(the minimum number specified), then it will increase the search radius by
0.1 (third parameter for the radius keyword). It will do at most 2 searches
(second parameter for the radius keyword).
This adaptive search radius is done because there will be some areas of high
density and some areas of low density in most scenes, and this provides
a good way to quickly render both with good image quality.
-Nathan
Bob Hughes wrote:
>
> Gee, I was hoping for some genuine Nathan Kopp suggestions and I got a
> bunch!
> Bear with me a moment though; if anything, could you clarify one thing
> for me (and anyone else) if at all possible?
> The 'gather' is relative to the 'density' but how so? If say you had
> gather 0.1 and density 0.1 what is happening when gather is
> increased/decreased? I read the html help but came out of it lost, I
> just get dumb sometimes so that could be it too.
> I take it that as the density value gets smaller photons increase in
> number (saturation? pretty much straight-forward there), and as gather
> increases---well, there's the end to my understanding so far, reason I
> asked.
> You've just increased my knowledge 10-fold besides, greatly appreciated.
>
> Nathan Kopp wrote:
> >
> > First, I'd like to say that I really like this watch scene. Below I've
> > written a bunch of tips for this scene, but anyone interested in the
> > photon mapping patch should read them, since they clarify a few things
> > where my documentation is lacking.
> >
> > The photons_pass_through option was designed for situations where you want
> > to shoot photons at an object, but there is another object between the
> > light and the target object. Normally, photons are discarded if they don't
> > hit their target object directly. In this example, if you try to shoot
> > photons at the watch without specifying photons_pass_through for the
> > dome, none of the photons that are shot at the watch will get there. They
> > will all hit the dome first and be discarded.
> >
> > Just shoot photons at the watch (by specifying a density), and just specify
> > photons_pass_through for the dome:
> > photons { photons_pass_through ignore_photons } // ignore is used to
> > // speed things up
> >
> > > The two main lights have photons{reflection on refraction off}
> >
> > This isn't really necessary. I'll have more documentation on this in
> > the future, but for now imagine this:
> > Let's say you have a scene with three lights and three lenses (I made
> > this scene once, and I'll use it for a demo scene). Now, the three
> > lights are set up like this:
> >
> > light_source { loc1, color Red photons{refraction on}}
> > light_source { loc2, color Green }
> > light_source { loc3, color Blue photons{refraction off}}
> >
> > The three lenses are set up like this:
> >
> > object { Lens1 photons { density 0.02*phd refraction on} }
> > object { Lens2 photons { density 0.02*phd } }
> > object { Lens3 photons { density 0.02*phd refraction off} }
> >
> > Now, from the first lens, you'll see caustics from the red and green lights.
> > From the second lens, you'll only see caustics from the red light.
> > And you won't see any caustics from the third lens.
> >
> > So if you turn on refraction in your object, you don't have to for the
> > lights. I hope this is kind of clear.
> >
> > > watch metal has density 0.2 and reflection on only also. The dome glass
> > > is using refraction only with density 0.2 and the watch crystal is
> > > refraction only with density 0.15. The mirror is using reflection on and
> > > density 0.2.
> >
> > The mirror's reflection looks good.
> > Don't use a density with the dome (it's not worth it... and if you really
> > want to, then don't shoot anything at the watch... the photons that go
> > through the dome will hit the watch).
> >
> > > Here's the global photon_map settings:
> > >
> > > gather 23,123
> > > radius .12,3,.23
> > > jitter .3
> > > autostop 6
> >
> > Jitter could go up to 0.4 (that will be the default in the next version).
> > Autostop angle is in degrees. If it doesn't stop shooting photons too
> > soon, then you've found a good value.
> >
> > For the gather radius, I'd suggest:
> > radius 0.12, 2, 0.12
> >
> > If the gather size is too small, go to something like:
> > radius 0.2, 2, 0.2
> >
> > It looks like you've got a lot of variation in the normal for the watch
> > metal's surface. That could lead to what you see. A higher photon
> > density (and smaller gather radius) might help this (as could decreasing
> > the amount that the normal is perturbed).
> >
> > > Oh, and wouldn't be complete without some stats:
> > >
> > > Win95 OSR2, 233MMX Intel Pentium, 256K L2 cache, 64M sdram, 256M swap
> > > file (permanent).
> > > 300x300 pixel res.
> > > AA 0.3 AAdepth 2 Jitter 0.0
> > > 43 seconds to parse.
> > > 1h 28m 26s total render time.
> > > Just less than 6 megabytes peak memory used.
> >
> > Looks kind of missproportonate pre/regular processing (too few photons used).
> > I'd suggest you to to multiply all of your densities and gather radii by a
> > variable and then adjust that variable to get more or less photons.
> >
> > Now that I look at the scene more closely, I can see some splotchiness on
> > the far wall (viewed in the mirror). You may wish to increase the gather
> > radius (relative to the photon-shooting density) to avoid this.
> >
> > -Nathan
>
> --
> omniVERSE: beyond the universe
> http://members.aol.com/inversez/POVring.htm
> mailto:inv### [at] aolcom?PoV
Post a reply to this message
|
|
| |
| |
|
|
|
|
| |
| |
|
|
Understood. Thanks again.
It was another one of those 2-sided mind-twisters to me before. Had to
be sure.
One of these things in need of a graphical example perhaps, like:
.
. = .
. = ... = .
. = ..+:+.. = .
. = ..+:::+.. = .
. = ..+:::::+.. = . // . is density
. = ..+:::+.. = . // + is first gather (or *only* gather)
. = ..+:+.. = . // = is second step and so on
. = ... = .
. = .
.
Where basically the 'gather' is finding less further away.
I haven't a clue as to what you've made it actually do, just throwing
out an example of how it might be portrayed visually here.
Wonder how messed up this ascII art gets in different fonts. Oh well.
Nathan Kopp wrote:
>
> You've got the density thing right. Smaller value for density means smaller
> distance between photons that are shot means more photons.
>
> Now, once you have photons depostited on the surface, you need to gather
> them. To speed up the search for photons, you look only in an area close to
> the intersection. The algorithm will need to process all photons within
> the radius you specify, so if you use something too big, it will take a
> long time to render. However, if you choose something too small, the
> scene will look splotchy, since you won't get enough photons.
>
> (It doesn't really process all photons withing the specified radius, but
> it will process a large number of them.)
>
> You want to gather at least 20 photons (30+ is probably better)... so if you
> estimate that there are 30 photons in a circle with radius 0.1, you should
> set your gather radius to 0.1.
>
> If you use something like this,
> gather 20,100
> raidus 0.1, 2, 0.1
>
> then it will gather first using a radius of 0.1. Then, if it fails to get 20
> (the minimum number specified), then it will increase the search radius by
> 0.1 (third parameter for the radius keyword). It will do at most 2 searches
> (second parameter for the radius keyword).
>
> This adaptive search radius is done because there will be some areas of high
> density and some areas of low density in most scenes, and this provides
> a good way to quickly render both with good image quality.
>
> -Nathan
>
--
omniVERSE: beyond the universe
http://members.aol.com/inversez/POVring.htm
mailto:inv### [at] aolcom?PoV
Post a reply to this message
|
|
| |
| |
|
|
|
|
| |
|
|