|
|
|
|
|
|
| |
| |
|
|
|
|
| |
| |
|
|
Hi,
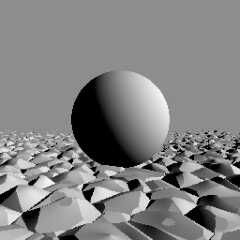
Here's a generic raymarcher in POV-Ray. It consists of a camera looking at a
plane, and a pattern applied to said plane. Only diffuse shading has been
implemented (no shadows, reflections, etc.) The pattern loops through x and y
gradients, and uses various inputs which define the scene.
I would have liked to do this using pure functions (and not pigment_map loops)
but... solutions based on nothing but functions are hard to figure out :P
Sam
/*
BasicRaymarching.pov
2023 Sam Benge
Warning! It takes a long time to parse. For faster parsing, lower the values for
Res and NSteps.
*/
#version 3.7;
global_settings{assumed_gamma 2.2}
#default{ finish{emission 1} }
camera{
orthographic
right x up y
location -z
look_at 0
}
// a displacement pattern for the plane
#declare FPattern = function{pattern{crackle}}
// Distance Estimate for sphere and plane (This is the scene's geometry.
DE=signed distance function)
#declare DE =
function{
min(
// sphere
sqrt(x*x+y*y+z*z)-2,
// plane
y+1.9
// displacement for plane
- .4*FPattern(x, y, z)
)
}
//~~~ Raymarching Variables ~~~//
// x & y resolution (later versions of POV-Ray [or maybe just UberPOV] allow
for more than 256 pigment_map entries)
#declare Res = <256, 256>;
// number of raymarching steps
#declare NSteps = 64;
// camera position
#declare RayBeg = <0, 0, -10>;
// light position
#declare LPos = vnormalize(<1, .5, -.3>);
// raymarching bailout threshold
#declare Threshold = 0.001;
// normal accuracy
#declare NAcc = .001;
//~~~ Rendering ~~~//
// we are just looking at a plane
plane{
z, 0
// image is mapped using two gradients: x & y
pigment{
// image uv y gradient
function{min(1, max(0, y))}
pigment_map{
#for(Y, 0, Res.y-1)
[1/Res.y*Y
// image uv x gradient
function{min(1, max(0, x))}
pigment_map{
#for(X, 0, Res.x-1)
[1/Res.x*X
// initialize Ray
#local Ray = RayBeg;
// ray direction
#local RayDir = vnormalize(<X/Res.x-.5, Y/Res.y-.5, 1>);
// did the ray hit something?
// -1 = no, it did not
// >=0 = yeah, it hit something
#local FDist = -1;
// march the ray through DE
#for(I, 0, NSteps-1)
// functions require all axes to be reduced to single values
#local RX = Ray.x;
#local RY = Ray.y;
#local RZ = Ray.z;
// value for DE at Ray position
#local Dist = DE(RX, RY, RZ);
// if DE at Ray position is below threshold
#if(Dist<Threshold)
// the ray hit something, so we give FDist a value
#local FDist = Dist;
// and then we get surface normal
#local Norm =
vnormalize(
<
DE(RX-NAcc, RY, RZ)-DE(RX+NAcc, RY, RZ),
DE(RX, RY-NAcc, RZ)-DE(RX, RY+NAcc, RZ),
DE(RX, RY, RZ-NAcc)-DE(RX, RY, RZ+NAcc)
>
);
#break
#end
// advance the ray
#local Ray = Ray + Dist * RayDir;
#end
// return color/value based on whether or not the ray hit something
#if(FDist>=0)
// diffuse shading
rgb .875 * max(0, pow(vdot(Norm, -LPos), .75))
#else
// background
rgb .5
#end
]
#end
}
]
#end
}
// center pattern on screen
translate -.5*(x+y-1/Res)
}
}
Post a reply to this message
Attachments:
Download 'basicraymarching.jpg' (68 KB)
Preview of image 'basicraymarching.jpg'
|
|
| |
| |
|
|
|
|
| |
| |
|
|
Sam,
Can't you use the trace function for intersection testing an getting the normal?
Only had a swift look at the code. I.i.r.c. there was some patch that also
returned the colour at the intersection point. Brain's getting more fuzzy than
I'd like to.
Just posted a recent inc that traces objects or patterns to an inc file with
array's <web.64d47ced807074f217bac71e8ffb8ce3@news.povray.org>
ingo
"Samuel B." <stb### [at] hotmail com> wrote:
> Hi,
>
> Here's a generic raymarcher in POV-Ray. It consists of a camera looking at a
> plane, and a pattern applied to said plane. Only diffuse shading has been
> implemented (no shadows, reflections, etc.) The pattern loops through x and y
> gradients, and uses various inputs which define the scene.
>
> I would have liked to do this using pure functions (and not pigment_map loops)
> but... solutions based on nothing but functions are hard to figure out :P com> wrote:
> Hi,
>
> Here's a generic raymarcher in POV-Ray. It consists of a camera looking at a
> plane, and a pattern applied to said plane. Only diffuse shading has been
> implemented (no shadows, reflections, etc.) The pattern loops through x and y
> gradients, and uses various inputs which define the scene.
>
> I would have liked to do this using pure functions (and not pigment_map loops)
> but... solutions based on nothing but functions are hard to figure out :P
Post a reply to this message
|
|
| |
| |
|
|
|
|
| |
| |
|
|
"ingo" <nomail@nomail> wrote:
> Sam,
>
> Can't you use the trace function for intersection testing an getting the normal?
> Only had a swift look at the code.
Hi ingo,
I could cheat, sure, but this is a raymarcher. It's an entirely different type
of rendering engine. To put it succinctly: it traces isosurfaces. It can't trace
any standard POV object directly because it only evaluates a function (signed
distance field/function, to be precise). That is why the ray has to step through
the scene; it can't know when it has hit something until it actually gets there.
(Believe it or not, but this method is actually faster when rendering certain
complex objects when using a GPU [if you have a GPU, check out shadertoy.com].
Things like 3D fractals can be rendered in real time, whereas in POV-Ray they
can take hours)
This scene is a test case: can it be done in POV-Ray? The answer is yes it
can... But this particular method is very inefficient.
> I.i.r.c. there was some patch that also returned the colour at the intersection
> point.
That could be done here too, since it's possible to obtain the value of a
pattern function after the ray has hit something. But any lighting here is
"virtual." I use no actual light_sources; they must be defined another way.
> Brain's getting more fuzzy than I'd like to.
I know what you mean, somewhat. I go through periods of extreme mental
tiredness, and I tend to forget a lot of things. Even the names of people I went
to school with. Or events that happened and /should/ remember, but I don't. (I
don't think it's dementia or anything... I think it's just the extreme changes
my brain goes through periodically.)
> Just posted a recent inc that traces objects or patterns to an inc file with
> array's <web.64d47ced807074f217bac71e8ffb8ce3@news.povray.org>
>
> ingo
Hm, I'll have to check that out. Based on the description, it makes rounded
shapes from sharp-edged objects (such as text)? I won't really know until I run
it, I guess :D
Sam
Post a reply to this message
|
|
| |
| |
|
|
|
|
| |
| |
|
|
"Samuel B." <stb### [at] hotmailcom> wrote:
> a generic raymarcher in POV-Ray.
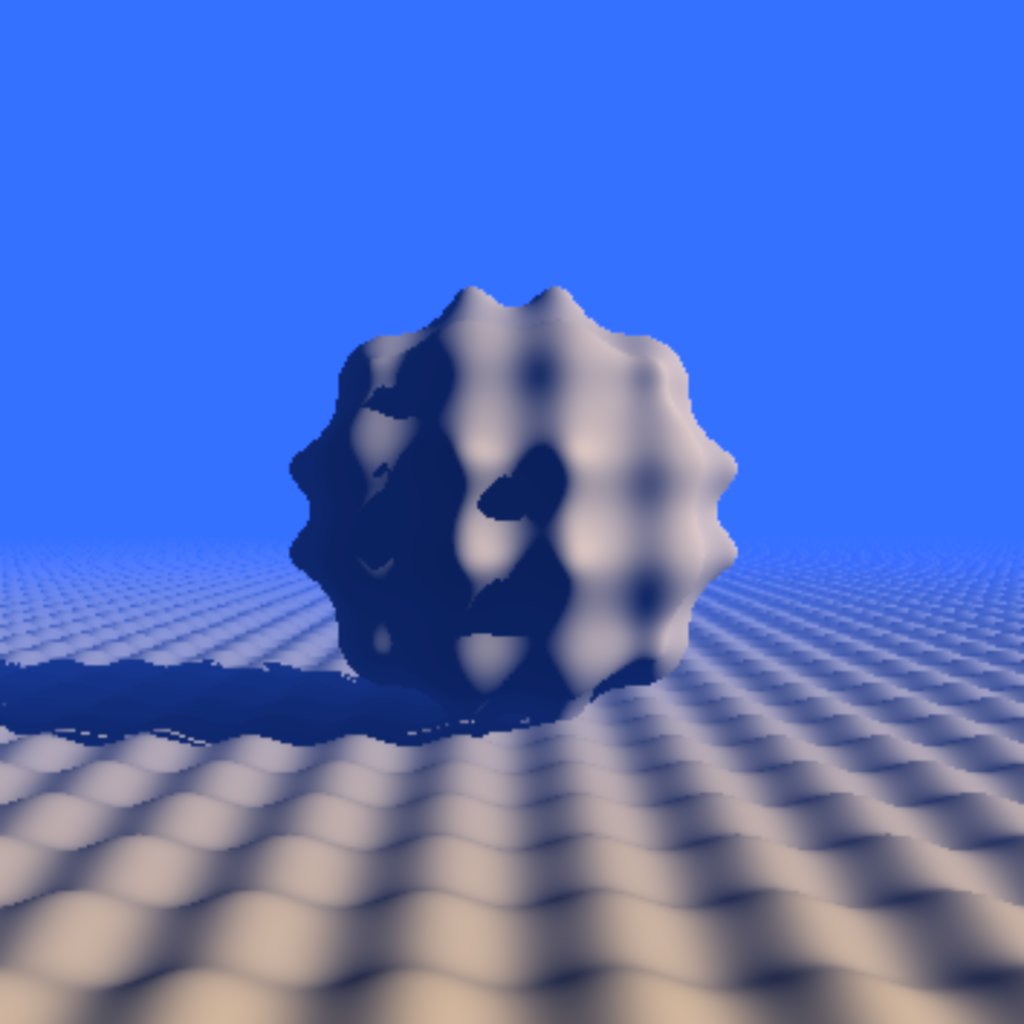
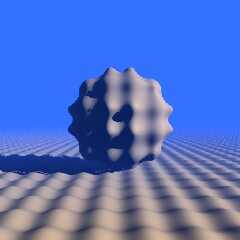
Here's another version. I added a surface color, fog color, and shadows. It's
very slow. No antialiasing. A lot of artifacts typical of naive ray marching.
This image parsed very slowly but rendered quickly, finishing at a total of 3
minutes and 33 seconds, with a resolution of only 354x354.
(Why did I do this?)
This is far as I'll take it, because the whole exercise if kind of pointless,
other than to show how flexible POV-Ray's SDL can be.
Sam
/*
BasicRaymarchingB.pov
2023 Sam Benge
Warning! It takes a long time to parse... minutes, even. For faster parsing,
lower the values for Res (start with <32, 32> Also, lower or RaySteps and
LightSteps if needed.
*/
#version 3.7;
global_settings{assumed_gamma 2.2}
#default{ finish{emission 1} }
// linear interpolation function
#macro Mix(A, B, C) A*(1-C) + B*C #end
camera{
orthographic
right x up y
location -z
look_at 0
}
// distance estimate for sphere and plane (This is the scene's geometry.
DE=signed distance field/function)
#declare DE =
function{
min(
// sphere
sqrt(x*x+y*y+z*z)-2,
// plane
y+2
)
// displacement
+ .07*(cos(7*x)+cos(7*y)+cos(7*z))
}
//~~~ Raymarching Variables ~~~//
// x & y resolution (later versions of POV-Ray [or maybe just UberPOV] allow
for more than 256 pigment_map entries)
#declare Res = <354, 354>;
// number of camera raymarching steps
#declare RaySteps = 256;
// adjust camera ray step amount (1 is ideal, but some distance estimates
require lower values)
#declare Adj = 0.5;
// number of light steps
#declare LightSteps = 32;
// camera position
#declare RayBeg = <0, 0, -10>;
// light position
#declare LPos = <1, .5, -.3>;
// raymarching bailout threshold
#declare Threshold = 0.001;
// normal accuracy
#declare NAcc = .001;
// object color
#declare ObjCol = <1, .8, .5>;
// fog color
#declare FogCol = <.2, .4, 1>;
// fog distance
#declare FogDist = 20;
//~~~ Rendering ~~~//
// we are only looking at a plane
plane{
z, 0
// image is mapped using x & y gradients
pigment{
// image uv y gradient
function{min(1, max(0, y))}
pigment_map{
#for(Y, 0, Res.y-1)
[1/Res.y*Y
// image uv x gradient
function{min(1, max(0, x))}
pigment_map{
#for(X, 0, Res.x-1)
[1/Res.x*X
// initialize Ray
#local Ray = RayBeg;
// ray direction
#local RayDir = vnormalize(<X/Res.x-.5, Y/Res.y-.5, 1>);
// did the ray hit something?
// false = (default) no, it didn't hit anything
// true = yeah, it hit something
#local DidHit = false;
// march the ray through DE
#for(I, 0, RaySteps-1)
// functions require all axes to be reduced to single values
#local RX = Ray.x;
#local RY = Ray.y;
#local RZ = Ray.z;
// value for DE at Ray position
#local Dist = Adj*DE(RX, RY, RZ);
// if DE at Ray position is below threshold
#if(Dist<Threshold)
// the ray hit something, so we set DidHit to true
#local DidHit = true;
// escape the loop because we don't need to trace anything anymore
#break
#end
// advance the ray
#local Ray = Ray + Dist * RayDir;
#end
// did the ray hit something?
#if(DidHit) // the ray hit something, so we start shading the objects
// position where the ray hit
#local Hit = Ray;
#local HX = Hit.x;
#local HY = Hit.y;
#local HZ = Hit.z;
// initial color
#local Col = ObjCol;
// get the surface normal from DE() at hit position
#local Norm =
vnormalize(
<
DE(HX+NAcc, HY, HZ)-DE(HX-NAcc, HY, HZ),
DE(HX, HY+NAcc, HZ)-DE(HX, HY-NAcc, HZ),
DE(HX, HY, HZ+NAcc)-DE(HX, HY, HZ-NAcc)
>
);
// diffuse value
#local Diffuse = max(0, pow(vdot(Norm, LPos), .75));
// set initial color
#local Col = ObjCol;
// apply diffuse
#local Col = Col * Diffuse;
// calculate shadows
#if(true)
// light direction
#local LDir = vnormalize(LPos);
// initialize light ray (slightly offset from surface)
#local LRay = Hit + 2 * Threshold * Norm;
// Is the light shining here? default = true
#local IsLit = true;
// march the light ray through DE
// (not designed to stop after passing through light source)
#for(I, 0, LightSteps)
// light ray position is reduced to single values
#local LX = LRay.x;
#local LY = LRay.y;
#local LZ = LRay.z;
// value for DE at light ray position
#local LDist = DE(LX, LY, LZ);
// if light ray hits an object, then no light is shining on this
pixel
#if(LDist<Threshold)
// not lit
#local IsLit = false;
// escape the loop because we don't need to trace anything anymore
#break
#end
// advance the ray
#local LRay = LRay + LDist * LDir;
#end
// apply shadow
#local Col = Col * IsLit;
#end // ~if shadows
// apply fog (calculation provided from POV docs)
#local Col = Mix(FogCol, Col, exp(-vlength(RayBeg-Hit)/FogDist));
// final object color
rgb Col
#else // the ray didn't hit anything, so we use the background color
// background
rgb FogCol
#end
]
#end
}
]
#end
}
// center pattern on screen
translate -.5*(x+y-1/Res)
}
}
Post a reply to this message
Attachments:
Download 'basicraymarchingb3m_33s.jpg' (59 KB)
Preview of image 'basicraymarchingb3m_33s.jpg'
|
|
| |
| |
|
|
|
|
| |
| |
|
|
"Samuel B." <stb### [at] hotmailcom> wrote:
> "Samuel B." <stb### [at] hotmailcom> wrote:
> > a generic raymarcher in POV-Ray.
>
> Here's another version. I added a surface color, fog color, and shadows. It's
> very slow. No antialiasing. A lot of artifacts typical of naive ray marching.
> This image parsed very slowly but rendered quickly, finishing at a total of 3
> minutes and 33 seconds, with a resolution of only 354x354.
>
> (Why did I do this?)
>
> This is far as I'll take it, because the whole exercise if kind of pointless,
> other than to show how flexible POV-Ray's SDL can be.
>
> Sam
>
> /*
>
> BasicRaymarchingB.pov
>
> 2023 Sam Benge
>
> Warning! It takes a long time to parse... minutes, even. For faster parsing,
> lower the values for Res (start with <32, 32> Also, lower or RaySteps and
> LightSteps if needed.
>
> */
Thanks for sharing... very nice!
Again, will need spend some time looking at the funtions to understand. ;)
Mike.
Post a reply to this message
|
|
| |
| |
|
|
|
|
| |
| |
|
|
"Mike Miller" <mil### [at] gmailcom> wrote:
> "Samuel B." <stb### [at] hotmailcom> wrote:
> > "Samuel B." <stb### [at] hotmailcom> wrote:
> > > a generic raymarcher in POV-Ray. [...]
> >
> > Here's another version. [...]
>
> Thanks for sharing... very nice!
> Again, will need spend some time looking at the funtions to understand. ;)
> Mike.
Thank you, Mike. It's ok. Not very useful in POV-Ray, although a more
function-based approach could be good in certain situations.
(If one /really/ wanted to learn about ray marching, they would check out
shadertoy.com, and also Inigo Quilez's tutorials here:
https://iquilezles.org/articles/)
Sam
Post a reply to this message
|
|
| |
| |
|
|
|
|
| |
| |
|
|
"Samuel B." <stb### [at] hotmailcom> wrote:
> "Mike Miller" <mil### [at] gmailcom> wrote:
> > "Samuel B." <stb### [at] hotmailcom> wrote:
> > > "Samuel B." <stb### [at] hotmailcom> wrote:
> > > > a generic raymarcher in POV-Ray. [...]
> > >
> > > Here's another version. [...]
> >
> > Thanks for sharing... very nice!
> > Again, will need spend some time looking at the funtions to understand. ;)
> > Mike.
>
> Thank you, Mike. It's ok. Not very useful in POV-Ray, although a more
> function-based approach could be good in certain situations.
>
> (If one /really/ wanted to learn about ray marching, they would check out
> shadertoy.com, and also Inigo Quilez's tutorials here:
> https://iquilezles.org/articles/)
>
> Sam
Thanks Sam,
I appreciate the reference.
Cheers,
Mike.
Post a reply to this message
|
|
| |
| |
|
|
|
|
| |
|
|