 |
 |
|
 |
|
 |
|  |
|  |
|
 |
|
 |
|  |
|  |
|
 |
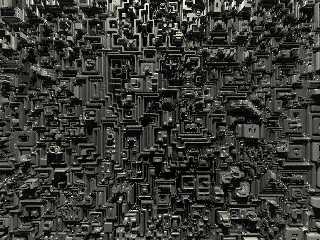
....which I say, because all I do with POVray is render the heightfield.
*generating* the heightfield I do in Gimp:
(1) run your favorite noise filter. Think star/speckle patterns.
(2) pixelate it, then edge-detect it with LaPlace. Repeat as desired.
(3) run a low Gaussian blur about 2.0 on it. You want some of the lines to
blend, but not all of them. you should now have various blocks and
maze-shapes.
(4) With the paint bucket at various gray shades, you can either click
randomly around or zoom in and try to make it look like something.
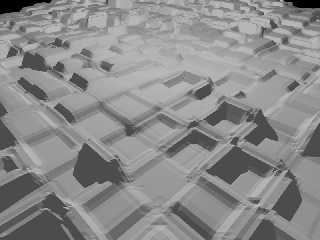
(5) Save it as a PNG, go in POVray, use the PNG as a height-field. Here I
textured it with metal finish.
It's nothing, really, but I've noticed the greeble fad in here, so I thought
I'd share my concept. With this effect, I wanted acres of cold metal
machinery stretching out in a Borg-like complexity without ever repeating.
But I can also map it as a normal in a texture itself.
Post a reply to this message
Attachments:
Download 'complexity.jpg' (215 KB)
Preview of image 'complexity.jpg'
|
 |
|  |
|  |
|
 |
|
 |
|  |
|  |
|
 |
"Hosiah" <lev### [at] linuxquestions net> wrote in message
news:web.44913cdf75c99535a8c263d50@news.povray.org...
> ....which I say, because all I do with POVray is render the heightfield.
> *generating* the heightfield I do in Gimp:
>
Wow, I seem to be horrific at duplicating what you've done. Would you mind
posting the GIMP output for comparison? I think I've got the "various
blocks and maze shapes", but the paint bucket step just 'fills in' some of
those blocks, and when I finally produce my heightfield, it looks more like
Gilles Tran's 'Pipes' macro than what you've got. What am I missing?
Thanks for the technique, though.
- How net> wrote in message
news:web.44913cdf75c99535a8c263d50@news.povray.org...
> ....which I say, because all I do with POVray is render the heightfield.
> *generating* the heightfield I do in Gimp:
>
Wow, I seem to be horrific at duplicating what you've done. Would you mind
posting the GIMP output for comparison? I think I've got the "various
blocks and maze shapes", but the paint bucket step just 'fills in' some of
those blocks, and when I finally produce my heightfield, it looks more like
Gilles Tran's 'Pipes' macro than what you've got. What am I missing?
Thanks for the technique, though.
- How
Post a reply to this message
|
 |
|  |
|  |
|
 |
|
 |
|  |
|  |
|
 |
"Hosiah" <lev### [at] linuxquestions net> wrote in message
news:web.44913cdf75c99535a8c263d50@news.povray.org...
> ....which I say, because all I do with POVray is render the heightfield.
> *generating* the heightfield I do in Gimp:
>
Looks like it could make a very nice city skyline with a bit of modification net> wrote in message
news:web.44913cdf75c99535a8c263d50@news.povray.org...
> ....which I say, because all I do with POVray is render the heightfield.
> *generating* the heightfield I do in Gimp:
>
Looks like it could make a very nice city skyline with a bit of modification
Post a reply to this message
|
 |
|  |
|  |
|
 |
|
 |
|  |
|  |
|
 |
I'm thinking this technique'd be a good way for a very close look at an IC.
Put in an array of NAND gates and make some flash memory...
"Gail Shaw" <initialsurname@sentech sa dot com> wrote:
> "Hosiah" <lev### [at] linuxquestions net> wrote in message
> news:web.44913cdf75c99535a8c263d50@news.povray.org...
> > ....which I say, because all I do with POVray is render the heightfield.
> > *generating* the heightfield I do in Gimp:
> >
>
> Looks like it could make a very nice city skyline with a bit of modification net> wrote in message
> news:web.44913cdf75c99535a8c263d50@news.povray.org...
> > ....which I say, because all I do with POVray is render the heightfield.
> > *generating* the heightfield I do in Gimp:
> >
>
> Looks like it could make a very nice city skyline with a bit of modification
Post a reply to this message
|
 |
|  |
|  |
|
 |
|
 |
|  |
|  |
|
 |
I think it looks great, but I'm likewise having difficulty recreating it.
I'm guessing the thin "walls" are little more than a pixel wide in your
hf image.
I wonder if it's possible to write a script-fu to automate the gimp step.
--
Bill Hails
http://billhails.net/
Post a reply to this message
|
 |
|  |
|  |
|
 |
|
 |
|  |
|  |
|
 |
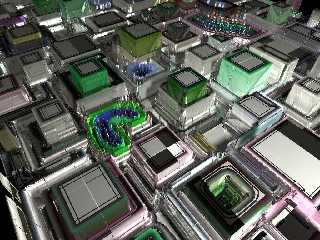
>> "Looks like it could make a very nice city skyline with a bit of modification"
Yep, I've been doing those, too. Here's another one with some fancier
texturing. In this case, I used the same png as the height-field, but
colored it and used it for the texture map over the HF and added a metallic
finish.
By the way, the "highway" with the "streetlights" in the upper right corner
was a complete accident!
>> "I'm guessing the thin "walls" are little more than a pixel wide in your
hf image."
Yup! I make the HF 1024x768, and scale it large in POVray.
>> "I'm likewise having difficulty recreating it"
Help is on the way! Just for a sanity check, I'll sit down in Gimp and do
another one, carefully noting the steps along the way.
Post a reply to this message
Attachments:
Download 'steely_town.jpg' (187 KB)
Preview of image 'steely_town.jpg'
|
 |
|  |
|  |
|
 |
|
 |
|  |
|  |
|
 |
My apologies for blowing it before; I couldn't believe anybody
else would want to do it this way!
Gimp Greeble Formula:
Start with a 1024x768 blank canvas, white background.
Run Filters>Noise>ScatterHSV with Holdness 2, Hue 3, Saturation 10, Value
26.
Now do Image>Mode>Grayscale. ScatterHSV isn't available in grayscale, so you
have to do this step in this order.
Run Filters>Blur>Pixelize with Height 20, Width20.
Pick Filters>Edge-Detect>Edge. In the edge dialog, select LaPlace,
amount can be 2.0,
and I check 'Black" radio button. You'll still see almost nothing here!
Hit "ctrl-F" a bunch of times to repeat the Edge-Detect. I keep going until
the entire field is filled with black-and-white lines.
You should now see a mosaic/maze effect.
And then click around with the paint bucket *before* running the blur!
Use "fill similar colors" with an extremely high threashold (85.0)
on the bucket.
You can keep the bucket black, click around, change the paint color to a
few clicks higher
on the greyscale, and keep going. At 1-1 zoom, your paint bucket will hit
a lot of "dead spots",
but just keep going. Hit Ctrl-Z if your bucket wipes out a lot of
detail you wanted to save.
This part is much easier if you zoom in, but it *is* laborous doing
the whole thing this way.
In fact, I wouldn't recommend this to someone suffering carpal tunnel
syndrone! Feel free to switch hands.
Murmer to yourself "Hosiah's *nuts* for doing it this way!
I'm going to find him a shortcut when I'm done with this!"
Ok, now you can Gaussian Blur using only a value of 2.0, and then
fill in some *more* squares and paths. It's a matter of experimenting, here.
Picking different shades of grey makes all the areas stick up at
different heights. But using a slight blur on your final image will
make the HF render in POVray with smoother corners.
Also, remember to set the bucket's threshold *lower* (to, say, 40.0)
before clicking in the image after doing a blur.
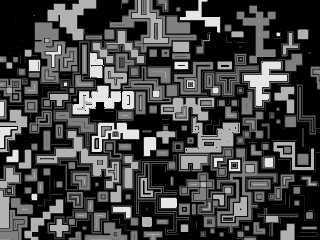
Example Heightfield:
Post a reply to this message
Attachments:
Download 'greeble2.png' (84 KB)
Preview of image 'greeble2.png'
|
 |
|  |
|  |
|
 |
|
 |
|  |
|  |
|
 |
Nice! I really like the textures you've used here...
Jim
Post a reply to this message
|
 |
|  |
|  |
|
 |
|
 |
|  |
|  |
|
 |
"Hosiah" <lev### [at] linuxquestions net> wrote in message
news:web.449211d2cc5c4d29a8c263d50@news.povray.org...
> My apologies for blowing it before; I couldn't believe anybody
> else would want to do it this way!
Thanks for making the effort, Hosiah. This is really helpful!
- How net> wrote in message
news:web.449211d2cc5c4d29a8c263d50@news.povray.org...
> My apologies for blowing it before; I couldn't believe anybody
> else would want to do it this way!
Thanks for making the effort, Hosiah. This is really helpful!
- How
Post a reply to this message
|
 |
|  |
|  |
|
 |
|
 |
|  |
|  |
|
 |
On Thu, 15 Jun 2006 22:05:06 -0400, Hosiah wrote:
> My apologies for blowing it before; I couldn't believe anybody
> else would want to do it this way!
>
> Gimp Greeble Formula:
>
> Start with a 1024x768 blank canvas, white background.
I started with a 512x512, white background. But here I cheat, and add
another layer, above the white, with an alpha channel, completely empty.
I also use Grayscale mode to begin (c.f.)
> Run Filters>Noise>ScatterHSV with Holdness 2,
Hue 3, Saturation 10,
> Value 26.
I just did Filters > Noise > Hurl. Did this on the upper, transparent,
layer.
> Now do Image>Mode>Grayscale. ScatterHSV isn't available in grayscale, so
> you have to do this step in this order.
Hurl will work in Grayscale, so I'm OK. :)
> Run Filters>Blur>Pixelize with
> Height 20, Width20. Pick Filters>Edge-Detect>Edge. In the edge dialog,
> select LaPlace, amount can be 2.0,
> and I check 'Black" radio button. You'll still see almost nothing here!
> Hit "ctrl-F" a bunch of times to repeat the Edge-Detect. I keep going
> until the entire field is filled with black-and-white lines. You should
> now see a mosaic/maze effect.
I ran Pixelize at 16, then used Filters > Edge-Detect > Laplace.
> And then click around with the paint bucket *before* running the blur!
> Use "fill similar colors" with an extremely high threashold (85.0) on
> the bucket.
> You can keep the bucket black, click around, change the paint color to a
> few clicks higher
> on the greyscale, and keep going. At 1-1 zoom, your paint bucket will
> hit a lot of "dead spots",
> but just keep going. Hit Ctrl-Z if your bucket wipes out a lot of detail
> you wanted to save.
> This part is much easier if you zoom in, but it *is* laborous doing the
> whole thing this way.
> In fact, I wouldn't recommend this to someone suffering carpal tunnel
> syndrone! Feel free to switch hands.
>
> Murmer to yourself "Hosiah's *nuts* for doing it this way! I'm going to
> find him a shortcut when I'm done with this!"
I did. :) Remember the lower layer? I ran Filters > Render > Cloud
Patterns > Solid Noise, then pixelated it at 16. Poof.
> Ok, now you can Gaussian Blur using only a value of 2.0, and then fill
> in some *more* squares and paths. It's a matter of experimenting, here.
> Picking different shades of grey makes all the areas stick up at
> different heights. But using a slight blur on your final image will make
> the HF render in POVray with smoother corners. Also, remember to set the
> bucket's threshold *lower* (to, say, 40.0) before clicking in the image
> after doing a blur.
Did this, but I first had to merge visible layers. (Ctrl-M, or Image >
Merge Visible Layers.)
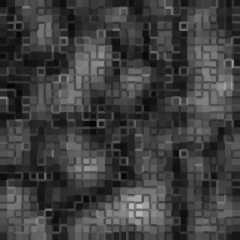
OK, so here's my sample heightfield:
Post a reply to this message
Attachments:
Download 'hf.jpg' (95 KB)
Download 'greeble.jpg' (194 KB)
Preview of image 'hf.jpg'
Preview of image 'greeble.jpg'
|
 |
|  |
|  |
|
 |
|
 |
|  |
|
 |


![]()