|
 |
On Thu, 15 Jun 2006 22:05:06 -0400, Hosiah wrote:
> My apologies for blowing it before; I couldn't believe anybody
> else would want to do it this way!
>
> Gimp Greeble Formula:
>
> Start with a 1024x768 blank canvas, white background.
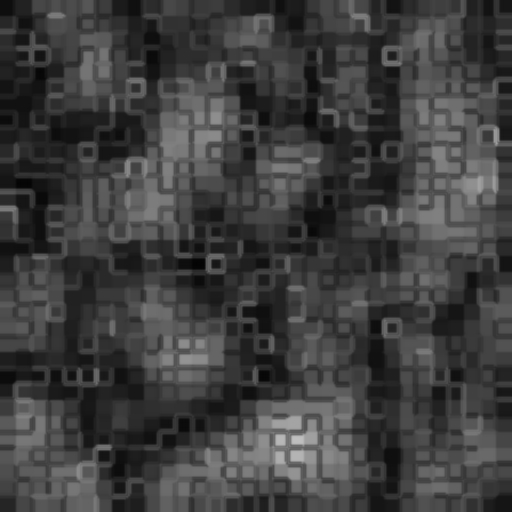
I started with a 512x512, white background. But here I cheat, and add
another layer, above the white, with an alpha channel, completely empty.
I also use Grayscale mode to begin (c.f.)
> Run Filters>Noise>ScatterHSV with Holdness 2,
Hue 3, Saturation 10,
> Value 26.
I just did Filters > Noise > Hurl. Did this on the upper, transparent,
layer.
> Now do Image>Mode>Grayscale. ScatterHSV isn't available in grayscale, so
> you have to do this step in this order.
Hurl will work in Grayscale, so I'm OK. :)
> Run Filters>Blur>Pixelize with
> Height 20, Width20. Pick Filters>Edge-Detect>Edge. In the edge dialog,
> select LaPlace, amount can be 2.0,
> and I check 'Black" radio button. You'll still see almost nothing here!
> Hit "ctrl-F" a bunch of times to repeat the Edge-Detect. I keep going
> until the entire field is filled with black-and-white lines. You should
> now see a mosaic/maze effect.
I ran Pixelize at 16, then used Filters > Edge-Detect > Laplace.
> And then click around with the paint bucket *before* running the blur!
> Use "fill similar colors" with an extremely high threashold (85.0) on
> the bucket.
> You can keep the bucket black, click around, change the paint color to a
> few clicks higher
> on the greyscale, and keep going. At 1-1 zoom, your paint bucket will
> hit a lot of "dead spots",
> but just keep going. Hit Ctrl-Z if your bucket wipes out a lot of detail
> you wanted to save.
> This part is much easier if you zoom in, but it *is* laborous doing the
> whole thing this way.
> In fact, I wouldn't recommend this to someone suffering carpal tunnel
> syndrone! Feel free to switch hands.
>
> Murmer to yourself "Hosiah's *nuts* for doing it this way! I'm going to
> find him a shortcut when I'm done with this!"
I did. :) Remember the lower layer? I ran Filters > Render > Cloud
Patterns > Solid Noise, then pixelated it at 16. Poof.
> Ok, now you can Gaussian Blur using only a value of 2.0, and then fill
> in some *more* squares and paths. It's a matter of experimenting, here.
> Picking different shades of grey makes all the areas stick up at
> different heights. But using a slight blur on your final image will make
> the HF render in POVray with smoother corners. Also, remember to set the
> bucket's threshold *lower* (to, say, 40.0) before clicking in the image
> after doing a blur.
Did this, but I first had to merge visible layers. (Ctrl-M, or Image >
Merge Visible Layers.)
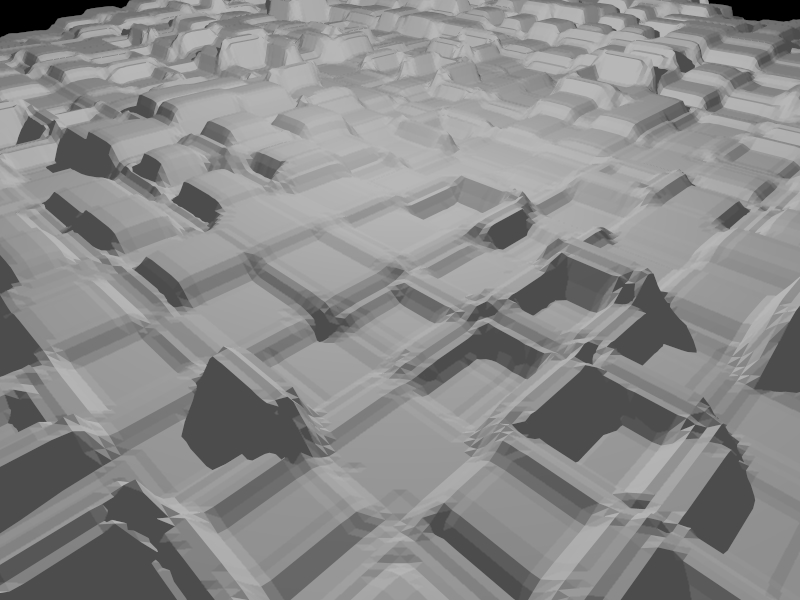
OK, so here's my sample heightfield:
Post a reply to this message
Attachments:
Download 'hf.jpg' (95 KB)
Download 'greeble.jpg' (194 KB)
Preview of image 'hf.jpg'

Preview of image 'greeble.jpg'

|
|