|
 |
I'm going through some old scenes that I never posted about, trying to finish
them.
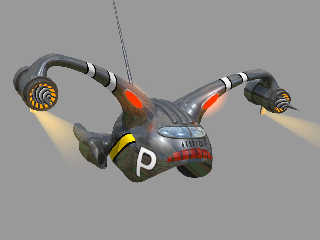
For one animated scene, I decided I needed a 'humorous flying police car.'
Here's what I've come up with so far. It's meant to have a dog-like look--maybe
a bulldog!
It's mostly CSG, but the arm struts and what I call the 'mufflers' were made in
sPatch.
By far, the trickiest part of modeling (and the most fun) was making the raised
'outline' around the windshield. (The body and the windshield are just
spheres--but they intersect at an interesting angle.) Modelling that outline by
hand seemed an impossible task, so I came up with an automated technique, a
multi-stage process, which worked out well:
1) as the first step, rendering a hi-rez orthograhic view of the windshield
area, from the top (with NO antialiasing; very important.)
2) In Photoshop, turning that into a high-contrast image, just pure black and
white. (The windshield white, everything else black.)
3) using eval_pigment on the image to find where the 'border' of one color meets
the other--getting just the borderline *positions*. Lots of them!
4) using trace() on the windshield and its surrounding area to place lots of
closely-packed spheres on the borderline-- with the eval_pigment positions used
as the trace shoot_from points (which required some tricky scaling and
translation, by eye--the image_map and the car model don't have a 1:1 size
correlation.)
5) #Writing the union of spheres to a file, so that subsequent renders don't
have to deal with the *slow* eval_pigment/trace routine over and over again
during animation. Then I #included that union back into the scene--which was
MUCH faster to parse.
In actual practice, it was a bit more complicated; but those are the basics.
There are probably other ways of going about this, but I wanted a 'general'
technique (for future use) that I could apply to any finished model.
Originally, I tried just a typical trace() of the car/windshield, making use of
the *differences* in the found normals to place the spheres. That didn't work
well--because those differences are really subtle in places; the windshield
doesn't bulge out that much.
This police car was originally not so detailed, as it makes only a brief
appearance in my scene. But it's a good asset for the future, so I'm looking for
ways to improve it. Suggestions or criticisms welcome.
Post a reply to this message
Attachments:
Download 'police_car_wip1.jpg' (72 KB)
Preview of image 'police_car_wip1.jpg'
|
|


