|
 |
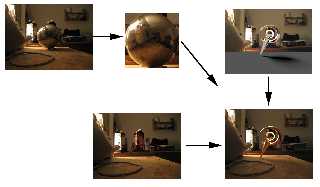
Making matte/shadow-textures in instant-compositings
To complete the chrome-map tutorial, here the one to show you how to make
matte/shadow-textures in renderings.
I've posted a new thread, because you can use this also in other issues like
HDR-renderings of object into an additional photos of the HDR-environments and
more.
By the way: don't confuse the chrome-map with HDRs the one has nothing to do
with the other.
For this tutorial you'll need:
-Megapov
-A picture, where you like to put a 3d-object into.
-read this: web.496bc004fe4d566620776f0@news.povray.org
To let your 3d-object better fit into the real environment, a shadow is very
important - and in most cases its easy!
In fact, most cases means a plane: In normal environments, you have a ground and
you will put something on it. What you need is a plane that is more or less
opaque in-, and invisible outside of the shadows.
The first step is, to fit the plane, or other objects, to the
background-picture. this is the most difficult part. Sometimes you need to
adjust your lens-angle to.
When this is done, do this:
plane {y,0 // adjust plane first
hollow on
pigment {
projection {
object {your_object} // this pattern projects your object onto the plane
point <-20,40,15> // point of the light_source
//normal on // use this to get an occlusion-effect //
instead of a normal shadow
blur .1,64 // this blurs your shadow (amount,samples)
}
color_map {
[0 color rgbt 1] // this is outside of the shadow (invisible)
[1 color rgbt <0,0,0,0.5>] // experiment with the last value:
}}} // 1=invisible 0=black
If you have more than one object, define them as a union{..} and take them for
the projection{object{...}} keyword.
To finalize your rendering, focus the camera somewhere between your object and
the camera-plane that contains the background-image. Use small values for the
aperture keyword.
With this trick, you cam adjust the sharpness between you object and the photo.
Sharp objects often looking very artificial.
Have fun
Holger
Post a reply to this message
Attachments:
Download 'shadow.png' (593 KB)
Preview of image 'shadow.png'
|
|


