|
|
|
|
|
|
| |
| |
|
|
|
|
| |
| |
|
|
"bubble_person" <nomail@nomail> wrote:
>
>
> Hello Kenneth,
>
> Thank you for all of your sleuthing and the stripped-down example...This
> gives me some good footing to streamline my POV-RAY scripting.
>
Glad to help. There are many forum users here who can give you good advice, so
don't hesitate to ask even the most basic questions.
By the way: The 'default' attributes and values for a texture{...} are not
easily found in the documentation, and they're not all in one place for easy
look-up as far as I know. And some have changed over time, depending on which
version of POV-ray you are running.
To put it very simply, POV-Ray's default texture{...} has ALL of the many
possible attributes included in it, behind-the-scenes-- but they are set up so
that you see a simple (bland!) pigment{...}, finish{...}, interior{...} etc.
For older versions, the pigment color is opaque black; for newer versions, it's
opaque white (and I'm not exactly sure when that change occurred-- possibly with
v3.7?). Those are rgbft <0,0,0,0,0> *or* rgbft <1,1,1,0,0>.
So when you manually specify a specific texture{...} for an object, whatever
attributes and values you include there simply override the built-in 'default'
values-- but any remaining non-specified attributes are still there, at their
defaults. That's why you can specify an object with NO manually-attached
texture{...} yet still see the object in your scene.
Also, take a look at the #default{...} keyword in the docs; it's an easy and
time-saving way of setting up any texture attribute OR full texture near the
beginning of a scene file, which is then used for *every* object in your scene
(and you can then override any of the attributes on a per-object basis, as
needed.) Less typing drudgery! ;-)
Post a reply to this message
|
|
| |
| |
|
|
|
|
| |
| |
|
|
Le 2021-11-11 à 13:19, bubble_person a écrit :
> Alain Martel <kua### [at] videotron ca> wrote:
>> Le 2021-11-11 à 08:06, bubble_person a écrit :
>>> Hello Forum,
>>>
>>> I am relatively new to POV-RAY, but have a functional script .
>>>
>>> I am simulating air bubbles in a glass tube full of gel. I am running into a
>>> funny problem where, if I add too many bubbles to the script, they go from being
>>> transparent and rendered correctly, to a completely opaque, black object through
>>> which no light shines.
>>>
>>> Things that don't seem to work:
>>>
>>> 1) Increasing the max_trace_level
>>>
>>> 2) I have tried to be sure that the inner surface of the gel is not in contact
>>> with the air bubble by reducing the bubble radius by epsilon (.0001). Oddly
>>> enough, the script with up to 4 bubbles works only when the two surfaces are
>>> coincident, and subtracting an epsilon value (.0001,.001,.01) causes the bubbles
>>> to turn black, no matter the number.
>>>
>>> I would love your input on this issue as I am stumped. I cannot figure out why
>>> this renders without issue when I only have a certain number of objects defined.
>>>
>>>
>>> The order of my file:
>>>
>>> In my scene, centered at the origin, I have bubbles, inside of gel, inside of a
>>> glass tube, inside of water, inside of a plexiglass cylinder.
>>>
>>> My code
>>>
>>> 1) I define variables, set trace level, and place the camera
>>>
>>> 2) I create a distributed area light source on a rectangular box
>>>
>>> 3) I define the bubbles I want in the gel
>>>
>>> 4) I create the glass tube into which the gel will sit
>>>
>>> 5) I create the gel region with voids into which the bubbles sit.
>>>
>>> 6) I then add water around the glass tube, and then a plexiglass perimeter.
>>>
>>>
>>>
>>>
>>
>> The first thing that I would to would be to increase max_trace_level
>> further still. It can go up to 255.
>>
>> Note : Your area_light is oblique. If you want it to be flat, then, it's
>> size should be something like this :
>> area_light 160*x 200*z 65 65
>> adaptive 0 // start with zero, then, increase if needed
>> Size of area_light adjusted to match the light_box dimensions.
>>
>> During testing, you should disable the area_light. It makes testing and
>> debugging faster.
>>
>> The 100 by 100 get silently increased to 129 by 129 when adaptive is
>> used. That increase DO NOT affect the rendering time.
>>
>> Using dispersion 1 is the same as not using dispersion. It must be
>> slightly different than 1. Realistic values are usually in the 1.01 to
>> 1.08. Values less than 1 result in inverted dispersion.
>>
>> You are using fade_power 1000 !? You should use 1 or 1001.
>> Using 1000 may cause some issues.
>
> Hello Alain,
>
> Thank you so much for your reply and suggestions. As you may have noticed, I am
> still in the process of understanding the different features.
>
> In the case of max_trace_level, I have put this all the way up to the max as you
> suggested, but this did not resolve the issue from my original script. I'll
> have to keep digging for a solution in that regard.
>
> For the area_light, I was certainly not clear on the pov-ray documentation and
> examples. From what I understand, I am creating a box (light box) that is
> parallel with the xy-plan, onto which I'm stretching an array of 100x100 light
> sources. And as you stated, by adding the adaptive, feature, this gets
> increased when running (Great thing to know! I wasn't completely clear on what
> happened in the background).
>
> I am, however, still confused on why the area_light would be tilted. As you
> mentioned, I want a light parallel to the xy plane, and thought that this was
> the case.
>
> Given this example below, my understanding is that my light_box is a box that is
> 160x200x2 units (x,y,z) and collared white. I then locate my light_source at
> <light_loc_x, light_loc_y,light_loc_z>. I then use the area_light feature to
> define two points <-10, -10, 10>, <10, 10, 10> from the origin to indicate the
> vectors over which to stretch the light.
>
> #declare light_box = box{ <-80,-100,0>, <80,100,2>
> pigment{color White}
> } //end light box
> light_source {
> <light_loc_x, light_loc_y,light_loc_z>
> color White
> area_light <-10, -10, 10>, <10, 10, 10>, 100, 100
> adaptive 1
> jitter
> looks_like { light_box }
> }
>
>
The size vectors of an area_light define the 2D dimentions of the
area_light. A line going from the origin to one of them will be parallel
to the side of the area_light.
Simple length are used for a light array with sides parallel to the axis.
Two non-zero component are used for an array parallel to one of the
major planes but rotated/sheared.
Three non-zero components will define an array that is not parallel to
any of the planes.
Normally, we use simple lengts parameters, each in line with one of the
axis.
In the present example, the vectors are diagonal. They pass through the
origin <0,0,0> and the defined points, or <-10, -10, 10> and <10, 10, 10>.
It goes from <-10, -10, 10> to <0, 0, 0> to <10, 10, 10>.
This is perpendicular to the X-Z plane, and at 45° from the X-Y plane.
If you want an area_light parallel to the X-Z plane, then, the vectors
need their Y components to be zero.
light_source {
<light_loc_x, light_loc_y,light_loc_z>
color White
area_light <-10, 0, 10>, <10, 0, 10>, 100, 100
adaptive 1
jitter
looks_like { light_box }
}
Defines an area_light parallel to the Z-X plane, rotated 45°.
light_source {
<light_loc_x, light_loc_y,light_loc_z>
color White
area_light <-10, -10, 0>, <10, 10, 0>, 100, 100
adaptive 1
jitter
looks_like { light_box }
}
Defines a LINEAR light array as the two vectors are colinear. It won't,
but should, generate at least a warning. ca> wrote:
>> Le 2021-11-11 à 08:06, bubble_person a écrit :
>>> Hello Forum,
>>>
>>> I am relatively new to POV-RAY, but have a functional script .
>>>
>>> I am simulating air bubbles in a glass tube full of gel. I am running into a
>>> funny problem where, if I add too many bubbles to the script, they go from being
>>> transparent and rendered correctly, to a completely opaque, black object through
>>> which no light shines.
>>>
>>> Things that don't seem to work:
>>>
>>> 1) Increasing the max_trace_level
>>>
>>> 2) I have tried to be sure that the inner surface of the gel is not in contact
>>> with the air bubble by reducing the bubble radius by epsilon (.0001). Oddly
>>> enough, the script with up to 4 bubbles works only when the two surfaces are
>>> coincident, and subtracting an epsilon value (.0001,.001,.01) causes the bubbles
>>> to turn black, no matter the number.
>>>
>>> I would love your input on this issue as I am stumped. I cannot figure out why
>>> this renders without issue when I only have a certain number of objects defined.
>>>
>>>
>>> The order of my file:
>>>
>>> In my scene, centered at the origin, I have bubbles, inside of gel, inside of a
>>> glass tube, inside of water, inside of a plexiglass cylinder.
>>>
>>> My code
>>>
>>> 1) I define variables, set trace level, and place the camera
>>>
>>> 2) I create a distributed area light source on a rectangular box
>>>
>>> 3) I define the bubbles I want in the gel
>>>
>>> 4) I create the glass tube into which the gel will sit
>>>
>>> 5) I create the gel region with voids into which the bubbles sit.
>>>
>>> 6) I then add water around the glass tube, and then a plexiglass perimeter.
>>>
>>>
>>>
>>>
>>
>> The first thing that I would to would be to increase max_trace_level
>> further still. It can go up to 255.
>>
>> Note : Your area_light is oblique. If you want it to be flat, then, it's
>> size should be something like this :
>> area_light 160*x 200*z 65 65
>> adaptive 0 // start with zero, then, increase if needed
>> Size of area_light adjusted to match the light_box dimensions.
>>
>> During testing, you should disable the area_light. It makes testing and
>> debugging faster.
>>
>> The 100 by 100 get silently increased to 129 by 129 when adaptive is
>> used. That increase DO NOT affect the rendering time.
>>
>> Using dispersion 1 is the same as not using dispersion. It must be
>> slightly different than 1. Realistic values are usually in the 1.01 to
>> 1.08. Values less than 1 result in inverted dispersion.
>>
>> You are using fade_power 1000 !? You should use 1 or 1001.
>> Using 1000 may cause some issues.
>
> Hello Alain,
>
> Thank you so much for your reply and suggestions. As you may have noticed, I am
> still in the process of understanding the different features.
>
> In the case of max_trace_level, I have put this all the way up to the max as you
> suggested, but this did not resolve the issue from my original script. I'll
> have to keep digging for a solution in that regard.
>
> For the area_light, I was certainly not clear on the pov-ray documentation and
> examples. From what I understand, I am creating a box (light box) that is
> parallel with the xy-plan, onto which I'm stretching an array of 100x100 light
> sources. And as you stated, by adding the adaptive, feature, this gets
> increased when running (Great thing to know! I wasn't completely clear on what
> happened in the background).
>
> I am, however, still confused on why the area_light would be tilted. As you
> mentioned, I want a light parallel to the xy plane, and thought that this was
> the case.
>
> Given this example below, my understanding is that my light_box is a box that is
> 160x200x2 units (x,y,z) and collared white. I then locate my light_source at
> <light_loc_x, light_loc_y,light_loc_z>. I then use the area_light feature to
> define two points <-10, -10, 10>, <10, 10, 10> from the origin to indicate the
> vectors over which to stretch the light.
>
> #declare light_box = box{ <-80,-100,0>, <80,100,2>
> pigment{color White}
> } //end light box
> light_source {
> <light_loc_x, light_loc_y,light_loc_z>
> color White
> area_light <-10, -10, 10>, <10, 10, 10>, 100, 100
> adaptive 1
> jitter
> looks_like { light_box }
> }
>
>
The size vectors of an area_light define the 2D dimentions of the
area_light. A line going from the origin to one of them will be parallel
to the side of the area_light.
Simple length are used for a light array with sides parallel to the axis.
Two non-zero component are used for an array parallel to one of the
major planes but rotated/sheared.
Three non-zero components will define an array that is not parallel to
any of the planes.
Normally, we use simple lengts parameters, each in line with one of the
axis.
In the present example, the vectors are diagonal. They pass through the
origin <0,0,0> and the defined points, or <-10, -10, 10> and <10, 10, 10>.
It goes from <-10, -10, 10> to <0, 0, 0> to <10, 10, 10>.
This is perpendicular to the X-Z plane, and at 45° from the X-Y plane.
If you want an area_light parallel to the X-Z plane, then, the vectors
need their Y components to be zero.
light_source {
<light_loc_x, light_loc_y,light_loc_z>
color White
area_light <-10, 0, 10>, <10, 0, 10>, 100, 100
adaptive 1
jitter
looks_like { light_box }
}
Defines an area_light parallel to the Z-X plane, rotated 45°.
light_source {
<light_loc_x, light_loc_y,light_loc_z>
color White
area_light <-10, -10, 0>, <10, 10, 0>, 100, 100
adaptive 1
jitter
looks_like { light_box }
}
Defines a LINEAR light array as the two vectors are colinear. It won't,
but should, generate at least a warning.
Post a reply to this message
|
|
| |
| |
|
|
|
|
| |
| |
|
|
Le 2021-11-12 à 12:19, Kenneth a écrit :
> To put it very simply, POV-Ray's default texture{...} has ALL of the many
> possible attributes included in it, behind-the-scenes-- but they are set up so
> that you see a simple (bland!) pigment{...}, finish{...}, interior{...} etc.
> For older versions, the pigment color is opaque black; for newer versions, it's
> opaque white (and I'm not exactly sure when that change occurred-- possibly with
> v3.7?). Those are rgbft <0,0,0,0,0> *or* rgbft <1,1,1,0,0>.
> The change occurred between 3.7 and 3.8.
Post a reply to this message
|
|
| |
| |
|
|
|
|
| |
| |
|
|
Op 11-11-2021 om 19:19 schreef bubble_person:
> Finally, with the fade_power, how is 1000 bad, but 1 or 1001 good? I did a
> little copy-pasting of this part from an example, so I had not really asked
> myself what realistic values should be.
>
Alain is right about the fade_power of 1001. However, when I wanted to
find again the location of this in the wiki pages to help your
understanding of it - surprisingly - I was unable to find it! I am sure
it was there, somewhere, in the documentation...
--
Thomas
Post a reply to this message
|
|
| |
| |
|
|
|
|
| |
| |
|
|
Thomas de Groot <tho### [at] degrootorg> wrote:
> Op 11-11-2021 om 19:19 schreef bubble_person:
> > Finally, with the fade_power, how is 1000 bad, but 1 or 1001 good? I did a
> > little copy-pasting of this part from an example, so I had not really asked
> > myself what realistic values should be.
> >
> Alain is right about the fade_power of 1001. However, when I wanted to
> find again the location of this in the wiki pages to help your
> understanding of it - surprisingly - I was unable to find it! I am sure
> it was there, somewhere, in the documentation...
>
> --
> Thomas
Generally, when this occurs, the bit of information, is rather in release logs
instead of doc, if you do find it in one or the other, please share, so that we
can update or ignore. Meanwhile, I added some of Alain's guidelines to
dispersion page in the wiki which are developing a bit further than current doc,
so if a native speaker wants to restyle, do not hesitate and add your
improvements in the page's discussion:
https://wiki.povray.org/content/Reference:Interior#Dispersion
Thanks for your patience
Post a reply to this message
|
|
| |
| |
|
|
|
|
| |
| |
|
|
Op 16-11-2021 om 11:52 schreef Mr:
> Thomas de Groot <tho### [at] degrootorg> wrote:
>> Op 11-11-2021 om 19:19 schreef bubble_person:
>>> Finally, with the fade_power, how is 1000 bad, but 1 or 1001 good? I did a
>>> little copy-pasting of this part from an example, so I had not really asked
>>> myself what realistic values should be.
>>>
>> Alain is right about the fade_power of 1001. However, when I wanted to
>> find again the location of this in the wiki pages to help your
>> understanding of it - surprisingly - I was unable to find it! I am sure
>> it was there, somewhere, in the documentation...
>>
>> --
>> Thomas
>
> Generally, when this occurs, the bit of information, is rather in release logs
> instead of doc, if you do find it in one or the other, please share, so that we
> can update or ignore. Meanwhile, I added some of Alain's guidelines to
> dispersion page in the wiki which are developing a bit further than current doc,
> so if a native speaker wants to restyle, do not hesitate and add your
> improvements in the page's discussion:
> https://wiki.povray.org/content/Reference:Interior#Dispersion
>
I am not sure. In the 'Attenuation' section of 'Dispersion & Caustics',
there is that mention about "If you set fade_power in the interior of an
object at 1000 or above, a realistic exponential attenuation function
will be used". I guess that the '1001' value comes from there.
This brings the following question: What is the difference between
fade_power 2 and fade_power 1001, as both, in the docs/wiki, are
described as 'exponential'?
Finally, in:
https://news.povray.org/povray.binaries.images/thread/%3C4f2654d6%241%40news.povray.org%3E/
Ive tells us: "note that this "fade_power 1001" statement is an old (and
really dirty as it lacks any logic) hack that is part of POV-Ray since
ages to turn realistic fade power calculation on."
Food for thoughts?
--
Thomas
Post a reply to this message
|
|
| |
| |
|
|
|
|
| |
| |
|
|
Thomas de Groot <tho### [at] degrootorg> wrote:
>
> This brings the following question: What is the difference between
> fade_power 2 and fade_power 1001, as both, in the docs/wiki, are
> described as 'exponential'?
I did a search through old newsgroups too, and found a useful comment by Alain
posted Dec 18 2017 (with my own comments in brackets, which I hope are correct):
"For a material [i.e., showing light attenuation inside a translucent object]
you should use fade_power 1 or fade_power 1001 to get a more realistic result.
Fade_power 2 is for light attenuation over a distance in empty space." [i.e., in
POV-ray's 'air' or external space, not *inside* an object.]
So there is a difference in how and when fade_power is used, apparently.
>
> Ive tells us: "note that this "fade_power 1001" statement is an old (and
> really dirty as it lacks any logic) hack that is part of POV-Ray since
> ages to turn realistic fade power calculation on."
>
I saw that one too. :-) And here's a later comment by Clipka, dated Oct 27 2012:
"...realistic fading for interiors is exponential rather than
linear; specify a fade_power value of 1000 or greater (1001 is often
used, but it doesn't really matter), POV-Ray will then enable
exponential fading."
It seems that fade_power 1001 has been used for quite a long time. It's in a
section of code in a post by Ross on September 11 2003 entitled "glass objects".
Personally, I have not yet run a comparative test of values <1000 vs. 1000 vs.
1001 vs. some higher value, so I can't comment on the expected effects. It seems
that a value of 1001 *or higher* turns on the 'exponential' fading, not
specifically 1001. What that exponent *is*, I don't know; I guess it's derived
by the in-built equation mentioned in the docs:
Attenuation = exp(-depth/fade_dist)
??
Post a reply to this message
|
|
| |
| |
|
|
|
|
| |
| |
|
|
Op 16/11/2021 om 20:57 schreef Kenneth:
> Thomas de Groot <tho### [at] degrootorg> wrote:
>>
>> This brings the following question: What is the difference between
>> fade_power 2 and fade_power 1001, as both, in the docs/wiki, are
>> described as 'exponential'?
>
> I did a search through old newsgroups too, and found a useful comment by Alain
> posted Dec 18 2017 (with my own comments in brackets, which I hope are correct):
>
Hey! Thanks Kenneth! This does answer some questions indeed. I never
paid much attention to the 'issue', and always mindlessly used the 1001
value when necessary. The query from bubble_person made me wonder
suddenly, however.
> "For a material [i.e., showing light attenuation inside a translucent object]
> you should use fade_power 1 or fade_power 1001 to get a more realistic result.
> Fade_power 2 is for light attenuation over a distance in empty space." [i.e., in
> POV-ray's 'air' or external space, not *inside* an object.]
>
> So there is a difference in how and when fade_power is used, apparently.
>
Good. This is an additional information of importance it seems. If
confirmed by 'the powers that be', I would be grateful if this info
could be added to the wiki and/or official documentation.
>>
>> Ive tells us: "note that this "fade_power 1001" statement is an old (and
>> really dirty as it lacks any logic) hack that is part of POV-Ray since
>> ages to turn realistic fade power calculation on."
>>
>
> I saw that one too. :-) And here's a later comment by Clipka, dated Oct 27 2012:
>
> "...realistic fading for interiors is exponential rather than
> linear; specify a fade_power value of 1000 or greater (1001 is often
> used, but it doesn't really matter), POV-Ray will then enable
> exponential fading."
>
> It seems that fade_power 1001 has been used for quite a long time. It's in a
> section of code in a post by Ross on September 11 2003 entitled "glass objects".
>
He he! I had not come across those two. I believe the comment by Clipka
should also find its way, one way or another, to the documentation.
> Personally, I have not yet run a comparative test of values <1000 vs. 1000 vs.
> 1001 vs. some higher value, so I can't comment on the expected effects. It seems
> that a value of 1001 *or higher* turns on the 'exponential' fading, not
> specifically 1001. What that exponent *is*, I don't know; I guess it's derived
> by the in-built equation mentioned in the docs:
> Attenuation = exp(-depth/fade_dist)
>
Yes, I expect that is the case.
Thanks again for your sleuth work! :-)
--
Thomas
Post a reply to this message
|
|
| |
| |
|
|
|
|
| |
| |
|
|
Kenneth, I have not tested it here, but are the 'voids' really
necessary? Is it not enough to just add the bubbles to the gel, as both
have different ior's and do not interact?
See my recent test in p.b.i. with the crystal + huge inclusion.
--
Thomas
Post a reply to this message
|
|
| |
| |
|
|
|
|
| |
| |
|
|
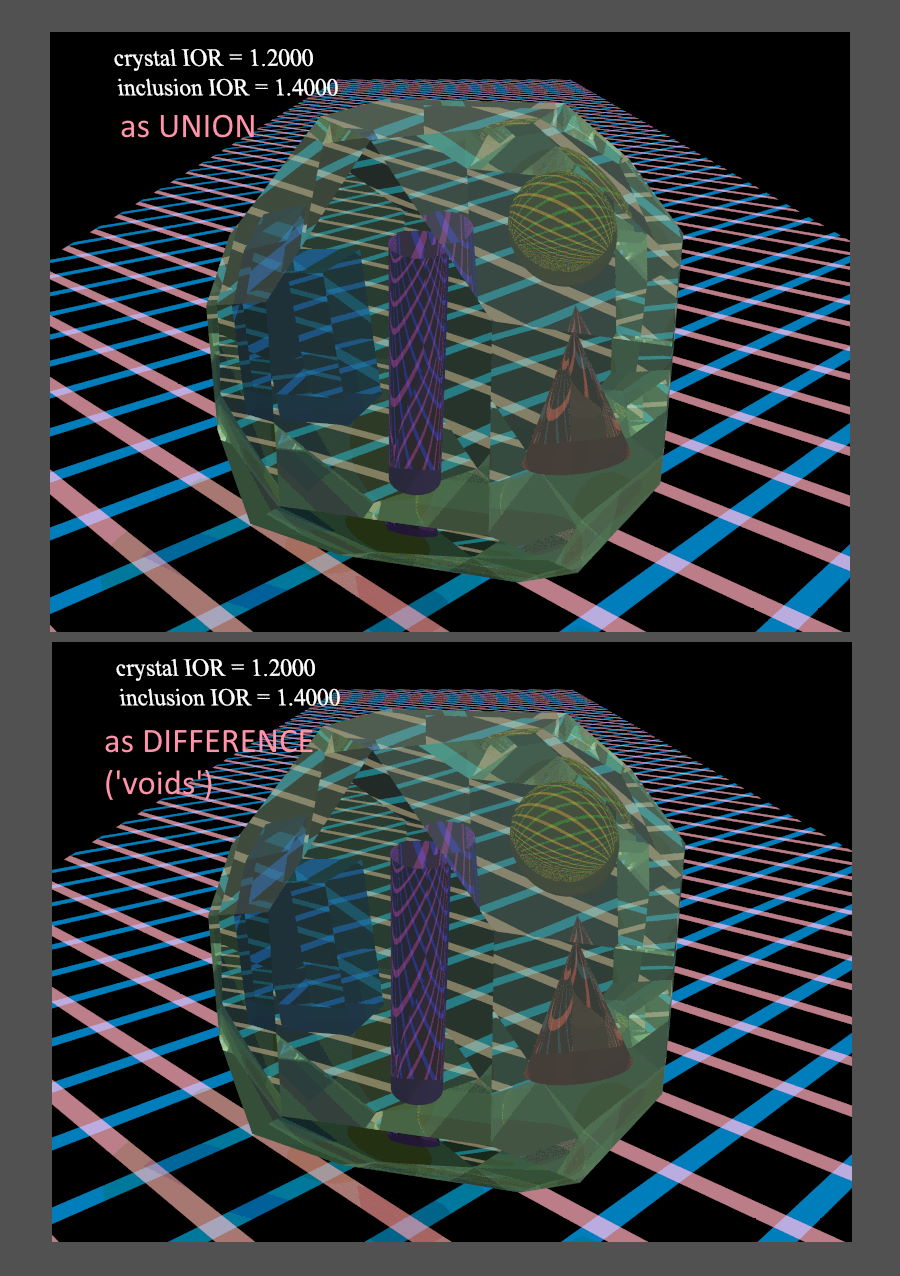
Thomas de Groot <tho### [at] degrootorg> wrote:
> Kenneth, I have not tested it here, but are the 'voids' really
> necessary? Is it not enough to just add the bubbles to the gel, as both
> have different ior's and do not interact?
>
Apparently, the visual result is exactly the same either way.
Here is my own "poor man's crystal", ha-- just an intersection of three rotated
boxes. The inclusions are simple shapes. I rendered two versions, with the
inclusions as a UNION with the crystal vs. being DIFFERENCED from it as voids. I
see absolutely no visual change, although I was expecting them to look
completely different. It seems that the ior 'effect' depends only on the
*surfaces* that the camera ray sees, not really on any imagined interior
substance of the inclusions.
I have not yet tested my scene to discover how the different iors affect each
other-- i.e., simple addition vs. multiplication of the iors. That's difficult
to tell, visually. I suspect that it's just addition.
-----
BTW, this 'multiple-ior' effect gave me an idea-- which I am experimenting
with-- about creating what looks like *variable* ior within an object, that
changes along its length or depth, etc. The basic idea is to pre-slice the
object into *many* very thin box sections, each with a slightly increasing ior
value, then re-combine the slices to look like the original solid object. Of
course, I am running into coincident-surface problems with all of those slice
recombinations... but I think that's a temporary problem, until I figure out how
best to re-position them. (Should they be separated by tiny 'air' gaps-- or
should they be slightly embedded into each other?) Anyway, my experiments look
promising so far, if a bit...odd ;-)
Post a reply to this message
Attachments:
Download 'crystal_as_union_vs_difference.jpg' (233 KB)
Preview of image 'crystal_as_union_vs_difference.jpg'
|
|
| |
| |
|
|
|
|
| |
|
|