|
|
|
|
|
|
| |
| |
|
|
|
|
| |
| |
|
|
Op 23/05/2023 om 18:17 schreef Mike Miller:
> Thomas de Groot <tho### [at] degroot org> wrote:
>> Op 22-5-2023 om 23:03 schreef Bald Eagle:
>>> "Mike Miller" <mil### [at] gmailcom> wrote:
>>>> I had to post this. I looked over at my work surface and it's starting to
>>>> resemble my rendering.
>>>> Miller
>>>
>>> Either
>>>
>>> a) you're lying, and this is not a photograph, but another render....
>>>
>>> or
>>>
>>> b) You've crossed into the nexus between reality and POV-Ray
>>>
>>> because it really IS hard to tell where one ends and the other begins.
>>>
>>
>> I agree with Bill. How do you *achieve* all of this amazing
>> modelling/scene building? I cannot even dream about equalling your
>> quality work...
>>
>> --
>> Thomas
>
>
> Thank you. Too kind. I do enjoy the modeling and scene building. I tend to look
> at the world as "how would I model that!"....and then get all excited about
> modeling it (without triangles). :)
>
Yes indeed, and you are a master at texturing/uv-mapping your objects.
Personally, much of /that/ work I do with the help of dedicated
modellers (mainly Silo), others here would probably mention Blender at
this stage. Do you use those or do you all the modelling in POV-Ray?
> As far as the quality, I would say most of that is the excellent programming and
> development that has gone into POV - which I had nothing to do with.
> After 30 plus years, I'm still amazed with POV.
> Mike.
>
Still, when I examine for instance your jacks workbench scene, I am
absolutely overcome by the quality of the lighting. And somehow, it
looks so /casual/ that I wonder where the trick is hidden. Lighting a
scene is - at least for me - something not /casual/ at all!
--
Thomas org> wrote:
>> Op 22-5-2023 om 23:03 schreef Bald Eagle:
>>> "Mike Miller" <mil### [at] gmailcom> wrote:
>>>> I had to post this. I looked over at my work surface and it's starting to
>>>> resemble my rendering.
>>>> Miller
>>>
>>> Either
>>>
>>> a) you're lying, and this is not a photograph, but another render....
>>>
>>> or
>>>
>>> b) You've crossed into the nexus between reality and POV-Ray
>>>
>>> because it really IS hard to tell where one ends and the other begins.
>>>
>>
>> I agree with Bill. How do you *achieve* all of this amazing
>> modelling/scene building? I cannot even dream about equalling your
>> quality work...
>>
>> --
>> Thomas
>
>
> Thank you. Too kind. I do enjoy the modeling and scene building. I tend to look
> at the world as "how would I model that!"....and then get all excited about
> modeling it (without triangles). :)
>
Yes indeed, and you are a master at texturing/uv-mapping your objects.
Personally, much of /that/ work I do with the help of dedicated
modellers (mainly Silo), others here would probably mention Blender at
this stage. Do you use those or do you all the modelling in POV-Ray?
> As far as the quality, I would say most of that is the excellent programming and
> development that has gone into POV - which I had nothing to do with.
> After 30 plus years, I'm still amazed with POV.
> Mike.
>
Still, when I examine for instance your jacks workbench scene, I am
absolutely overcome by the quality of the lighting. And somehow, it
looks so /casual/ that I wonder where the trick is hidden. Lighting a
scene is - at least for me - something not /casual/ at all!
--
Thomas
Post a reply to this message
|
|
| |
| |
|
|
|
|
| |
| |
|
|
Thomas de Groot <tho### [at] degrootorg> wrote:
> Op 23/05/2023 om 18:17 schreef Mike Miller:
> > Thomas de Groot <tho### [at] degrootorg> wrote:
> >> Op 22-5-2023 om 23:03 schreef Bald Eagle:
> >>> "Mike Miller" <mil### [at] gmailcom> wrote:
> >>>> I had to post this. I looked over at my work surface and it's starting to
> >>>> resemble my rendering.
> >>>> Miller
> >>>
> >>> Either
> >>>
> >>> a) you're lying, and this is not a photograph, but another render....
> >>>
> >>> or
> >>>
> >>> b) You've crossed into the nexus between reality and POV-Ray
> >>>
> >>> because it really IS hard to tell where one ends and the other begins.
> >>>
> >>
> >> I agree with Bill. How do you *achieve* all of this amazing
> >> modelling/scene building? I cannot even dream about equalling your
> >> quality work...
> >>
> >> --
> >> Thomas
> >
> >
> > Thank you. Too kind. I do enjoy the modeling and scene building. I tend to look
> > at the world as "how would I model that!"....and then get all excited about
> > modeling it (without triangles). :)
> >
> Yes indeed, and you are a master at texturing/uv-mapping your objects.
> Personally, much of /that/ work I do with the help of dedicated
> modellers (mainly Silo), others here would probably mention Blender at
> this stage. Do you use those or do you all the modelling in POV-Ray?
>
> > As far as the quality, I would say most of that is the excellent programming and
> > development that has gone into POV - which I had nothing to do with.
> > After 30 plus years, I'm still amazed with POV.
> > Mike.
> >
> Still, when I examine for instance your jacks workbench scene, I am
> absolutely overcome by the quality of the lighting. And somehow, it
> looks so /casual/ that I wonder where the trick is hidden. Lighting a
> scene is - at least for me - something not /casual/ at all!
>
> --
> Thomas
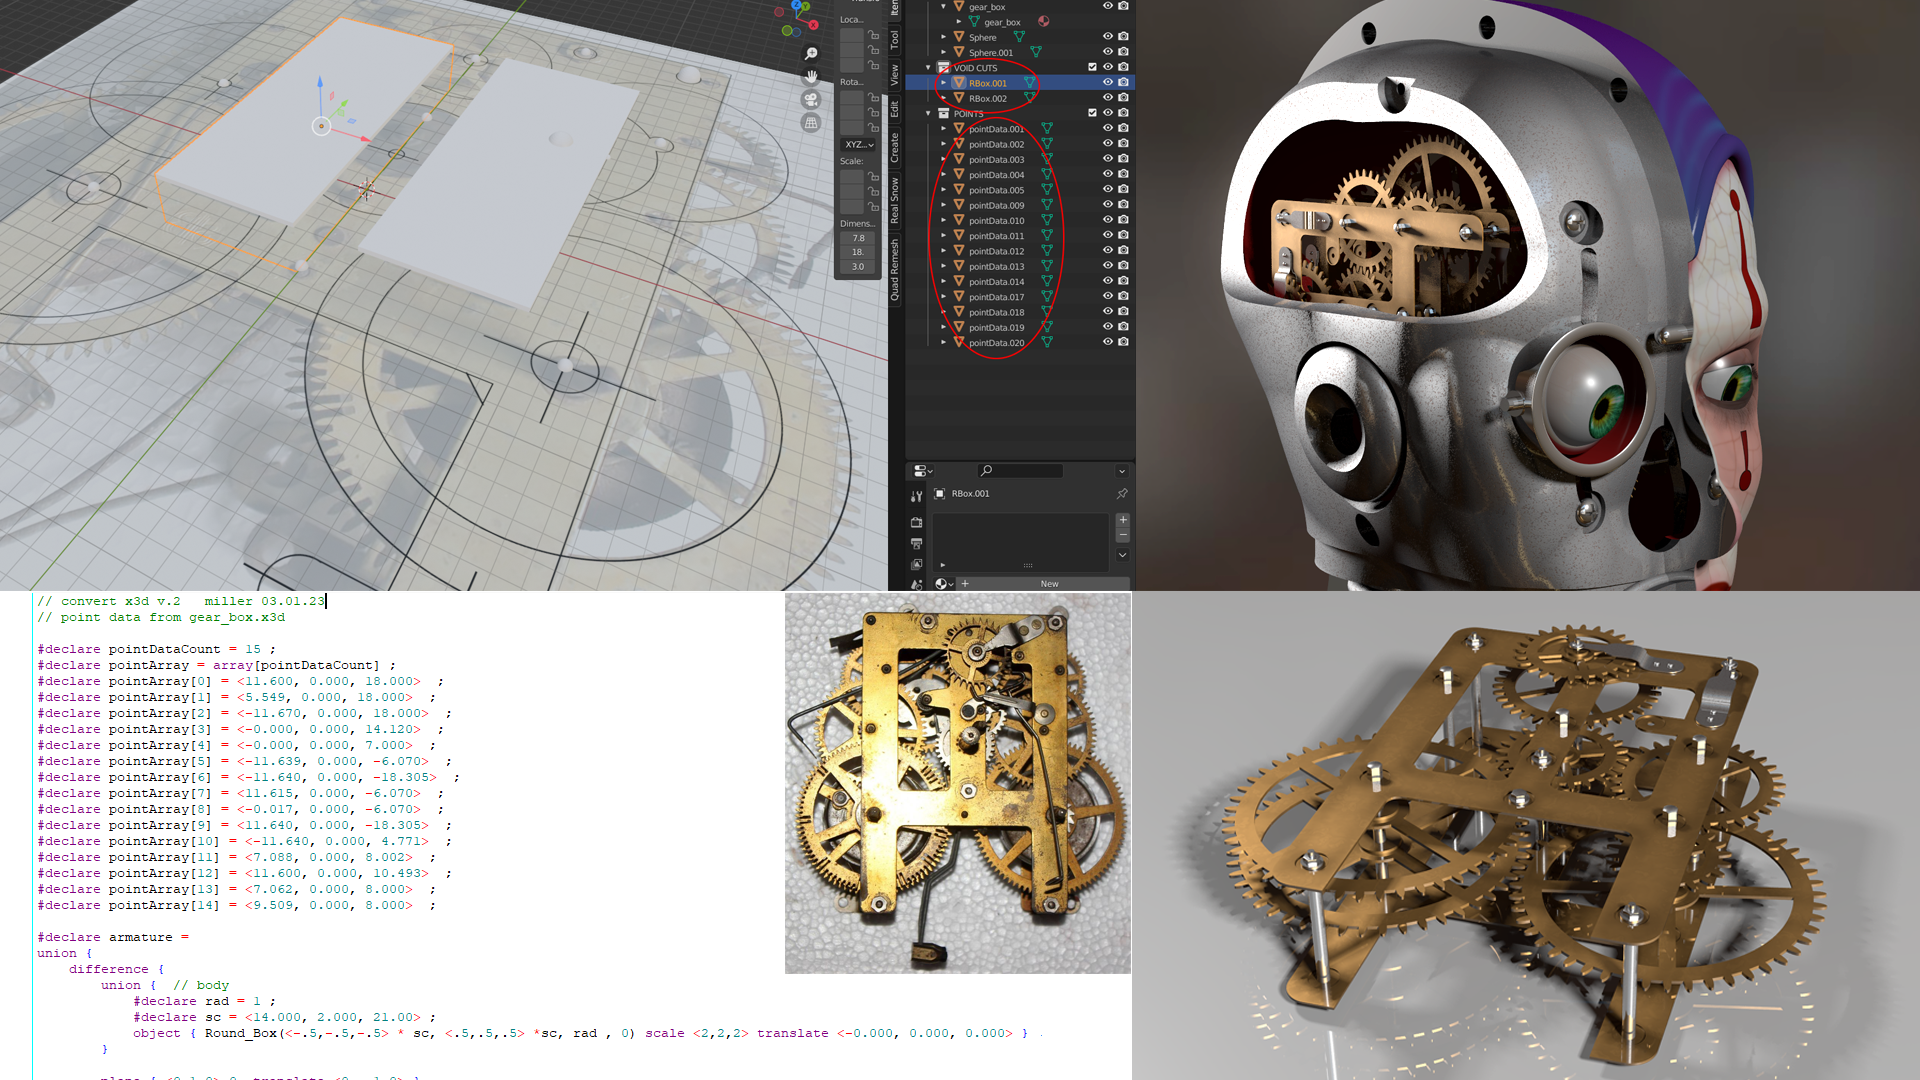
Thanks for the kudos.
When I jumped back into POV, I was using 3DS Max to export some object types to
assist in modeling and object placement. Recently, I moved to Blender once I
realized I could export & convert almost all of the object types through the
..x3D file format. I wrote a small translator and now use it frequently for
object/scene building.
In Blender, I always start with an image underlay.
I use naming conventions to sort the POV object types. I currently convert
spheres, boxes, round_boxes, cylinders, torus, blobs, points for prisms, lathes,
sweeps, and position arrays.
Yesterday, I modeled a gearbox for Jack's brain. I found an image that was
approximately what I had in mind. I screened it back and adding some guide-lines
before importing to Blender. I used spheres renames as pointData for position
arrays and use cubes renamed as RBox to export as POV Round_Box(), etc...
In POV, I use the pointData array in a loop to punch holes in the frame, and
place the gears, and used the Round_Boxes to create and void cut the frame body.
Attached shows the Blender file, the data dump, and 2 test renders.
Always a work in progress. :)
As for lighting, it's lots of test renderings. :)
Start with no lights and a few objects to confirm the global ambient - try to
use as little as possible. Use a sky sphere imaged close to the final
environment lighting unless your scene is fully enclosed.
Position the camera close to the intended view. Add each light 1 one at a time
starting with the most dominate. Hide all scene objects and add a few
materialized spheres on a floor plane in front of the camera to determine light
intensity, color, shadow direction, and reflections. I use a chrome sphere and
another with a satin bumpy finish. Look at the bump and phong positions to
verify that the light direction looks good. Never position lights behind the
camera. I like to have good definition between 'light-side/dark-side' on
objects. If the dominate light is from the right, add a softer fill/bounded
light from the left. I try to use 2 light to fill a scene and sometimes a very
weak under-light (no shadow) to fake bounced light from below the camera. If the
scene is starting to look over-lit, hide all the lights and add them back in one
at a time with less intensity. ...and lots of test renderings. :>)
Render on - I love what you have going on in your current scene.
Mike
Post a reply to this message
Attachments:
Download 'gear_box.png' (1928 KB)
Preview of image 'gear_box.png'
|
|
| |
| |
|
|
|
|
| |
| |
|
|
Op 24-5-2023 om 16:07 schreef Mike Miller:
[...]
>
>
> Thanks for the kudos.
> When I jumped back into POV, I was using 3DS Max to export some object types to
> assist in modeling and object placement. Recently, I moved to Blender once I
> realized I could export & convert almost all of the object types through the
> ..x3D file format. I wrote a small translator and now use it frequently for
> object/scene building.
>
> In Blender, I always start with an image underlay.
> I use naming conventions to sort the POV object types. I currently convert
> spheres, boxes, round_boxes, cylinders, torus, blobs, points for prisms, lathes,
> sweeps, and position arrays.
>
> Yesterday, I modeled a gearbox for Jack's brain. I found an image that was
> approximately what I had in mind. I screened it back and adding some guide-lines
> before importing to Blender. I used spheres renames as pointData for position
> arrays and use cubes renamed as RBox to export as POV Round_Box(), etc...
>
> In POV, I use the pointData array in a loop to punch holes in the frame, and
> place the gears, and used the Round_Boxes to create and void cut the frame body.
>
> Attached shows the Blender file, the data dump, and 2 test renders.
> Always a work in progress. :)
>
> As for lighting, it's lots of test renderings. :)
> Start with no lights and a few objects to confirm the global ambient - try to
> use as little as possible. Use a sky sphere imaged close to the final
> environment lighting unless your scene is fully enclosed.
>
> Position the camera close to the intended view. Add each light 1 one at a time
> starting with the most dominate. Hide all scene objects and add a few
> materialized spheres on a floor plane in front of the camera to determine light
> intensity, color, shadow direction, and reflections. I use a chrome sphere and
> another with a satin bumpy finish. Look at the bump and phong positions to
> verify that the light direction looks good. Never position lights behind the
> camera. I like to have good definition between 'light-side/dark-side' on
> objects. If the dominate light is from the right, add a softer fill/bounded
> light from the left. I try to use 2 light to fill a scene and sometimes a very
> weak under-light (no shadow) to fake bounced light from below the camera. If the
> scene is starting to look over-lit, hide all the lights and add them back in one
> at a time with less intensity. ...and lots of test renderings. :>)
>
> Render on - I love what you have going on in your current scene.
> Mike
>
Thanks indeed, Mike, for your detailed explanation. It is always
refreshing and enlightening to learn from others how they approach and
solve puzzles and problems which, I am sure, are so familiar to most of
us. I shall have to carefully re-read this: some solutions are familiar
to me as I follow more or less the same path/approach, others are new
and intriguing. Where lighting is concerned, I very much lean on
radiosity to help me fill the lighted space, sometimes adding small
fill-ins where difficulties appear... and it is lots of test renders
indeed!
--
Thomas
Post a reply to this message
|
|
| |
| |
|
|
|
|
| |
| |
|
|
Holy...diddly! /8---------O\
I'm speechless! :D Excuse me, now have to try and find my chin that just dropped
somewhere here on the floor, huuaah! :D
And gotta have some pills too; red, blue, dried frog, anything goes at this
point. xD
Post a reply to this message
|
|
| |
| |
|
|
|
|
| |
| |
|
|
Thomas de Groot <tho### [at] degrootorg> wrote:
> Op 24-5-2023 om 16:07 schreef Mike Miller:
> [...]
> >
> >
> > Thanks for the kudos.
> > When I jumped back into POV, I was using 3DS Max to export some object types to
> > assist in modeling and object placement. Recently, I moved to Blender once I
> > realized I could export & convert almost all of the object types through the
> > ..x3D file format. I wrote a small translator and now use it frequently for
> > object/scene building.
> >
> > In Blender, I always start with an image underlay.
> > I use naming conventions to sort the POV object types. I currently convert
> > spheres, boxes, round_boxes, cylinders, torus, blobs, points for prisms, lathes,
> > sweeps, and position arrays.
> >
> > Yesterday, I modeled a gearbox for Jack's brain. I found an image that was
> > approximately what I had in mind. I screened it back and adding some guide-lines
> > before importing to Blender. I used spheres renames as pointData for position
> > arrays and use cubes renamed as RBox to export as POV Round_Box(), etc...
> >
> > In POV, I use the pointData array in a loop to punch holes in the frame, and
> > place the gears, and used the Round_Boxes to create and void cut the frame body.
> >
> > Attached shows the Blender file, the data dump, and 2 test renders.
> > Always a work in progress. :)
> >
> > As for lighting, it's lots of test renderings. :)
> > Start with no lights and a few objects to confirm the global ambient - try to
> > use as little as possible. Use a sky sphere imaged close to the final
> > environment lighting unless your scene is fully enclosed.
> >
> > Position the camera close to the intended view. Add each light 1 one at a time
> > starting with the most dominate. Hide all scene objects and add a few
> > materialized spheres on a floor plane in front of the camera to determine light
> > intensity, color, shadow direction, and reflections. I use a chrome sphere and
> > another with a satin bumpy finish. Look at the bump and phong positions to
> > verify that the light direction looks good. Never position lights behind the
> > camera. I like to have good definition between 'light-side/dark-side' on
> > objects. If the dominate light is from the right, add a softer fill/bounded
> > light from the left. I try to use 2 light to fill a scene and sometimes a very
> > weak under-light (no shadow) to fake bounced light from below the camera. If the
> > scene is starting to look over-lit, hide all the lights and add them back in one
> > at a time with less intensity. ...and lots of test renderings. :>)
> >
> > Render on - I love what you have going on in your current scene.
> > Mike
> >
> Thanks indeed, Mike, for your detailed explanation. It is always
> refreshing and enlightening to learn from others how they approach and
> solve puzzles and problems which, I am sure, are so familiar to most of
> us. I shall have to carefully re-read this: some solutions are familiar
> to me as I follow more or less the same path/approach, others are new
> and intriguing. Where lighting is concerned, I very much lean on
> radiosity to help me fill the lighted space, sometimes adding small
> fill-ins where difficulties appear... and it is lots of test renders
> indeed!
>
> --
> Thomas
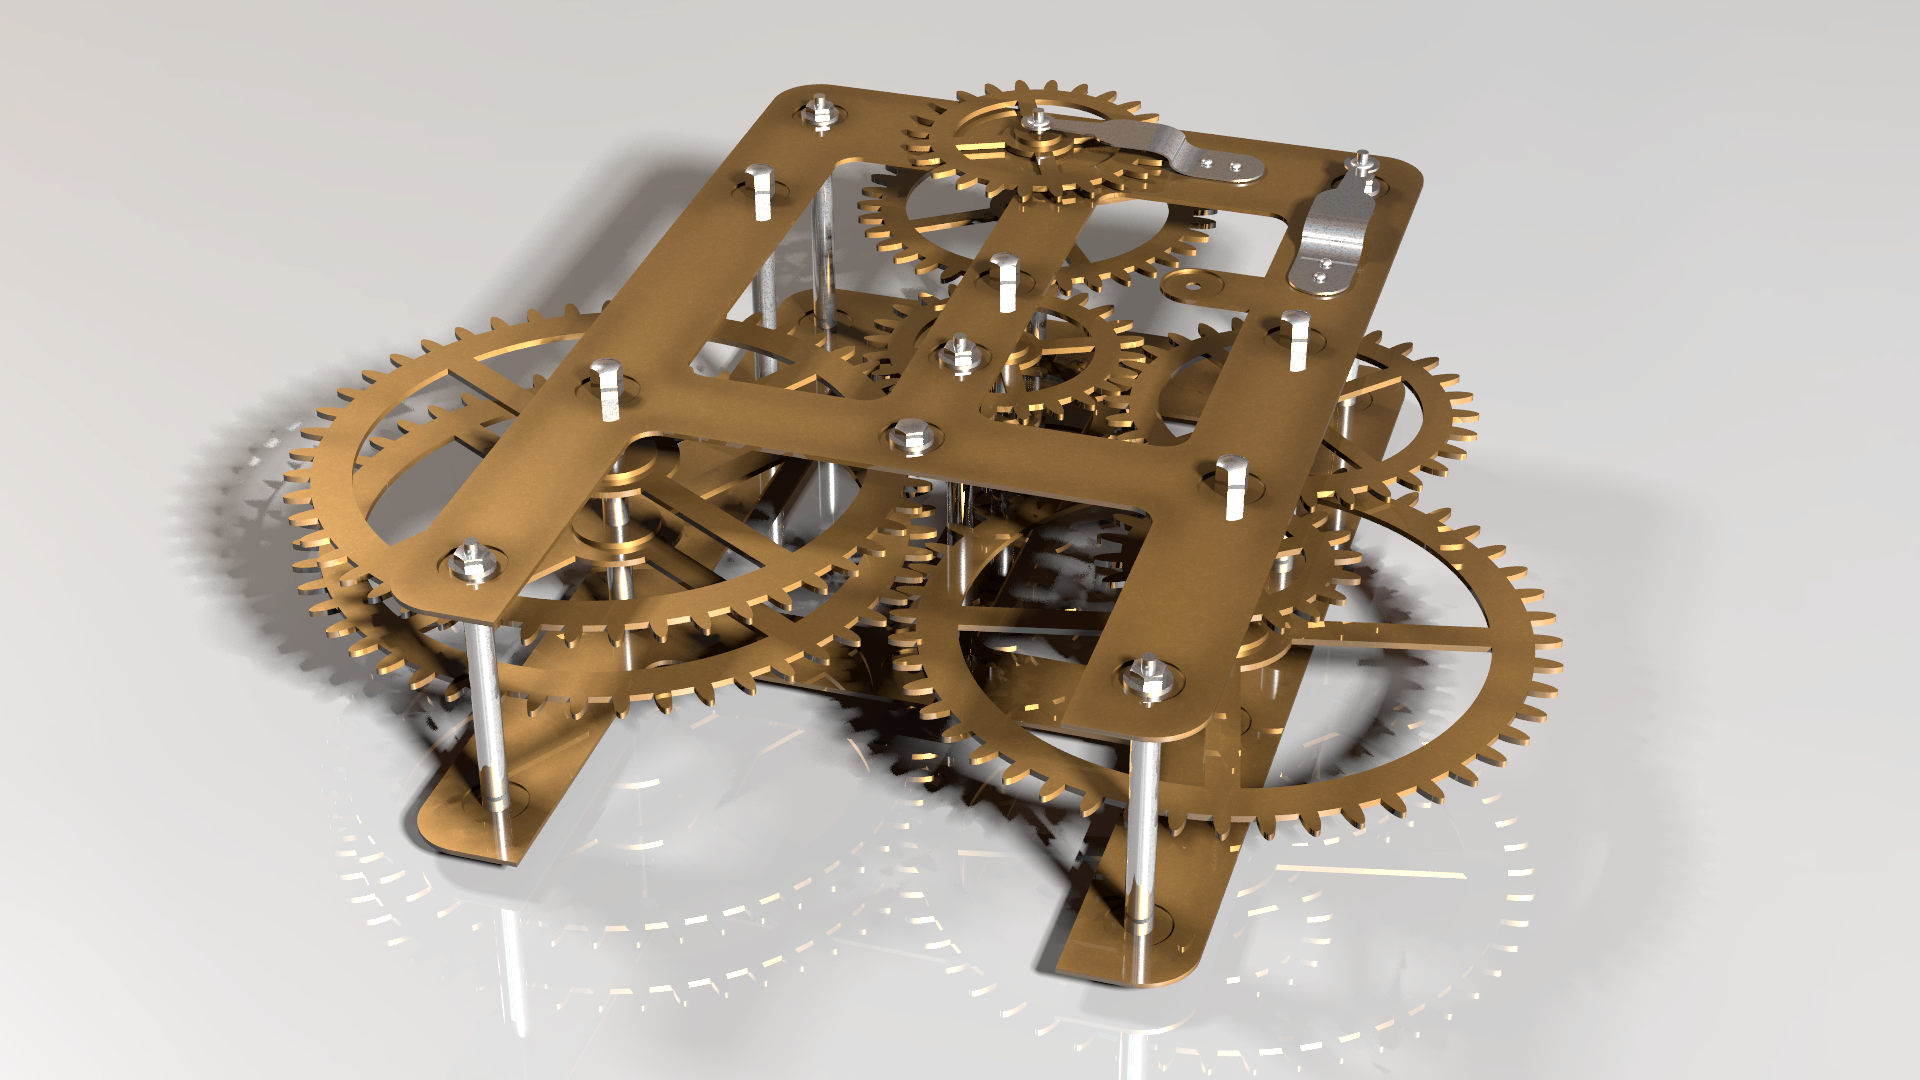
Thanks, I have not worked with POV's radiosity much. It can be very slow on
complex scenes. I've been able to 'fake-it' with using only area lights. I'm
sure I need to upgrade my hardware...requires wife intervention. ugg.
I mentioned 'no light' behind the camera...I meant the lights' view of the scene
is close to the cameras' view. Can make for bad renderings.
I just posted the scene file for the attached gear box image. It will show how
the Blender export is being used to construct the parts. If you use Blender and
think you have use for the .x3D to POV executes, you're free to use them.
Mike.
Post a reply to this message
Attachments:
Download 'gear_box.png' (1322 KB)
Preview of image 'gear_box.png'

|
|
| |
| |
|
|
|
|
| |
| |
|
|
"Mike Miller" <mil### [at] gmailcom> wrote:
> I had to post this. I looked over at my work surface and it's starting to
> resemble my rendering.
> Miller
Ha ha, I actually thought that was a render and was in awe.
I am still of course in awe of your other work but at least my desk is tidier
than yours ;-)
Sean
Post a reply to this message
|
|
| |
| |
|
|
|
|
| |
| |
|
|
"s.day" <s.d### [at] uelacuk> wrote:
> "Mike Miller" <mil### [at] gmailcom> wrote:
> > I had to post this. I looked over at my work surface and it's starting to
> > resemble my rendering.
> > Miller
>
> Ha ha, I actually thought that was a render and was in awe.
>
> I am still of course in awe of your other work but at least my desk is tidier
> than yours ;-)
>
> Sean
Oh my... I thought that too! :D :D :D Earlier today I was in a bit of a hurry
and didn't pay more attention. xD
Nevertheless, kudos to Mike's work, amazing stuff indeed! :)
Post a reply to this message
|
|
| |
| |
|
|
|
|
| |
| |
|
|
Le 2023-05-24 à 13:01, Mike Miller a écrit :
> Thanks, I have not worked with POV's radiosity much. It can be very slow on
> complex scenes. I've been able to 'fake-it' with using only area lights. I'm
> sure I need to upgrade my hardware...requires wife intervention. ugg.
>
> Mike.
>
>
Radiosity tend to dislike scenes with a lot of reflective and
transparent objects.
If that's your case, it MAY be worth it doing a multi-pass render.
A pass without most of the reflection and with the transparent objects
removed where you save the radiosity data.
Use higher quality radiosity settings.
Then, a second pass with all the reflections and transparent objects
where you load the previously generated radiosity data. Use relaxed
radiosity settings.
As I have no personal experience with that technique, I can't give you
advice about the details.
Post a reply to this message
|
|
| |
| |
|
|
|
|
| |
| |
|
|
Op 26/05/2023 om 16:06 schreef Alain Martel:
> Le 2023-05-24 à 13:01, Mike Miller a écrit :
>
>> Thanks, I have not worked with POV's radiosity much. It can be very
>> slow on
>> complex scenes. I've been able to 'fake-it' with using only area
>> lights. I'm
>> sure I need to upgrade my hardware...requires wife intervention. ugg.
>>
>
>> Mike.
>>
>>
>
> Radiosity tend to dislike scenes with a lot of reflective and
> transparent objects.
>
> If that's your case, it MAY be worth it doing a multi-pass render.
> A pass without most of the reflection and with the transparent objects
> removed where you save the radiosity data.
> Use higher quality radiosity settings.
> Then, a second pass with all the reflections and transparent objects
> where you load the previously generated radiosity data. Use relaxed
> radiosity settings.
> As I have no personal experience with that technique, I can't give you
> advice about the details.
1) A bit old by now maybe, but I guess still valid for current versions:
http://news.povray.org/povray.general/thread/%3C4e81db88@news.povray.org%3E/
2) The attached pdf is a compilation about the subject, starting in
2008, but towards the end there are some more recent tips and tricks
which may be of interest.
--
Thomas
Post a reply to this message
Attachments:
Download 'clipkas pov-ray voodoo - radiosity.pdf' (119 KB)
|
|
| |
| |
|
|
|
|
| |
| |
|
|
Il 22/05/2023 22:47, Mike Miller ha scritto:
> I had to post this. I looked over at my work surface and it's starting to
> resemble my rendering.
> Miller
Amazing.
Paolo
Post a reply to this message
|
|
| |
| |
|
|
|
|
| |
|
|