|
|
|
|
|
|
| |
| |
|
|
From: Jörg 'Yadgar' Bleimann
Subject: Planetary atmosphere using media
Date: 11 Apr 2010 09:49:18
Message: <4bc1d35e@news.povray.org>
|
|
|
| |
| |
|
|
High!
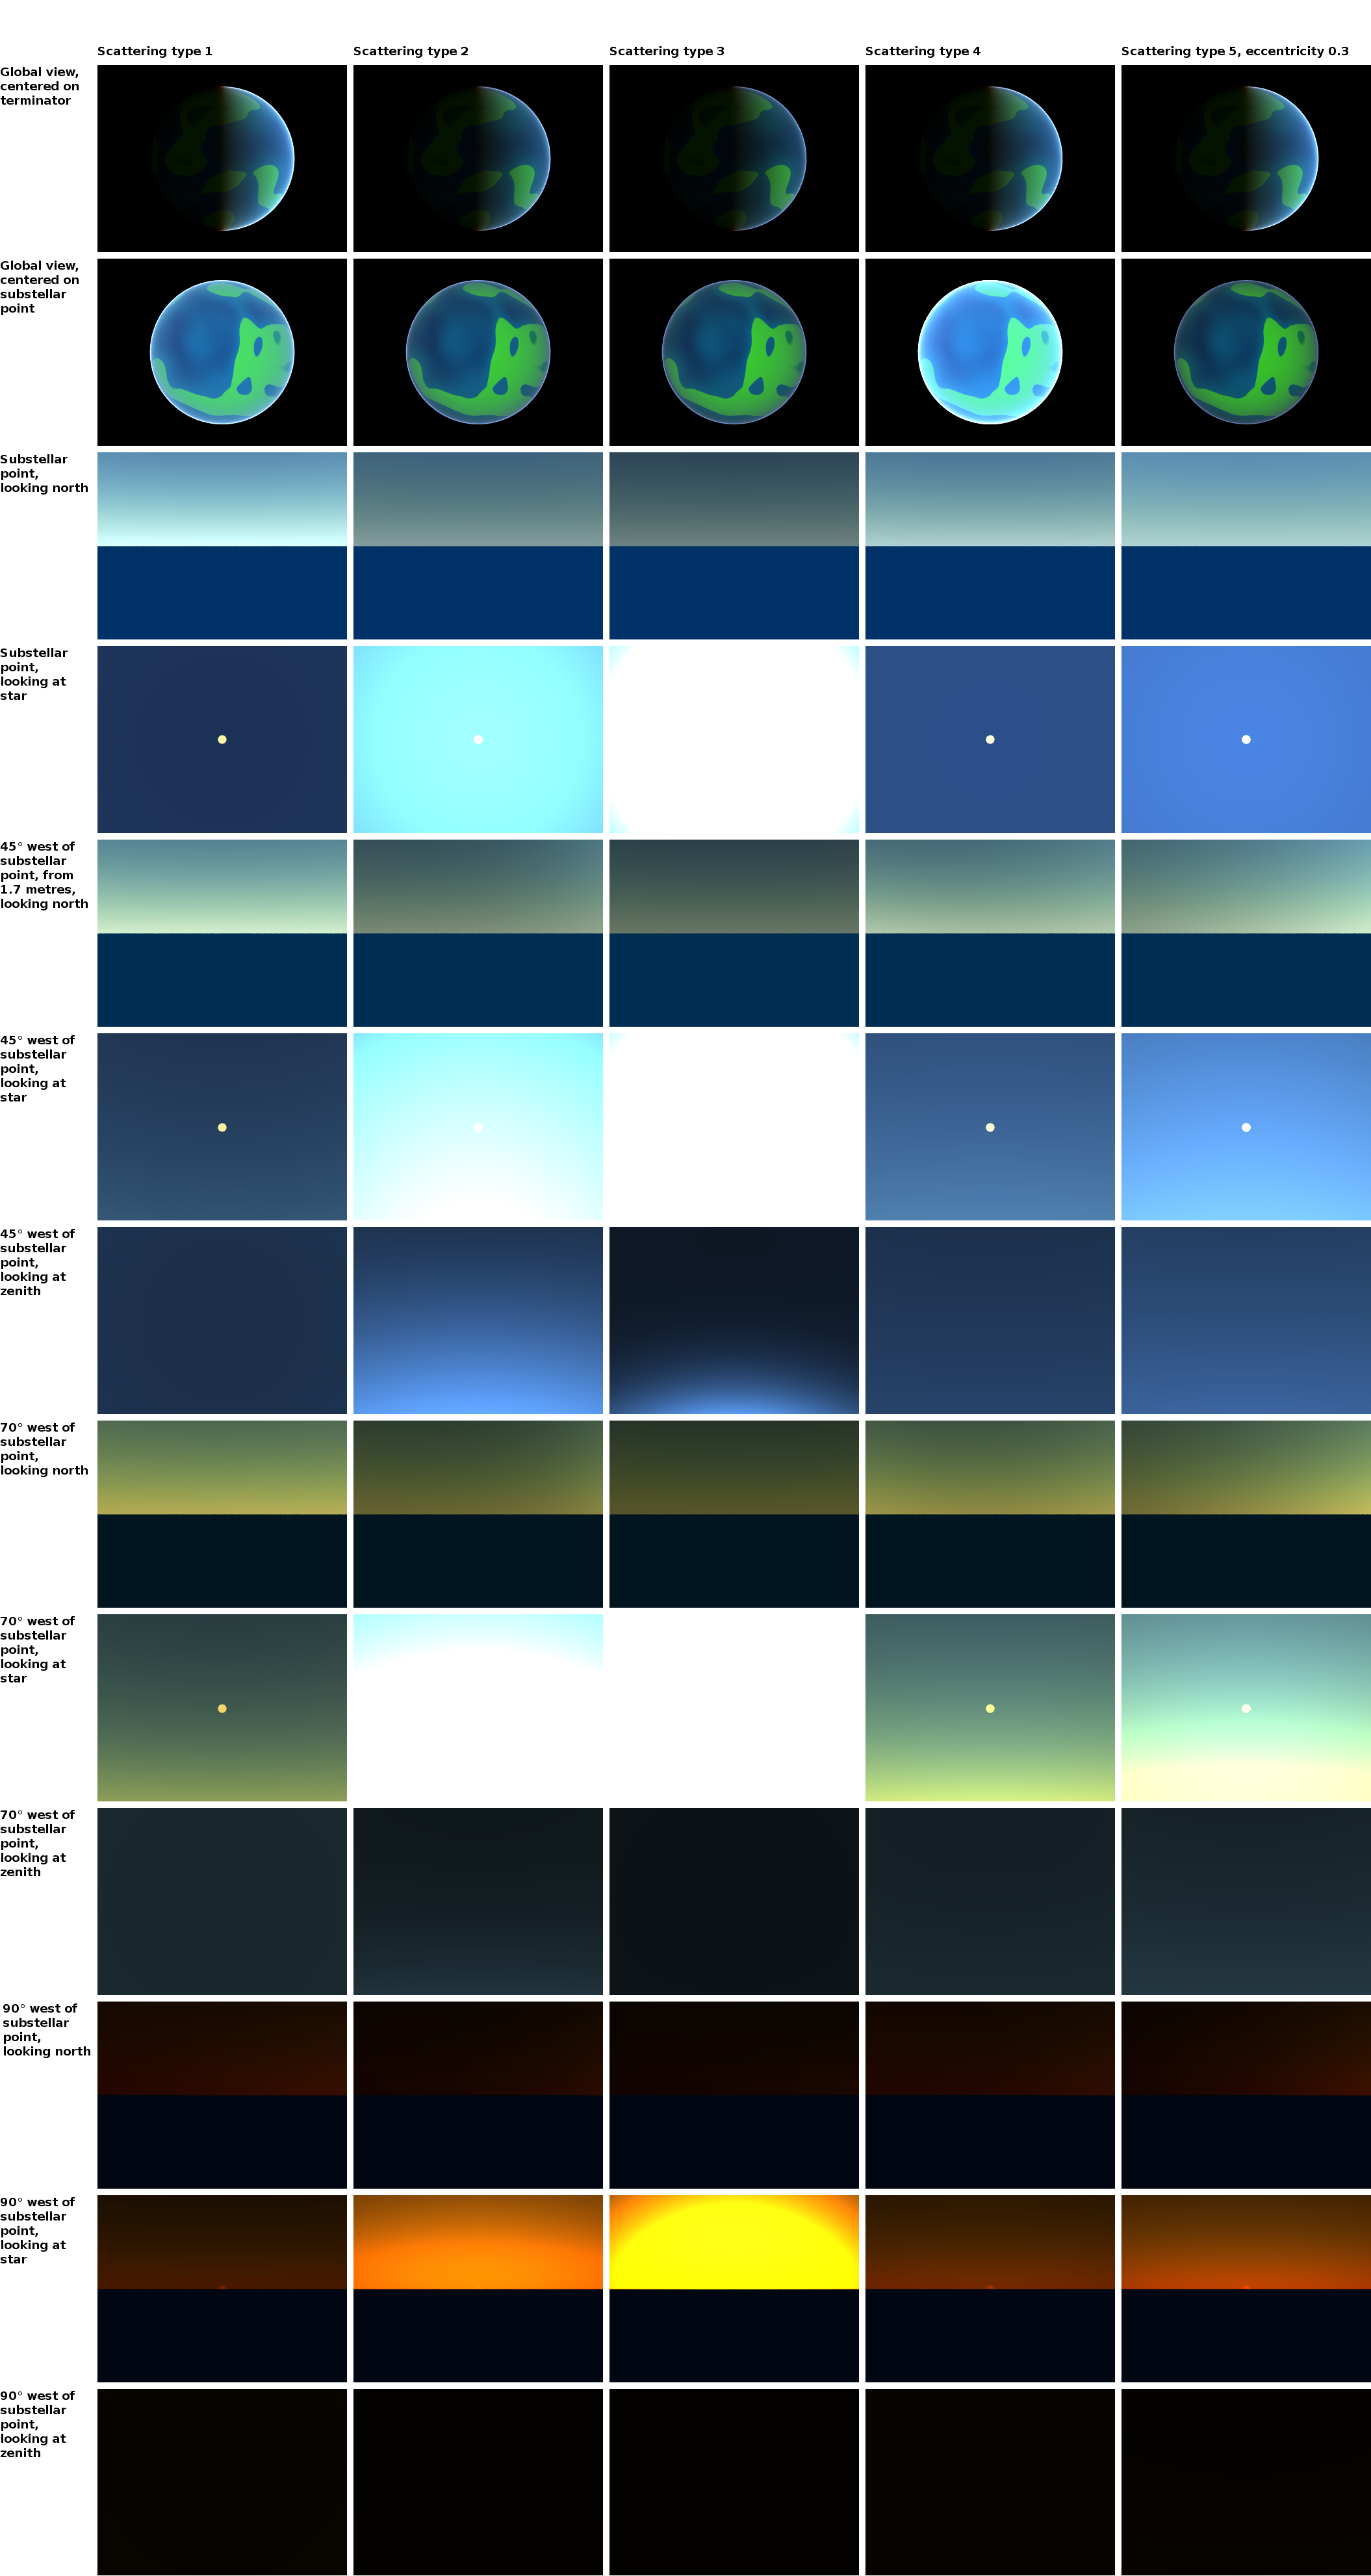
To make testing easier, I resorted to a simple spherical "test planet"
and tried various camera positions and illumination angles with all five
scattering types (and yes, it wasn't media but the isosurface which
slowed down my renderings - now each scene took about 70 seconds!).
The simplified test planet is a sphere with a radius of 5,100 POV units
(1 unit equals 1 kilometre); the media is contained by a sphere with a
radius of 5,150 units. In all scenes, the illumnating star is a simple
point light; in all ground scenes (all scenes from row 3 on), the camera
is placed 0.0017 units above the planet's surface.
Method, samples and intervals settings are default (see code attached here).
The most striking flaw with all scattering types is the extremely dark
sky at low illumination angles - the sunrise looks like on Mars but not
like on a planet with Earth-like atmospheric pressure. Could using an
area light instead of a point light be helpful here? Or do I have to
fake the indirectly illuminated sky before dawn by using an additional
(shadowless) fill light source?
Reactor's suggestion of adding an absorbing component did not work at
all - regardless which ratios between scattering and absorbing, the sky
turned even darker!
Then, at medium illumination angels (~45 degrees), the otherwise pretty
realistic sky with scattering type 1 and 4 still turns too greenish
close to the horizon...
See you in Khyberspace!
Yadgar
// Planetary Surface Camera test scene
#declare Model_Planet=
sphere
{
0, 1
texture
{
pigment
{
bozo
color_map
{
[0 rgb <0, 0, 0.2>]
[0.5 rgb <0, 0.4, 1>]
[0.5 rgb <0.2, 1, 0>]
[0.65 rgb <0.2, 1, 0>]
[0.67 rgb <0, 0.6, 0.2>]
[0.78 rgb <0, 0.6, 0.2>]
[0.79 rgb <0.5, 1, 0.5>]
[0.86 rgb 0.6]
[0.92 rgb 0.6]
[0.925 rgb 1]
}
turbulence 2
octaves 7
omega 0.2
}
finish { ambient 0.1 diffuse 1 brilliance 0.5 }
}
scale 5140
}
#declare Atmosphere =
sphere
{
0, 5190
hollow
material
{
texture
{
pigment
{
color rgbt 1
}
}
interior
{
media
{
#declare tp=int(clock/13);
scattering
{
tp, <0.8, 0.8, 1>/80
#if (tp=5)
eccentricity 0.3
#end
}
density
{
spherical
density_map
{
[0 rgb <0.25, 0.5, 1>]
[0.005 rgb <0.25, 0.5, 1>]
[0.011 rgb <0.9, 1, 1>]
[1 rgb <0.9, 1, 1>]
}
}
}
}
}
}
object { Model_Planet }
object { Atmosphere }
light_source
{
<1000000, 0, 0>
color rgb 1
looks_like
{
sphere
{
<1000000, 0, 0>, 25000
texture
{
pigment { color rgb <1, 1, 0.65> }
finish { ambient 1 diffuse 0 }
}
}
}
}
// #declare view=4;
#switch (mod(clock, 13))
#case (0) // global view, centered on terminator
#declare lat=0;
#declare long=180;
#declare ht=20000;
#declare dir=0;
#declare azi=-89.9999;
#break
#case (1) // global view, centered on substellar point
#declare lat=0;
#declare long=270;
#declare ht=20000;
#declare dir=0;
#declare azi=-89.9999;
#break
#case (2) // substellar point from 1.7 metres, looking north
#declare lat=0;
#declare long=270;
#declare ht=0.0017;
#declare dir=0;
#declare azi=0;
#break
#case (3) // Star from substellar point at 1.7 metres
#declare lat=0;
#declare long=270;
#declare ht=0.0017;
#declare dir=0;
#declare azi=89.9999;
#break
#case (4) // 45 degress west of substellar point from 1.7 metres,
looking north
#declare lat=0;
#declare long=225;
#declare ht=0.0017;
#declare dir=0;
#declare azi=0;
#break
#case (5) // Star from 45 degrees west of substellar point at 1.7 metres
#declare lat=0;
#declare long=225;
#declare ht=0.0017;
#declare dir=90;
#declare azi=45;
#break
#case (6) // Zenith from 45 degrees west of substellar point at 1.7
metres
#declare lat=0;
#declare long=225;
#declare ht=0.0017;
#declare dir=90;
#declare azi=89.9999;
#break
#case (7) // 70 degress west of substellar point from 1.7 metres,
looking north
#declare lat=0;
#declare long=200;
#declare ht=0.0017;
#declare dir=0;
#declare azi=0;
#break
#case (8) // Star from 70 degrees west of substellar point at 1.7 metres
#declare lat=0;
#declare long=200;
#declare ht=0.0017;
#declare dir=90;
#declare azi=20;
#break
#case (9) // Zenith from 70 degrees west of substellar point at 1.7
metres
#declare lat=0;
#declare long=200;
#declare ht=0.0017;
#declare dir=90;
#declare azi=89.9999;
#break
#case (10) // 90 degress west of substellar point from 1.7 metres,
looking north
#declare lat=0;
#declare long=180;
#declare ht=0.0017;
#declare dir=0;
#declare azi=0;
#break
#case (11) // Star from 90 degrees west of substellar point at 1.7 metres
#declare lat=0;
#declare long=180;
#declare ht=0.0017;
#declare dir=90;
#declare azi=0;
#break
#case (12) // Zenith from 90 degrees west of substellar point at 1.7
metres
#declare lat=0;
#declare long=180;
#declare ht=0.0017;
#declare dir=90;
#declare azi=89.9999;
#break
#end
#declare surfPos = trace(Model_Planet, 0,
<sin(radians(-long))*cos(radians(lat)), sin(radians(lat)),
cos(radians(-long))*cos(radians(lat))>);
#declare camPos = surfPos + vnormalize(surfPos)*ht;
#declare dirVect = <sin(radians(dir))*cos(radians(azi)),
sin(radians(azi)), cos(radians(dir))*cos(radians(azi))>;
camera
{
sky surfPos
location camPos
look_at camPos + vrotate(dirVect, <lat-90, -(long-180), 0>)
angle 40
}
Post a reply to this message
Attachments:
Download '2010-04-11 atmospheric media tests 1 to 65.png' (745 KB)
Preview of image '2010-04-11 atmospheric media tests 1 to 65.png'

|
|
| |
| |
|
|
|
|
| |
| |
|
|
> High!
>
> To make testing easier, I resorted to a simple spherical "test planet"
> and tried various camera positions and illumination angles with all five
> scattering types (and yes, it wasn't media but the isosurface which
> slowed down my renderings - now each scene took about 70 seconds!).
>
> The simplified test planet is a sphere with a radius of 5,100 POV units
> (1 unit equals 1 kilometre); the media is contained by a sphere with a
> radius of 5,150 units. In all scenes, the illumnating star is a simple
> point light; in all ground scenes (all scenes from row 3 on), the camera
> is placed 0.0017 units above the planet's surface.
>
> Method, samples and intervals settings are default (see code attached
> here).
>
> The most striking flaw with all scattering types is the extremely dark
> sky at low illumination angles - the sunrise looks like on Mars but not
> like on a planet with Earth-like atmospheric pressure. Could using an
> area light instead of a point light be helpful here? Or do I have to
> fake the indirectly illuminated sky before dawn by using an additional
> (shadowless) fill light source?
>
> Reactor's suggestion of adding an absorbing component did not work at
> all - regardless which ratios between scattering and absorbing, the sky
> turned even darker!
>
> Then, at medium illumination angels (~45 degrees), the otherwise pretty
> realistic sky with scattering type 1 and 4 still turns too greenish
> close to the horizon...
>
> See you in Khyberspace!
>
> Yadgar
>
> density
> {
> spherical
> density_map
> {
> [0 rgb <0.25, 0.5, 1>]
> [0.005 rgb <0.25, 0.5, 1>]
> [0.011 rgb <0.9, 1, 1>]
> [1 rgb <0.9, 1, 1>]
> }
> }
> }
> }
> }
> }
>
Your spherical pattern have a value of rgb<0.25, 0.5, 1> EVERYWHERE
outside a radius of 1. That means that the part that you can see only
have that value, as the surface is at a radius of 5140.
You may try scaling the media to the radius of it's container.
Add:
scale 5190
just after the density_map.
Alain
Post a reply to this message
|
|
| |
| |
|
|
|
|
| |
| |
|
|
Have you looked at p.b.tutorials "TerraPOV - Sky system - Atmosphere" by
Bruno Cabasson?
I did use (a just slightly modified version) of his atmosphere and it
did work fairly well and realistic.
-Ive
Post a reply to this message
|
|
| |
| |
|
|
|
|
| |
| |
|
|
There are various effects in the atmosphere which contribute
to scattering. Therefore, a single media statement may not be
enough to simulate all kinds of views.
Here is a sample with two media blocks (not a great atmosphere
but it shows how combine uniform and directional scattering so
you can get more control how it looks in various directions.
I also fixed the scale for spherical as Alain suggested, and
used a macro so you can see for which height above ground you
are actually specifying densities:
#declare ATM_THICKNESS = 50;
#declare ATM_RADIUS = 5140 + ATM_THICKNESS;
#declare Atmosphere = difference
{
sphere {0, ATM_RADIUS}
sphere {0, 5140}
hollow
material
{
texture
{
pigment
{
color rgbt 1
}
}
interior
{
media
{
method 3 samples 10
scattering {1, <0.8, 0.8, 1>/200}
density
{
spherical scale ATM_RADIUS
color_map
{
[(ATM_THICKNESS-50)/ATM_RADIUS rgb <0.0,0.0,0.0>]
[(ATM_THICKNESS-20)/ATM_RADIUS rgb <0.8,0.9,0.9>]
[(ATM_THICKNESS-00)/ATM_RADIUS rgb <0.9,1.0,1.0>]
}
}
}
media
{
method 3 samples 10
scattering {5, <0.8, 0.8, 1>/100 eccentricity 0.4}
density
{
spherical scale ATM_RADIUS
color_map
{
[(ATM_THICKNESS-50)/ATM_RADIUS rgb 0]
[(ATM_THICKNESS-00)/ATM_RADIUS rgb <0.9,1.0,1.0>]
}
}
}
}
}
}
Post a reply to this message
|
|
| |
| |
|
|
|
|
| |
| |
|
|
> The most striking flaw with all scattering types is the extremely dark
> sky at low illumination angles - the sunrise looks like on Mars but not
> like on a planet with Earth-like atmospheric pressure. Could using an
> area light instead of a point light be helpful here? Or do I have to
> fake the indirectly illuminated sky before dawn by using an additional
> (shadowless) fill light source?
Perhaps one reason that pre-dawn and early dawn scenes look much darker
than what you're used to seeing in the real world is the fact that our
eyes adjust to darkness and brightness to bring all scenes to the
middle. If things are too dark, our eyes adjust to make everything
brighter.
Regards,
John
Post a reply to this message
|
|
| |
| |
|
|
|
|
| |
| |
|
|
John VanSickle wrote:
> Perhaps one reason that pre-dawn and early dawn scenes look much darker
> than what you're used to seeing in the real world is the fact that our
> eyes adjust to darkness and brightness to bring all scenes to the
> middle. If things are too dark, our eyes adjust to make everything
> brighter.
fwiw I concur. In my own raytracer I got close, but getting consistent
coloration between different ground camera angles (pointing along the
ground, then pointing up at the sky's zenith, etc.) was wonky. Can be
tweaked for stills without reflections, but the moment you add a lake or
ocean, the colors would be wrong because the zenith sky would be partly
reflected while the camera is aiming at the horizon sky.
The problem turned out to be the color model. In RGB, it's hard or
perhaps intractable; in CIE it's easy because the color units are more
directly mapped to actual radiation wavelengths which the
scattering/absorption equations prefer, and tonemapping to handle eye
dark/light adaptation is easy too.
Ray
Post a reply to this message
|
|
| |
| |
|
|
|
|
| |
| |
|
|
Am 15.04.2010 11:07, schrieb Ray Gardener:
> The problem turned out to be the color model. In RGB, it's hard or
> perhaps intractable; in CIE it's easy because the color units are more
> directly mapped to actual radiation wavelengths which the
> scattering/absorption equations prefer, and tonemapping to handle eye
> dark/light adaptation is easy too.
Is that "CIE" as in "CIE RGB", "CIE XYZ", or "CIE L*a*b*"?
Post a reply to this message
|
|
| |
| |
|
|
From: "Jérôme M. Berger"
Subject: Re: Planetary atmosphere using media
Date: 15 Apr 2010 14:18:00
Message: <4bc75858@news.povray.org>
|
|
|
| |
| |
|
|
clipka wrote:
> Am 15.04.2010 11:07, schrieb Ray Gardener:
>
>> The problem turned out to be the color model. In RGB, it's hard or
>> perhaps intractable; in CIE it's easy because the color units are more
>> directly mapped to actual radiation wavelengths which the
>> scattering/absorption equations prefer, and tonemapping to handle eye
>> dark/light adaptation is easy too.
>
> Is that "CIE" as in "CIE RGB", "CIE XYZ", or "CIE L*a*b*"?
You forgot "CIE L*u*v*". OTOH, what is "CIE RGB"?
Jerome
--
mailto:jeb### [at] free fr
http://jeberger.free.fr
Jabber: jeb### [at] jabberfr fr
http://jeberger.free.fr
Jabber: jeb### [at] jabberfr
Post a reply to this message
Attachments:
Download 'us-ascii' (1 KB)
|
|
| |
| |
|
|
|
|
| |
| |
|
|
> clipka wrote:
>> Am 15.04.2010 11:07, schrieb Ray Gardener:
>>
>>> The problem turned out to be the color model. In RGB, it's hard or
>>> perhaps intractable; in CIE it's easy because the color units are more
>>> directly mapped to actual radiation wavelengths which the
>>> scattering/absorption equations prefer, and tonemapping to handle eye
>>> dark/light adaptation is easy too.
>>
>> Is that "CIE" as in "CIE RGB", "CIE XYZ", or "CIE L*a*b*"?
> You forgot "CIE L*u*v*". OTOH, what is "CIE RGB"?
I also forgot "CIE xyY" and "CIE UVW" ;-)
CIE RGB is a wide-gamut RGB color space defined in 1931 based on
spectral colors, with R=700nm, G=546.1nm, B=435.8nm (the latter two are
mercury vapor spectral lines) and whitepoint E. At least that's what
Wikipedia claims.
Post a reply to this message
|
|
| |
| |
|
|
|
|
| |
| |
|
|
clipka wrote:
> Am 15.04.2010 11:07, schrieb Ray Gardener:
>
>> The problem turned out to be the color model. In RGB, it's hard or
>> perhaps intractable; in CIE it's easy because the color units are more
>> directly mapped to actual radiation wavelengths which the
>> scattering/absorption equations prefer, and tonemapping to handle eye
>> dark/light adaptation is easy too.
>
> Is that "CIE" as in "CIE RGB", "CIE XYZ", or "CIE L*a*b*"?
CIE XYZ.
Ray
Post a reply to this message
|
|
| |
| |
|
|
|
|
| |
|
|