|
|
|
|
|
|
| |
| |
|
|
|
|
| |
| |
|
|
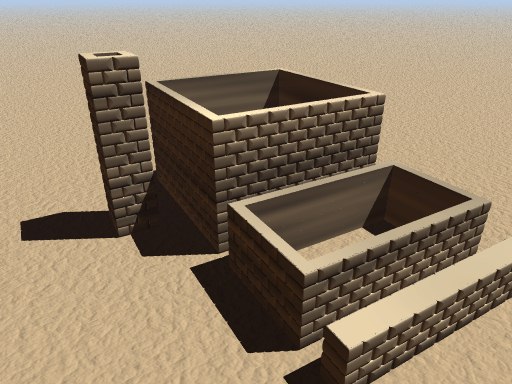
Just thought I would show everybody what I was working on today. the
macro so far lets you define the width, depth and height of the brick
structure. It's all done with isosurfaces. It renders fairly fast,
considering it is a complex isosurface. This scene rendered in 4 minutes
57 seconds with AA on my P166 mhz.
The next thing I will do is make a roof macro to be used with the wall
macro.
Any questions, comments, improvements?
--
Samuel Benge
E-Mail: STB### [at] aol com
Visit the still unfinished isosurface tutorial:
http://members.aol.com/stbenge com
Visit the still unfinished isosurface tutorial:
http://members.aol.com/stbenge
Post a reply to this message
Attachments:
Download 'bricks.jpg' (53 KB)
Preview of image 'bricks.jpg'
|
|
| |
| |
|
|
|
|
| |
| |
|
|
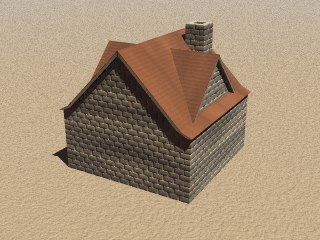
Here's more progress on it. It still needs windows and doors. My plan is to
make it easy to create many buildings with little work. For instance this
house is made by typing this:
union{
House(3,3,3,<0,0,0>)
House(.25,6.5,.25,<1,0,2>)
Roof(3,3,0,y*3)
Roof(2.5,2.5,90,y*3)
pigment{function noise3d(x/4,y*4,z/4)color_map{[0 rgb<.9 .85 .7>][1 rgb<.9
.85 .7>*.6]}}
finish{diffuse .9}
}
--
Samuel Benge
E-Mail: STB### [at] aolcom
Visit the still unfinished isosurface tutorial: http://members.aol.com/stbenge
Post a reply to this message
Attachments:
Download 'bricks2.jpg' (23 KB)
Preview of image 'bricks2.jpg'
|
|
| |
| |
|
|
|
|
| |
| |
|
|
I can see a need for some instructions going with that. I think people might
need to understand how it gets put together somehow. The Resulting example
image sure looks nice though.
Bob
"SamuelT." <STB### [at] aolcom> wrote in message news:38CDE109.C2217349@aol.com...
| Here's more progress on it. It still needs windows and doors. My plan is to
| make it easy to create many buildings with little work. For instance this
| house is made by typing this:
|
| union{
| House(3,3,3,<0,0,0>)
| House(.25,6.5,.25,<1,0,2>)
| Roof(3,3,0,y*3)
| Roof(2.5,2.5,90,y*3)
| pigment{function noise3d(x/4,y*4,z/4)color_map{[0 rgb<.9 .85 .7>][1 rgb<.9
| .85 .7>*.6]}}
| finish{diffuse .9}
| }
|
| --
| Samuel Benge
|
| E-Mail: STB### [at] aolcom
|
| Visit the still unfinished isosurface tutorial: http://members.aol.com/stbenge
|
|
|
--------------------------------------------------------------------------------
Post a reply to this message
|
|
| |
| |
|
|
|
|
| |
| |
|
|
Sweet! Great work Sammy!
Post a reply to this message
|
|
| |
| |
|
|
|
|
| |
| |
|
|
Very cool. Interesting striped texture on the wall. How easy would it be to add a
realistic brick texture like Jeff Lee's to this thing? That would make this
incredibly cool for filling in villiages and towns...
Josh
"SamuelT." wrote:
> Here's more progress on it. It still needs windows and doors. My plan is to
> make it easy to create many buildings with little work. For instance this
> house is made by typing this:
>
> union{
> House(3,3,3,<0,0,0>)
> House(.25,6.5,.25,<1,0,2>)
> Roof(3,3,0,y*3)
> Roof(2.5,2.5,90,y*3)
> pigment{function noise3d(x/4,y*4,z/4)color_map{[0 rgb<.9 .85 .7>][1 rgb<.9
> .85 .7>*.6]}}
> finish{diffuse .9}
> }
>
> --
> Samuel Benge
>
> E-Mail: STB### [at] aolcom
>
> Visit the still unfinished isosurface tutorial: http://members.aol.com/stbenge
>
> ------------------------------------------------------------------------
> [Image]
--
Josh English
eng### [at] spiritonecom
"May your hopes, dreams, and plans not be destroyed by a few zeros."
Post a reply to this message
|
|
| |
| |
|
|
|
|
| |
| |
|
|
Put the chimney up to the wall... that way they don't have to go out
side to the fireplace...
Post a reply to this message
|
|
| |
| |
|
|
|
|
| |
| |
|
|
This would make a nice Moray plugin :}
--
+--------------------------+----------------------------------------+
| Robert Alan Byer | "I don't want to take over the world, |
| bye### [at] mailourserversnet | just my own little part of it." |
| Phone: (317)357-2724 | http://www.ourservers.net/~byer |
+--------------------------+----------------------------------------+
| Send an E-mail request to obtain my PGP key. ICQ #65926579 |
+-------------------------------------------------------------------+
Post a reply to this message
|
|
| |
| |
|
|
|
|
| |
| |
|
|
Bob Hughes wrote:
> I can see a need for some instructions going with that. I think people might
> need to understand how it gets put together somehow.
I was just showing how after the macros are made, how little code it takes to do
something. In this case, it is a brick house.
> The Resulting example
> image sure looks nice though.
>
> Bob
Thanks!
--
Samuel Benge
E-Mail: STB### [at] aolcom
Visit the still unfinished isosurface tutorial: http://members.aol.com/stbenge
Post a reply to this message
|
|
| |
| |
|
|
|
|
| |
| |
|
|
Thanks. I made it to where you just put the macro inside a union{ } statement along
with your pigment, finish, and normal. The bricks aren't the standard setup, meaning
there are huge bicks and little bricks on the edges, instead of normal-sized ones.
This may cause some problems when putting a standard brick-type pigment on them.
Josh English wrote:
> Very cool. Interesting striped texture on the wall. How easy would it be to add a
> realistic brick texture like Jeff Lee's to this thing? That would make this
> incredibly cool for filling in villiages and towns...
>
> Josh
--
Samuel Benge
E-Mail: STB### [at] aolcom
Visit the still unfinished isosurface tutorial: http://members.aol.com/stbenge
Post a reply to this message
|
|
| |
| |
|
|
|
|
| |
|
|