|
 |
Well this is my first post in about 6 months or so, I've stopped using pov
for quite a while but I've decided to get back into it. This time I'm making
a conceded effort NOT to use a modeller, I've always used Moray, with the
exception of some of my earlier images, and while it is a good modeller I
sorta feel like I'm cheating ;-) Anyway people on this server tend to look
at you funny if you use a modeller, hehe. So to start things off I've
decided to take on a rather hard project. I'm modelling a tunnel made of
individual bricks with a brick floor. This is the first time I've ever used
any of the scripting capabilities of Pov and I have to say I'm enjoying it.
However I have gotten a little stuck with a Geometry/Scripting problem.
Let's see if anyone can help. Here is what I'm trying to do. I want to
create N number of bricks rotated 0 (theta) degrees. I want the bricks to be
placed end to end vertically. After about 2 hours of working this out of
paper I boiled the translation on the y axis down to this formula.
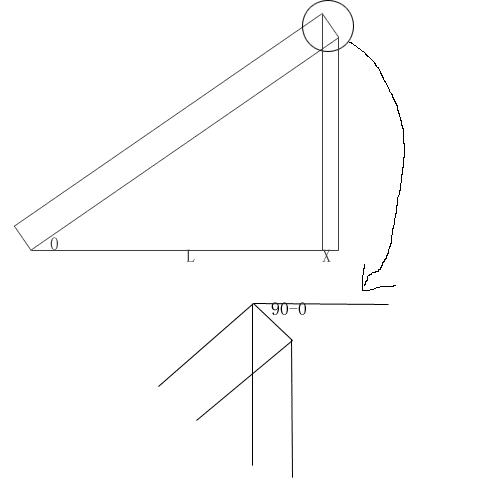
tan(0+atan2(boxh,boxw))*(cos(90-0)*boxw-cos(0)*boxh)
where 0 = theta and boxw = width and boxh=height
0 here is the angle I rotate the box. On the diagram below L is
cos(90-0)*boxw-cos(0)*boxh.
However I want the altitude up to the top of the corner, this forms a right
triangle with the diagonal of the box as a hypotenuse and L as the base.
However theta of THIS triangle is different from theta the theta on the
diagram bellow. In order to get the new angle I add the angle formed by the
base of the box and its diagonal given by atan2(boxh,boxw) to 0. I don't
know if this makes ANY sense to anyone. Anyhow the formula seems to work, a
little. As long as the angle is 45 or -45 it works perfectly, however
anything other than 45 doesn't work. I'm only in Math 12 now so there is
probably a much more consise way of doing this, but this is the way that
seemed best to me. Bellow is the entire scene file.
#include "colors.inc"
#declare boxh = 1;
#declare boxw = 10;
#declare boxl = 8;
#declare Mybox =
box{
<-boxw/2,boxh/2,-boxl/2>
<boxw/2,-boxh/2,boxl/2>
texture{
pigment {color White}
}
}
camera {
location <0,8,-20>
look_at <0,0,0>
}
#declare rot = 45;
object {Mybox
rotate <0,0,rot>}
object {Mybox
rotate <0,0,rot>
translate <(cos(radians(90-rot))*boxw - cos(radians(rot))*boxh),
(tan(radians(rot)+atan2(boxh,boxw))*(cos(radians(90-rot))*boxw-cos(radians(r
ot))*boxh)),
0> }
light_source {<10,50,-100> color White}
Post a reply to this message
Attachments:
Download 'diagram.gif' (6 KB)
Preview of image 'diagram.gif'
|
|