|
 |
John M. Dlugosz <joh### [at] dlugosz com> wrote:
> Here is a first cut at weaving. This is like the bottom of the basket
photo
> in a few important ways. I see the splines are rippled, though -- the
> individual torii don't exactly line up, I guess. It's not like other
macros
> where the component shapes are designed to meet perfectly. I need a =lot=
> of segments to make it smooth (enough), and the rendering slows down right
> off the bat, so I suspect the bounding boxes aren't working as well as
they
> ought to.
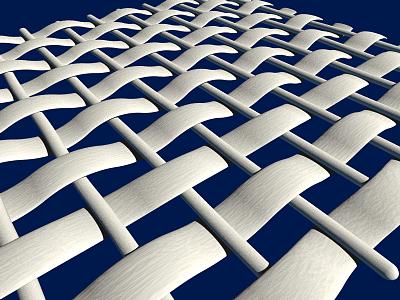
Each torii segment starts with the tangent that the previous segment ended
with, so the results certainly should be smooth. This continuation of
tangents, however, can cause some rippling, like a sine wave along the
spline. This is precisely the effect I used in the original basket at the
beginning of this thread, and also for the attached render. This uses torus
pipe splines for the cross bars and weft, both with slightly randomised
starting tangents so they do ripple along their lengths.
As you can see in the code below, only one spline is used, a straight line
along the x-axis. Note also the spline continuity of 1 - this ensures a
regular spacing of spline points in time and space. Without the option, the
points will bunch up at the beginning and end of the spline (a natural
property of cubic splines).
If, however, you are using a spline that follows the shape of the weft up
and down between the bars, I might suggest you look at using blob splines -
these can be squashed and stretched, and many components (spline steps) can
be used with quite reasonable render times. If you cut and paste the
contents of the blob_spline () macro into your own macro, you can modify the
spline_object () code to randomise the position, size and/or orientation of
each component, reusing a single spline rather than declaring separate
splines for each weft.
// Code for attached render
#include "spline\spline.mcr"
#declare BSpline = create_spline (array[3] {-x*5, x*0, x*5},
spline_continuity (1))
#declare BTexture = texture {
pigment {rgb 1}
normal {wood -.02 scallop_wave turbulence .3 scale <.05, .05, .5>}
finish {brilliance .8 ambient .1 diffuse .8}
}
#declare R1 = seed(0);
union {
#declare X = -4.5; #while (X < 5)
union {torus_pipe_spline (BSpline,
spline_rotate (-y*90)
+ initial_torus_tangent (z + (<rand(R1), rand(R1),
rand(R1)>-.5)*.1)
+ spline_radius (.1)
+ spline_steps (int(3 + rand(R1)*5))
)
scale <1, .7, 1>
translate x*X
texture {BTexture translate <rand(R1), rand(R1), rand(R1)>*100}
}
#declare X = X + 1; #end
#declare T = 1;
#declare Z = -4.5; #while (Z < 5)
union {torus_pipe_spline (BSpline,
initial_torus_tangent (<1, .4, 0> + (<rand(R1), rand(R1),
rand(R1)>-.5)*.1)
+ spline_radius (.05)
+ spline_steps (10)
)
scale <1, T, 6>
translate z*Z
texture {BTexture rotate y*90 translate <rand(R1), rand(R1),
rand(R1)>*100}
}
#declare T = (T = 1 ? -1 : 1);
#declare Z = Z + 1; #end
} com> wrote:
> Here is a first cut at weaving. This is like the bottom of the basket
photo
> in a few important ways. I see the splines are rippled, though -- the
> individual torii don't exactly line up, I guess. It's not like other
macros
> where the component shapes are designed to meet perfectly. I need a =lot=
> of segments to make it smooth (enough), and the rendering slows down right
> off the bat, so I suspect the bounding boxes aren't working as well as
they
> ought to.
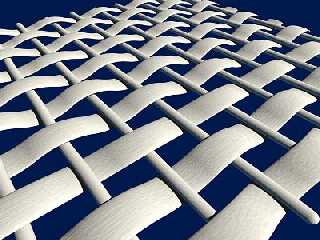
Each torii segment starts with the tangent that the previous segment ended
with, so the results certainly should be smooth. This continuation of
tangents, however, can cause some rippling, like a sine wave along the
spline. This is precisely the effect I used in the original basket at the
beginning of this thread, and also for the attached render. This uses torus
pipe splines for the cross bars and weft, both with slightly randomised
starting tangents so they do ripple along their lengths.
As you can see in the code below, only one spline is used, a straight line
along the x-axis. Note also the spline continuity of 1 - this ensures a
regular spacing of spline points in time and space. Without the option, the
points will bunch up at the beginning and end of the spline (a natural
property of cubic splines).
If, however, you are using a spline that follows the shape of the weft up
and down between the bars, I might suggest you look at using blob splines -
these can be squashed and stretched, and many components (spline steps) can
be used with quite reasonable render times. If you cut and paste the
contents of the blob_spline () macro into your own macro, you can modify the
spline_object () code to randomise the position, size and/or orientation of
each component, reusing a single spline rather than declaring separate
splines for each weft.
// Code for attached render
#include "spline\spline.mcr"
#declare BSpline = create_spline (array[3] {-x*5, x*0, x*5},
spline_continuity (1))
#declare BTexture = texture {
pigment {rgb 1}
normal {wood -.02 scallop_wave turbulence .3 scale <.05, .05, .5>}
finish {brilliance .8 ambient .1 diffuse .8}
}
#declare R1 = seed(0);
union {
#declare X = -4.5; #while (X < 5)
union {torus_pipe_spline (BSpline,
spline_rotate (-y*90)
+ initial_torus_tangent (z + (<rand(R1), rand(R1),
rand(R1)>-.5)*.1)
+ spline_radius (.1)
+ spline_steps (int(3 + rand(R1)*5))
)
scale <1, .7, 1>
translate x*X
texture {BTexture translate <rand(R1), rand(R1), rand(R1)>*100}
}
#declare X = X + 1; #end
#declare T = 1;
#declare Z = -4.5; #while (Z < 5)
union {torus_pipe_spline (BSpline,
initial_torus_tangent (<1, .4, 0> + (<rand(R1), rand(R1),
rand(R1)>-.5)*.1)
+ spline_radius (.05)
+ spline_steps (10)
)
scale <1, T, 6>
translate z*Z
texture {BTexture rotate y*90 translate <rand(R1), rand(R1),
rand(R1)>*100}
}
#declare T = (T = 1 ? -1 : 1);
#declare Z = Z + 1; #end
}
Post a reply to this message
Attachments:
Download 'cc_weaving.jpg' (33 KB)
Preview of image 'cc_weaving.jpg'
|
|