|
|
|
|
|
|
| |
| |
|
|
|
|
| |
| |
|
|
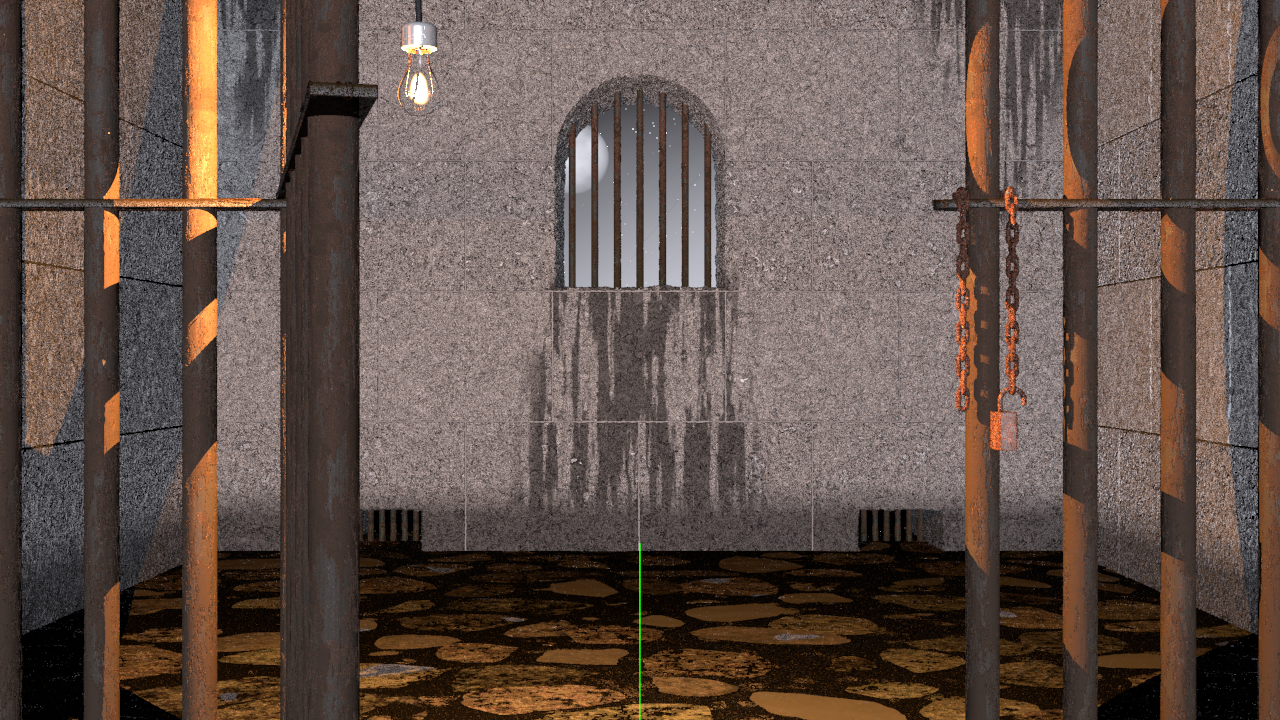
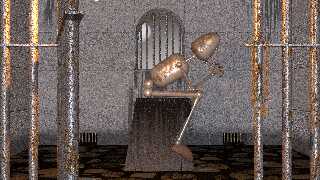
I decided to start a project with more of a story line, and was thinking back on
Stanislaw Lem's book "Cyberiad" as inspiration. I melded that with the
sculpture, "The Thinker", and cogito ergo sum, and came up with this scene.
My robot, "Cogito", has been imprisoned on a planet in Lem's world and has been
contemplating his errors for so long that he has rusted in place and doesn't
even notice that the door is standing open.
The model for Cogito is completely parameterized (using dictionaries!) so I can
pose him however I want if I decide to let him get up from his stoop and escape.
I started modeling the rust using macros I created for modeling painted
surfaces, where the paint may show part of the underlying surface and has its
own surface texture independent of the object. (This technique uses an
isosurface function for the object, and then extends that function with a paint
thickness function for the paint as a separate object.) Since the rust had more
open space, the renders were expensive and I didn't like how they looked.
So, I started modeling the rusted areas using a pigment pattern applied to the
basic shape function to get the raised areas, and then using that same pigment
pattern in the object's texture{} to differentiate the base object texture from
the rust texture. I used this on Cogito himself, all of the iron bars, the
chain, and the lock.
I also used the pigment_pattern approach to apply texture to the walls and the
stoop to model where the stone was wet from a leaky roof and the window opening.
The attached render is using a moderate anti-aliasing setting, which seems to
work fine given the rough nature of the scene surfaces, and is not using
radiosity. (I will need a few long days to do that, so maybe later.)
-- Chris R
Post a reply to this message
Attachments:
Download 'scene-v1.1-al-hd-mq-2023-10-26.png' (4614 KB)
Preview of image 'scene-v1.1-al-hd-mq-2023-10-26.png'
|
|
| |
| |
|
|
|
|
| |
| |
|
|
Il 26/10/2023 20:05, Chris R ha scritto:
> I decided to start a project with more of a story line, and was thinking back on
> Stanislaw Lem's book "Cyberiad" as inspiration. I melded that with the
> sculpture, "The Thinker", and cogito ergo sum, and came up with this scene.
>
> My robot, "Cogito", has been imprisoned on a planet in Lem's world and has been
> contemplating his errors for so long that he has rusted in place and doesn't
> even notice that the door is standing open.
>
[...]
>
> -- Chris R
Poor Cogito... the scene is very interesting, perhaps you can work on
the walls (in order to give more evidence to the rusted metal, the walls
could be darker, perhaps).
Paolo
Post a reply to this message
|
|
| |
| |
|
|
|
|
| |
| |
|
|
"Chris R" <car### [at] comcast net> wrote:
> I decided to start a project with more of a story line, and was thinking back on
> Stanislaw Lem's book "Cyberiad" as inspiration. I melded that with the
> sculpture, "The Thinker", and cogito ergo sum, and came up with this scene.
>
> My robot, "Cogito", has been imprisoned on a planet in Lem's world and has been
> contemplating his errors for so long that he has rusted in place and doesn't
> even notice that the door is standing open.
>
> The model for Cogito is completely parameterized (using dictionaries!) so I can
> pose him however I want if I decide to let him get up from his stoop and escape.
>
> I started modeling the rust using macros I created for modeling painted
> surfaces, where the paint may show part of the underlying surface and has its
> own surface texture independent of the object. (This technique uses an
> isosurface function for the object, and then extends that function with a paint
> thickness function for the paint as a separate object.) Since the rust had more
> open space, the renders were expensive and I didn't like how they looked.
>
> So, I started modeling the rusted areas using a pigment pattern applied to the
> basic shape function to get the raised areas, and then using that same pigment
> pattern in the object's texture{} to differentiate the base object texture from
> the rust texture. I used this on Cogito himself, all of the iron bars, the
> chain, and the lock.
>
> I also used the pigment_pattern approach to apply texture to the walls and the
> stoop to model where the stone was wet from a leaky roof and the window opening.
>
> The attached render is using a moderate anti-aliasing setting, which seems to
> work fine given the rough nature of the scene surfaces, and is not using
> radiosity. (I will need a few long days to do that, so maybe later.)
>
> -- Chris R
The rust effect looks really good, nice! net> wrote:
> I decided to start a project with more of a story line, and was thinking back on
> Stanislaw Lem's book "Cyberiad" as inspiration. I melded that with the
> sculpture, "The Thinker", and cogito ergo sum, and came up with this scene.
>
> My robot, "Cogito", has been imprisoned on a planet in Lem's world and has been
> contemplating his errors for so long that he has rusted in place and doesn't
> even notice that the door is standing open.
>
> The model for Cogito is completely parameterized (using dictionaries!) so I can
> pose him however I want if I decide to let him get up from his stoop and escape.
>
> I started modeling the rust using macros I created for modeling painted
> surfaces, where the paint may show part of the underlying surface and has its
> own surface texture independent of the object. (This technique uses an
> isosurface function for the object, and then extends that function with a paint
> thickness function for the paint as a separate object.) Since the rust had more
> open space, the renders were expensive and I didn't like how they looked.
>
> So, I started modeling the rusted areas using a pigment pattern applied to the
> basic shape function to get the raised areas, and then using that same pigment
> pattern in the object's texture{} to differentiate the base object texture from
> the rust texture. I used this on Cogito himself, all of the iron bars, the
> chain, and the lock.
>
> I also used the pigment_pattern approach to apply texture to the walls and the
> stoop to model where the stone was wet from a leaky roof and the window opening.
>
> The attached render is using a moderate anti-aliasing setting, which seems to
> work fine given the rough nature of the scene surfaces, and is not using
> radiosity. (I will need a few long days to do that, so maybe later.)
>
> -- Chris R
The rust effect looks really good, nice!
Post a reply to this message
|
|
| |
| |
|
|
|
|
| |
| |
|
|
Very nice - and based on your past renders, I'm sure you'll be making some
really nice improvements and subsequent storyboard frames.
I also like your choice of inspirations - all excellent sorce material.
Out of everything in the render, the chain looks the best in terms of texture.
You might try flattening the texture on the bars - since they're likely to be
dusty/rusty and not shiny, and maybe go for a darker shaed of gray instead of
silver, or almost black, as most hot-rolled things will have mill scale.
The pedestal and window frame have a great attention to detail - since the
dripping will carry material down with it to produce the staining pattern. I
would extend that idea to the window bars, the robot, and the floor grate bars -
the bars would likely be rusted more at the bottom due to shielding from the
upper stone, and the direction of accumulation of condensation. You're also
likely going to have a blackening effect there as well. The rusting pattern
would likely be reversed on the robot - more rust on the bottom, not the top.
Also less shiny. And maybe turn the face ever so slightly more toward the
camera?
Then you can have a larger transformation if he gets up and moves and loses some
of the corrosion.
Not sure about the floor - is it wet? Not wet?
Also, the wall texture could use a bit more "definition" and dirtying - it is a
prison cell after all. Maybe more mottled patterning, more dirt near the floor,
and just a greater visual distinction between the high and low spots - the low
spots tend to accumulated dirt, and the high spots tend to get abraded clean.
You can likely do that very cheaply by intersecting a very thin box or triangles
with a very dark and highly transparent pigment with the walls - assuming the
high spots are actually geometrically high spots...
I'd also maybe raise the cam or drop the light to give a better sense of where
that light is coming from.
This looks like a fun start, and has a touch of that Wallace and Grommit feel!
:)
- BW
Post a reply to this message
|
|
| |
| |
|
|
|
|
| |
| |
|
|
"Bald Eagle" <cre### [at] netscapenet> wrote:
> Very nice - and based on your past renders, I'm sure you'll be making some
> really nice improvements and subsequent storyboard frames.
>
> I also like your choice of inspirations - all excellent sorce material.
>
> Out of everything in the render, the chain looks the best in terms of texture.
>
> You might try flattening the texture on the bars - since they're likely to be
> dusty/rusty and not shiny, and maybe go for a darker shaed of gray instead of
> silver, or almost black, as most hot-rolled things will have mill scale.
>
> The pedestal and window frame have a great attention to detail - since the
> dripping will carry material down with it to produce the staining pattern. I
> would extend that idea to the window bars, the robot, and the floor grate bars -
> the bars would likely be rusted more at the bottom due to shielding from the
> upper stone, and the direction of accumulation of condensation. You're also
> likely going to have a blackening effect there as well. The rusting pattern
> would likely be reversed on the robot - more rust on the bottom, not the top.
> Also less shiny. And maybe turn the face ever so slightly more toward the
> camera?
>
> Then you can have a larger transformation if he gets up and moves and loses some
> of the corrosion.
>
> Not sure about the floor - is it wet? Not wet?
> Also, the wall texture could use a bit more "definition" and dirtying - it is a
> prison cell after all. Maybe more mottled patterning, more dirt near the floor,
> and just a greater visual distinction between the high and low spots - the low
> spots tend to accumulated dirt, and the high spots tend to get abraded clean.
> You can likely do that very cheaply by intersecting a very thin box or triangles
> with a very dark and highly transparent pigment with the walls - assuming the
> high spots are actually geometrically high spots...
>
> I'd also maybe raise the cam or drop the light to give a better sense of where
> that light is coming from.
>
> This looks like a fun start, and has a touch of that Wallace and Grommit feel!
> :)
>
>
> - BW
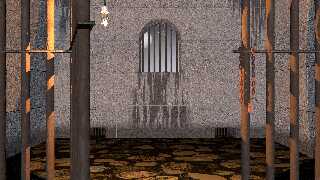
All good suggestions and will give me something to play with for a while.
I was away for the weekend, so I kicked off a radiosity render of the scene. I
still had to keep the anti-aliasing at a moderate level; at a high level the
radiosity was taking hours for the first pass, so I didn't think it would ever
finish. All it really seems to have done is to warm up the scene a bit, so I'll
probably leave it out while I'm working on your suggestions.
I'll be off looking for more real images of rusty iron bars, and probably run
down some rabbit holes on oxidation patterns. I hadn't thought about the fact
that water dripping from the ceiling onto Cogito would spend more time on his
underside rather than the top, so I'll be playing with that, as well as getting
a more realistic gradient for the vertical bars for rust density.
I had just started trying to get a more realistic distribution of dirt and grime
and wet spots on the walls. There is a gradient from the bottom, but it's too
regular and probably too small so it looks like a shadow instead of extra dirt.
I should have some other colors as well, or maybe some moss/mold growing from
the walls.
I wasn't paying attention to the light, (which I spent a lot of time modeling),
so I hadn't noticed that the 16:9 view almost pushes it out of the scene. Maybe
a wider viewing angle on the camera, or a slightly different viewpoint.
The floor was intended to be pavers with dirt between them, and a distribution
of wet/dry spots. There are also some puddles formed from drips in the ceiling
that don't show up very well, even in the 1920x1080 resolution. With the
lighting, though, I'm not real happy with how it looks, so that will get
reworked a bit.
I'll do a render with Cogito turning to look at the door, probably keeping the
rust as it is to indicate that he just moved recently...
-- Chris R
Post a reply to this message
Attachments:
Download 'scene-v1.1-al-hd-mq-rad11-2023-10-30.png' (4634 KB)
Preview of image 'scene-v1.1-al-hd-mq-rad11-2023-10-30.png'
|
|
| |
| |
|
|
|
|
| |
| |
|
|
hi,
"Chris R" <car### [at] comcastnet> wrote:
> ...
> I started modeling the rust ...
that bar nearest the camera looks like a very believable "pig iron" I think. v
cool.
the scene too appeals, I thought "Cogito" is wondering why all calculations
result in '42'. </grin>
regards, jr.
Post a reply to this message
|
|
| |
| |
|
|
|
|
| |
| |
|
|
"Bald Eagle" <cre### [at] netscapenet> wrote:
>
> You might try flattening the texture on the bars - since they're likely to be
> dusty/rusty and not shiny, and maybe go for a darker shaed of gray instead of
> silver, or almost black, as most hot-rolled things will have mill scale.
>
....
> the bars would likely be rusted more at the bottom due to shielding from the
> upper stone, and the direction of accumulation of condensation. You're also
> likely going to have a blackening effect there as well. The rusting pattern
> would likely be reversed on the robot - more rust on the bottom, not the top.
> Also less shiny. And maybe turn the face ever so slightly more toward the
> camera?
>
>
> - BW
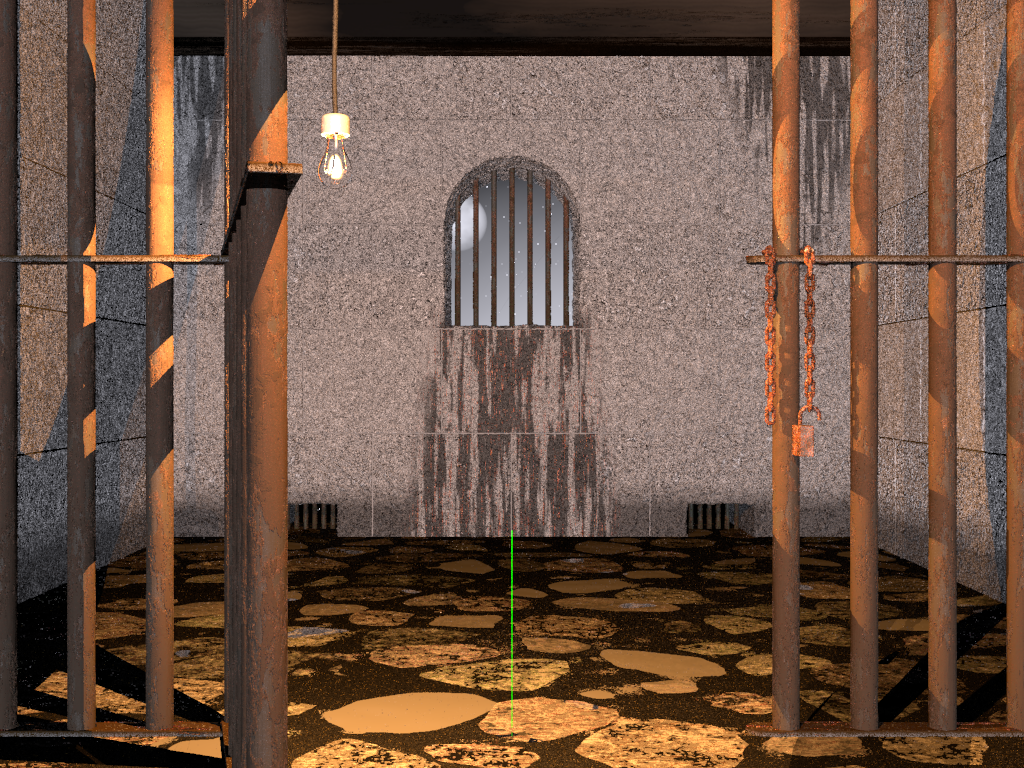
I started working on the rusted iron elements of the scene, (except Cogito).
This is a test rendering of just the cell that shows the cell bars, chain,
window bars, and drain bars with updated textures and rust definitions.
First, I pulled some images of rusted iron and created color palettes from them
that I am now using to create color_maps for rust, rather than the ones I
invented earlier. I think these are better looking than the original. I also
took your suggestion and increased the rust density at the bottoms of vertical
posts, and created less shiny version of iron with darkening from grime that
carries over to the rust as well.
The vertical bars had striations that I found in pulled iron images. I fixed
how they are formed so they don't get reflected in the rusty areas, and I
updated the rust pattern to be more realistic as well. The horizontal bars
really only changed by using the new rust color palette, and by applying the
grime to apply mostly to the top of the bar where it would rest.
Finally, I adjusted the length of the cord to hang the lightbulb down further so
it shows up in a 16:9 rendering.
The next improvements will come in the walls, then probably the floor, and then
I'll get back to Cogito himself.
-- Chris R
Post a reply to this message
Attachments:
Download 'cell.png' (1920 KB)
Preview of image 'cell.png'
|
|
| |
| |
|
|
|
|
| |
| |
|
|
"Chris R" <car### [at] comcastnet> wrote:
> First, I pulled some images of rusted iron and created color palettes from them
> that I am now using to create color_maps for rust, rather than the ones I
> invented earlier. I think these are better looking than the original. I also
> took your suggestion and increased the rust density at the bottoms of vertical
> posts, and created less shiny version of iron with darkening from grime that
> carries over to the rust as well.
>
> The vertical bars had striations that I found in pulled iron images. I fixed
> how they are formed so they don't get reflected in the rusty areas, and I
> updated the rust pattern to be more realistic as well. The horizontal bars
> really only changed by using the new rust color palette, and by applying the
> grime to apply mostly to the top of the bar where it would rest.
>
> Finally, I adjusted the length of the cord to hang the lightbulb down further so
> it shows up in a 16:9 rendering.
>
> The next improvements will come in the walls, then probably the floor, and then
> I'll get back to Cogito himself.
>
> -- Chris R
Hi Chris,
It's great that you're pursuing changes based on observations and suggestions.
I will also acknowledge upfront that it's going to be a challenging task, since
I myself have found creating a realistic, or even satisfying rust texture to be
a very challenging task.
Trying not to be too negative / overly critical (it's not my render) but:
Whatever you have right now --- just isn't doing it for me. It may be the
lighting, it may be the textures, or the normals, or the geometry, ... it's
always very hard to tell. But it all seems very --- flat, or washed out, or
muddied together.
Maybe experiment with a more grazing lighting angle - perhaps from a fill light
(which could plausibly be a hallway light) or an HDR light source.
I have always found that creating textures from photographs to be incredibly
difficult, not just from the perspective of creating a suitable pattern, but
also simply getting the basic pigment colors right.
Having said all that, I'm in the middle of daisy-chaining together a completely
ridiculous number of algorithms to make some decent wood textures, and it's like
doing a mini-PhD in computer graphics. (Huge shout-out to jr who's been working
behind-the-scenes for nearly/over a month to get even a small part of the
procedural workflow implemented!)
I've done some searching for an extant procedural rust texture, to see if any
analogous work has been done, and most of what I've found is (to my
eye/taste/expectation) crap.
My suggestions at this stage would be to simply try and find examples of things
that _look good_. They might be photos, they might be restoration videos from
youtube, or they might be CG textures that are in movies or software packages.
https://www.texturecan.com/details/73/
I have hundreds of pounds of antique/vintage tools that I've de-rusted and
restored to working order - so much, that my kitchen had a layer of reddish dust
that I had to wipe down.
"Realistic" rust is likely going to be a huge challenge to pull off, simply
because that sort of organic, developmental change exhibits such a wide degree
of variation - due to age, base allow, wet-dry cycles, whether static or in-use,
etc.
For your scene(s), I'd focus on something practical, but still aesthetically
acceptable. To achieve that, I think you're looking at meshes or isosurfaces to
get the required surface displacement that I'd don't think a simple normal can
provide, and probably a layered texture at a minimum.
Rust is fundamentally an electrochemical phenomemon, expanding outward from
defects in the crystal structure that channel the oxidation process. It
therefore tends to be very patchy, expanding from localized defect centers.
There are two main forms of iron oxides - magnetite (Fe3O4) which is black, and
hematite (Fe2O3) which is reddish brown. (you also have the hydroxides and
oxyhydroxides mixed in there....)
Aside from that, it's important to realize that when iron rusts, it becomes a
new chemical compound, which has a different density, and so it expands. That
gives you powdery "blooms", cracking, flaking, and when material is lost, deep
pitting.
https://en.wikipedia.org/wiki/Rust
Which is why at the moment, I'm thinking that most of what you're doing will
benefit the most from geometry, normals, and lighting (which accentuates the
first two).
Also, there's the issue of particle size, which amazingly, gives you different
colors for what are chemically the same oxide.
https://www.911metallurgist.com/iron-oxide-pigments/
So you can have an interesting gradient of colors going from black through red,
orange, and up to yellow, sometimes with some purple mixed in.
Lots to think about, research, and learn, but better that you're also making
progress and not doing _too_ much analysis, which leads to paralysis.
Hope that "helps". ;)
- BW
(also attached, find a procedural rust that I found on Wayback - the rightmost
is something like what I think you're generally shooting for)
Post a reply to this message
Attachments:
Download 'rust1.jpg' (187 KB)
Preview of image 'rust1.jpg'

|
|
| |
| |
|
|
|
|
| |
| |
|
|
"Bald Eagle" <cre### [at] netscapenet> wrote:
> "Chris R" <car### [at] comcastnet> wrote:
>
>
> Hi Chris,
>
> It's great that you're pursuing changes based on observations and suggestions.
> I will also acknowledge upfront that it's going to be a challenging task, since
> I myself have found creating a realistic, or even satisfying rust texture to be
> a very challenging task.
>
> Trying not to be too negative / overly critical (it's not my render) but:
>
> Whatever you have right now --- just isn't doing it for me. It may be the
> lighting, it may be the textures, or the normals, or the geometry, ... it's
> always very hard to tell. But it all seems very --- flat, or washed out, or
> muddied together.
>
> Maybe experiment with a more grazing lighting angle - perhaps from a fill light
> (which could plausibly be a hallway light) or an HDR light source.
> I have always found that creating textures from photographs to be incredibly
> difficult, not just from the perspective of creating a suitable pattern, but
> also simply getting the basic pigment colors right.
>
This was just a test render; the full scene definitely needs more attention to
other light sources. Having the light bulb inside the cell (and the moon
outside) means all of the front bars are back-lit, so that flattens them out.
I'm doing another render where I added another copy of the light bulb behind the
camera, which should help give a better view.
Also, one thing I've noticed is that the gamma of my monitor makes a tremendous
difference in how flat/washed out a render looks. I have a large monitor
attached to my laptop that has been gamma-tuned for looking at documents, so
it's pretty bright and contrasty. My renders always look much flatter and
washed out than they do on the laptop screen. The whole gamma system in POV is
a bit of a mystery to me, and I usually just leave it at 1.0 for all of my
scenes.
To be clear, I chose one photo of rust that I liked, and it was on a flat sheet
of iron. I could do some more exploration that matches cylindrical bars better.
However, I am not using them as image maps. I edited the image in GIMP and
used the feature for creating a smooth color palette from the image. In
POV-Ray I sample that color palette to create a color map for the pigment. I
used this technique on a bunch of wood samples earlier.
> Having said all that, I'm in the middle of daisy-chaining together a completely
> ridiculous number of algorithms to make some decent wood textures, and it's like
> doing a mini-PhD in computer graphics. (Huge shout-out to jr who's been working
> behind-the-scenes for nearly/over a month to get even a small part of the
> procedural workflow implemented!)
> I've done some searching for an extant procedural rust texture, to see if any
> analogous work has been done, and most of what I've found is (to my
> eye/taste/expectation) crap.
>
I, too, did some searching for scientific papers on rust formation patterns and
didn't find much. For other projects, icicles hanging from a roof, for example,
I found a bunch of papers with formulas for computing how they form in different
conditions.
> My suggestions at this stage would be to simply try and find examples of things
> that _look good_. They might be photos, they might be restoration videos from
> youtube, or they might be CG textures that are in movies or software packages.
>
> https://www.texturecan.com/details/73/
>
I will look for more examples of vertical, cylindrical rusty bars and see if I
can discern better rust formation patterns. This wasn't a real rabbit-hole
search, as I spent less than a day on it...
> I have hundreds of pounds of antique/vintage tools that I've de-rusted and
> restored to working order - so much, that my kitchen had a layer of reddish dust
> that I had to wipe down.
>
> "Realistic" rust is likely going to be a huge challenge to pull off, simply
> because that sort of organic, developmental change exhibits such a wide degree
> of variation - due to age, base allow, wet-dry cycles, whether static or in-use,
> etc.
>
> For your scene(s), I'd focus on something practical, but still aesthetically
> acceptable. To achieve that, I think you're looking at meshes or isosurfaces to
> get the required surface displacement that I'd don't think a simple normal can
> provide, and probably a layered texture at a minimum.
>
Virtually everything in this scene, (and most of my scenes) are isosurfaces,
precisely so I can add the texture to the surface with more control and depth
than with a normal. I don't think most of the textures in the scene even have
normals at this point, as I haven't played around with the interaction between
very bumpy surfaces and texture normals. I have shifted more towards patterned
textures, (which may contain some layered textures), so that I can have
different finishes, (e.g. the unrusted part of the metal has a different finish
than the rusty parts do). The grime gets added to each component of the
patterned texture in a consistent way.
> Rust is fundamentally an electrochemical phenomemon, expanding outward from
> defects in the crystal structure that channel the oxidation process. It
> therefore tends to be very patchy, expanding from localized defect centers.
>
> There are two main forms of iron oxides - magnetite (Fe3O4) which is black, and
> hematite (Fe2O3) which is reddish brown. (you also have the hydroxides and
> oxyhydroxides mixed in there....)
> Aside from that, it's important to realize that when iron rusts, it becomes a
> new chemical compound, which has a different density, and so it expands. That
> gives you powdery "blooms", cracking, flaking, and when material is lost, deep
> pitting.
> https://en.wikipedia.org/wiki/Rust
> Which is why at the moment, I'm thinking that most of what you're doing will
> benefit the most from geometry, normals, and lighting (which accentuates the
> first two).
>
> Also, there's the issue of particle size, which amazingly, gives you different
> colors for what are chemically the same oxide.
> https://www.911metallurgist.com/iron-oxide-pigments/
> So you can have an interesting gradient of colors going from black through red,
> orange, and up to yellow, sometimes with some purple mixed in.
>
> Lots to think about, research, and learn, but better that you're also making
> progress and not doing _too_ much analysis, which leads to paralysis.
> Hope that "helps". ;)
>
> - BW
>
> (also attached, find a procedural rust that I found on Wayback - the rightmost
> is something like what I think you're generally shooting for)
As always, inciteful comments! I'll post updates as I go along. I just
recently added some specs of rust into the wall beneath the window that water
dripping from the rusty bars would have picked up and transported there.
-- Chris R.
Post a reply to this message
|
|
| |
| |
|
|
|
|
| |
| |
|
|
This is a slight improvement on the test render after adding in another copy of
the light bulb behind the camera. I think the depth of the rust on the closest
bars is more apparent here. It's not perfect, as I have not played with the
location of that second light, or if other lights might add more interest.
Also, note, that the absence of Cogito and his seat changes the reflection of
lighting, so that will make a slight difference in the full scene as well.
Sorry for the change in aspect ratio, I realized I hit the wrong selection when
it was an hour into the render and didn't feel like starting over again.
I'm off to do some more tests on rust patterns and then will get back to the
walls, I promise.
-- Chris R
Post a reply to this message
Attachments:
Download 'cell.png' (1633 KB)
Preview of image 'cell.png'

|
|
| |
| |
|
|
|
|
| |
|
|