 |
|
|
|
|
|
| |
| |
|
|
|
|
| |
| |
|
|
On 30/11/2017 12:19, Thomas de Groot wrote:
> On 30-11-2017 10:51, Stephen wrote:
>> I don't really want to get distracted form what I am doing in Poser. I
>> am having problems getting clothes to fit a model in a crouching
>> position. The working title is: "How Christianity came to the Western
>> Isles."
>
> That /is/ difficult to do. Best I can suggest is to subdivide the cloth
> as much as possible.
>
Thanks but that is really not the big problem. My new installation of
Win7 is flaky. I think I am going to reinstall it. So I can get Poser
working properly. I've been going La, la, la to all the problems. In
denial. I've just bought an upgrade from Win7 home to Win7 Pro so I'll
try a clean install from that rather than upgrade it again.
>>
>> BTW Do you (or anyone) know how to add a colour tint to a poser model?
>> Say, give a green or blue tint to a skin tone.
>>
>
> You gave the answer :-)
>
>
I was thinking in terms of doing it in PovRay but it is much easier to
do it at source.
--
Regards
Stephen
Post a reply to this message
|
|
| |
| |
|
|
|
|
| |
| |
|
|
On 30-11-2017 13:44, Bald Eagle wrote:
> Thomas de Groot <tho### [at] degroot org> wrote:
>
>> That is looking good indeed. I need to ponder this a bit more; I think I
>> know how to do this but I want to examine all the angles, so to speak. I
>> can see the advantage of this procedure and it would avoid the
>> subdividing of the container in discrete elements.
>
> Right - sometimes it's easier to just develop something that's generally
> applicable, because then you can use it with just about anything.
> I had an idea last night about a way to fill the object, and if I ever get the
> time to work it out, it would look great as an animation.
Agreed. Looking forward to it.
>
>> Saving the point locations is certainly an excellent idea. I shall
>> certainly come to that eventually.
>
> I haven't gotten that far, I only had enough time to work out some code and
> syntax on my work laptop, and then rewrite it all at home.
> Thou shalt not forget thy USB stick.
> IIRC, you had posted some read/write code for an evalpigment scene or something
> - I'll probably work off of that.
That's correct. Should work.
>
>
>> Well done indeed.
>
> Thanks - as with most things, it's just a matter of getting around to actually
> doing it.
>
> It would be nice to have a few robust "FillObject()" macros in the ole' POV-Ray
> toolkit.
>
Yep.
--
Thomas org> wrote:
>
>> That is looking good indeed. I need to ponder this a bit more; I think I
>> know how to do this but I want to examine all the angles, so to speak. I
>> can see the advantage of this procedure and it would avoid the
>> subdividing of the container in discrete elements.
>
> Right - sometimes it's easier to just develop something that's generally
> applicable, because then you can use it with just about anything.
> I had an idea last night about a way to fill the object, and if I ever get the
> time to work it out, it would look great as an animation.
Agreed. Looking forward to it.
>
>> Saving the point locations is certainly an excellent idea. I shall
>> certainly come to that eventually.
>
> I haven't gotten that far, I only had enough time to work out some code and
> syntax on my work laptop, and then rewrite it all at home.
> Thou shalt not forget thy USB stick.
> IIRC, you had posted some read/write code for an evalpigment scene or something
> - I'll probably work off of that.
That's correct. Should work.
>
>
>> Well done indeed.
>
> Thanks - as with most things, it's just a matter of getting around to actually
> doing it.
>
> It would be nice to have a few robust "FillObject()" macros in the ole' POV-Ray
> toolkit.
>
Yep.
--
Thomas
Post a reply to this message
|
|
| |
| |
|
|
|
|
| |
| |
|
|
On 30-11-2017 16:02, Stephen wrote:
> On 30/11/2017 12:19, Thomas de Groot wrote:
>> On 30-11-2017 10:51, Stephen wrote:
>>> I don't really want to get distracted form what I am doing in Poser.
>>> I am having problems getting clothes to fit a model in a crouching
>>> position. The working title is: "How Christianity came to the Western
>>> Isles."
>>
>> That /is/ difficult to do. Best I can suggest is to subdivide the
>> cloth as much as possible.
>>
>
> Thanks but that is really not the big problem. My new installation of
> Win7 is flaky. I think I am going to reinstall it. So I can get Poser
> working properly. I've been going La, la, la to all the problems. In
> denial. I've just bought an upgrade from Win7 home to Win7 Pro so I'll
> try a clean install from that rather than upgrade it again.
Eventually, we (you and me) shall have to migrate to Win10. Not that I
enjoy that. I'll stick to Win7 as long as I can.
>
>
>>>
>>> BTW Do you (or anyone) know how to add a colour tint to a poser
>>> model? Say, give a green or blue tint to a skin tone.
>>>
>>
>> You gave the answer :-)
>>
>>
> I was thinking in terms of doing it in PovRay but it is much easier to
> do it at source.
>
To do the former, you can use the good old functions provided by Poseray:
#macro pigment_multiply(p1,p2)
//multiplies two pigments
#local PR1 = function {pigment{p1}}
#local PR2 = function {pigment{p2}}
#local PR_FRed=function (x,y,z) {PR1(x,y,z).red*PR2(x,y,z).red}
#local PR_FGrn=function (x,y,z) {PR1(x,y,z).green*PR2(x,y,z).green}
#local PR_FBlu=function (x,y,z) {PR1(x,y,z).blue*PR2(x,y,z).blue}
average pigment_map{
[function{PR_FRed(x,y,z)} color_map{[0 rgb 0][1 rgb <1,0,0>*3]}]
[function{PR_FGrn(x,y,z)} color_map{[0 rgb 0][1 rgb <0,1,0>*3]}]
[function{PR_FBlu(x,y,z)} color_map{[0 rgb 0][1 rgb <0,0,1>*3]}]
}
#end
Then use that in the material file. e.g:
material {
texture {
uv_mapping
pigment {pigment_multiply(p_shalwar, pigment{color srgb
<1.00,0.67,0.00> }) }
finish {diffuse 0.8}
}
}
[watch out for the line feed above]
--
Thomas
Post a reply to this message
|
|
| |
| |
|
|
|
|
| |
| |
|
|
On 01/12/2017 08:00, Thomas de Groot wrote:
> On 30-11-2017 16:02, Stephen wrote:
>>>
>>
>> Thanks but that is really not the big problem. My new installation of
>> Win7 is flaky. I think I am going to reinstall it. So I can get Poser
>> working properly. I've been going La, la, la to all the problems. In
>> denial. I've just bought an upgrade from Win7 home to Win7 Pro so I'll
>> try a clean install from that rather than upgrade it again.
>
> Eventually, we (you and me) shall have to migrate to Win10. Not that I
> enjoy that. I'll stick to Win7 as long as I can.
>
I can't believe I am saying this. I think I would rather move to Linux.
I have Win 10 on my laptop and I now never use it.
Reply from Smith Micro.
Thank you for contacting Support. Make sure you have the last updates
installed
http://my.smithmicro.com/poser-pro-2010-updates.html
last release of Windows 7
You will need to use the External Library along with the last available
AIR from Adobe
Poser Pro 11 is the current version and there is a Coupon
HOLIDAY17 available to use on the Upgrade Offers
http://my.smithmicro.com/poser-pro-11-upgrades.html
>>
>>
>>>>
>>>> BTW Do you (or anyone) know how to add a colour tint to a poser
>>>> model? Say, give a green or blue tint to a skin tone.
>>>>
>>>
>>> You gave the answer :-)
>>>
>>>
>> I was thinking in terms of doing it in PovRay but it is much easier to
>> do it at source.
>>
>
> To do the former, you can use the good old functions provided by Poseray:
>
The thought did cross my mind after I saw how easy it was to do in
Poser. Unfortunately since I use Bishop3d to put my scenes together I
need to use PoseRay Ver (quite old) as B3D cannot handle functions.
> <1.00,0.67,0.00> }) }
>
>
> [watch out for the line feed above]
>
>
That is the only one that gets broken in Tbird.
--
Regards
Stephen
Post a reply to this message
|
|
| |
| |
|
|
|
|
| |
| |
|
|
On 12/01/2017 03:00 AM, Thomas de Groot wrote:
> On 30-11-2017 16:02, Stephen wrote:
>> On 30/11/2017 12:19, Thomas de Groot wrote:
>>
...
>>>>
>>>> BTW Do you (or anyone) know how to add a colour tint to a poser
>>>> model? Say, give a green or blue tint to a skin tone.
>>>>
>>>
>>> You gave the answer :-)
>>>
>>>
>> I was thinking in terms of doing it in PovRay but it is much easier to
>> do it at source.
>>
>
> To do the former, you can use the good old functions provided by Poseray:
>
> #macro pigment_multiply(p1,p2)
> //multiplies two pigments
> #local PR1 = function {pigment{p1}}
> #local PR2 = function {pigment{p2}}
> #local PR_FRed=function (x,y,z) {PR1(x,y,z).red*PR2(x,y,z).red}
> #local PR_FGrn=function (x,y,z) {PR1(x,y,z).green*PR2(x,y,z).green}
> #local PR_FBlu=function (x,y,z) {PR1(x,y,z).blue*PR2(x,y,z).blue}
> average pigment_map{
> #end
>
...
FYI. The pigment_multiply macro above can be coded in POV-Ray 3.8
somewhat more succinctly as:
//------------------- 3.8 ------------------------
//multiplies two pigments
#macro pigment_multiply(p1,p2)
#local PR1 = function {pigment{p1}}
#local PR2 = function {pigment{p2}}
user_defined {
function { PR1(x,y,z).red*PR2(x,y,z).red },
function { PR1(x,y,z).green*PR2(x,y,z).green },
function { PR1(x,y,z).blue*PR2(x,y,z).blue },,
}
#end
Bill P.
Post a reply to this message
|
|
| |
| |
|
|
|
|
| |
| |
|
|
"Bald Eagle" <cre### [at] netscapenet> wrote:
> > That is looking good indeed. I need to ponder this a bit more; I think I
> > know how to do this but I want to examine all the angles, so to speak. I
> > can see the advantage of this procedure and it would avoid the
> > subdividing of the container in discrete elements.
Here's the relevant portion that does the scanning and filling.
I haven't had a chance yet to dig up the write/save vs read code and implement
it.
#declare Min = min_extent (Object);
#declare Max = max_extent (Object);
#declare MinZ = floor(Min.z);
#declare MinY = floor(Min.y);
#declare MinX = floor(Min.x);
#declare MaxZ = ceil(Max.z);
#declare MaxY = ceil(Max.y);
#declare MaxX = ceil(Max.x);
#declare Step = 0.5;
#declare ZRange = (MaxZ - MinZ)/Step;
#declare YRange = (MaxY - MinY)/Step;
#declare XRange = (MaxX - MinX)/Step;
#declare ArraySize = XRange*YRange*ZRange;
#declare TestArray = array [ArraySize];
#declare N = 0;
#for (Z, MinZ, MaxZ, Step)
#for (Y, MinY, MaxY, Step)
#for (X, MinX, MaxX, Step)
#if(inside (Object, <X, Y, Z>))
#declare TestArray [N] = <X, Y, Z>;
//#debug concat ( "Point ", str (N, 3, 1), " = ", vstr(3, TestArray[N], ",
", 3, 0), " \n")
#declare N = N +1;
#end
#end
#end
#end
#declare InSize = N - 1;
#declare Stream = seed (123456789);
#declare Stream1 = seed (456123789);
#declare Stream2 = seed (789456123);
#declare Stream3 = seed (135791113);
#declare Stream4 = seed (987654321);
#declare Stream5 = seed (987654321);
#declare ScaleRange = 3;
#declare Tries = 2000;
#for (N, 1, Tries)
#declare P = int(rand (Stream5)*InSize);
#declare rx = rand(Stream1)*90;
#declare ry = rand(Stream2)*90;
#declare rz = rand(Stream3)*90;
#declare Scale = rand(Stream4)*ScaleRange;
#declare TexNum = int (rand (Stream4) * dimension_size (TexArray, 1) );
object {Jack rotate <rx, ry, rz> scale Scale translate TestArray [P] texture
{TexArray[TexNum]} }
#end
Post a reply to this message
|
|
| |
| |
|
|
|
|
| |
| |
|
|
On 1-12-2017 14:52, William F Pokorny wrote:
> On 12/01/2017 03:00 AM, Thomas de Groot wrote:
>> On 30-11-2017 16:02, Stephen wrote:
>>> On 30/11/2017 12:19, Thomas de Groot wrote:
>>>
> ...
>>>>>
>>>>> BTW Do you (or anyone) know how to add a colour tint to a poser
>>>>> model? Say, give a green or blue tint to a skin tone.
>>>>>
>>>>
>>>> You gave the answer :-)
>>>>
>>>>
>>> I was thinking in terms of doing it in PovRay but it is much easier
>>> to do it at source.
>>>
>>
>> To do the former, you can use the good old functions provided by Poseray:
>>
>> #macro pigment_multiply(p1,p2)
>> //multiplies two pigments
>> #local PR1 = function {pigment{p1}}
>> #local PR2 = function {pigment{p2}}
>> #local PR_FRed=function (x,y,z) {PR1(x,y,z).red*PR2(x,y,z).red}
>> #local PR_FGrn=function (x,y,z) {PR1(x,y,z).green*PR2(x,y,z).green}
>> #local PR_FBlu=function (x,y,z) {PR1(x,y,z).blue*PR2(x,y,z).blue}
>> average pigment_map{
>> #end
>>
> ...
>
> FYI. The pigment_multiply macro above can be coded in POV-Ray 3.8
> somewhat more succinctly as:
>
> //------------------- 3.8 ------------------------
> //multiplies two pigments
> #macro pigment_multiply(p1,p2)
> #local PR1 = function {pigment{p1}}
> #local PR2 = function {pigment{p2}}
> user_defined {
> }
> #end
>
> Bill P.
>
Aaaah! Progress! :-)
Thank you indeed. A good reason (if none other) to download version 3.8.
--
Thomas
Post a reply to this message
|
|
| |
| |
|
|
|
|
| |
| |
|
|
On 2-12-2017 2:47, Bald Eagle wrote:
> Here's the relevant portion that does the scanning and filling.
> I haven't had a chance yet to dig up the write/save vs read code and implement
> it.
>
Ah, thanks indeed! I was just starting to work on this - from a
different angle I must confess, but to the same ultimate result. THis
comes just in time.
--
Thomas
Post a reply to this message
|
|
| |
| |
|
|
|
|
| |
| |
|
|
Thomas de Groot <tho### [at] degrootorg> wrote:
> Ah, thanks indeed! I was just starting to work on this - from a
> different angle I must confess, but to the same ultimate result. THis
> comes just in time.
Certainly :)
With so many people with so few Round Tuits, it's a lot easier to pitch in
1/4-of-a-Round-Tuit each and get 1 full final result.
I'll see if I can work on this some more - if you have any questions or ideas
for improvements, let me know.
One thing that comes to mind is to use trace() to limit scanning the entire
bounding box, though it seems to go fast enough at the moment.
Maybe that could be a switchable enable/disable feature for when high-density
scanning of sparse objects are used.
Post a reply to this message
|
|
| |
| |
|
|
|
|
| |
| |
|
|
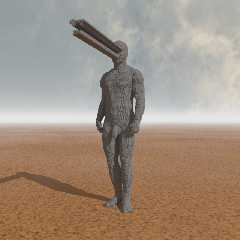
On 2-12-2017 17:23, Bald Eagle wrote:
> Thomas de Groot <tho### [at] degrootorg> wrote:
>
>> Ah, thanks indeed! I was just starting to work on this - from a
>> different angle I must confess, but to the same ultimate result. THis
>> comes just in time.
>
> Certainly :)
> With so many people with so few Round Tuits, it's a lot easier to pitch in
> 1/4-of-a-Round-Tuit each and get 1 full final result.
Like bitcoins, their value increases worryingly.
>
> I'll see if I can work on this some more - if you have any questions or ideas
> for improvements, let me know.
> One thing that comes to mind is to use trace() to limit scanning the entire
> bounding box, though it seems to go fast enough at the moment.
> Maybe that could be a switchable enable/disable feature for when high-density
> scanning of sparse objects are used.
>
At this point, I have the following code ready (write/read) installed,
based on (the first part of) your own code. I increased the container a
bit to be sure the model was completely inside. Nice to be working again
with arrays. I am not using them as often as I should:
//start code-----------------------
#if (Write)
#debug " writing object locations...\n"
#fopen ObjLocs "ArrayFill.inc" write
#declare MinZ = floor(Min.z-0.1);
#declare MinY = floor(Min.y-0.1);
#declare MinX = floor(Min.x-0.1);
#declare MaxZ = ceil(Max.z+0.1);
#declare MaxY = ceil(Max.y+0.1);
#declare MaxX = ceil(Max.x+0.1);
#declare Step = 0.01;
#declare ZRange = (MaxZ - MinZ)/Step;
#declare YRange = (MaxY - MinY)/Step;
#declare XRange = (MaxX - MinX)/Step;
#declare ArraySize = XRange*YRange*ZRange;
#declare TestArray = array [ArraySize];
#declare N = 0;
#for (Z, MinZ, MaxZ, Step)
#for (Y, MinY, MaxY, Step)
#for (X, MinX, MaxX, Step)
#if(inside (Model, <X, Y, Z>))
#declare TestArray [N] = <X, Y, Z>;
//#debug concat ( "Point ", str (N, 3, 1), " = ", vstr(3,
TestArray[N], ", ", 3, 3), " \n")
#write (ObjLocs,"<",vstr(3, TestArray[N], ", ", 3, 3),">",",\n")
#declare N = N +1;
#end
#end
#end
#end
#fclose ObjLocs
#end //of Write
#debug " reading sand locations...\n"
#fopen ObjLocs "ArrayFill.inc" read
union {
#while (defined(ObjLocs))
#read (ObjLocs, Locs)
sphere {0, 0.01 translate Locs}
#end
rotate 20*y
}
//end code--------------------------------
I have to correct the original model a bit: welding vertices and filling
holes. This has become critical for this method. The example image shows
why (eyes and mouth still with holes).
I have to study the second part of your code now. I do not yet fully
understand it.
--
Thomas
Post a reply to this message
Attachments:
Download 'antony gormley sim.png' (390 KB)
Preview of image 'antony gormley sim.png'
|
|
| |
| |
|
|
|
|
| |
|
|


