|
|
|
|
|
|
| |
| |
|
|
|
|
| |
| |
|
|
Hello Forum,

I am relatively new to POV-RAY, but have a functional script .

I am simulating air bubbles in a glass tube full of gel.  I am running into a
funny problem where, if I add too many bubbles to the script, they go from being
transparent and rendered correctly, to a completely opaque, black object through
which no light shines.

Things that don't seem to work:

1) Increasing the  max_trace_level

2) I have tried to be sure that the inner surface of the gel is not in contact
with the air bubble by reducing the bubble radius by epsilon (.0001).  Oddly
enough, the script with up to 4 bubbles works only when the two surfaces are
coincident, and subtracting an epsilon value (.0001,.001,.01) causes the bubbles
to turn black, no matter the number.

I would love your input on this issue as I am stumped.  I cannot figure out why
this renders without issue when I only have a certain number of objects defined.


The order of my file:

In my scene, centered at the origin, I have bubbles, inside of gel, inside of a
glass tube, inside of water, inside of a plexiglass cylinder.

My code

1) I define variables, set trace level, and place the camera

2) I create a distributed area light source on a rectangular box

3) I define the bubbles I want in the gel

4) I create the glass tube into which the gel will sit

5) I create the gel region with voids into which the bubbles sit.

6) I then add water around the glass tube, and then a plexiglass perimeter.
Post a reply to this message
Attachments:
Download 'test-script.pov.txt' (15 KB)
|
|
| |
| |
|
|
|
|
| |
| |
|
|
hi,

"bubble_person" <nomail@nomail> wrote:
> Hello Forum,
>
> I am relatively new to POV-RAY, but have a functional script .
>
> I am simulating air bubbles in a glass tube full of gel.  I am running into a
> funny problem where, if I add too many bubbles to the script, they go from being
> transparent and rendered correctly, to a completely opaque, black object through
> which no light shines.

not sure if it will help, or is even related to "the issue", but if I change the
"bubble_r" to "(bubble_r - epsilon)" in the five spheres following comment "Add
Bubble Voids here", they're visible.

quick comment re "new to POV-Ray".  you have five identical (apart from
location) spheres.  have a look at macros, they're ideal in such a situation.
<https://wiki.povray.org/content/Reference:User_Defined_Macros#The_macro_Directive>


regards, jr.
Post a reply to this message
|
|
| |
| |
|
|
|
|
| |
| |
|
|
Le 2021-11-11 à 08:06, bubble_person a écrit :
> Hello Forum,
>
> I am relatively new to POV-RAY, but have a functional script .
>
> I am simulating air bubbles in a glass tube full of gel.  I am running into a
> funny problem where, if I add too many bubbles to the script, they go from being
> transparent and rendered correctly, to a completely opaque, black object through
> which no light shines.
>
> Things that don't seem to work:
>
> 1) Increasing the  max_trace_level
>
> 2) I have tried to be sure that the inner surface of the gel is not in contact
> with the air bubble by reducing the bubble radius by epsilon (.0001).  Oddly
> enough, the script with up to 4 bubbles works only when the two surfaces are
> coincident, and subtracting an epsilon value (.0001,.001,.01) causes the bubbles
> to turn black, no matter the number.
>
> I would love your input on this issue as I am stumped.  I cannot figure out why
> this renders without issue when I only have a certain number of objects defined.
>
>
> The order of my file:
>
> In my scene, centered at the origin, I have bubbles, inside of gel, inside of a
> glass tube, inside of water, inside of a plexiglass cylinder.
>
> My code
>
> 1) I define variables, set trace level, and place the camera
>
> 2) I create a distributed area light source on a rectangular box
>
> 3) I define the bubbles I want in the gel
>
> 4) I create the glass tube into which the gel will sit
>
> 5) I create the gel region with voids into which the bubbles sit.
>
> 6) I then add water around the glass tube, and then a plexiglass perimeter.
>
>
>
>

The first thing that I would to would be to increase max_trace_level
further still. It can go up to 255.

Note : Your area_light is oblique. If you want it to be flat, then, it's
size should be something like this :
area_light 160*x 200*z 65 65
adaptive 0 // start with zero, then, increase if needed
Size of area_light adjusted to match the light_box dimensions.

During testing, you should disable the area_light. It makes testing and
debugging faster.

The 100 by 100 get silently increased to 129 by 129 when adaptive is
used. That increase DO NOT affect the rendering time.

Using dispersion 1 is the same as not using dispersion. It must be
slightly different than 1. Realistic values are usually in the 1.01 to
1.08. Values less than 1 result in inverted dispersion.

You are using fade_power 1000 !? You should use 1 or 1001.
Using 1000 may cause some issues.
Post a reply to this message
|
|
| |
| |
|
|
|
|
| |
| |
|
|
"jr" <cre### [at] gmail com> wrote:
> hi,
>
> "bubble_person" <nomail@nomail> wrote:
> > Hello Forum,
> >
> > I am relatively new to POV-RAY, but have a functional script .
> >
> > I am simulating air bubbles in a glass tube full of gel. I am running into a
> > funny problem where, if I add too many bubbles to the script, they go from being
> > transparent and rendered correctly, to a completely opaque, black object through
> > which no light shines.
>
> not sure if it will help, or is even related to "the issue", but if I change the
> "bubble_r" to "(bubble_r - epsilon)" in the five spheres following comment "Add
> Bubble Voids here", they're visible.
>
> quick comment re "new to POV-Ray". you have five identical (apart from
> location) spheres. have a look at macros, they're ideal in such a situation.
> <https://wiki.povray.org/content/Reference:User_Defined_Macros#The_macro_Directive>
>
>
> regards, jr.
Hello Jr.,
Thank you for the response, and I appreciate your pointer to the Macros. I'll
be taking a deeper look at this.
I tried what you suggested, and for my script, it causes the bubble surface to
be shiny (I can see reflection on the perimeter of the bubble), but it seems
like the center of the bubble remains black, unrendered, or something like that.
Light is certainly not going through it.
In previous cases, light refracts through the center of the bubbles, so the fact
that the center is still dark tells me that I'm still encountering an issue.
One other idea that I had was using the "clipped_by{}" function when defining
the voids. I reordered the merge{} definition for the gel and the used the
clipped_by{} function to subtract out the bubble voids.
I did this and the centers seem to have reappeared for all the bubbles. The
light is refracting through the bubbles which is good, but I'm worried that I
might be missing a subtlety about how the "difference{}" and "clipped_by{}"
functions work. I'm not sure why this has worked, and it's worrying me when my
goal is to simulate realistic refraction through this volume. com> wrote:
> hi,
>
> "bubble_person" <nomail@nomail> wrote:
> > Hello Forum,
> >
> > I am relatively new to POV-RAY, but have a functional script .
> >
> > I am simulating air bubbles in a glass tube full of gel. I am running into a
> > funny problem where, if I add too many bubbles to the script, they go from being
> > transparent and rendered correctly, to a completely opaque, black object through
> > which no light shines.
>
> not sure if it will help, or is even related to "the issue", but if I change the
> "bubble_r" to "(bubble_r - epsilon)" in the five spheres following comment "Add
> Bubble Voids here", they're visible.
>
> quick comment re "new to POV-Ray". you have five identical (apart from
> location) spheres. have a look at macros, they're ideal in such a situation.
> <https://wiki.povray.org/content/Reference:User_Defined_Macros#The_macro_Directive>
>
>
> regards, jr.
Hello Jr.,
Thank you for the response, and I appreciate your pointer to the Macros. I'll
be taking a deeper look at this.
I tried what you suggested, and for my script, it causes the bubble surface to
be shiny (I can see reflection on the perimeter of the bubble), but it seems
like the center of the bubble remains black, unrendered, or something like that.
Light is certainly not going through it.
In previous cases, light refracts through the center of the bubbles, so the fact
that the center is still dark tells me that I'm still encountering an issue.
One other idea that I had was using the "clipped_by{}" function when defining
the voids. I reordered the merge{} definition for the gel and the used the
clipped_by{} function to subtract out the bubble voids.
I did this and the centers seem to have reappeared for all the bubbles. The
light is refracting through the bubbles which is good, but I'm worried that I
might be missing a subtlety about how the "difference{}" and "clipped_by{}"
functions work. I'm not sure why this has worked, and it's worrying me when my
goal is to simulate realistic refraction through this volume.
Post a reply to this message
|
|
| |
| |
|
|
|
|
| |
| |
|
|
Hi! Welcome to the forum.

Your sphere voids are not really 'black' but opaque (like silhouettes) due to
your light's position.

After stripping-out everything that was non-essential in your code, I
narrowed-down the problem to your 'gel' object and its differenced spheres (the
'voids'). It was only then that I realized that the problem is really with the
spheres themselves: In your code section "Add Bubble Definitions here", you need
to #declare those individual objects, then use *those* definitions in your gel
object. The sphere objects you actually used in your gel object are 'redefined'
there and have 'default' textures (which have no transparency.) So in effect,
your original five sphere definitions are not even being used; and the ones you
did use are simply opaque.

I've included my stripped-down scene to give you a better idea of what is
required, code-wise. I hope this helps you to understand the idea of #declaring
objects beforehand. Of course, it's not always necessary; you could have written
your five complete sphere definitions IN the gel object instead, without using
#declares.


[Some notes: In your own code, you used  ambient_light White. Nothing wrong with
that, but in case you don't know, ambient_light is just a *multiplier* for the
finish(ambient...} values in a scene. So here, you are simply multiplying your
ambient values by <1,1,1>, which is the White color.  Also, it looks like you
have a redundant or extra use of rotate <...> for your sphere voids. You should
eliminate one set of those, unless it's for some purpose.]

--- simplified code ---
#version 3.8;
global_settings{assumed_gamma 1.0 max_trace_level 50}

background{rgb <.1,.05,.05>}

#include "colors.inc"

#default{finish{ambient 0 emission 0 diffuse .9}}

#declare epsilon       = .0001;
#declare light_loc_x   = 0;
#declare light_loc_y   = 0;
#declare light_loc_z   = 90;

#declare tube_base    =  -55;
#declare tube_height  = 92;
#declare tube_rinner  = 13;

#declare gel_height   = 0.9*tube_height;
#declare bubble_r     = 0.8;

// [additional camera]
camera {
  perspective
  location  <-40, 19, -5>
  look_at   <0, 19,  0>
  right     x*image_width/image_height
 // rotate -180*clock*y
}

light_source {
<light_loc_x, light_loc_y,light_loc_z>
color White
  }

//———————————————————————————————————————————————————
// Creating bubbles that go into voids of gel
//———————————————————————————————————————————————————

// Add Bubble Definitions Here:

#declare SPH_1 =
sphere{ <4.708,7.784,4.171>, (bubble_r)
 texture {
  pigment{ color rgbt<.99,.99,.99,0.9>}
            finish { phong .001 }
              }
}

#declare SPH_2 =
sphere{ <1.862,29.796,-6.023>, (bubble_r)
 texture {
  pigment{ color rgbt<.99,.99,.99,0.9>}
  finish { phong .001 }
    }
}

#declare SPH_3 =
sphere{ <-7.205,20.129,-3.448>, (bubble_r)
 texture {
  pigment{ color rgbt<.99,.99,.99,0.9>}
  finish { phong .001 }
    } // end of texture
}

#declare SPH_4 =
sphere{ <1.424,17.806,-9.772>, (bubble_r)
 texture {
  pigment{ color rgbt<.99,.99,.99,0.9>}
  finish { phong .001 }
    } // end of texture
}

#declare SPH_5 =
sphere{ <-5.249,17.494,-3.139>, (bubble_r)
 texture {
  pigment{ color rgbt<.99,.99,.99,0.9>}
  finish { phong .001 }
    } // end of texture
}

// --- Creating gel and the bubble voids ---

difference{
 merge{
  sphere { <0,tube_base,0>, tube_rinner-epsilon}
  cylinder{<0,tube_base,0>, <0,gel_height,0>,
                                tube_rinner-epsilon}
   texture { pigment{ color rgbt<.99,.99,.99,0.9>}
   finish { phong .001 }
                      } // end of texture
  } // end merge (gel matrix)

// subtract Bubble Voids Here:

 object{SPH_1}  // bubble
 object{SPH_2}  // bubble
 object{SPH_3}  // bubble
 object{SPH_4}  // bubble
 object{SPH_5}  // bubble

 } // End difference for bubbles
Post a reply to this message
|
|
| |
| |
|
|
|
|
| |
| |
|
|
Alain Martel <kua### [at] videotronca> wrote:
> Le 2021-11-11 à 08:06, bubble_person a écrit :
> > Hello Forum,
> >
> > I am relatively new to POV-RAY, but have a functional script .
> >
> > I am simulating air bubbles in a glass tube full of gel.  I am running into a
> > funny problem where, if I add too many bubbles to the script, they go from being
> > transparent and rendered correctly, to a completely opaque, black object through
> > which no light shines.
> >
> > Things that don't seem to work:
> >
> > 1) Increasing the  max_trace_level
> >
> > 2) I have tried to be sure that the inner surface of the gel is not in contact
> > with the air bubble by reducing the bubble radius by epsilon (.0001).  Oddly
> > enough, the script with up to 4 bubbles works only when the two surfaces are
> > coincident, and subtracting an epsilon value (.0001,.001,.01) causes the bubbles
> > to turn black, no matter the number.
> >
> > I would love your input on this issue as I am stumped.  I cannot figure out why
> > this renders without issue when I only have a certain number of objects defined.
> >
> >
> > The order of my file:
> >
> > In my scene, centered at the origin, I have bubbles, inside of gel, inside of a
> > glass tube, inside of water, inside of a plexiglass cylinder.
> >
> > My code
> >
> > 1) I define variables, set trace level, and place the camera
> >
> > 2) I create a distributed area light source on a rectangular box
> >
> > 3) I define the bubbles I want in the gel
> >
> > 4) I create the glass tube into which the gel will sit
> >
> > 5) I create the gel region with voids into which the bubbles sit.
> >
> > 6) I then add water around the glass tube, and then a plexiglass perimeter.
> >
> >
> >
> >
>
> The first thing that I would to would be to increase max_trace_level
> further still. It can go up to 255.
>
> Note : Your area_light is oblique. If you want it to be flat, then, it's
> size should be something like this :
> area_light 160*x 200*z 65 65
> adaptive 0 // start with zero, then, increase if needed
> Size of area_light adjusted to match the light_box dimensions.
>
> During testing, you should disable the area_light. It makes testing and
> debugging faster.
>
> The 100 by 100 get silently increased to 129 by 129 when adaptive is
> used. That increase DO NOT affect the rendering time.
>
> Using dispersion 1 is the same as not using dispersion. It must be
> slightly different than 1. Realistic values are usually in the 1.01 to
> 1.08. Values less than 1 result in inverted dispersion.
>
> You are using fade_power 1000 !? You should use 1 or 1001.
> Using 1000 may cause some issues.

Hello Alain,

Thank you so much for your reply and suggestions.  As you may have noticed, I am
still in the process of understanding the different features.

In the case of max_trace_level, I have put this all the way up to the max as you
suggested, but this did not resolve the issue from my original script.  I'll
have to keep digging for a solution in that regard.

For the area_light, I was certainly not clear on the pov-ray documentation and
examples.  From what I understand, I am creating a box (light box) that is
parallel with the xy-plan, onto which I'm stretching an array of 100x100 light
sources.  And as you stated, by adding the adaptive, feature, this gets
increased when running (Great thing to know!  I wasn't completely clear on what
happened in the background).

I am, however, still confused on why the area_light would be tilted.  As you
mentioned, I want a light parallel to the xy plane, and thought that this was
the case.

Given this example below, my understanding is that my light_box is a box that is
160x200x2 units (x,y,z) and collared white.  I then locate my light_source at
<light_loc_x, light_loc_y,light_loc_z>.  I then use the area_light feature to
define two points <-10, -10, 10>, <10, 10, 10> from the origin to indicate the
vectors over which to stretch the light.

#declare light_box = box{ <-80,-100,0>, <80,100,2>
        pigment{color White}
       } //end light box
light_source {
    <light_loc_x, light_loc_y,light_loc_z>
    color White
    area_light <-10, -10, 10>, <10, 10, 10>, 100, 100
    adaptive 1
    jitter
    looks_like { light_box }
  }


As I look closely at this and my response, I'm very much confused about the
area_light.

Given my example above, how would you define an area light parallel to the
xy-plane that is, say, + 80 units in the Z-direction, and fits to the dimensions
of the light_box that I defined?  I've missed something important in the
documentation.

Finally, with the fade_power, how is 1000 bad, but 1 or 1001 good?  I did a
little copy-pasting of this part from an example, so I had not really asked
myself what realistic values should be.

Thank you again for all of your comments and insights.  I've got more digging to
do!
Post a reply to this message
|
|
| |
| |
|
|
|
|
| |
| |
|
|
"Kenneth" <kdw### [at] gmailcom> wrote:
>
> ... So in effect, your original five sphere definitions are not even being
> used; and the ones you did use are simply opaque.

Correction: In your scene, both sets of spheres ARE being rendered at the same
time... by mistake of course...and they exactly overlap, which is probably why
you (and I!) were seeing odd results during various experiments. When multiple
objects occupy the same exact space, POV-ray's built-in precision with its
calculations can sometimes show one object or the other, or else 'coincident
surface' speckles or other oddities.
Post a reply to this message
|
|
| |
| |
|
|
|
|
| |
| |
|
|
"bubble_person" <nomail@nomail> wrote:
> Alain Martel <kua### [at] videotronca> wrote:

> > Note : Your area_light is oblique. If you want it to be flat, then, it's
> > size should be something like this :
> > area_light 160*x 200*z 65 65

> For the area_light, I was certainly not clear on the pov-ray documentation and
> examples.  From what I understand, I am creating a box (light box) that is
> parallel with the xy-plan, onto which I'm stretching an array of 100x100 light
> sources.


>
> I am, however, still confused on why the area_light would be tilted.  As you
> mentioned, I want a light parallel to the xy plane, and thought that this was
> the case.

I'm confused also.  I'm not entirely certain that using looks_like will tilt the
area light array.  (I'm not sure of the top of my head how to accurately
visualize the actual area light.)


> Given this example below, my understanding is that my light_box is a box that is
> 160x200x2 units (x,y,z) and collared white.  I then locate my light_source at
> <light_loc_x, light_loc_y,light_loc_z>.  I then use the area_light feature to
> define two points <-10, -10, 10>, <10, 10, 10> from the origin to indicate the
> vectors over which to stretch the light.
>
> #declare light_box = box{ <-80,-100,0>, <80,100,2>
>         pigment{color White}
>        } //end light box
> light_source {
>     <light_loc_x, light_loc_y,light_loc_z>
>     color White
>     area_light <-10, -10, 10>, <10, 10, 10>, 100, 100
>     adaptive 1
>     jitter
>     looks_like { light_box }
>   }

So, a few things, in no particular order or importance:

It's ... weird to be that you're making a box of one size and an area light of
another.  Use the same dimensions.

Also kinda clunky that you're defining location x, y, and z separately, when you
could just declare a vector.

Is your light box visible in the scene? (I can't see it)  If not, can you just
use  a light source without the looks_like attribute?

Just in case you didn't know, when x, y, and z are used outside of function {}
equation definitions, they refer to vectors  (<1, 0, 0>, etc.)
So you can do something like 10*x to get <10, 0, 0>

Also, we have a weird thing in POV-Ray called automatic vector promotion.  They
way it works is, say you are making your light box, and you need two 3D vectors.
 If you are making a unit cube centered at the origin, you can do something
like:
box {-0.5, 0.5}, and the automatic vector promotion will promote --- expand ---
the scalar quantities into the 3D vectors that POV-Ray's parser is expecting for
those parameters.
So what you'd wind up with is the equivalent of:
box {<-0.5, -0.5, -0.5>, <0.5, 0.5, 0.5>}

This can be convenient for certain things, and a real PITA with others (rgbft
color vectors)

I noticed that Kenneth tracked down your core issue - and you may want to try
modeling individual components separately, one by one, in a standalone scene so
that you can see exactly what is going on.  That would have shown you that your
spheres have the default texture, not the one you _thought_ you were using.

You're making a tube filled with stuff that will be in some rotated position.
Rather than rotating every individual component to line up with a rotated tube,
model your tube around the origin, place everything inside it, and then rotate
the whole union {} of everything all at once.

To save a million lines of code, declare your material, ONCE, and then use that
declared material name.

To save even more internal gymnastics, write a loop to make all of your spheres
inside of a union, and then apply that material to the entire union of spheres,
not to each individual sphere.

Think in a hierarchies and flowcharts.

Busy here doing other things and juggling crises, but looking forward to seeing
your progress and answering any questions when time allows.  :)

- Bill
Post a reply to this message
|
|
| |
| |
|
|
|
|
| |
| |
|
|
"Kenneth" <kdw### [at] gmailcom> wrote:
> "Kenneth" <kdw### [at] gmailcom> wrote:
> >
> > ... So in effect, your original five sphere definitions are not even being
> > used; and the ones you did use are simply opaque.
>
> Correction: In your scene, both sets of spheres ARE being rendered at the same
> time... by mistake of course...and they exactly overlap, which is probably why
> you (and I!) were seeing odd results during various experiments. When multiple
> objects occupy the same exact space, POV-ray's built-in precision with its
> calculations can sometimes show one object or the other, or else 'coincident
> surface' speckles or other oddities.

Hello Kenneth,

Thank you for all of your sleuthing and the stripped-down example.  This has
really cleared up a fundamental misunderstanding that I was having about
inserting objects.  I was under the impression that the spheres defined in the
difference{} function were only there to carve out holes.  I didn't realise I
could actually define material properties for those voids.  That's the reason I
defined the bubbles twice, thinking I had to scoop out the region, and then fill
it with a bubble with the desired material properties.  It makes a lot of sense
that I was getting funny results with the doubly-defined bubbles occupying the
same space!

I also appreciate the example of the object definitions. As you can see with my
long-winded scripting, I was pushing my basic knowledge of the program as far as
I could without adding the hierarchical structures that would make it elegant.
haha!  This gives me some good footing to streamline my POV-RAY scripting.

I'll keep everyone updated as I try to make the script cleaner using your
examples and the input of others in the post.

Sincerely,

bubble_person
Post a reply to this message
|
|
| |
| |
|
|
|
|
| |
| |
|
|
hi,

"bubble_person" <nomail@nomail> wrote:
> ...
> Hello Jr.,
> ...

good to see (from yr reply to Kenneth) that "you're sorted" :-).  re voids,
there's also the 'hollow' keyword, which may be of use.
<https://wiki.povray.org/content/Reference:Hollow_Object_Modifier>


regards, jr.
Post a reply to this message
|
|
| |
| |
|
|
|
|
| |
| |
|
|
"bubble_person" <nomail@nomail> wrote:
>
>
> Hello Kenneth,
>
> Thank you for all of your sleuthing and the stripped-down example...This
> gives me some good footing to streamline my POV-RAY scripting.
>

Glad to help. There are many forum users here who can give you good advice, so
don't hesitate to ask even the most basic questions.

By the way: The 'default' attributes and values for a texture{...} are not
easily found in the documentation, and they're not all in one place for easy
look-up as far as I know. And some have changed over time, depending on which
version of POV-ray you are running.

To put it very simply, POV-Ray's default texture{...} has ALL of the many
possible attributes included in it, behind-the-scenes-- but they are set up so
that you see a simple (bland!) pigment{...}, finish{...},  interior{...} etc.
For older versions, the pigment color is opaque black; for newer versions, it's
opaque white (and I'm not exactly sure when that change occurred-- possibly with
v3.7?).  Those are rgbft <0,0,0,0,0> *or* rgbft <1,1,1,0,0>.

So when you manually specify a specific texture{...} for an object, whatever
attributes and values you include there simply override the built-in 'default'
values-- but any remaining non-specified attributes are still there, at their
defaults. That's why you can specify an object with NO manually-attached
texture{...} yet still see the object in your scene.

Also, take a look at the #default{...} keyword in the docs; it's an easy and
time-saving way of setting up any texture attribute OR full texture near the
beginning of a scene file, which is then used for *every* object in your scene
(and you can then override any of the attributes on a per-object basis, as
needed.) Less typing drudgery!  ;-)
Post a reply to this message
|
|
| |
| |
|
|
|
|
| |
| |
|
|
Le 2021-11-11 à 13:19, bubble_person a écrit :
> Alain Martel <kua### [at] videotronca> wrote:
>> Le 2021-11-11 à 08:06, bubble_person a écrit :
>>> Hello Forum,
>>>
>>> I am relatively new to POV-RAY, but have a functional script .
>>>
>>> I am simulating air bubbles in a glass tube full of gel.  I am running into a
>>> funny problem where, if I add too many bubbles to the script, they go from being
>>> transparent and rendered correctly, to a completely opaque, black object through
>>> which no light shines.
>>>
>>> Things that don't seem to work:
>>>
>>> 1) Increasing the  max_trace_level
>>>
>>> 2) I have tried to be sure that the inner surface of the gel is not in contact
>>> with the air bubble by reducing the bubble radius by epsilon (.0001).  Oddly
>>> enough, the script with up to 4 bubbles works only when the two surfaces are
>>> coincident, and subtracting an epsilon value (.0001,.001,.01) causes the bubbles
>>> to turn black, no matter the number.
>>>
>>> I would love your input on this issue as I am stumped.  I cannot figure out why
>>> this renders without issue when I only have a certain number of objects defined.
>>>
>>>
>>> The order of my file:
>>>
>>> In my scene, centered at the origin, I have bubbles, inside of gel, inside of a
>>> glass tube, inside of water, inside of a plexiglass cylinder.
>>>
>>> My code
>>>
>>> 1) I define variables, set trace level, and place the camera
>>>
>>> 2) I create a distributed area light source on a rectangular box
>>>
>>> 3) I define the bubbles I want in the gel
>>>
>>> 4) I create the glass tube into which the gel will sit
>>>
>>> 5) I create the gel region with voids into which the bubbles sit.
>>>
>>> 6) I then add water around the glass tube, and then a plexiglass perimeter.
>>>
>>>
>>>
>>>
>>
>> The first thing that I would to would be to increase max_trace_level
>> further still. It can go up to 255.
>>
>> Note : Your area_light is oblique. If you want it to be flat, then, it's
>> size should be something like this :
>> area_light 160*x 200*z 65 65
>> adaptive 0 // start with zero, then, increase if needed
>> Size of area_light adjusted to match the light_box dimensions.
>>
>> During testing, you should disable the area_light. It makes testing and
>> debugging faster.
>>
>> The 100 by 100 get silently increased to 129 by 129 when adaptive is
>> used. That increase DO NOT affect the rendering time.
>>
>> Using dispersion 1 is the same as not using dispersion. It must be
>> slightly different than 1. Realistic values are usually in the 1.01 to
>> 1.08. Values less than 1 result in inverted dispersion.
>>
>> You are using fade_power 1000 !? You should use 1 or 1001.
>> Using 1000 may cause some issues.
>
> Hello Alain,
>
> Thank you so much for your reply and suggestions.  As you may have noticed, I am
> still in the process of understanding the different features.
>
> In the case of max_trace_level, I have put this all the way up to the max as you
> suggested, but this did not resolve the issue from my original script.  I'll
> have to keep digging for a solution in that regard.
>
> For the area_light, I was certainly not clear on the pov-ray documentation and
> examples.  From what I understand, I am creating a box (light box) that is
> parallel with the xy-plan, onto which I'm stretching an array of 100x100 light
> sources.  And as you stated, by adding the adaptive, feature, this gets
> increased when running (Great thing to know!  I wasn't completely clear on what
> happened in the background).
>
> I am, however, still confused on why the area_light would be tilted.  As you
> mentioned, I want a light parallel to the xy plane, and thought that this was
> the case.
>
> Given this example below, my understanding is that my light_box is a box that is
> 160x200x2 units (x,y,z) and collared white.  I then locate my light_source at
> <light_loc_x, light_loc_y,light_loc_z>.  I then use the area_light feature to
> define two points <-10, -10, 10>, <10, 10, 10> from the origin to indicate the
> vectors over which to stretch the light.
>
> #declare light_box = box{ <-80,-100,0>, <80,100,2>
>          pigment{color White}
>         } //end light box
> light_source {
>      <light_loc_x, light_loc_y,light_loc_z>
>      color White
>      area_light <-10, -10, 10>, <10, 10, 10>, 100, 100
>      adaptive 1
>      jitter
>      looks_like { light_box }
>    }
>
>
The size vectors of an area_light define the 2D dimentions of the
area_light. A line going from the origin to one of them will be parallel
to the side of the area_light.

Simple length are used for a light array with sides parallel to the axis.
Two non-zero component are used for an array parallel to one of the
major planes but rotated/sheared.
Three non-zero components will define an array that is not parallel to
any of the planes.

Normally, we use simple lengts parameters, each in line with one of the
axis.

In the present example, the vectors are diagonal. They pass through the
origin <0,0,0> and the defined points, or <-10, -10, 10> and <10, 10, 10>.

It goes from <-10, -10, 10> to <0, 0, 0> to <10, 10, 10>.
This is perpendicular to the X-Z plane, and at 45° from the X-Y plane.

If you want an area_light parallel to the X-Z plane, then, the vectors
need their Y components to be zero.

light_source {
     <light_loc_x, light_loc_y,light_loc_z>
     color White
     area_light <-10, 0, 10>, <10, 0, 10>, 100, 100
     adaptive 1
     jitter
     looks_like { light_box }
   }
Defines an area_light parallel to the Z-X plane, rotated 45°.

light_source {
     <light_loc_x, light_loc_y,light_loc_z>
     color White
     area_light <-10, -10, 0>, <10, 10, 0>, 100, 100
     adaptive 1
     jitter
     looks_like { light_box }
   }
Defines a LINEAR light array as the two vectors are colinear. It won't,
but should, generate at least a warning.
Post a reply to this message
|
|
| |
| |
|
|
|
|
| |
| |
|
|
Le 2021-11-12 à 12:19, Kenneth a écrit :

> To put it very simply, POV-Ray's default texture{...} has ALL of the many
> possible attributes included in it, behind-the-scenes-- but they are set up so
> that you see a simple (bland!) pigment{...}, finish{...},  interior{...} etc.
> For older versions, the pigment color is opaque black; for newer versions, it's
> opaque white (and I'm not exactly sure when that change occurred-- possibly with
> v3.7?).  Those are rgbft <0,0,0,0,0> *or* rgbft <1,1,1,0,0>.
> The change occurred between 3.7 and 3.8.
Post a reply to this message
|
|
| |
| |
|
|
|
|
| |
| |
|
|
Op 11-11-2021 om 19:19 schreef bubble_person:
> Finally, with the fade_power, how is 1000 bad, but 1 or 1001 good?  I did a
> little copy-pasting of this part from an example, so I had not really asked
> myself what realistic values should be.
>
Alain is right about the fade_power of 1001. However, when I wanted to
find again the location of this in the wiki pages to help your
understanding of it - surprisingly - I was unable to find it! I am sure
it was there, somewhere, in the documentation...

--
Thomas
Post a reply to this message
|
|
| |
| |
|
|
|
|
| |
| |
|
|
Thomas de Groot <tho### [at] degrootorg> wrote:
> Op 11-11-2021 om 19:19 schreef bubble_person:
> > Finally, with the fade_power, how is 1000 bad, but 1 or 1001 good?  I did a
> > little copy-pasting of this part from an example, so I had not really asked
> > myself what realistic values should be.
> >
> Alain is right about the fade_power of 1001. However, when I wanted to
> find again the location of this in the wiki pages to help your
> understanding of it - surprisingly - I was unable to find it! I am sure
> it was there, somewhere, in the documentation...
>
> --
> Thomas

Generally, when this occurs, the bit of information, is rather in release logs
instead of doc, if you do find it in one or the other, please share, so that we
can update or ignore. Meanwhile, I added some of Alain's guidelines to
dispersion page in the wiki which are developing a bit further than current doc,
so if a native speaker wants to restyle, do not hesitate and add your
improvements in the page's discussion:
https://wiki.povray.org/content/Reference:Interior#Dispersion

Thanks for your patience
Post a reply to this message
|
|
| |
| |
|
|
|
|
| |
| |
|
|
Op 16-11-2021 om 11:52 schreef Mr:
> Thomas de Groot <tho### [at] degrootorg> wrote:
>> Op 11-11-2021 om 19:19 schreef bubble_person:
>>> Finally, with the fade_power, how is 1000 bad, but 1 or 1001 good?  I did a
>>> little copy-pasting of this part from an example, so I had not really asked
>>> myself what realistic values should be.
>>>
>> Alain is right about the fade_power of 1001. However, when I wanted to
>> find again the location of this in the wiki pages to help your
>> understanding of it - surprisingly - I was unable to find it! I am sure
>> it was there, somewhere, in the documentation...
>>
>> --
>> Thomas
>
> Generally, when this occurs, the bit of information, is rather in release logs
> instead of doc, if you do find it in one or the other, please share, so that we
> can update or ignore. Meanwhile, I added some of Alain's guidelines to
> dispersion page in the wiki which are developing a bit further than current doc,
> so if a native speaker wants to restyle, do not hesitate and add your
> improvements in the page's discussion:
> https://wiki.povray.org/content/Reference:Interior#Dispersion
>
I am not sure. In the 'Attenuation' section of 'Dispersion & Caustics',
there is that mention about "If you set fade_power in the interior of an
object at 1000 or above, a realistic exponential attenuation function
will be used". I guess that the '1001' value comes from there.

This brings the following question: What is the difference between
fade_power 2 and fade_power 1001, as both, in the docs/wiki, are
described as 'exponential'?

Finally, in:
https://news.povray.org/povray.binaries.images/thread/%3C4f2654d6%241%40news.povray.org%3E/

Ive tells us: "note that this "fade_power 1001" statement is an old (and
really dirty as it lacks any logic) hack that is part of POV-Ray since
ages to turn realistic fade power calculation on."

Food for thoughts?

--
Thomas
Post a reply to this message
|
|
| |
| |
|
|
|
|
| |
| |
|
|
Thomas de Groot <tho### [at] degrootorg> wrote:
>
> This brings the following question: What is the difference between
> fade_power 2 and fade_power 1001, as both, in the docs/wiki, are
> described as 'exponential'?

I did a search through old newsgroups too, and found a useful comment by Alain
posted Dec 18 2017 (with my own comments in brackets, which I hope are correct):

"For a material [i.e., showing light attenuation inside a translucent object]
you should use fade_power 1 or fade_power 1001 to get a more realistic result.
Fade_power 2 is for light attenuation over a distance in empty space." [i.e., in
POV-ray's 'air' or external space, not *inside* an object.]

So there is a difference in how and when fade_power is used, apparently.

>
> Ive tells us: "note that this "fade_power 1001" statement is an old (and
> really dirty as it lacks any logic) hack that is part of POV-Ray since
> ages to turn realistic fade power calculation on."
>

I saw that one too. :-) And here's a later comment by Clipka, dated Oct 27 2012:

"...realistic fading for interiors is exponential rather than
linear; specify a fade_power value of 1000 or greater (1001 is often
used, but it doesn't really matter), POV-Ray will then enable
exponential fading."

It seems that fade_power 1001 has been used for quite a long time. It's in a
section of code in a post by Ross on September 11 2003 entitled "glass objects".

Personally, I have not yet run a comparative test of values <1000 vs. 1000 vs.
1001 vs. some higher value, so I can't comment on the expected effects. It seems
that a value of 1001 *or higher* turns on the 'exponential' fading, not
specifically 1001. What that exponent *is*, I don't know; I guess it's derived
by the in-built equation mentioned in the docs:
            Attenuation = exp(-depth/fade_dist)

??
Post a reply to this message
|
|
| |
| |
|
|
|
|
| |
| |
|
|
Op 16/11/2021 om 20:57 schreef Kenneth:
> Thomas de Groot <tho### [at] degrootorg> wrote:
>>
>> This brings the following question: What is the difference between
>> fade_power 2 and fade_power 1001, as both, in the docs/wiki, are
>> described as 'exponential'?
>
> I did a search through old newsgroups too, and found a useful comment by Alain
> posted Dec 18 2017 (with my own comments in brackets, which I hope are correct):
>
Hey! Thanks Kenneth! This does answer some questions indeed. I never
paid much attention to the 'issue', and always mindlessly used the 1001
value when necessary. The query from bubble_person made me wonder
suddenly, however.

> "For a material [i.e., showing light attenuation inside a translucent object]
> you should use fade_power 1 or fade_power 1001 to get a more realistic result.
> Fade_power 2 is for light attenuation over a distance in empty space." [i.e., in
> POV-ray's 'air' or external space, not *inside* an object.]
>
> So there is a difference in how and when fade_power is used, apparently.
>
Good. This is an additional information of importance it seems. If
confirmed by 'the powers that be', I would be grateful if this info
could be added to the wiki and/or official documentation.

>>
>> Ive tells us: "note that this "fade_power 1001" statement is an old (and
>> really dirty as it lacks any logic) hack that is part of POV-Ray since
>> ages to turn realistic fade power calculation on."
>>
>
> I saw that one too. :-) And here's a later comment by Clipka, dated Oct 27 2012:
>
> "...realistic fading for interiors is exponential rather than
> linear; specify a fade_power value of 1000 or greater (1001 is often
> used, but it doesn't really matter), POV-Ray will then enable
> exponential fading."
>
> It seems that fade_power 1001 has been used for quite a long time. It's in a
> section of code in a post by Ross on September 11 2003 entitled "glass objects".
>
He he! I had not come across those two. I believe the comment by Clipka
should also find its way, one way or another, to the documentation.

> Personally, I have not yet run a comparative test of values <1000 vs. 1000 vs.
> 1001 vs. some higher value, so I can't comment on the expected effects. It seems
> that a value of 1001 *or higher* turns on the 'exponential' fading, not
> specifically 1001. What that exponent *is*, I don't know; I guess it's derived
> by the in-built equation mentioned in the docs:
>              Attenuation = exp(-depth/fade_dist)
>
Yes, I expect that is the case.

Thanks again for your sleuth work! :-)

--
Thomas
Post a reply to this message
|
|
| |
| |
|
|
|
|
| |
| |
|
|
Kenneth, I have not tested it here, but are the 'voids' really
necessary? Is it not enough to just add the bubbles to the gel, as both
have different ior's and do not interact?

See my recent test in p.b.i. with the crystal + huge inclusion.

--
Thomas
Post a reply to this message
|
|
| |
| |
|
|
|
|
| |
| |
|
|
Thomas de Groot <tho### [at] degrootorg> wrote:
> Kenneth, I have not tested it here, but are the 'voids' really
> necessary? Is it not enough to just add the bubbles to the gel, as both
> have different ior's and do not interact?
>

Apparently, the visual result is exactly the same either way.

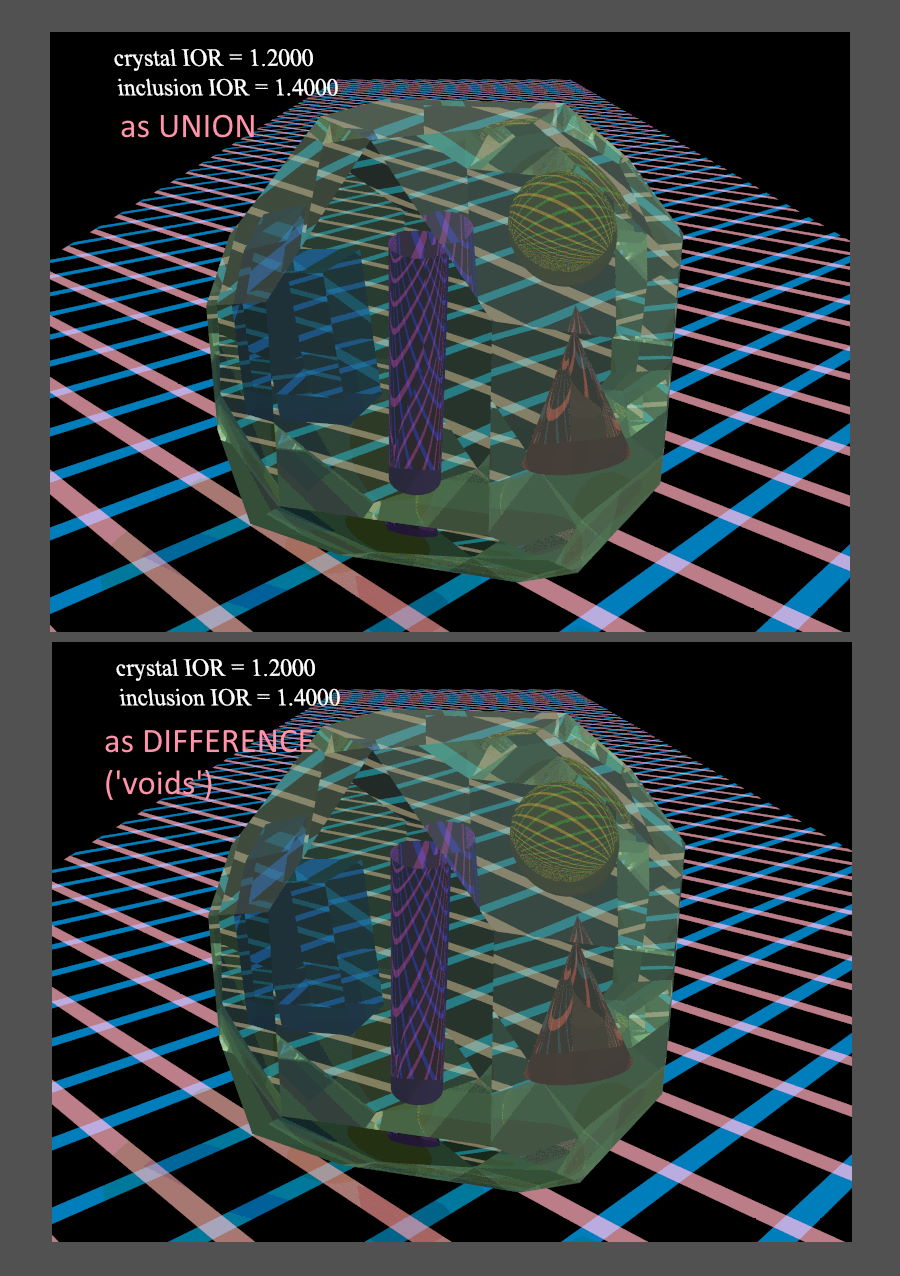
Here is my own "poor man's crystal", ha-- just an intersection of three rotated
boxes. The inclusions are simple shapes. I rendered two versions, with the
inclusions as a UNION with the crystal vs. being DIFFERENCED from it as voids. I
see absolutely no visual change, although I was expecting them to look
completely different. It seems that the ior 'effect' depends only on the
*surfaces* that the camera ray sees, not really on any imagined interior
substance of the inclusions.

I have not yet tested my scene to discover how the different iors affect each
other-- i.e., simple addition vs. multiplication of the iors. That's difficult
to tell, visually. I suspect that it's just addition.

-----
BTW, this 'multiple-ior' effect gave me an idea-- which I am experimenting
with-- about creating what looks like *variable* ior within an object, that
changes along its length or depth, etc. The basic idea is to pre-slice the
object into *many* very thin box sections, each with a slightly increasing ior
value, then re-combine the slices to look like the original solid object. Of
course, I am running into coincident-surface problems with all of those slice
recombinations... but I think that's a temporary problem, until I figure out how
best to re-position them. (Should they be separated by tiny 'air' gaps-- or
should they be slightly embedded into each other?) Anyway, my experiments look
promising so far, if a bit...odd ;-)
Post a reply to this message
Attachments:
Download 'crystal_as_union_vs_difference.jpg' (233 KB)
Preview of image 'crystal_as_union_vs_difference.jpg'
|
|
| |
| |
|
|
From: Thomas de Groot
Subject: Re: Transparent Objects Become Black
Date: 18 Nov 2021 07:27:27
Message: <619646af@news.povray.org>
|
|
|
| |
| |
|
|
Op 17-11-2021 om 22:06 schreef Kenneth:
> Thomas de Groot <tho### [at] degrootorg> wrote:
>> Kenneth, I have not tested it here, but are the 'voids' really
>> necessary? Is it not enough to just add the bubbles to the gel, as both
>> have different ior's and do not interact?
>>
>
> Apparently, the visual result is exactly the same either way.
>
> Here is my own "poor man's crystal", ha-- just an intersection of three rotated
> boxes. The inclusions are simple shapes. I rendered two versions, with the
> inclusions as a UNION with the crystal vs. being DIFFERENCED from it as voids. I
> see absolutely no visual change, although I was expecting them to look
> completely different. It seems that the ior 'effect' depends only on the
> *surfaces* that the camera ray sees, not really on any imagined interior
> substance of the inclusions.
>
Yes, that confirms my guess. You didn't say, but I suppose that the
'union' renders faster than the 'difference'. Additionally, using blobs
as inclusions, especially if there are many of them, will speed up
render time.

> I have not yet tested my scene to discover how the different iors affect each
> other-- i.e., simple addition vs. multiplication of the iors. That's difficult
> to tell, visually. I suspect that it's just addition.
>
I am not sure. It looks like that - independent from ior - the used
media inside container and inclusions are treated separately. In my
experiments I do no see any cross-influence, addition or multiplication,
of colors.

> -----
> BTW, this 'multiple-ior' effect gave me an idea-- which I am experimenting
> with-- about creating what looks like *variable* ior within an object, that
> changes along its length or depth, etc. The basic idea is to pre-slice the
> object into *many* very thin box sections, each with a slightly increasing ior
> value, then re-combine the slices to look like the original solid object. Of
> course, I am running into coincident-surface problems with all of those slice
> recombinations... but I think that's a temporary problem, until I figure out how
> best to re-position them. (Should they be separated by tiny 'air' gaps-- or
> should they be slightly embedded into each other?) Anyway, my experiments look
> promising so far, if a bit...odd ;-)
>
I am interested to see the result.


@bubble_person: sorry if this discussion 'seems' to ignore you. This is
not the intention nor the reality; Your original question generated a
number of issues which we are not sure about, and I think everybody will
benefit in the end.

--
Thomas
Post a reply to this message
|
|
| |
| |
|
|
|
|
| |
| |
|
|
Le 2021-11-17 à 16:06, Kenneth a écrit :

> -----
> BTW, this 'multiple-ior' effect gave me an idea-- which I am experimenting
> with-- about creating what looks like *variable* ior within an object, that
> changes along its length or depth, etc. The basic idea is to pre-slice the
> object into *many* very thin box sections, each with a slightly increasing ior
> value, then re-combine the slices to look like the original solid object. Of
> course, I am running into coincident-surface problems with all of those slice
> recombinations... but I think that's a temporary problem, until I figure out how
> best to re-position them. (Should they be separated by tiny 'air' gaps-- or
> should they be slightly embedded into each other?) Anyway, my experiments look
> promising so far, if a bit...odd ;-)
>
>

Try clipped_by to make your slices. That way, there will be no internal
boundaries.
Post a reply to this message
|
|
| |
| |
|
|
|
|
| |
| |
|
|
Alain Martel <kua### [at] videotronca> wrote:
> Le 2021-11-17 à 16:06, Kenneth a écrit :
> >
> > .. Of course, I am running into coincident-surface problems with all of
> > those slice recombinations... but I think that's a temporary problem, until
> > I figure out how best to re-position them.
>
> Try clipped_by to make your slices. That way, there will be no internal
> boundaries.

I didn't even think of clipped_by. Thanks, I'll give that a try.
Post a reply to this message
|
|
| |
| |
|
|
|
|
| |
| |
|
|
Thomas de Groot <tho### [at] degrootorg> wrote:
>
> You didn't say, but I suppose that the
> 'union' renders faster than the 'difference'. Additionally, using blobs
> as inclusions, especially if there are many of them, will speed up
> render time.

My current machine is so fast that I didn't even notice a difference in render
times! But I went back and noted the times: 2.067 sec for union, 2.138 sec for
difference. So yes, the union is faster. BTW, I have almost never experimented
with blobs(!); I need to do that. I still find it amazing that they render
faster in a 'difference' than even simple spheres do-- because I assume that
they are far more complex as math constructs.

BTW, I forgot to mention that my previous image post did not include media,
although I plan to experiment with that addition as well.

There is an interesting difference in how POV-ray treats media vs. ior regarding
embedded objects, which might be unexpected to a new user: Embedded objects with
different iors show the ior changes, whereas embedded media objects do NOT show
their different
                    media method...
                    intervals...
                    samples...
For media, the only values recognized for those settings are from the first
object 'surface' that the camera ray 'sees'-- which is the larger container
object. The inner-object values, if different, are ignored, and take on the
outer object values. It might be assumed that the ior and media 'mechanisms' --
both being interior{...} attributes-- would work the same way, but they don't.

> > [Kenneth wrote:]
> > I have not yet tested my scene to discover how the different iors
> > affect each other-- i.e., simple addition vs. multiplication of the
> > iors. That's difficult to tell, visually. I suspect that it's
> > just addition.

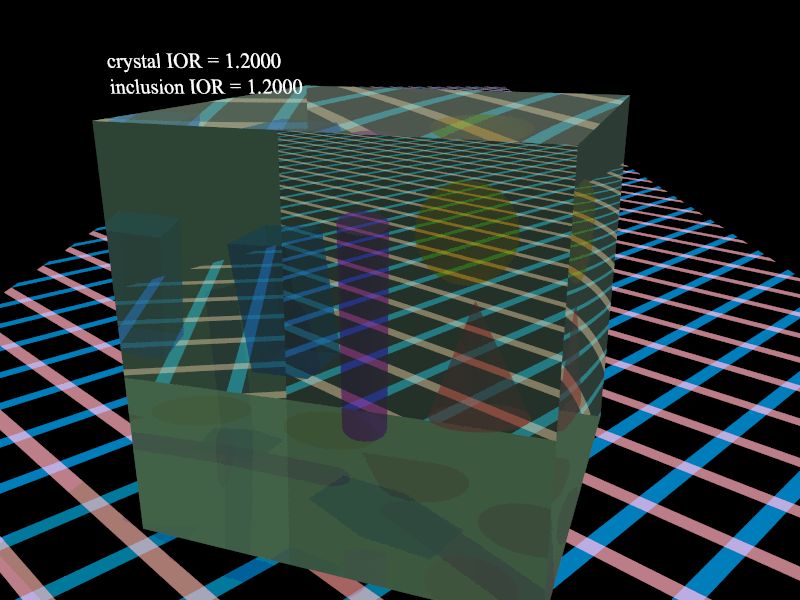
This situation is not quite what I originally thought, although it *is* simple
addition, in a different form:  From further tests, I see that the different
iors interact like this example:
              crystal ior (the container): 1.2
              inclusion ior: 1.2
When they are the *same*, the inclusions do not show any 'additional' ior effect
-- like an additional 0.2 for themselves, above the container's 1.2-- but just
the overall ior of 1.2... as if the container and the inclusions are all "made
from the same material" (whether as a union or a difference).  I guess that I
should have expected this-- it seems obvious now-- although I originally thought
that the inclusions would show 1.2 + 0.2 = 1.4.

BTW, I also discovered something interesting along the way:
An ior of 0.0 is the same as ior 1.0. This has actually confused me in the
past-- because 'negative' iors ( < 1.0 and even < 0.0) can be used for
interesting effects, but there is this unexpected  'glitch' at exactly 0.0.
Post a reply to this message
Attachments:
Download 'identical_iors_jpeg_file.jpg' (75 KB)
Preview of image 'identical_iors_jpeg_file.jpg'
|
|
| |
| |
|
|
|
|
| |
| |
|
|
I adapted the script to what I think is a comprehensive scene. I attach
it here for everybody interested in fairly complex nested interiors. I
am sure further improvements can be made, which I leave to you.

In p.b.i I post an image of this scene file.

--
Thomas
Post a reply to this message
Attachments:
Download 'test-script.pov.txt' (10 KB)
|
|
| |
| |
|
|
|
|
| |
| |
|
|
Le 2021-11-18 à 17:48, Kenneth a écrit :
               inclusion ior: 1.2
> When they are the *same*, the inclusions do not show any 'additional' ior effect
> -- like an additional 0.2 for themselves, above the container's 1.2-- but just
> the overall ior of 1.2... as if the container and the inclusions are all "made
> from the same material" (whether as a union or a difference).  I guess that I
> should have expected this-- it seems obvious now-- although I originally thought
> that the inclusions would show 1.2 + 0.2 = 1.4.
>
> BTW, I also discovered something interesting along the way:
> An ior of 0.0 is the same as ior 1.0. This has actually confused me in the
> past-- because 'negative' iors ( < 1.0 and even < 0.0) can be used for
> interesting effects, but there is this unexpected  'glitch' at exactly 0.0.
>
>

The refraction depends on the ratio of the iors on each sides of the
surface. What you see is what is expected and observed in nature.

I've experienced with negative ior. That makes the surface behave as if
it had
finish{ reflection 1 }

When you think about it, it makes sense. The ior is the ratio of the
speed of light in a vacuum divided by the speed of light in a medium.
A negative ior demand a negative speed of light in that medium.
Post a reply to this message
|
|
| |
| |
|
|
|
|
| |
| |
|
|
Alain Martel <kua### [at] videotronca> wrote:
>
> I've experienced with negative ior. That makes the surface behave as if
> it had
> finish{ reflection 1 }
>

That's an interesting observation. With my own tests here, I was not sure a
'negative' ior was having any effect when lower than 0.5-- until I re-positioned
the crystal and camera 'just so'. Then I could see at least my sphere inclusion
subtly changing its appearance as the ior decreased. But as a practical matter,
the more negative it goes, the less of a visual change there is.
Post a reply to this message
|
|
| |
| |
|
|
|
|
| |
| |
|
|
On 22/11/2021 5:11 am, Kenneth wrote:
> Alain Martel <kua### [at] videotronca> wrote:
>>
>> I've experienced with negative ior. That makes the surface behave as if
>> it had
>> finish{ reflection 1 }
>>
>
> That's an interesting observation. With my own tests here, I was not sure a
> 'negative' ior was having any effect when lower than 0.5-- until I re-positioned
> the crystal and camera 'just so'. Then I could see at least my sphere inclusion
> subtly changing its appearance as the ior decreased. But as a practical matter,
> the more negative it goes, the less of a visual change there is.
>


In this animation I cycle the ior of a glass sphere from 1.6 to zero and
back:

<https://youtu.be/gUzp0Bc6u1I>

Probably not relevant :-)
Post a reply to this message
|
|
| |
| |
|
|
|
|
| |
| |
|
|
On 11/21/21 4:11 PM, Kenneth wrote:
> Alain Martel <kua### [at] videotronca> wrote:
>>
>> I've experienced with negative ior. That makes the surface behave as if
>> it had
>> finish{ reflection 1 }
>>
>
> That's an interesting observation. With my own tests here, I was not sure a
> 'negative' ior was having any effect when lower than 0.5-- until I re-positioned
> the crystal and camera 'just so'. Then I could see at least my sphere inclusion
> subtly changing its appearance as the ior decreased. But as a practical matter,
> the more negative it goes, the less of a visual change there is.
>

FWIW. The ior value ripples into many finish features and how it is used
in any given feature depend upon additional finish settings and the
version of POV-Ray - v3.7, v3.8 releases and the (v4.0 master branch)
all differ somewhat. For example, fresnel being on in a many v3.8 finish
features will cause the negative negative ior values to be treated as
positive ones. In other words, only the ior magnitude then matters.

Also FWIW. In the most recent povr branch tarball there is a file called
albedoFresnelStory.txt in the doc directory with a great deal of finish
related detail - should anyone be interested. It was started as an
attempt at albedo documentation I could understand and intended to be a
wiki subject for the v3.8 release. As I dug, it grew and grew - and got
more and more complicated. I changed the aim to be a newsgroup post at
some point - but I've never posted it.

The file does represent my current understanding of the state of many
finish features in v3.7/v3.8/v4.0. To a significant degree it explains
why I'm playing with certain changes in my povr branch.

Anyhow...

Bill P.
Post a reply to this message
|
|
| |
| |
|
|
|
|
| |
| |
|
|
"m@b" <sai### [at] googlemailcom> wrote:
>
> In this animation I cycle the ior of a glass sphere from 1.6 to zero and
> back:
>
> <https://youtu.be/gUzp0Bc6u1I>
>

Nicely done!

Are you sure that your sphere's ior goes to exactly 0.0? I am not seeing the
'glitch' that I mentioned earlier, where ior 0.0 = ior 1.0. I suspect that your
animation code gets the ior *very close* to zero, but then cycles back.
Post a reply to this message
|
|
| |
| |
|
|
|
|
| |
| |
|
|
On 23/11/2021 3:45 am, Kenneth wrote:
> "m@b" <sai### [at] googlemailcom> wrote:
>>
>> In this animation I cycle the ior of a glass sphere from 1.6 to zero and
>> back:
>>
>> <https://youtu.be/gUzp0Bc6u1I>
>>
>
> Nicely done!
>
> Are you sure that your sphere's ior goes to exactly 0.0? I am not seeing the
> 'glitch' that I mentioned earlier, where ior 0.0 = ior 1.0. I suspect that your
> animation code gets the ior *very close* to zero, but then cycles back.
>
>
>
>
Yes - well spotted it goes down to 0.001 :-)
Post a reply to this message
|
|
| |
| |
|
|
|
|
| |
| |
|
|
Le 2021-11-22 à 19:52, m@b a écrit :
> On 23/11/2021 3:45 am, Kenneth wrote:
>> "m@b" <sai### [at] googlemailcom> wrote:
>>>
>>> In this animation I cycle the ior of a glass sphere from 1.6 to zero and
>>> back:
>>>
>>> <https://youtu.be/gUzp0Bc6u1I>
>>>
>>
>> Nicely done!
>>
>> Are you sure that your sphere's ior goes to exactly 0.0? I am not
>> seeing the
>> 'glitch' that I mentioned earlier, where ior 0.0 = ior 1.0. I suspect
>> that your
>> animation code gets the ior *very close* to zero, but then cycles back.
>>
>>
>>
>>
> Yes - well spotted it goes down to 0.001 :-)
>
That mean a substance where light travels at 1000 times the speed of light.

An ior of zero would mean light travelling at an infinite speed... In
both directions at the same time.
Post a reply to this message
|
|
| |
| |
|
|
|
|
| |
| |
|
|
William F Pokorny <ano### [at] anonymousorg> wrote:
>
> fresnel being on in a many v3.8 finish
> features will cause the negative negative ior values to be treated as
> positive ones. In other words, only the ior magnitude then matters.

Wow, that's...strange. I didn't know. Good detective work.
>
> Also FWIW. In the most recent povr branch tarball there is a file called
> albedoFresnelStory.txt in the doc directory with a great deal of finish
> related detail - should anyone be interested...

I would definitely like to read that. Could you post a link to it, here or
elsewhere? I thought I had various links to your povr stuff, but can't find
them. (They might be on my previous Win 7 machine, which is down at the moment.)
I actually couldn't find any povr/Github reference on the web at all, even with
a detailed Google search(!)
Post a reply to this message
|
|
| |
| |
|
|
|
|
| |
| |
|
|
On 11/23/21 4:33 PM, Kenneth wrote:
>> Also FWIW. In the most recent povr branch tarball there is a file called
>> albedoFresnelStory.txt in the doc directory with a great deal of finish
>> related detail - should anyone be interested...

> I would definitely like to read that. Could you post a link to it, here or
> elsewhere? I thought I had various links to your povr stuff, but can't find
> them. (They might be on my previous Win 7 machine, which is down at the moment.)
> I actually couldn't find any povr/Github reference on the web at all, even with
> a detailed Google search(!)

See:
http://news.povray.org/povray.binaries.programming/thread/%3C61781abc%40news.povray.org%3E/

or

Web Message: <61781abc@news.povray.org>


---
Thus far, the povr branch is published on the POV-Ray newsgroups as a
linux/unix tarball a few times a year.

Bill P.
Post a reply to this message
|
|
| |
| |
|
|
|
|
| |
| |
|
|
Alain Martel <kua### [at] videotronca> wrote:
> Le 2021-11-11 à 13:19, bubble_person a écrit :
> > Alain Martel <kua### [at] videotronca> wrote:
> >> Le 2021-11-11 à 08:06, bubble_person a écrit :
> >>> Hello Forum,
> >>>
> >>> I am relatively new to POV-RAY, but have a functional script .
> >>>
> >>> I am simulating air bubbles in a glass tube full of gel.  I am running into a
> >>> funny problem where, if I add too many bubbles to the script, they go from being
> >>> transparent and rendered correctly, to a completely opaque, black object through
> >>> which no light shines.
> >>>
> >>> Things that don't seem to work:
> >>>
> >>> 1) Increasing the  max_trace_level
> >>>
> >>> 2) I have tried to be sure that the inner surface of the gel is not in contact
> >>> with the air bubble by reducing the bubble radius by epsilon (.0001).  Oddly
> >>> enough, the script with up to 4 bubbles works only when the two surfaces are
> >>> coincident, and subtracting an epsilon value (.0001,.001,.01) causes the bubbles
> >>> to turn black, no matter the number.
> >>>
> >>> I would love your input on this issue as I am stumped.  I cannot figure out why
> >>> this renders without issue when I only have a certain number of objects defined.
> >>>
> >>>
> >>> The order of my file:
> >>>
> >>> In my scene, centered at the origin, I have bubbles, inside of gel, inside of a
> >>> glass tube, inside of water, inside of a plexiglass cylinder.
> >>>
> >>> My code
> >>>
> >>> 1) I define variables, set trace level, and place the camera
> >>>
> >>> 2) I create a distributed area light source on a rectangular box
> >>>
> >>> 3) I define the bubbles I want in the gel
> >>>
> >>> 4) I create the glass tube into which the gel will sit
> >>>
> >>> 5) I create the gel region with voids into which the bubbles sit.
> >>>
> >>> 6) I then add water around the glass tube, and then a plexiglass perimeter.
> >>>
> >>>
> >>>
> >>>
> >>
> >> The first thing that I would to would be to increase max_trace_level
> >> further still. It can go up to 255.
> >>
> >> Note : Your area_light is oblique. If you want it to be flat, then, it's
> >> size should be something like this :
> >> area_light 160*x 200*z 65 65
> >> adaptive 0 // start with zero, then, increase if needed
> >> Size of area_light adjusted to match the light_box dimensions.
> >>
> >> During testing, you should disable the area_light. It makes testing and
> >> debugging faster.
> >>
> >> The 100 by 100 get silently increased to 129 by 129 when adaptive is
> >> used. That increase DO NOT affect the rendering time.
> >>
> >> Using dispersion 1 is the same as not using dispersion. It must be
> >> slightly different than 1. Realistic values are usually in the 1.01 to
> >> 1.08. Values less than 1 result in inverted dispersion.
> >>
> >> You are using fade_power 1000 !? You should use 1 or 1001.
> >> Using 1000 may cause some issues.
> >
> > Hello Alain,
> >
> > Thank you so much for your reply and suggestions.  As you may have noticed, I am
> > still in the process of understanding the different features.
> >
> > In the case of max_trace_level, I have put this all the way up to the max as you
> > suggested, but this did not resolve the issue from my original script.  I'll
> > have to keep digging for a solution in that regard.
> >
> > For the area_light, I was certainly not clear on the pov-ray documentation and
> > examples.  From what I understand, I am creating a box (light box) that is
> > parallel with the xy-plan, onto which I'm stretching an array of 100x100 light
> > sources.  And as you stated, by adding the adaptive, feature, this gets
> > increased when running (Great thing to know!  I wasn't completely clear on what
> > happened in the background).
> >
> > I am, however, still confused on why the area_light would be tilted.  As you
> > mentioned, I want a light parallel to the xy plane, and thought that this was
> > the case.
> >
> > Given this example below, my understanding is that my light_box is a box that is
> > 160x200x2 units (x,y,z) and collared white.  I then locate my light_source at
> > <light_loc_x, light_loc_y,light_loc_z>.  I then use the area_light feature to
> > define two points <-10, -10, 10>, <10, 10, 10> from the origin to indicate the
> > vectors over which to stretch the light.
> >
> > #declare light_box = box{ <-80,-100,0>, <80,100,2>
> >          pigment{color White}
> >         } //end light box
> > light_source {
> >      <light_loc_x, light_loc_y,light_loc_z>
> >      color White
> >      area_light <-10, -10, 10>, <10, 10, 10>, 100, 100
> >      adaptive 1
> >      jitter
> >      looks_like { light_box }
> >    }
> >
> >
> The size vectors of an area_light define the 2D dimentions of the
> area_light. A line going from the origin to one of them will be parallel
> to the side of the area_light.
>
> Simple length are used for a light array with sides parallel to the axis.
> Two non-zero component are used for an array parallel to one of the
> major planes but rotated/sheared.
> Three non-zero components will define an array that is not parallel to
> any of the planes.
>
> Normally, we use simple lengts parameters, each in line with one of the
> axis.
>
> In the present example, the vectors are diagonal. They pass through the
> origin <0,0,0> and the defined points, or <-10, -10, 10> and <10, 10, 10>.
>
> It goes from <-10, -10, 10> to <0, 0, 0> to <10, 10, 10>.
> This is perpendicular to the X-Z plane, and at 45° from the X-Y plane.
>
> If you want an area_light parallel to the X-Z plane, then, the vectors
> need their Y components to be zero.
>
> light_source {
>      <light_loc_x, light_loc_y,light_loc_z>
>      color White
>      area_light <-10, 0, 10>, <10, 0, 10>, 100, 100
>      adaptive 1
>      jitter
>      looks_like { light_box }
>    }
> Defines an area_light parallel to the Z-X plane, rotated 45°.
>
> light_source {
>      <light_loc_x, light_loc_y,light_loc_z>
>      color White
>      area_light <-10, -10, 0>, <10, 10, 0>, 100, 100
>      adaptive 1
>      jitter
>      looks_like { light_box }
>    }
> Defines a LINEAR light array as the two vectors are colinear. It won't,
> but should, generate at least a warning.

Hello Alain,

Thank you again for all of your input and help.  I was unexpectedly out of my
project for a bit, but have implemented a number of changes of the code that
have resolved the issues of my bubbles being opaque.  I have also declared
objects and materials to simplify the code.

The last issue that I'm having is this topic of the area_light.  Your
explanation is much clearer than the documentation online, and I think I now
have it set in my scene correctly.  I just wanted to bounce this off of you as a
sanity check:

What I want is an area_light acting as a diffuse backlight shining through my
tube setup into my camera.  I want this area_light parallel to the XY plane
with dimensions 160x200, centered along the Z-axis, and translated +100 units in
the Z direction.

If I were only defining an area light without attaching it to an object it would
be defined as:

light_source {
    <0, 0,100>
    color White
    area_light <160, 0, 0>, <, 200, 0>, 100, 100
    adaptive 1
    jitter
  }

When I do this, however, the background is all black, as I believe this only
produces rays from the defined area_light, but doesn't really simulate the
appearance of looking into a bright backlight.  To mimic realistic backlighting,
I can then use the command looks_like{ light_box } where I predefine a white
rectangle called "light_box."  My code then looks like this:

#declare light_box = box{ <-80,-100,0>, <80,100,2>
        pigment{color White}
       } //end light box

light_source {
    <0, 0,100>
    color White
    area_light <-10, -10, 0>, <10, 10, 0>, 100, 100
    adaptive 1
    jitter
    looks_like { light_box }
  }

Doing this, I have defined an area_light parallel to the XY, stretched it over
my box dimensions, and translated that box/area_light +100 units in the
Z-direction.

Is this correct?

Sincerely,

bubble_person
Post a reply to this message
Attachments:
Download 'example-transparent-object-10-obj-and-mat-declaration.pov.txt' (10 KB)
|
|
| |
| |
|
|
|
|
| |
| |
|
|
Le 2021-12-01 à 08:58, bubble_person a écrit :

> light_source {
>      <0, 0,100>
>      color White
>      area_light <160, 0, 0>, <, 200, 0>, 100, 100
>      adaptive 1
>      jitter
>    }
>
> When I do this, however, the background is all black, as I believe this only
> produces rays from the defined area_light, but doesn't really simulate the
> appearance of looking into a bright backlight.  To mimic realistic backlighting,
> I can then use the command looks_like{ light_box } where I predefine a white
> rectangle called "light_box."  My code then looks like this:
>
> #declare light_box = box{ <-80,-100,0>, <80,100,2>
>          pigment{color White}
>         } //end light box
>
> light_source {
>      <0, 0,100>
>      color White
>      area_light <-10, -10, 0>, <10, 10, 0>, 100, 100// Not correct !
>      adaptive 1
>      jitter
>      looks_like { light_box }
>    }
>
> Doing this, I have defined an area_light parallel to the XY, stretched it over
> my box dimensions, and translated that box/area_light +100 units in the
> Z-direction.
>
> Is this correct?
Not quite...
>
> Sincerely,
>
> bubble_person
>

First point : It is important to remember that light sources are never
directly visible by the camera. They are ONLY places from where light
emanate to illuminate the scene, they are not actual objects.

In your example, one side of the area_light is parallel to a line going
from the origin to a point at <-10, -10, 0>, and the other side is
parallel to a line going from the origin to <10, 10, 0>.
Those two lines are co-linear. This will cause soft shadows in only one
direction. That direction is a diagonal.

There is an obvious, for me, confusion about what is defined where.

When defining a box, you use the two opposite corners. You effectively say :
Here is a box with faces parallel to the orthogonal planes, and it's
opposite corners are at those locations.

When defining an area_light, you define the DIRECTION and length of each
sides, NOT the location of the corners of the parallelogram covering the
area_light. Here, you are effectively saying :
Here is a parallelogram centred at the light's location with one side
oriented this way and this long, and the other side oriented that way
and that long.

Normally, you want those to be orthogonal. In your case, they need to
align to the X and Y axis. That mean that only one coordinate have to be
non-zero and the other two have to be zero. The sign is not important,
only the absolute value of the length.

area_light 160*x, 200*y, 100, 100
area_light -160*x, 200*y, 100, 100
area_light 160*x, -200*y, 100, 100
and
area_light -160*x, -200*y, 100, 100
all define exactly the same area_light.

As you want the light to be parallel to the X-Y plane, it should be
defined as :
#declare light_box = box{ <-80,-100,0>, <80,100,2>
         pigment{color White}
   finish{emission 1}
        } //end light box

light_source {
     <0, 0,100>
     color White
     area_light 160*x, 200*y, 65, 65
     adaptive 0 // May be enough
     jitter
     looks_like { light_box }
   }

The smaller size is more than adequate. Because it use the adaptive
mechanism, the performance is nearly identical.
Just using adaptive 0 will enable the adaptive sampling. The value is
not an on/off switch, but determine the minimum number of elements to
start with.

adaptive 0 start with just the four corners, a 2x2 array. (2^0 +1)
adaptive 1 start with a 3x3 array. (2^1 +1)
adaptive 2 start with a 5x5 array. (2^2 +1)
adaptive 3 start with a 9x9 array. (2^3 +1)
.
.
.

That progression is also why your 100 by 100 array get increased to 129
by 129, or 2^7 + 1.
Post a reply to this message
|
|
| |
| |
|
|
|
|
| |
| |
|
|
Alain Martel <kua### [at] videotronca> wrote:
> Le 2021-12-01 à 08:58, bubble_person a écrit :
>
> > light_source {
> >      <0, 0,100>
> >      color White
> >      area_light <160, 0, 0>, <, 200, 0>, 100, 100
> >      adaptive 1
> >      jitter
> >    }
> >
> > When I do this, however, the background is all black, as I believe this only
> > produces rays from the defined area_light, but doesn't really simulate the
> > appearance of looking into a bright backlight.  To mimic realistic backlighting,
> > I can then use the command looks_like{ light_box } where I predefine a white
> > rectangle called "light_box."  My code then looks like this:
> >
> > #declare light_box = box{ <-80,-100,0>, <80,100,2>
> >          pigment{color White}
> >         } //end light box
> >
> > light_source {
> >      <0, 0,100>
> >      color White
> >      area_light <-10, -10, 0>, <10, 10, 0>, 100, 100// Not correct !
> >      adaptive 1
> >      jitter
> >      looks_like { light_box }
> >    }
> >
> > Doing this, I have defined an area_light parallel to the XY, stretched it over
> > my box dimensions, and translated that box/area_light +100 units in the
> > Z-direction.
> >
> > Is this correct?
> Not quite...
> >
> > Sincerely,
> >
> > bubble_person
> >
>
> First point : It is important to remember that light sources are never
> directly visible by the camera. They are ONLY places from where light
> emanate to illuminate the scene, they are not actual objects.
>
> In your example, one side of the area_light is parallel to a line going
> from the origin to a point at <-10, -10, 0>, and the other side is
> parallel to a line going from the origin to <10, 10, 0>.
> Those two lines are co-linear. This will cause soft shadows in only one
> direction. That direction is a diagonal.
>
> There is an obvious, for me, confusion about what is defined where.
>
> When defining a box, you use the two opposite corners. You effectively say :
> Here is a box with faces parallel to the orthogonal planes, and it's
> opposite corners are at those locations.
>
> When defining an area_light, you define the DIRECTION and length of each
> sides, NOT the location of the corners of the parallelogram covering the
> area_light. Here, you are effectively saying :
> Here is a parallelogram centred at the light's location with one side
> oriented this way and this long, and the other side oriented that way
> and that long.
>
> Normally, you want those to be orthogonal. In your case, they need to
> align to the X and Y axis. That mean that only one coordinate have to be
> non-zero and the other two have to be zero. The sign is not important,
> only the absolute value of the length.
>
> area_light 160*x, 200*y, 100, 100
> area_light -160*x, 200*y, 100, 100
> area_light 160*x, -200*y, 100, 100
> and
> area_light -160*x, -200*y, 100, 100
> all define exactly the same area_light.
>
> As you want the light to be parallel to the X-Y plane, it should be
> defined as :
> #declare light_box = box{ <-80,-100,0>, <80,100,2>
>          pigment{color White}
>    finish{emission 1}
>         } //end light box
>
> light_source {
>      <0, 0,100>
>      color White
>      area_light 160*x, 200*y, 65, 65
>      adaptive 0 // May be enough
>      jitter
>      looks_like { light_box }
>    }
>
> The smaller size is more than adequate. Because it use the adaptive
> mechanism, the performance is nearly identical.
> Just using adaptive 0 will enable the adaptive sampling. The value is
> not an on/off switch, but determine the minimum number of elements to
> start with.
>
> adaptive 0 start with just the four corners, a 2x2 array. (2^0 +1)
> adaptive 1 start with a 3x3 array. (2^1 +1)
> adaptive 2 start with a 5x5 array. (2^2 +1)
> adaptive 3 start with a 9x9 array. (2^3 +1)
> .
> .
> .
>
> That progression is also why your 100 by 100 array get increased to 129
> by 129, or 2^7 + 1.

Hello Alain,

Thank you so much for the in-depth description and example to illustrate the
concepts.  I see exactly what you mean, and I definitely got myself turned
around on it.  This makes total sense about the light source not being visible
by itself, and the coordinate system.  I think I got turned around on the online
diagrams of the area_light, and trying to figure out where the two defining
vectors were connected (as you said, an origin which is why I was doing wacky
things like making two co-linear vectors!).

As for the adaptive, this makes sense now and thank you for making this clear.
I just posted another question on my rendering that includes essentially this
same question.  I did not see your reply, and will go change the post if I can
because this has cleared up my questions.  Thank you again for all of your
support and insight!

Sincerely,

Bubble_person
Post a reply to this message
|
|
| |
| |
|
|
|
|
| |
|
|