 |
|
|
|
|
|
| |
| |
|
|
From: Ilya Razmanov
Subject: Re: 3-D printing via 3D SLICER app-- step by step
Date: 10 Apr 2024 10:38:58
Message: <6616a482$1@news.povray.org>
|
|
|
| |
| |
|
|
On 06.04.2024 14:24, Kenneth wrote:
>
> This is a step-by-step guide to 3-D-print almost any type of POV-ray object or
> model (bicubic-patch objects being the exception) -- mathematical primitives
> like spheres, cylinders, etc. and CSG constructs of the same; isosurfaces;
> 'object patterns'; height_fields from images or functions; triangle meshes; even
> simple extruded artwork-- most of which have always been a problem to print
> because no other app can presently import them from POV-ray and turn them
> into .stl files for printing.
Ok, thinking of cheaper modifications to STL producing process, I
decided to make an STL-producing version of my previous PNG heightfield
to POVRay mesh converter:
https://github.com/Dnyarri/img2mesh
I just uploaded img2mesh-STL.py file there, so anyone having Python
installed may give it a try. No compiled exe so far, since it's just 0.1
version supposedly having unknown number of unknown bugs. This is why
I'm quite interested in feedback from people using real 3D printers. So
far I checked resulting .stl file for compatibility with several viewers
and tried some 3D printing software called UltiMaker Cura 5.7.0, all
were able to successfully open my .stl files. However, I'm still not
sure that it guarantees successful printing, so, again, I will much
appreciate testing and feedback.
Now, going back to Kenneth's idea of slicing: I thought that perharps we
can replace complete interpolation of slices and tesselation with some
POVRay interpolation, that is, instead of black/white sections of object
use sections with height-gradient pigment, then use resulting PNG
rendering as heightfield for conversion into triangle mesh.
Surely, it will work only with "visible" half of the object; I still
haven't figured out universal solution but that printing software seem
to be capable to import several .stl and then place it on top of each
other. Maybe, in combination with Kenneth's slicing but in gradient
variant, this will allow assembling complex objects.
Ok, my typing resources seem to be exhausted for today, right next to
thinking ones. May be later.
Again, I would be very grateful for testing and finding issues.
--
Ilyich the Toad
https://dnyarri.github.io/
Post a reply to this message
|
|
| |
| |
|
|
|
|
| |
| |
|
|
The attached image shows the nature of 3D SLICER's voxel-to-.stl-triangles
construction scheme on an enlarged scale, with and without 'smoothing' used
there. The same number of triangles are created either way.
I purposely sliced a POV-ray cone object at a very *low* resolution, 50 X 50
pixels with 50 slices. The exported .stl file is shown in Meshmixer and
Ultimaker CURA. Note that on curved exterior surfaces, the voxels join to their
neighbors with a 45-degree tilt of triangles. In my opinion, this is an
advantage-- the surfaces are not simple 'stacked boxes'. With *high*-resolution
image slices, those tilted triangles become so small that even sharp model edges
are retained.
The tip of the cone ended up as four voxels, not one; that was my mistake with
the image resolution I chose. 51X51 pixels would have produced a single-voxel
tip, I think.
This particular cone object illustrates an interesting fact about the slicing
scheme itself, and how it relates to 3D SLICER. In POV-ray, the cone was made
with a 1-unit diameter base and 1 unit tall--- which happens to result in an
exactly cubic bounding box there, behind the scenes. Since it *is* a cube, the
slicing image dimensions and number of slices should be in a 1:1:1 ratio-- for
example, 500X500 rez with 500 slices (assuming the object 'fills the view' in
the renders). POV-ray's messages pane is not really needed to get the proper
ratio in this case-- the result would be a perfectly-proportioned cone due to
the automatic camera in my slicing code. The same would happen with a sphere--
a cubic bounding box again. This little fact initially confused me as to how the
app was processing the *number* of slices I made-- my test objects had
different-sized b.b.'s with just a few being cubic by chance, and I didn't
realize the significance of the difference at first. It's fundamentally because
the voxels in 3D SLICER are 1mm cubes themselves, by default. But most objects
will have an oblong bounding box, not cubic-- which affects the number of slices
required, as each slice represents a single voxel's height. The wrong number
distorts the model.
Post a reply to this message
Attachments:
Download 'low_rez_3d_slicer_example_kw_4_2024.jpg' (915 KB)
Preview of image 'low_rez_3d_slicer_example_kw_4_2024.jpg'

|
|
| |
| |
|
|
|
|
| |
| |
|
|
Ilya Razmanov <ily### [at] gmail com> wrote:
> On 08.04.2024 1:46, Kenneth wrote:
>
> > Yep, I'm beginning to see the problems now-- even the most fundamental one of:
> > What should each image pixel represent as a triangle conversion? One triangle?
> > Multiple ones? POV-ray's internal height_field-from-image algorithm uses 4
> > neighboring pixels to create... two triangles. A similar scheme may or may not
> > be appropriate, I don't know.
> Hehehe, as I've told once already, in my simple img2mesh program:
>
> https://github.com/Dnyarri/img2mesh
>
> I use 1 pixel to produce 4 triangles ;-) That is, it replaces 1 pixel
> with a pyramid of 4 triangles.
Aha! YES, I remember reading your post, but I forgot that your scheme has a
connection to the current problem! (I just read your latest post here as well,
about your .stl experiment; I need time to digest it.) Your use of 4 triangles
per pixel is something that I was considering as well...although I did not think
it through in detail like you did. Nice work! You mentioned that you used Python
for your experiments; I have to admit that I have not yet 'dipped my toes' into
learning it.
You might be interested in the attached image ;-)
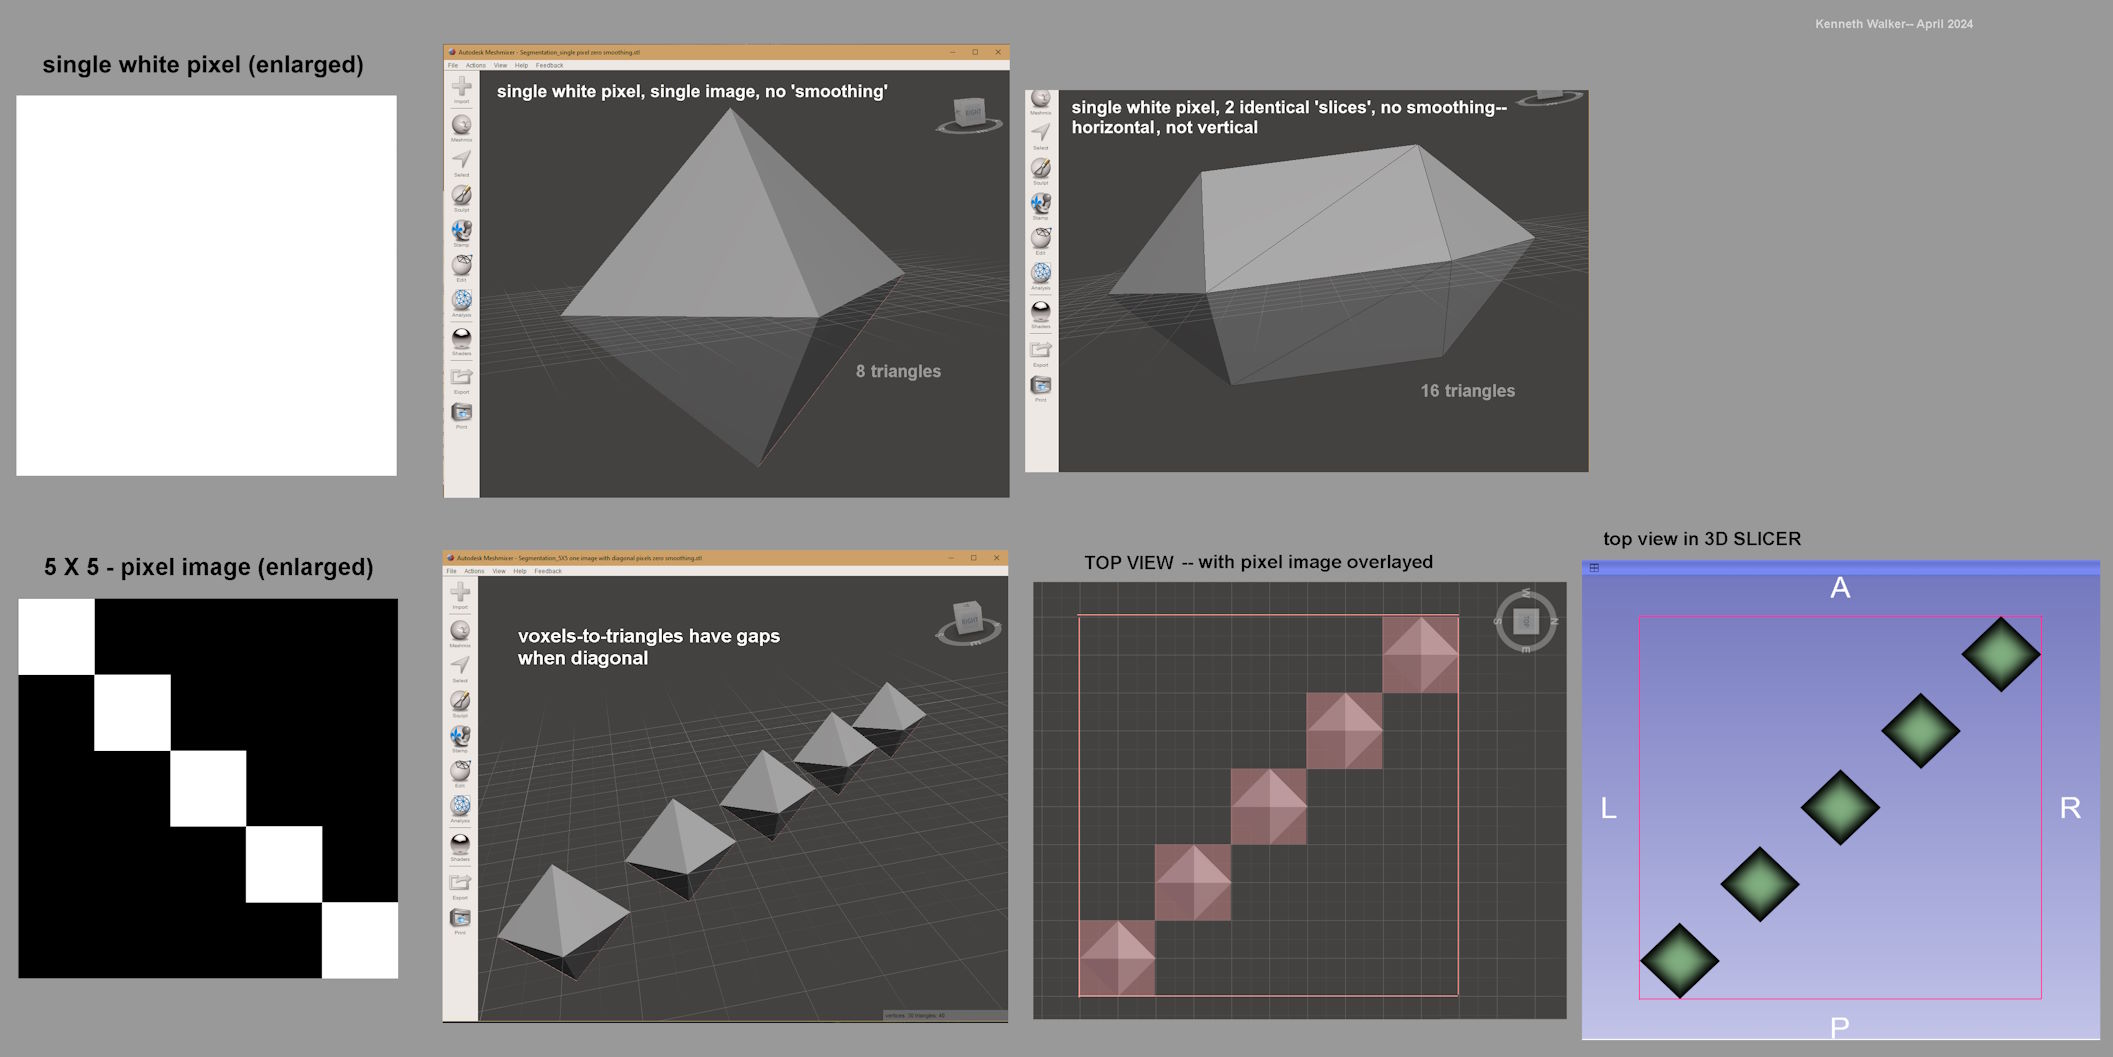
This is what a single 'naked' pixel looks like as a voxel in 3D SLICER, using
zero 'smoothing' there-- actually 8 triangles instead of 4, and rotated 45-deg
around vertical. (I used Meshmixer to view the resulting .stl file.) The
diamond shape occurs when there are no neighboring voxels to join-up with. To
create it, I made a single 1X1 pixel white image(!) and loaded that into the
app. (Such a single voxel-as-.stl *can* be 3-D printed, by greatly enlarging it
in the printer's software.)
3D SLICER was apparently never designed to process pure white images or
CT-scans-- this tiny image does not show up there until my STEP 3 instructions
(in 'Segment Editor') are used to 'activate' it and show it as 3-D. (My
slicing code keeps a 1-pixel black border around typical much-larger slice
images, to eliminate this problem.)
A single line of *diagonal* pixels is an oddity-- there are gaps between the
created voxels because of their intrinsic rotated orientations, even though they
do still have a 1:1 size-correspondence with the image...but I wonder how those
gaps affect tiny details in medical CT scans.
And TWO copies of a single-pixel image -- as two 'vertical slices' so to speak--
end up as a horizontal unit of voxels, not vertical as I would have expected.
That is an anomaly in my opinion, but I guess the app's developers had a reason
for designing it with such behavior...or didn't foresee the possibility(?) My
single-pixel 'torture test' is rather extreme though! com> wrote:
> On 08.04.2024 1:46, Kenneth wrote:
>
> > Yep, I'm beginning to see the problems now-- even the most fundamental one of:
> > What should each image pixel represent as a triangle conversion? One triangle?
> > Multiple ones? POV-ray's internal height_field-from-image algorithm uses 4
> > neighboring pixels to create... two triangles. A similar scheme may or may not
> > be appropriate, I don't know.
> Hehehe, as I've told once already, in my simple img2mesh program:
>
> https://github.com/Dnyarri/img2mesh
>
> I use 1 pixel to produce 4 triangles ;-) That is, it replaces 1 pixel
> with a pyramid of 4 triangles.
Aha! YES, I remember reading your post, but I forgot that your scheme has a
connection to the current problem! (I just read your latest post here as well,
about your .stl experiment; I need time to digest it.) Your use of 4 triangles
per pixel is something that I was considering as well...although I did not think
it through in detail like you did. Nice work! You mentioned that you used Python
for your experiments; I have to admit that I have not yet 'dipped my toes' into
learning it.
You might be interested in the attached image ;-)
This is what a single 'naked' pixel looks like as a voxel in 3D SLICER, using
zero 'smoothing' there-- actually 8 triangles instead of 4, and rotated 45-deg
around vertical. (I used Meshmixer to view the resulting .stl file.) The
diamond shape occurs when there are no neighboring voxels to join-up with. To
create it, I made a single 1X1 pixel white image(!) and loaded that into the
app. (Such a single voxel-as-.stl *can* be 3-D printed, by greatly enlarging it
in the printer's software.)
3D SLICER was apparently never designed to process pure white images or
CT-scans-- this tiny image does not show up there until my STEP 3 instructions
(in 'Segment Editor') are used to 'activate' it and show it as 3-D. (My
slicing code keeps a 1-pixel black border around typical much-larger slice
images, to eliminate this problem.)
A single line of *diagonal* pixels is an oddity-- there are gaps between the
created voxels because of their intrinsic rotated orientations, even though they
do still have a 1:1 size-correspondence with the image...but I wonder how those
gaps affect tiny details in medical CT scans.
And TWO copies of a single-pixel image -- as two 'vertical slices' so to speak--
end up as a horizontal unit of voxels, not vertical as I would have expected.
That is an anomaly in my opinion, but I guess the app's developers had a reason
for designing it with such behavior...or didn't foresee the possibility(?) My
single-pixel 'torture test' is rather extreme though!
Post a reply to this message
Attachments:
Download '3d_slicer_single_pixel_test_kw_4_2024.jpg' (168 KB)
Preview of image '3d_slicer_single_pixel_test_kw_4_2024.jpg'

|
|
| |
| |
|
|
From: Ilya Razmanov
Subject: Re: 3-D printing via 3D SLICER app-- step by step
Date: 11 Apr 2024 08:30:31
Message: <6617d7e7$1@news.povray.org>
|
|
|
| |
| |
|
|
On 11.04.2024 15:09, Kenneth wrote:
>
> You might be interested in the attached image ;-)
Sorry, don't have much time for a complete answer - some job retracted
me from experiments with single pixels and finding bugs ;-)
What as to your previous image, yes, it shows tessellation at work.
That's a bit tricky stuff. Surely there are some ready-made libraries
for that, but it takes time to just read about it - it's not an easy
task (I mean tessellation. However, on the other hand, reading is too),
that's why I though of some cheap tricks first.
What as to Python, I'm only starting to look at it, so far I can say it
definitely helps me making mistakes faster (that is, I don't have to
wait for a long compilation to discover that I made yet another mistake) ;-)
--
Ilyich the Toad
https://dnyarri.github.io/
Post a reply to this message
|
|
| |
| |
|
|
|
|
| |
| |
|
|
So after you have generated your STL files, have you tried editing them to see
how that works out?
Repaired / retriangulated the mesh?
Also, I have an STL file that I need to edit (enlarge a USB connector hole) - do
you have any recommendations for a good STL editor (free).
- BW
Post a reply to this message
|
|
| |
| |
|
|
|
|
| |
| |
|
|
"Bald Eagle" <cre### [at] netscapenet> wrote:
> So after you have generated your STL files, have you tried editing them to see
> how that works out?
> Repaired / retriangulated the mesh?
>
> Also, I have an STL file that I need to edit (enlarge a USB connector hole) - do
> you have any recommendations for a good STL editor (free).
Have look here:
https://www.geeetech.com/blog/tutorials/5-free-stl-editors-how-to-edit-stl-files/
--
http://subcube.com
https://github.com/t-o-k
Post a reply to this message
|
|
| |
| |
|
|
|
|
| |
| |
|
|
"Bald Eagle" <cre### [at] netscapenet> wrote:
> So after you have generated your STL files, have you tried editing them to see
> how that works out?
> Repaired / retriangulated the mesh?
>
> Also, I have an STL file that I need to edit (enlarge a USB connector hole) - do
> you have any recommendations for a good STL editor (free).
>
The only appropriate app I have at present is the free Meshmixer by Autodesk. It
has lots of mesh-repair tools for .stl files and other kinds of meshes, but I
have not yet learned how to use many of those features. And it can re-export the
file as .stl again. It hasn't been updated since 2021(?) but is still available.
There are a lot of instructional websites and videos out there for newbies; I
need to take a look myself.
Post a reply to this message
|
|
| |
| |
|
|
From: Ilya Razmanov
Subject: Re: 3-D printing via 3D SLICER app-- step by step
Date: 12 Apr 2024 01:37:31
Message: <6618c89b$1@news.povray.org>
|
|
|
| |
| |
|
|
On 11.04.2024 20:05, Bald Eagle wrote:
> Also, I have an STL file that I need to edit (enlarge a USB connector hole) - do
> you have any recommendations for a good STL editor (free).
Simplest way for Windows seem to be 3D Builder from Microsoft Store - it
does complain about some stl files and promises to fix them.
Unfortunately, it doesn't seem to be forced to say the reason for
complains, neither it does seem to export text stl, only binary one,
which I cannot understand, so I can't understand what happened.
So I'm also rather interested in seeing some stl validator/fixer,
preferrably small, and verbose enough for me to understand what's going on.
--
Ilyich the Toad
https://dnyarri.github.io/
Post a reply to this message
|
|
| |
| |
|
|
|
|
| |
| |
|
|
"Tor Olav Kristensen" <tor### [at] TOBEREMOVEDgmailcom> wrote:
> Have look here:
> https://www.geeetech.com/blog/tutorials/5-free-stl-editors-how-to-edit-stl-files/
Thanks TOR and Kenneth - I tried Meshmixer, and other than being a bit fussy and
non-intuitive, I think I managed to get it to work.
We'll see what the guy with the 3D printer says. ;)
- BW
Post a reply to this message
|
|
| |
| |
|
|
|
|
| |
| |
|
|
"Kenneth" <kdw### [at] gmailcom> wrote:
> [importing the .stl file into CURA, and printing the final model]
>
> The attached image shows the final result: the .stl file brought into my
> printer's software (Ultimaker CURA) then printed with medium-quality settings
> and a standard 0.4mm print nozzle.
Hi Kenneth,
I don't have much to say since I never got into 3D printing, but that final
result looks very good! It's amazing you can take something modeled in POV-Ray
and print it into the real world like that.
Have you tried using gyroid infills? Some people really like them.
Sam
Post a reply to this message
|
|
| |
| |
|
|
|
|
| |
|
|


