|
|
|
|
|
|
| |
| |
|
|
|
|
| |
| |
|
|
Hello.
I'm trying to work with Area Lights, but I can't seem to orient them correctly.
I've been trying a <-50 , 0 , 50 > , <50 , 0 , 50 > and that doesn't seem to
illuminate my scene, so I tried a <-50 , 0 , 0 > , < 0 , 50 , 0 > in an attempt
to make the angles at 90 degrees to each other, but that doesn't seem to have
worked either.
Any tips on how to generate a proper Area Light? The documentation is a little
slim. What I have developed seems pretty dull, too.
Thanks very much.
Post a reply to this message
|
|
| |
| |
|
|
|
|
| |
| |
|
|
"88Keys" <doz### [at] gmail com> wrote:
> Hello.
>
> I'm trying to work with Area Lights, but I can't seem to orient them correctly.
> I've been trying a <-50 , 0 , 50 > , <50 , 0 , 50 > and that doesn't seem to
> illuminate my scene, so I tried a <-50 , 0 , 0 > , < 0 , 50 , 0 > in an attempt
> to make the angles at 90 degrees to each other, but that doesn't seem to have
> worked either.
>
> Any tips on how to generate a proper Area Light? The documentation is a little
> slim. What I have developed seems pretty dull, too.
>
> Thanks very much.
I've just been banging my head over 2 different sorting algorithm scenes, so
I'll keep this short, and then see if you need any more help than this by
tomorrow.
A plane {} is defined by the vector normal to its surface, and the distance away
from those vector coordinates.
So you could start by placing a point light at -normal, and then putting a plane
{normal, distance} into your scene with the shadowless keyword
Also a cylinder {0, normal translate -normal*distance pigment {rgbt 0.9}
shadowless} would help show the direction of the light.
Then you could try to model your area light like the diagram in the
documentation to see if it lines up with what you think you're describing in the
code.
Placing visible objects in the scene like this, and trying to model the
invisible thing that you're trying to create is by far the best way to
troubleshoot and debug these kinds of issues, and it's a valuable learning
experience that will help you in every scene thereafter.
Hopefully this at least points you in the right direction.
- Bill com> wrote:
> Hello.
>
> I'm trying to work with Area Lights, but I can't seem to orient them correctly.
> I've been trying a <-50 , 0 , 50 > , <50 , 0 , 50 > and that doesn't seem to
> illuminate my scene, so I tried a <-50 , 0 , 0 > , < 0 , 50 , 0 > in an attempt
> to make the angles at 90 degrees to each other, but that doesn't seem to have
> worked either.
>
> Any tips on how to generate a proper Area Light? The documentation is a little
> slim. What I have developed seems pretty dull, too.
>
> Thanks very much.
I've just been banging my head over 2 different sorting algorithm scenes, so
I'll keep this short, and then see if you need any more help than this by
tomorrow.
A plane {} is defined by the vector normal to its surface, and the distance away
from those vector coordinates.
So you could start by placing a point light at -normal, and then putting a plane
{normal, distance} into your scene with the shadowless keyword
Also a cylinder {0, normal translate -normal*distance pigment {rgbt 0.9}
shadowless} would help show the direction of the light.
Then you could try to model your area light like the diagram in the
documentation to see if it lines up with what you think you're describing in the
code.
Placing visible objects in the scene like this, and trying to model the
invisible thing that you're trying to create is by far the best way to
troubleshoot and debug these kinds of issues, and it's a valuable learning
experience that will help you in every scene thereafter.
Hopefully this at least points you in the right direction.
- Bill
Post a reply to this message
|
|
| |
| |
|
|
|
|
| |
| |
|
|
On 25/01/2023 5:17 AM, 88Keys wrote:
> Hello.
>
> I'm trying to work with Area Lights, but I can't seem to orient them correctly.
> I've been trying a <-50 , 0 , 50 > , <50 , 0 , 50 > and that doesn't seem to
> illuminate my scene, so I tried a <-50 , 0 , 0 > , < 0 , 50 , 0 > in an attempt
> to make the angles at 90 degrees to each other, but that doesn't seem to have
> worked either.
>
> Any tips on how to generate a proper Area Light? The documentation is a little
> slim. What I have developed seems pretty dull, too.
>
> Thanks very much.
>
// author: Matthew Bradwell
// date: 2023
//--------------------------------------------------------------------------
#version 3.8;
global_settings{ assumed_gamma 1.0 }
#default{ finish{ ambient 0.1 diffuse 0.9 }}
#default{texture{pigment{rgb<1,0,0>} finish{phong 1}}}
// camera ------------------------------------------------------------------
camera {perspective angle 11 location <0,10,-30> look_at <0,2,0>
right x*image_width/image_height}
// Sky ------------------------------------------------------------------
sky_sphere { pigment {rgb<0.3,0,1>*0.8}}
// ground
-------------------------------------------------------------------
plane{ <0,1,0>, 0 texture{pigment{rgb<1,0.5,0.5>}}}
sphere {<0,0,0>, 1 pigment {rgb<0.3,0,1>*0.8} translate<0,2,0>}
// An area light (creates soft shadows)
// WARNING: This special light can significantly slow down rendering times!
light_source {
<0,0,0> // light's position (translated below)
color rgb 1.0 // light's color
area_light
<20, 0, 0> <0, 0, 20> // lights spread out across this distance (x * z)
// The light is oriented in the horizontal plane (20x * 20z)
// Adding circular and orient below will ignore this orientation
// and automaticaly orient the light to be perpendicular to the
// shadows it casts.
4, 4 // total number of lights in grid (4x*4z = 16 lights)
adaptive 0 // 0,1,2,3...
jitter // adds random softening of light
circular // make the shape of the light circular
orient // orient light
translate <40, 80, -40> // <x y z> position of light
}
Post a reply to this message
|
|
| |
| |
|
|
|
|
| |
| |
|
|
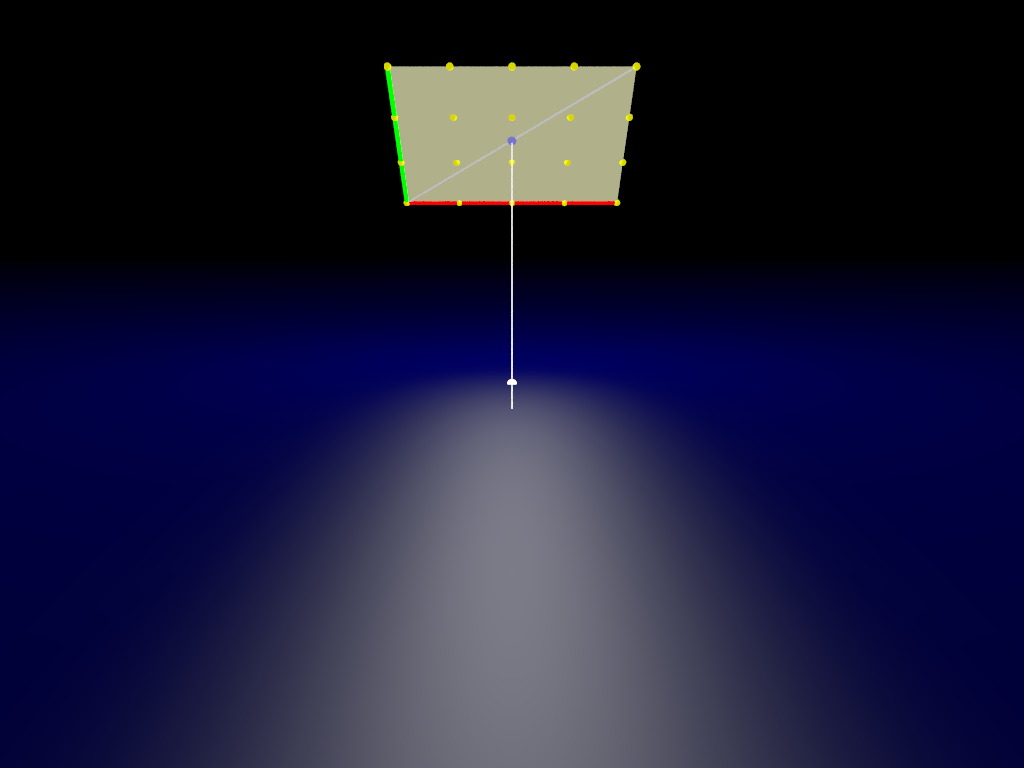
Try this.
It works by specifying a vector that extends from the origin to the far corner
of your area light "panel". Set "the Translate parameter to off while you do
this. When done, set Translate to on, and it will translate and rotate your
area light to the proper position.
I _think_ I got this all correct.
#macro Area_light_source (DiagonalVector, Location, LightColor, Size1, Size2,
RotateY, Translate)
#local Rotate = transform {rotate y*RotateY}
//#local DiagonalVector = DiagonalVector*<1, 1, -1>;
union {
cylinder {0, DiagonalVector Line texture {pigment {rgb 0.5} finish {emission
1}} }
#local ProjectZ = vdot (DiagonalVector, z);
#local ProjectY = vdot (DiagonalVector, y);
#local ProjectX = vdot (DiagonalVector, x);
//cylinder {0, x*ProjectX Line pigment {rgb x}}
//cylinder {0, z*ProjectZ Line pigment {rgb z}}
#declare PanelColor = <176, 176, 139>/255;
#declare PanelPigment = srgb PanelColor;
#declare DotColor = <213, 213, 0>/255;
#declare DotPigment = srgb DotColor;
#declare CenterColor = <117, 117, 203>/255;
#declare CenterPigment = srgb CenterColor;
#local Axis1 = vtransform (x*ProjectX, Rotate);
#local Axis2 = vtransform (y*ProjectY+z*ProjectZ, Rotate);
union {
triangle {0, x*ProjectX, DiagonalVector}
triangle {0, DiagonalVector, y*ProjectY+z*ProjectZ}
texture {pigment {PanelPigment} finish {emission 1}}
}
#declare PanelNormal = vnormalize (vcross (DiagonalVector, x*ProjectX));
cylinder {0, PanelNormal*30 Line/2 texture {pigment {rgb 1} finish {emission
1}} translate DiagonalVector/2 no_shadow}
#for (Columns, 0, Size1)
#for (Rows, 0, Size2)
sphere {0, Line*3 texture {pigment {DotPigment} finish {emission 1}}
translate <ProjectX/Size1*Columns, ProjectY/Size2*Rows, ProjectZ*(Rows/Size2)>}
#end
#end
sphere {0 Line*4 texture {pigment {rgb CenterPigment} finish {emission 1}}
translate DiagonalVector/2 no_shadow}
union {
cylinder {0, x*ProjectX Line*2 texture {pigment {rgb x} finish {emission 1}}
}
cylinder {0, y*ProjectY+z*ProjectZ Line*2 texture {pigment {rgb y} finish
{emission 1}} }
}
no_shadow
//translate -PanelNormal*3
#if (Translate)
translate Location-DiagonalVector/2
rotate y*RotateY
#end
}
object {
light_source
{
#if (Translate)
Location,
#else
DiagonalVector/2
#end
LightColor
area_light
Axis1, Axis2, Size1, Size2
adaptive 1
}
#if (Translate)
rotate y*RotateY
#end
}
#end
//use: Area_light_source (DiagonalVector, Location, LightColor, Size1, Size2,
RotateY, Translate)
Area_light_source (<10, 5, -5>, y*10, 1, 4, 3, 0,
no)
Post a reply to this message
Attachments:
Download 'arealight.png' (79 KB)
Preview of image 'arealight.png'
|
|
| |
| |
|
|
|
|
| |
| |
|
|
Le 2023-01-24 à 21:11, m@b a écrit :
> On 25/01/2023 5:17 AM, 88Keys wrote:
>> Hello.
>>
>> I'm trying to work with Area Lights, but I can't seem to orient them
>> correctly.
>> I've been trying a <-50 , 0 , 50 > , <50 , 0 , 50 > and that doesn't
>> seem to
>> illuminate my scene, so I tried a <-50 , 0 , 0 > , < 0 , 50 , 0 > in
>> an attempt
>> to make the angles at 90 degrees to each other, but that doesn't seem
>> to have
>> worked either.
>>
>> Any tips on how to generate a proper Area Light? The documentation is
>> a little
>> slim. What I have developed seems pretty dull, too.
>>
>> Thanks very much.
>>
>
>
>
> // author: Matthew Bradwell
> // date: 2023
> //--------------------------------------------------------------------------
> #version 3.8;
> global_settings{ assumed_gamma 1.0 }
> #default{ finish{ ambient 0.1 diffuse 0.9 }}
> #default{texture{pigment{rgb<1,0,0>} finish{phong 1}}}
> // camera
> ------------------------------------------------------------------
> camera {perspective angle 11 location <0,10,-30> look_at <0,2,0>
> right x*image_width/image_height}
>
> // Sky ------------------------------------------------------------------
> sky_sphere { pigment {rgb<0.3,0,1>*0.8}}
>
> // ground
> -------------------------------------------------------------------
> plane{ <0,1,0>, 0 texture{pigment{rgb<1,0.5,0.5>}}}
>
>
> sphere {<0,0,0>, 1 pigment {rgb<0.3,0,1>*0.8} translate<0,2,0>}
>
>
> // An area light (creates soft shadows)
> // WARNING: This special light can significantly slow down rendering times!
> light_source {
> <0,0,0> // light's position (translated below)
> color rgb 1.0 // light's color
> area_light
> <20, 0, 0> <0, 0, 20> // lights spread out across this distance
> (x * z)
Placed flat in a 20 by 20 square.
> // The light is oriented in the horizontal plane
(20x
> * 20z)
> // Adding circular and orient below will ignore this
> orientation
> // and automaticaly orient the light to be
> perpendicular to the
> // shadows it casts.
> 4, 4 // total number of lights in grid (4x*4z = 16
> lights)
That's a small array.
> adaptive 0 // 0,1,2,3...
And using adaptive with it gives almost no benefit. With that adaptive
value, you can use a 33 by 33 array with almost no performance hit.
> jitter // adds random softening of light
ESSENTIAL with such a small array
> circular // make the shape of the light circular
> orient // orient light
Make the light act as a spherical light source. This makes the
orientation of the array irrelevant, just setting the extant of the light.
> translate <40, 80, -40> // <x y z> position of light
> }
>
Post a reply to this message
|
|
| |
| |
|
|
|
|
| |
| |
|
|
Le 2023-01-24 à 16:17, 88Keys a écrit :
> Hello.
>
> I'm trying to work with Area Lights, but I can't seem to orient them correctly.
> I've been trying a <-50 , 0 , 50 > , <50 , 0 , 50 > and that doesn't seem to
> illuminate my scene, so I tried a <-50 , 0 , 0 > , < 0 , 50 , 0 > in an attempt
> to make the angles at 90 degrees to each other, but that doesn't seem to have
> worked either.
>
> Any tips on how to generate a proper Area Light? The documentation is a little
> slim. What I have developed seems pretty dull, too.
>
> Thanks very much.
>
Always start with with your light set as a regular light.
Once the light is properly placed, add the area_light options.
It's better to have the sides at 90° from one another, but, that's not a
requirement. It'll only make your area_light into a parallelogram.
If you want an area_light that act like a bright ball or light bulb, you
are better using the circular and orient options.
The circular option make the light into a circle, or ellipse if the
sides are of different length.
With orient active, the orientation of the array is no longer important.
It demand that the light starts as a square with the same sampling
density in both direction. If not, a warning is displayed and the
offending part altered to meet the requirement.
Remember that the vectors used to define the area_light are ALWAYS
relative to the location of the area_light, NEVER the origin of the scene.
Sample :
light_source{
<100, 1000, 75>// the location
rgb 1 // colour and intensity, can be more than 1
//add the following only after the light is properly placed
area_light 20*x 20*y// It's dimension or extant
33 33// maximum number of samples to use
adaptive 0// turn on adaptive sampling starting
// with the corners, or a 2x2 array
//increase the value if you get artefacts
circular // make it into a circle
orient // always oriented toward the location currently evaluated
}
The starting sampling arrays associated with various adaptive values :
Adaptive MINIMUM suggested minimum array
Value sampling size to use to see
to use the benefit
0 2 x 2 9 x 9
1 3 x 3 33 x 33
2 5 x 5 65 x 65
3 9 x 9 129 x 129
4 17 x 17 257 x 257
5 33 x 33 513 x 513
Any sampling array size between those values will be silently increased
to the following size of the list. A 4 x 4 adaptive is really 5 x 5, 6 x
6 is promoted to 9 x 9 and 10 x 10 become 17 x 17.
Post a reply to this message
|
|
| |
| |
|
|
|
|
| |
| |
|
|
Wow, thank you! That's incredibly helpful, all of you. Can't thank you enough,
I actually understand it now. Again, thank you all so much.
Post a reply to this message
|
|
| |
| |
|
|
|
|
| |
| |
|
|
On 2023-01-25 12:22 (-4), Alain Martel wrote:
>
> Any sampling array size between those values will be silently increased
> to the following size of the list. A 4 x 4 adaptive is really 5 x 5, 6 x
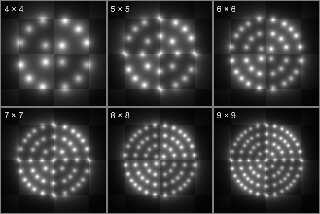
> 6 is promoted to 9 x 9 and 10 x 10 become 17 x 17.
Not according to my tests. The attached images were rendered with
area_illumination to reveal the internal array of lights.
Post a reply to this message
Attachments:
Download 'circular_light-20230126.jpg' (72 KB)
Preview of image 'circular_light-20230126.jpg'
|
|
| |
| |
|
|
|
|
| |
| |
|
|
On 1/26/23 14:40, Cousin Ricky wrote:
> On 2023-01-25 12:22 (-4), Alain Martel wrote:
>>
>> Any sampling array size between those values will be silently increased
>> to the following size of the list. A 4 x 4 adaptive is really 5 x 5, 6 x
>> 6 is promoted to 9 x 9 and 10 x 10 become 17 x 17.
>
> Not according to my tests. The attached images were rendered with
> area_illumination to reveal the internal array of lights.
Probable complications - as best my glitchy memory serves... :-)
area_illumination essentially walks through each of the area light
positions - more or less - as originally specified; tracing each are
position in turn and coming up with a final, weight adjusted, result.
Any adaptive bits (for shadow rays only) and circular bits run at each
of the area light's effectively moving 'center' positions with
area_illumination on.
The adaptive mechanism being discussed in this thread comes into play
only during shadow ray tracing.
The circular option itself introduces some bias in the counts and
position of the area lights as the rectangular specification gets mapped
to a circular one.
--- Other misc.
There is an open github issue on the circular option occasionally
introducing visible bias in lighting results.
https://github.com/POV-Ray/povray/issues/222
There is too this open github issue related specifically to
area_illumination and adaptive/circular shadow calculations not playing
well together:
https://github.com/POV-Ray/povray/issues/224
I believe these github issues still unsorted in any available POV-Ray or
branch/patch release.
Bill P.
Post a reply to this message
|
|
| |
| |
|
|
|
|
| |
| |
|
|
Le 2023-01-26 à 14:40, Cousin Ricky a écrit :
> On 2023-01-25 12:22 (-4), Alain Martel wrote:
>>
>> Any sampling array size between those values will be silently increased
>> to the following size of the list. A 4 x 4 adaptive is really 5 x 5, 6 x
>> 6 is promoted to 9 x 9 and 10 x 10 become 17 x 17.
>
> Not according to my tests. The attached images were rendered with
> area_illumination to reveal the internal array of lights.
So, shining an area_light with adaptive AND area_illumination thru a
small opening changes how adaptive work. Interesting.
Did you try without area_illumination ?
Post a reply to this message
|
|
| |
| |
|
|
|
|
| |
|
|