|
|
|
|
|
|
| |
| |
|
|
|
|
| |
| |
|
|
Can anyone recommend a way of creating sprites like these?

http://www.gamedev.net/page/resources/_/technical/game-programming/tilemap-based-game-techniques-handling-terrai-r934

The sprites need to join up together smoothly at the edges so you don't
see a big seam between them. I was thinking of using the intersection of
an squarish isosurface and a plane, but that will not necessarily line
up at the edges.

Thoughts?


Mike
Post a reply to this message
|
|
| |
| |
|
|
|
|
| |
| |
|
|
Mike Horvath <mik### [at] gmail com> wrote:
> Can anyone recommend a way of creating sprites like these?
>
>
http://www.gamedev.net/page/resources/_/technical/game-programming/tilemap-based-game-techniques-handling-terrai-r934
>
> The sprites need to join up together smoothly at the edges so you don't
> see a big seam between them. I was thinking of using the intersection of
> an squarish isosurface and a plane, but that will not necessarily line
> up at the edges.
>
> Thoughts?
>
>
> Mike
1) Determine your terrain types
e.g. desert, plains, beach, tundra, taiga, forest, boreal... etc.
2) make a 3x3 grid, and create a radial transition between each type
3) slice up the resulting image into tiles
4) create a map using large tiles, say 16x16, you might look at the diamond
square algorithm. Limit your shades of grey to the number of different biomes
alternatively, you might use a 2d cellular automata: Split the tiles into
categories - center (can only border on it's own type), north edge (can only
connect to a south edge or a center of the border type...
https://www.youtube.com/watch?v=MFvsRvo_78Y
Regards,
A.D.B. com> wrote:
> Can anyone recommend a way of creating sprites like these?
>
>
http://www.gamedev.net/page/resources/_/technical/game-programming/tilemap-based-game-techniques-handling-terrai-r934
>
> The sprites need to join up together smoothly at the edges so you don't
> see a big seam between them. I was thinking of using the intersection of
> an squarish isosurface and a plane, but that will not necessarily line
> up at the edges.
>
> Thoughts?
>
>
> Mike
1) Determine your terrain types
e.g. desert, plains, beach, tundra, taiga, forest, boreal... etc.
2) make a 3x3 grid, and create a radial transition between each type
3) slice up the resulting image into tiles
4) create a map using large tiles, say 16x16, you might look at the diamond
square algorithm. Limit your shades of grey to the number of different biomes
alternatively, you might use a 2d cellular automata: Split the tiles into
categories - center (can only border on it's own type), north edge (can only
connect to a south edge or a center of the border type...
https://www.youtube.com/watch?v=MFvsRvo_78Y
Regards,
A.D.B.
Post a reply to this message
|
|
| |
| |
|
|
|
|
| |
| |
|
|
On 2/29/2016 2:03 AM, Anthony D. Baye wrote:
> Mike Horvath <mik### [at] gmailcom> wrote:
>> Can anyone recommend a way of creating sprites like these?
>>
>>
http://www.gamedev.net/page/resources/_/technical/game-programming/tilemap-based-game-techniques-handling-terrai-r934
>
>>
>> The sprites need to join up together smoothly at the edges so you don't
>> see a big seam between them. I was thinking of using the intersection of
>> an squarish isosurface and a plane, but that will not necessarily line
>> up at the edges.
>>
>> Thoughts?
>>
>>
>> Mike
>
> 1) Determine your terrain types
>     e.g. desert, plains, beach, tundra, taiga, forest, boreal... etc.
> 2) make a 3x3 grid, and create a radial transition between each type
> 3) slice up the resulting image into tiles
> 4) create a map using large tiles, say 16x16, you might look at the diamond
> square algorithm.  Limit your shades of grey to the number of different biomes

I don't quite get what you're saying. For instance, why would I want to
use a radial texture map?

Also, does the diamond square algorithm repeat at its edges?

Mike

>
> alternatively, you might use a 2d cellular automata: Split the tiles into
> categories - center (can only border on it's own type), north edge (can only
> connect to a south edge or a center of the border type...
>
> https://www.youtube.com/watch?v=MFvsRvo_78Y
>
> Regards,
> A.D.B.
>
>
Post a reply to this message
|
|
| |
| |
|
|
|
|
| |
| |
|
|
Not _quite_ following what you need.
Did you need to make these things:
http://uploads.gamedev.net/monthly_06_2011/ccs-8549-0-57863900-1307467523_thumb.gif
 ?
Post a reply to this message
|
|
| |
| |
|
|
|
|
| |
| |
|
|
Argh.
Sorry.  I started reading this before enough, or any, coffee was consumed.

Anthony - that is some wicked cool stuff right there.
Thanks for that - I really enjoyed watching that guy bang out a nicely aligned
tile set in no time at all.   Very educational!

Mike - I think the two concepts are separate, but related.

The diamond-square algorithm can get you a nice terrain:

http://www.paulboxley.com/blog/2011/03/terrain-generation-mark-one
http://www.playfuljs.com/realistic-terrain-in-130-lines/
http://www.javaworld.com/article/2076745/learn-java/3d-graphic-java--render-fractal-landscapes.html

And it won't tile _if you generate it completely randomly_ .

So maybe what you do is take a cue from the video showing how it's done in
Photoshop and use that to keep the opposite edges of the large square the same.
Whatever's at 0,0 is what ought to be at 128,0.   Whatever's at 32,0 is what
32,128 ought to be.   That way if you did that double-half-displacement thing,
the edges would be identical.
You could probably do that at the time of generation or maybe even as a
post-generation interpolation across a wider swath.

I think if you check out the guy's tile set with the dirt and grass, you'll see
that it's a radial pattern / texture - akin to a circle in a square, but not
quite circumscribed.   The edges always match, and you get a nice solid center
tile.

If I'm following Anthony with his idea of generating shades of grey - then maybe
he's suggesting using a texture map.  Make one greyscale tile set, and then use
POV-Ray to put the right terrain on the different greys to generate the
transitions.   (I admit, I haven't thought it out completely, but I think that
might be what he's suggesting)
Post a reply to this message
|
|
| |
| |
|
|
|
|
| |
| |
|
|
"Bald Eagle" <cre### [at] netscapenet> wrote:
> Argh.
> Sorry.  I started reading this before enough, or any, coffee was consumed.
>
> Anthony - that is some wicked cool stuff right there.
> Thanks for that - I really enjoyed watching that guy bang out a nicely aligned
> tile set in no time at all.   Very educational!
>
> Mike - I think the two concepts are separate, but related.
>
> The diamond-square algorithm can get you a nice terrain:
>
> http://www.paulboxley.com/blog/2011/03/terrain-generation-mark-one
> http://www.playfuljs.com/realistic-terrain-in-130-lines/
>
http://www.javaworld.com/article/2076745/learn-java/3d-graphic-java--render-fractal-landscapes.html
>
> And it won't tile _if you generate it completely randomly_ .
>
> So maybe what you do is take a cue from the video showing how it's done in
> Photoshop and use that to keep the opposite edges of the large square the same.
> Whatever's at 0,0 is what ought to be at 128,0.   Whatever's at 32,0 is what
> 32,128 ought to be.   That way if you did that double-half-displacement thing,
> the edges would be identical.
> You could probably do that at the time of generation or maybe even as a
> post-generation interpolation across a wider swath.
>

The diamond square will tile if you wrap the calculation over the edges.

> I think if you check out the guy's tile set with the dirt and grass, you'll see
> that it's a radial pattern / texture - akin to a circle in a square, but not
> quite circumscribed.   The edges always match, and you get a nice solid center
> tile.
>
> If I'm following Anthony with his idea of generating shades of grey - then maybe
> he's suggesting using a texture map.  Make one greyscale tile set, and then use
> POV-Ray to put the right terrain on the different greys to generate the
> transitions.   (I admit, I haven't thought it out completely, but I think that
> might be what he's suggesting)

That's pretty much it.

Regards,
A.D.B.
Post a reply to this message
|
|
| |
| |
|
|
|
|
| |
| |
|
|
http://www.bluh.org/code-the-diamond-square-algorithm/

discusses "wrapping" over the edge.

http://www.mapeditor.org/    looked interesting if you're doing that kind of
work.
Post a reply to this message
|
|
| |
| |
|
|
|
|
| |
| |
|
|
"Bald Eagle" <cre### [at] netscapenet> wrote:
> http://www.bluh.org/code-the-diamond-square-algorithm/
>
> discusses "wrapping" over the edge.
>
> http://www.mapeditor.org/    looked interesting if you're doing that kind of
> work.

I was thinking that if you assigned each tile a shade of gray, you could use the
value of each pixel to tell you what tiles to place.

here's some old code I wrote for the diamond square algorithm:
https://www.dropbox.com/s/wbr4h93jssm6pfn/dsquare.tar.gz?dl=0

comments are almost non-existant, and it's somewhat messy, but it's functional.
I included the makefile so you can build it easily.

usage is lScape5 width height

really, I could have just used one parameter, since the image has to be square.
Also, the dimensions have to be one pixel higher than a power of 2 for it to
work: eg. 257x257 or 513x513

Regards,
A.D.B.
Post a reply to this message
|
|
| |
| |
|
|
|
|
| |
| |
|
|
I also just found this, from ... 1998

http://news.povray.org/povray.general/message/%3C01bde695%2434006a80%246a0e8dc3%40default%3E/#%3C01bde695%2434006a80%24
6a0e8dc3%40default%3E

Does anyone have a copy of this include file squirreled away on their hard
drive?
TdG probably has it, but it might take him all week to find it...   :D

Sounds pretty interesting though.
Post a reply to this message
|
|
| |
| |
|
|
|
|
| |
| |
|
|
"Bald Eagle" <cre### [at] netscapenet> wrote:
> I also just found this, from ... 1998
>
>
http://news.povray.org/povray.general/message/%3C01bde695%2434006a80%246a0e8dc3%40default%3E/#%3C01bde695%2434006a80%
24
> 6a0e8dc3%40default%3E
>
> Does anyone have a copy of this include file squirreled away on their hard
> drive?
> TdG probably has it, but it might take him all week to find it...   :D
>
> Sounds pretty interesting though.

http://www.reocities.com/SiliconValley/Lakes/1434/tilegen.html

Regards,
A.D.B.
Post a reply to this message
|
|
| |
| |
|
|
|
|
| |
| |
|
|
On 2/29/2016 10:03 PM, Bald Eagle wrote:
>
http://news.povray.org/povray.general/message/%3C01bde695%2434006a80%246a0e8dc3%40default%3E/#%3C01bde695%2434006a80%24
> 6a0e8dc3%40default%3E

Maybe here:

http://www.reocities.com/SiliconValley/Lakes/1434/otherincludes.html

https://web.archive.org/web/19991106003247/http://www.geocities.com/SiliconValley/Lakes/1434/otherincludes.html
Post a reply to this message
|
|
| |
| |
|
|
|
|
| |
| |
|
|
On 2/29/2016 8:20 AM, Bald Eagle wrote:
> Not _quite_ following what you need.
> Did you need to make these things:
> http://uploads.gamedev.net/monthly_06_2011/ccs-8549-0-57863900-1307467523_thumb.gif
>   ?
>
>
>
>


Yes, exactly. I was hoping to avoid using Photoshop however. I want to
do everything in POV-Ray.


Mike
Post a reply to this message
|
|
| |
| |
|
|
|
|
| |
| |
|
|
On 1-3-2016 4:03, Bald Eagle wrote:
> I also just found this, from ... 1998
>
>
http://news.povray.org/povray.general/message/%3C01bde695%2434006a80%246a0e8dc3%40default%3E/#%3C01bde695%2434006a80%24
> 6a0e8dc3%40default%3E
>
> Does anyone have a copy of this include file squirreled away on their hard
> drive?
> TdG probably has it, but it might take him all week to find it...   :D
>
> Sounds pretty interesting though.
>
>
>


cough! cough! Lots of dust in my attic...

Here it is.

--
Thomas
Post a reply to this message
Attachments:
Download 'tile generator.zip' (7 KB)
|
|
| |
| |
|
|
|
|
| |
| |
|
|
On 2/29/2016 8:20 AM, Bald Eagle wrote:
> Not _quite_ following what you need.
> Did you need to make these things:
> http://uploads.gamedev.net/monthly_06_2011/ccs-8549-0-57863900-1307467523_thumb.gif
>   ?
>
>
>
>


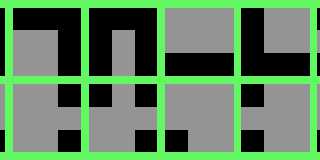
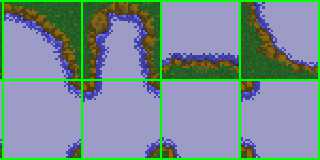
Here are the images again, but clearer.


Mike
Post a reply to this message
Attachments:
Download 'ccs-8549-0-92862100-1307467497.gif' (3 KB)
Download 'ccs-8549-0-57863900-1307467523.gif' (8 KB)
Preview of image 'ccs-8549-0-92862100-1307467497.gif'
Preview of image 'ccs-8549-0-57863900-1307467523.gif'
|
|
| |
| |
|
|
|
|
| |
| |
|
|
On 3/1/2016 2:50 AM, Thomas de Groot wrote:
> On 1-3-2016 4:03, Bald Eagle wrote:
>> I also just found this, from ... 1998
>>
>>
http://news.povray.org/povray.general/message/%3C01bde695%2434006a80%246a0e8dc3%40default%3E/#%3C01bde695%2434006a80%24
>>
>> 6a0e8dc3%40default%3E
>>
>> Does anyone have a copy of this include file squirreled away on their
>> hard
>> drive?
>> TdG probably has it, but it might take him all week to find it...   :D
>>
>> Sounds pretty interesting though.
>>
>>
>>
>
>
> cough! cough! Lots of dust in my attic...
>
> Here it is.
>


I played around with this a bit. It seems it creates images that can be
imported and used in subsequent scenes as repeating textures, but not
repeating flat textures that can be used within the *same* scene. Unless
I'm missing something.


Mike
Post a reply to this message
|
|
| |
| |
|
|
|
|
| |
| |
|
|
"Go go POV-Ray newsgroup!"
"Activate: Colefax Include file!"

:O

Thanks for all the links.
There's a bunch of includes I'm sure I'll love playing with.
Post a reply to this message
|
|
| |
| |
|
|
|
|
| |
| |
|
|
Mike Horvath <mik### [at] gmailcom> wrote:

> I played around with this a bit. It seems it creates images that can be
> imported and used in subsequent scenes as repeating textures, but not
> repeating flat textures that can be used within the *same* scene. Unless
> I'm missing something.
>
>
> Mike

I guess I'm not quite following what exactly it is that you're trying to
accomplish.
Could you expand upon what "... but not repeating flat textures that can be used
within the *same* scene" means?

I sliced up that little island/water jpg and played around with the tiles, but
it's not clear to me how you're intending to arrange them.  There are only 8
tiles, whereas I _did_ understand the logic behind the 9-tile system that
Anthony posted.  I couldn't get those tiles to do much, and after using 6, I
only had a choppy cubist reef and 2 extra tiles that seemed unusable or
redundant.

Maybe throw together a diagram or two to illustrate the goal - even if it's on
real quick on paper and photographed with a cellphone.  ;)
Post a reply to this message
|
|
| |
| |
|
|
|
|
| |
| |
|
|
http://www.jazz2online.com/tilesets/programs.php

http://www.verycomputer.com/275_080d1f45e2064eba_1.htm

Just posting these here - because.  :D
Post a reply to this message
|
|
| |
| |
|
|
|
|
| |
| |
|
|
On 3/1/2016 10:02 AM, Bald Eagle wrote:
> Mike Horvath <mik### [at] gmailcom> wrote:
>
>> I played around with this a bit. It seems it creates images that can be
>> imported and used in subsequent scenes as repeating textures, but not
>> repeating flat textures that can be used within the *same* scene. Unless
>> I'm missing something.
>>
>>
>> Mike
>
> I guess I'm not quite following what exactly it is that you're trying to
> accomplish.
> Could you expand upon what "... but not repeating flat textures that can be used
> within the *same* scene" means?
>

I want to create an flat textured object (such as a polygon or plane)
that is parallel to the ground; and that through clever manipulation
within POV-Ray itself can be used to create a series of frames like this:

http://uploads.gamedev.net/monthly_06_2011/ccs-8549-0-57863900-1307467523.gif

Except that I want them to be isometric. Think in terms of the old
strategy game Civilization II.

Here's an image chosen at random using Google that shows what an
isometric game sprite looks like:

https://s-media-cache-ak0.pinimg.com/736x/84/25/bb/8425bb96e5bcb75a8ef3a9c8fbde1bd2.jpg

If you look at Chris Colefax's Tile Generator carefully, you'll find it
creates a 3D scene - not a 2D scene - that is meant to be looked at from
one and only one direction. Therefore, I cannot use it in an isometric
scene.

I want to do 99% of the work in POV-Ray, not using some third-party tool
or Photoshop.

A short recap:

1. The object needs to be a flat textured POV-Ray object - maybe a
polygon - that is parallel with the ground.
2. By translating the object, its texture or the camera it should
produce a sprite suitable for use in an isometric video game.
3. The texture needs to repeat in such a way that when several of these
sprites are arranged next to each other, the transition will be seamless.
4. I want to use POV-Ray as much as possible instead of relying on
external tools.


> I sliced up that little island/water jpg and played around with the tiles,

What jpg are you talking about?


  but
> it's not clear to me how you're intending to arrange them.  There are only 8
> tiles, whereas I _did_ understand the logic behind the 9-tile system that
> Anthony posted.  I couldn't get those tiles to do much, and after using 6, I
> only had a choppy cubist reef and 2 extra tiles that seemed unusable or
> redundant.
>
> Maybe throw together a diagram or two to illustrate the goal - even if it's on
> real quick on paper and photographed with a cellphone.  ;)
>
>
>
>
>
Post a reply to this message
|
|
| |
| |
|
|
|
|
| |
| |
|
|
On 2/29/2016 10:49 AM, Bald Eagle wrote:
> http://www.mapeditor.org/    looked interesting if you're doing that kind of
> work.

I looked at this too, and I can't tell if it's capable of creating all
32 of the sprites stipulated in the first article I linked to. I think
it just creates a smaller subset of them.


Mike
Post a reply to this message
|
|
| |
| |
|
|
|
|
| |
| |
|
|
On 3/1/2016 12:03 PM, Mike Horvath wrote:
> On 3/1/2016 10:02 AM, Bald Eagle wrote:
>> Mike Horvath <mik### [at] gmailcom> wrote:
>>
>>> I played around with this a bit. It seems it creates images that can be
>>> imported and used in subsequent scenes as repeating textures, but not
>>> repeating flat textures that can be used within the *same* scene. Unless
>>> I'm missing something.
>>>
>>>
>>> Mike
>>
>> I guess I'm not quite following what exactly it is that you're trying to
>> accomplish.
>> Could you expand upon what "... but not repeating flat textures that
>> can be used
>> within the *same* scene" means?
>>
>
> I want to create an flat textured object (such as a polygon or plane)
> that is parallel to the ground; and that through clever manipulation
> within POV-Ray itself can be used to create a series of frames like this:
>
> http://uploads.gamedev.net/monthly_06_2011/ccs-8549-0-57863900-1307467523.gif
>
>
> Except that I want them to be isometric. Think in terms of the old
> strategy game Civilization II.
>
> Here's an image chosen at random using Google that shows what an
> isometric game sprite looks like:
>
>
https://s-media-cache-ak0.pinimg.com/736x/84/25/bb/8425bb96e5bcb75a8ef3a9c8fbde1bd2.jpg
>
>
> If you look at Chris Colefax's Tile Generator carefully, you'll find it
> creates a 3D scene - not a 2D scene - that is meant to be looked at from
> one and only one direction. Therefore, I cannot use it in an isometric
> scene.
>
> I want to do 99% of the work in POV-Ray, not using some third-party tool
> or Photoshop.
>
> A short recap:
>
> 1. The object needs to be a flat textured POV-Ray object - maybe a
> polygon - that is parallel with the ground.
> 2. By translating the object, its texture or the camera it should
> produce a sprite suitable for use in an isometric video game.
> 3. The texture needs to repeat in such a way that when several of these
> sprites are arranged next to each other, the transition will be seamless.
> 4. I want to use POV-Ray as much as possible instead of relying on
> external tools.
>
>
>> I sliced up that little island/water jpg and played around with the
>> tiles,
>
> What jpg are you talking about?
>
>
>   but
>> it's not clear to me how you're intending to arrange them.  There are
>> only 8
>> tiles, whereas I _did_ understand the logic behind the 9-tile system that
>> Anthony posted.  I couldn't get those tiles to do much, and after
>> using 6, I
>> only had a choppy cubist reef and 2 extra tiles that seemed unusable or
>> redundant.
>>
>> Maybe throw together a diagram or two to illustrate the goal - even if
>> it's on
>> real quick on paper and photographed with a cellphone.  ;)
>>
>>
>>
>>
>>
>


An important first step would be to get POV-Ray to make a tiling texture {}.


Mike
Post a reply to this message
|
|
| |
| |
|
|
|
|
| |
| |
|
|
#version 3.7;
global_settings { assumed_gamma 1.0 }

//------------------------------------------
// SDL for generating Isometric View Game Tiles
// Bill Walker - 2016
//------------------------------------------

#include "colors.inc"
#include "debug.inc"
 Set_Debug (true)
#include "math.inc"
#include "rand.inc"
#include "shapes.inc"
#include "metals.inc"
#include "transforms.inc"

//###############################################
#declare XImageSize = 1024;
#declare YImageSize = 768;
//###############################################

light_source { <0, 50, 0>  color rgb <1, 1, 1>}

#declare Camera_Iso = camera {
                            location  <0, 0, -12>
                            //right    x*image_width/image_height
                            look_at   <0, 0, 0>
                            rotate x*30 rotate y*45 }


camera {Camera_Iso}

sky_sphere { pigment {Blue} }

//=====================================================================================================================
==

#declare TileTexture =
pigment {cylindrical frequency 1 turbulence 0
         color_map {[0.0 color Green * 0.5]
            [0.3 color Green * 0.5]
            [0.8 color Yellow * 0.1]
                    [1.0 color Yellow * 0.1]
  }//end of color_map
} // end of pigment

#declare Scale = 3;

#declare TileBox = box { 0, 1 translate <-0.5, -0.5, -0.5> pigment {TileTexture}
scale <Scale, 0.01, Scale>}

#declare PlainBox = box { 0, 1 translate <-0.5, -0.5, -0.5>}

#declare Box1 = intersection {object {PlainBox translate <-1, 0,  1>} object
{TileBox}}
#declare Box2 = intersection {object {PlainBox translate < 0, 0,  1>} object
{TileBox}}
#declare Box3 = intersection {object {PlainBox translate < 1, 0,  1>} object
{TileBox}}
#declare Box4 = intersection {object {PlainBox translate <-1, 0,  0>} object
{TileBox}}
#declare Box5 = intersection {object {PlainBox translate < 0, 0,  0>} object
{TileBox}}
#declare Box6 = intersection {object {PlainBox translate < 1, 0,  0>} object
{TileBox}}
#declare Box7 = intersection {object {PlainBox translate <-1, 0, -1>} object
{TileBox}}
#declare Box8 = intersection {object {PlainBox translate < 0, 0, -1>} object
{TileBox}}
#declare Box9 = intersection {object {PlainBox translate < 1, 0, -1>} object
{TileBox}}


//=============================


#declare Spacing = 0.1;


#local NrX = -1;     // start x
#local EndNrX = 2; // end   x
#while (NrX < EndNrX)

 #local NrZ = -1;     // start z
 #local EndNrZ = 1; // end   z
 #while (NrZ < EndNrZ)

  object{Box1 translate <Scale * NrX, 0, Scale * NrZ>}
  object{Box2 translate <Scale * NrX, 0, Scale * NrZ>}
  object{Box3 translate <Scale * NrX, 0, Scale * NrZ>}
  object{Box4 translate <Scale * NrX, 0, Scale * NrZ>}
  object{Box5 translate <Scale * NrX, 0, Scale * NrZ>}
  object{Box6 translate <Scale * NrX, 0, Scale * NrZ>}
  object{Box7 translate <Scale * NrX, 0, Scale * NrZ>}
  object{Box8 translate <Scale * NrX, 0, Scale * NrZ>}
  object{Box9 translate <Scale * NrX, 0, Scale * NrZ>}

  #local NrZ = NrZ + 1+Spacing;  // next Nr z
 #end // --------------- end of loop z

#declare NrX = NrX + 1+Spacing;  // next Nr x
#end // --------------- end of loop x


// 1,3,7,9
  object{Box1 translate <Scale * NrX, 0, Scale * NrZ>}
  object{Box3 translate <Scale * NrX-1, 0, Scale * NrZ>}
  object{Box7 translate <Scale * NrX, 0, Scale * NrZ+1>}
  object{Box9 translate <Scale * NrX-1, 0, Scale * NrZ+1>}

// 1,2,3,7,8,9
  object{Box1 translate <Scale * (NrX-2), 0, Scale * NrZ>}
  object{Box2 translate <Scale * (NrX-2), 0, Scale * NrZ>}
  object{Box3 translate <Scale * (NrX-2), 0, Scale * NrZ>}

  object{Box7 translate <Scale * (NrX-2), 0, Scale * NrZ+1>}
  object{Box8 translate <Scale * (NrX-2), 0, Scale * NrZ+1>}
  object{Box9 translate <Scale * (NrX-2), 0, Scale * NrZ+1>}


// 9, 7, 3, 1
  object{Box9 translate <Scale * (NrX-4), 0, Scale * NrZ+1>}
  object{Box7 translate <Scale * (NrX-3), 0, Scale * NrZ+1>}
  object{Box3 translate <Scale * (NrX-4), 0, Scale * NrZ>}
  object{Box1 translate <Scale * (NrX-3), 0, Scale * NrZ>}
Post a reply to this message
|
|
| |
| |
|
|
|
|
| |
| |
|
|
I even looked up how to get the background of the sprite to be transparent if
you need that:

Use the command-line option +ua
(good to know!   :)  )

http://news.povray.org/povray.newusers/message/%3C48a89167%40news.povray.org%3E/#%3C48a89167%40news.povray.org%3E
Post a reply to this message
|
|
| |
| |
|
|
|
|
| |
| |
|
|
On 3/1/2016 8:02 PM, Bald Eagle wrote:
> #version 3.7;
> global_settings { assumed_gamma 1.0 }
>
> //------------------------------------------
> // SDL for generating Isometric View Game Tiles
> // Bill Walker - 2016
> //------------------------------------------
>
> #include "colors.inc"
> #include "debug.inc"
>   Set_Debug (true)
> #include "math.inc"
> #include "rand.inc"
> #include "shapes.inc"
> #include "metals.inc"
> #include "transforms.inc"
>
> //###############################################
> #declare XImageSize = 1024;
> #declare YImageSize = 768;
> //###############################################
>
> light_source { <0, 50, 0>  color rgb <1, 1, 1>}
>
> #declare Camera_Iso = camera {
>                              location  <0, 0, -12>
>                              //right    x*image_width/image_height
>                              look_at   <0, 0, 0>
>                              rotate x*30 rotate y*45 }
>
>
> camera {Camera_Iso}
>
> sky_sphere { pigment {Blue} }
>
>
//=====================================================================================================================
> ==
>
> #declare TileTexture =
> pigment {cylindrical frequency 1 turbulence 0
>           color_map {[0.0 color Green * 0.5]
>              [0.3 color Green * 0.5]
>              [0.8 color Yellow * 0.1]
>                      [1.0 color Yellow * 0.1]
>    }//end of color_map
> } // end of pigment
>
> #declare Scale = 3;
>
> #declare TileBox = box { 0, 1 translate <-0.5, -0.5, -0.5> pigment {TileTexture}
> scale <Scale, 0.01, Scale>}
>
> #declare PlainBox = box { 0, 1 translate <-0.5, -0.5, -0.5>}
>
> #declare Box1 = intersection {object {PlainBox translate <-1, 0,  1>} object
> {TileBox}}
> #declare Box2 = intersection {object {PlainBox translate < 0, 0,  1>} object
> {TileBox}}
> #declare Box3 = intersection {object {PlainBox translate < 1, 0,  1>} object
> {TileBox}}
> #declare Box4 = intersection {object {PlainBox translate <-1, 0,  0>} object
> {TileBox}}
> #declare Box5 = intersection {object {PlainBox translate < 0, 0,  0>} object
> {TileBox}}
> #declare Box6 = intersection {object {PlainBox translate < 1, 0,  0>} object
> {TileBox}}
> #declare Box7 = intersection {object {PlainBox translate <-1, 0, -1>} object
> {TileBox}}
> #declare Box8 = intersection {object {PlainBox translate < 0, 0, -1>} object
> {TileBox}}
> #declare Box9 = intersection {object {PlainBox translate < 1, 0, -1>} object
> {TileBox}}
>
>
> //=============================
>
>
> #declare Spacing = 0.1;
>
>
> #local NrX = -1;     // start x
> #local EndNrX = 2; // end   x
> #while (NrX < EndNrX)
>
>   #local NrZ = -1;     // start z
>   #local EndNrZ = 1; // end   z
>   #while (NrZ < EndNrZ)
>
>    object{Box1 translate <Scale * NrX, 0, Scale * NrZ>}
>    object{Box2 translate <Scale * NrX, 0, Scale * NrZ>}
>    object{Box3 translate <Scale * NrX, 0, Scale * NrZ>}
>    object{Box4 translate <Scale * NrX, 0, Scale * NrZ>}
>    object{Box5 translate <Scale * NrX, 0, Scale * NrZ>}
>    object{Box6 translate <Scale * NrX, 0, Scale * NrZ>}
>    object{Box7 translate <Scale * NrX, 0, Scale * NrZ>}
>    object{Box8 translate <Scale * NrX, 0, Scale * NrZ>}
>    object{Box9 translate <Scale * NrX, 0, Scale * NrZ>}
>
>    #local NrZ = NrZ + 1+Spacing;  // next Nr z
>   #end // --------------- end of loop z
>
> #declare NrX = NrX + 1+Spacing;  // next Nr x
> #end // --------------- end of loop x
>
>
> // 1,3,7,9
>    object{Box1 translate <Scale * NrX, 0, Scale * NrZ>}
>    object{Box3 translate <Scale * NrX-1, 0, Scale * NrZ>}
>    object{Box7 translate <Scale * NrX, 0, Scale * NrZ+1>}
>    object{Box9 translate <Scale * NrX-1, 0, Scale * NrZ+1>}
>
> // 1,2,3,7,8,9
>    object{Box1 translate <Scale * (NrX-2), 0, Scale * NrZ>}
>    object{Box2 translate <Scale * (NrX-2), 0, Scale * NrZ>}
>    object{Box3 translate <Scale * (NrX-2), 0, Scale * NrZ>}
>
>    object{Box7 translate <Scale * (NrX-2), 0, Scale * NrZ+1>}
>    object{Box8 translate <Scale * (NrX-2), 0, Scale * NrZ+1>}
>    object{Box9 translate <Scale * (NrX-2), 0, Scale * NrZ+1>}
>
>
> // 9, 7, 3, 1
>    object{Box9 translate <Scale * (NrX-4), 0, Scale * NrZ+1>}
>    object{Box7 translate <Scale * (NrX-3), 0, Scale * NrZ+1>}
>    object{Box3 translate <Scale * (NrX-4), 0, Scale * NrZ>}
>    object{Box1 translate <Scale * (NrX-3), 0, Scale * NrZ>}
>
>
>
>
>
>
>


I don't understand. What am I looking at here?


Mike
Post a reply to this message
|
|
| |
| |
|
|
|
|
| |
| |
|
|
Mike Horvath <mik### [at] gmailcom> wrote:
> I don't understand. What am I looking at here?

Continuous smoothly textured infinitely tessellating isometric tiles?

Replace the yellow and the green pigments with more complex textures, and that
seems PRETTY close to what you want.  Probably need to use orthographic camera
to get it exact.
Post a reply to this message
|
|
| |
| |
|
|
|
|
| |
|
|