 |
 |
|
 |
|
 |
|  |
|  |
|
 |
|
 |
|  |
|  |
|
 |
Once in a while I try to solve this puzzle, but I give up. It is beyond my
skills.
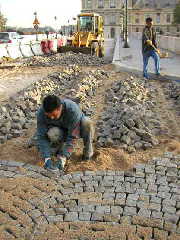
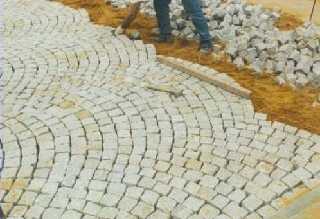
How would one model this pavement in POV-Ray? It looks simpler than it is
as - obviously - the inner arc of a row of stones is smaller than the outer
arc. In RL (as on the examples below) this is constantly compensated I
suppose to keep the pattern regular and symmetrical....
Thomas
Post a reply to this message
Attachments:
Download 'pave04.jpg' (41 KB)
Download 'pave03.jpg' (47 KB)
Preview of image 'pave04.jpg'
Preview of image 'pave03.jpg'
|
 |
|  |
|  |
|
 |
|
 |
|  |
|  |
|
 |
On 07-Sep-08 10:52, Thomas de Groot wrote:
> Once in a while I try to solve this puzzle, but I give up. It is beyond my
> skills.
>
> How would one model this pavement in POV-Ray? It looks simpler than it is
> as - obviously - the inner arc of a row of stones is smaller than the outer
> arc. In RL (as on the examples below) this is constantly compensated I
> suppose to keep the pattern regular and symmetrical....
>
hmm I see what you mean, I'll have a more close look when I see it in
RL. This is close to the Rijksmuseum? And is it also the pattern at Dam
square?
Post a reply to this message
Attachments:
Download 'pavement.jpg' (81 KB)
Preview of image 'pavement.jpg'
|
 |
|  |
|  |
|
 |
|
 |
|  |
|  |
|
 |
"Thomas de Groot" <t.d### [at] inter nlDOTnet> wrote in message
news:48c3964b@news.povray.org...
> Once in a while I try to solve this puzzle, but I give up. It is beyond my
> skills.
>
> How would one model this pavement in POV-Ray? It looks simpler than it is
> as - obviously - the inner arc of a row of stones is smaller than the
> outer arc. In RL (as on the examples below) this is constantly compensated
> I suppose to keep the pattern regular and symmetrical....
>
I would think that the key distances of any significance in the sample
picture you posted are the radius of the outer edge of an arc and the centre
to centre distance. In your image I would think that the stick is used to
keep the outer radius constant and that the strings keep the centre to
centre distance constant (and, in this instance the lines straight). The
radius of the inner edge is already set by the previous arc of stones and
would be used only as a guide to pick a block of the right depth.
To get a good join, the tangent to one arc should pass through the centre of
the other arc (and visa versa) so that you get a right angle at the joins
and you can use a square block there to give a perfect join. This means that
the centre to centre distance would have to be the Radius times the square
root of 2.
Regards,
Chris B. nlDOTnet> wrote in message
news:48c3964b@news.povray.org...
> Once in a while I try to solve this puzzle, but I give up. It is beyond my
> skills.
>
> How would one model this pavement in POV-Ray? It looks simpler than it is
> as - obviously - the inner arc of a row of stones is smaller than the
> outer arc. In RL (as on the examples below) this is constantly compensated
> I suppose to keep the pattern regular and symmetrical....
>
I would think that the key distances of any significance in the sample
picture you posted are the radius of the outer edge of an arc and the centre
to centre distance. In your image I would think that the stick is used to
keep the outer radius constant and that the strings keep the centre to
centre distance constant (and, in this instance the lines straight). The
radius of the inner edge is already set by the previous arc of stones and
would be used only as a guide to pick a block of the right depth.
To get a good join, the tangent to one arc should pass through the centre of
the other arc (and visa versa) so that you get a right angle at the joins
and you can use a square block there to give a perfect join. This means that
the centre to centre distance would have to be the Radius times the square
root of 2.
Regards,
Chris B.
Post a reply to this message
|
 |
|  |
|  |
|
 |
|
 |
|  |
|  |
|
 |
On 07-Sep-08 12:47, Chris B wrote:
>
> "Thomas de Groot" <t.d### [at] inter nlDOTnet> wrote in message
> news:48c3964b@news.povray.org...
>> Once in a while I try to solve this puzzle, but I give up. It is
>> beyond my skills.
>>
>> How would one model this pavement in POV-Ray? It looks simpler than it
>> is as - obviously - the inner arc of a row of stones is smaller than
>> the outer arc. In RL (as on the examples below) this is constantly
>> compensated I suppose to keep the pattern regular and symmetrical....
>>
>
> I would think that the key distances of any significance in the sample
> picture you posted are the radius of the outer edge of an arc and the
> centre to centre distance. In your image I would think that the stick
> is used to keep the outer radius constant and that the strings keep the
> centre to centre distance constant (and, in this instance the lines
> straight). The radius of the inner edge is already set by the previous
> arc of stones and would be used only as a guide to pick a block of the
> right depth.
>
> To get a good join, the tangent to one arc should pass through the
> centre of the other arc (and visa versa) so that you get a right angle
> at the joins and you can use a square block there to give a perfect
> join. This means that the centre to centre distance would have to be the
> Radius times the square root of 2.
>
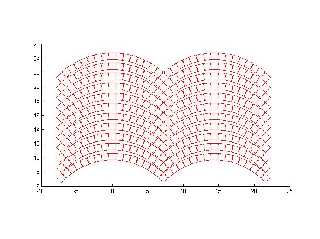
I am not sure if I understand what you mean. But let me put it in a way
that I can understand. There are two special stones. One is at the end
of one arc and at the beginning of the next one. The other is the one in
the middle of an arc. Referring to my picture, the latter is the highest
one in the arc and has a horizontal lower line. The other is 45 degrees
turned. No matter how you position the other stones. The corner one
advances sqrt(2) times the side of that stone every arc. The middle one
can only advance by the side of that stone. So you'll end up with 41%
space between the center stones of two consecutive arcs . That does not
happen in real life. Either because not all stones have the same size or
they are cheating in another way. nlDOTnet> wrote in message
> news:48c3964b@news.povray.org...
>> Once in a while I try to solve this puzzle, but I give up. It is
>> beyond my skills.
>>
>> How would one model this pavement in POV-Ray? It looks simpler than it
>> is as - obviously - the inner arc of a row of stones is smaller than
>> the outer arc. In RL (as on the examples below) this is constantly
>> compensated I suppose to keep the pattern regular and symmetrical....
>>
>
> I would think that the key distances of any significance in the sample
> picture you posted are the radius of the outer edge of an arc and the
> centre to centre distance. In your image I would think that the stick
> is used to keep the outer radius constant and that the strings keep the
> centre to centre distance constant (and, in this instance the lines
> straight). The radius of the inner edge is already set by the previous
> arc of stones and would be used only as a guide to pick a block of the
> right depth.
>
> To get a good join, the tangent to one arc should pass through the
> centre of the other arc (and visa versa) so that you get a right angle
> at the joins and you can use a square block there to give a perfect
> join. This means that the centre to centre distance would have to be the
> Radius times the square root of 2.
>
I am not sure if I understand what you mean. But let me put it in a way
that I can understand. There are two special stones. One is at the end
of one arc and at the beginning of the next one. The other is the one in
the middle of an arc. Referring to my picture, the latter is the highest
one in the arc and has a horizontal lower line. The other is 45 degrees
turned. No matter how you position the other stones. The corner one
advances sqrt(2) times the side of that stone every arc. The middle one
can only advance by the side of that stone. So you'll end up with 41%
space between the center stones of two consecutive arcs . That does not
happen in real life. Either because not all stones have the same size or
they are cheating in another way.
Post a reply to this message
|
 |
|  |
|  |
|
 |
|
 |
|  |
|  |
|
 |
"Chris B" <nom### [at] nomail com> wrote in message
news:48c3b143$1@news.povray.org...
>
> "Thomas de Groot" <t.d### [at] inter com> wrote in message
news:48c3b143$1@news.povray.org...
>
> "Thomas de Groot" <t.d### [at] inter nlDOTnet> wrote in message
> news:48c3964b@news.povray.org...
>> Once in a while I try to solve this puzzle, but I give up. It is beyond
>> my skills.
>>
>> How would one model this pavement in POV-Ray? It looks simpler than it is
>> as - obviously - the inner arc of a row of stones is smaller than the
>> outer arc. In RL (as on the examples below) this is constantly
>> compensated I suppose to keep the pattern regular and symmetrical....
>>
>
> I would think that the key distances of any significance in the sample
> picture you posted are the radius of the outer edge of an arc and the
> centre to centre distance. In your image I would think that the stick is
> used to keep the outer radius constant and that the strings keep the
> centre to centre distance constant (and, in this instance the lines
> straight). The radius of the inner edge is already set by the previous arc
> of stones and would be used only as a guide to pick a block of the right
> depth.
>
> To get a good join, the tangent to one arc should pass through the centre
> of the other arc (and visa versa) so that you get a right angle at the
> joins and you can use a square block there to give a perfect join. This
> means that the centre to centre distance would have to be the Radius times
> the square root of 2.
>
> Regards,
> Chris B.
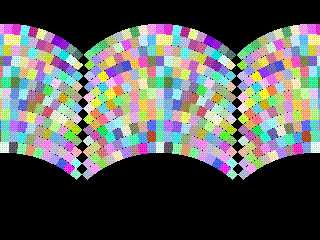
Below is a simple POV-Ray encapsulation of this. There are lots of things
you can play with, like bringing the corners in towards their centres to
give a mortar gap and randomising the size and shape a little etc. This
example uses a stone of a uniform width (BlockDepth*0.8) and you can
probably get a better looking result by reducing the width a little at the
outer edges and increasing it at the centre, but this complicates the
algorithm a little more.
Regards,
Chris B.
camera {location <0,2.2,1.1> look_at 1.2*z }
light_source {<-10,20,50>, rgb 4}
#include "math.inc"
#declare Radius = 1;
#declare BlockDepth = 0.1;
#local CentreToCentre = Radius*sqrt(2);
// Find the total length of an outer arc
#local ArcLength = 2*pi*Radius/4;
// Calculate the arc angle taken up by each block
#local BlocksPerArc = int(ArcLength/(BlockDepth*0.8));
#local BlockAngle = 90/BlocksPerArc;
#local RandomSeed = seed(1);
// Macro to draw a row of blocks
#macro RowOfBlocks ()
#local Angle = 0;
#local BlockCounter = 0;
#while (BlockCounter < BlocksPerArc)
#local TopLeft = vrotate(Radius*z,y*(-45+Angle));
#local TopRight = vrotate(Radius*z,y*(-45+Angle+BlockAngle));
// Find the inner arc positions by moving the top points back in towards
the centre
// Note. This uses a little approximation.
#local BottomLeft = TopLeft - vnormalize(TopLeft) *
BlockDepth*cosd(-45+Angle);
#local BottomRight = TopRight - vnormalize(TopRight) *
BlockDepth*cosd(-45+Angle+BlockAngle);
// Illustrate the algorithm with a randomly colored polygon
polygon {
4,
<BottomLeft.x,BottomLeft.z>, <BottomRight.x,BottomRight.z>,
<TopRight.x,TopRight.z>, <TopLeft.x,TopLeft.z>
pigment {color rgb
<rand(RandomSeed),rand(RandomSeed),rand(RandomSeed)>}
rotate 90*x
}
// Increment counters
#local BlockCounter = BlockCounter + 1;
#local Angle = Angle + BlockAngle;
#end
#end
// Define a section of 12 rows
#declare BlockSection = union {
#local I = 0;
#while (I<12)
union {RowOfBlocks() translate z*BlockDepth*I}
#local I = I + 1;
#end
}
// Show 3 sections side by side
object {BlockSection}
object {BlockSection translate CentreToCentre*x}
object {BlockSection translate -CentreToCentre*x} nlDOTnet> wrote in message
> news:48c3964b@news.povray.org...
>> Once in a while I try to solve this puzzle, but I give up. It is beyond
>> my skills.
>>
>> How would one model this pavement in POV-Ray? It looks simpler than it is
>> as - obviously - the inner arc of a row of stones is smaller than the
>> outer arc. In RL (as on the examples below) this is constantly
>> compensated I suppose to keep the pattern regular and symmetrical....
>>
>
> I would think that the key distances of any significance in the sample
> picture you posted are the radius of the outer edge of an arc and the
> centre to centre distance. In your image I would think that the stick is
> used to keep the outer radius constant and that the strings keep the
> centre to centre distance constant (and, in this instance the lines
> straight). The radius of the inner edge is already set by the previous arc
> of stones and would be used only as a guide to pick a block of the right
> depth.
>
> To get a good join, the tangent to one arc should pass through the centre
> of the other arc (and visa versa) so that you get a right angle at the
> joins and you can use a square block there to give a perfect join. This
> means that the centre to centre distance would have to be the Radius times
> the square root of 2.
>
> Regards,
> Chris B.
Below is a simple POV-Ray encapsulation of this. There are lots of things
you can play with, like bringing the corners in towards their centres to
give a mortar gap and randomising the size and shape a little etc. This
example uses a stone of a uniform width (BlockDepth*0.8) and you can
probably get a better looking result by reducing the width a little at the
outer edges and increasing it at the centre, but this complicates the
algorithm a little more.
Regards,
Chris B.
camera {location <0,2.2,1.1> look_at 1.2*z }
light_source {<-10,20,50>, rgb 4}
#include "math.inc"
#declare Radius = 1;
#declare BlockDepth = 0.1;
#local CentreToCentre = Radius*sqrt(2);
// Find the total length of an outer arc
#local ArcLength = 2*pi*Radius/4;
// Calculate the arc angle taken up by each block
#local BlocksPerArc = int(ArcLength/(BlockDepth*0.8));
#local BlockAngle = 90/BlocksPerArc;
#local RandomSeed = seed(1);
// Macro to draw a row of blocks
#macro RowOfBlocks ()
#local Angle = 0;
#local BlockCounter = 0;
#while (BlockCounter < BlocksPerArc)
#local TopLeft = vrotate(Radius*z,y*(-45+Angle));
#local TopRight = vrotate(Radius*z,y*(-45+Angle+BlockAngle));
// Find the inner arc positions by moving the top points back in towards
the centre
// Note. This uses a little approximation.
#local BottomLeft = TopLeft - vnormalize(TopLeft) *
BlockDepth*cosd(-45+Angle);
#local BottomRight = TopRight - vnormalize(TopRight) *
BlockDepth*cosd(-45+Angle+BlockAngle);
// Illustrate the algorithm with a randomly colored polygon
polygon {
4,
<BottomLeft.x,BottomLeft.z>, <BottomRight.x,BottomRight.z>,
<TopRight.x,TopRight.z>, <TopLeft.x,TopLeft.z>
pigment {color rgb
<rand(RandomSeed),rand(RandomSeed),rand(RandomSeed)>}
rotate 90*x
}
// Increment counters
#local BlockCounter = BlockCounter + 1;
#local Angle = Angle + BlockAngle;
#end
#end
// Define a section of 12 rows
#declare BlockSection = union {
#local I = 0;
#while (I<12)
union {RowOfBlocks() translate z*BlockDepth*I}
#local I = I + 1;
#end
}
// Show 3 sections side by side
object {BlockSection}
object {BlockSection translate CentreToCentre*x}
object {BlockSection translate -CentreToCentre*x}
Post a reply to this message
Attachments:
Download 'ngtest49 (paving).gif' (22 KB)
Preview of image 'ngtest49 (paving).gif'
|
 |
|  |
|  |
|
 |
|
 |
|  |
|  |
|
 |
"andrel" <a_l### [at] hotmail com> schreef in bericht
news:48C### [at] hotmail com> schreef in bericht
news:48C### [at] hotmail com...
>>
> hmm I see what you mean, I'll have a more close look when I see it in
> RL. This is close to the Rijksmuseum? And is it also the pattern at Dam
> square?
>
Well, I am not sure, but that might be so indeed. I remember those mainly
from Paris. The photographs are from there. Not mine. I plucked them from
the web.
Thomas com...
>>
> hmm I see what you mean, I'll have a more close look when I see it in
> RL. This is close to the Rijksmuseum? And is it also the pattern at Dam
> square?
>
Well, I am not sure, but that might be so indeed. I remember those mainly
from Paris. The photographs are from there. Not mine. I plucked them from
the web.
Thomas
Post a reply to this message
|
 |
|  |
|  |
|
 |
|
 |
|  |
|  |
|
 |
This looks very promising, Chris!! I have to play with this in order to
understand and see how this works. Thanks!!
Thomas
Post a reply to this message
|
 |
|  |
|  |
|
 |
|
 |
|  |
|  |
|
 |
> I am not sure if I understand what you mean. But let me put it in a way
> that I can understand. There are two special stones. One is at the end of
> one arc and at the beginning of the next one. The other is the one in the
> middle of an arc. Referring to my picture, the latter is the highest one
> in the arc and has a horizontal lower line. The other is 45 degrees
> turned. No matter how you position the other stones. The corner one
> advances sqrt(2) times the side of that stone every arc. The middle one
> can only advance by the side of that stone. So you'll end up with 41%
> space between the center stones of two consecutive arcs . That does not
> happen in real life. Either because not all stones have the same size or
> they are cheating in another way.
Well they are forced to 'cheat' a little, but with skill it doesn't look too
obvious.
In a perfect pattern the ones at the end of the arc would be pretty close to
square and smaller than the ones in the middle of the arc (see the POV-Ray
image I just posted). In a perfect pattern these differences could be fairly
apparent, but the craftsman randomizes the pattern a little using different
block sizes and different mortar gaps, so the 'cheating' becomes less
apparent.
As shown in the picture posted by Thomas, they don't even always pick square
blocks at the outer extremity of the arcs, as very apparent straight lines
would then form. As shown in your picture, if they used identical square
blocks they would indeed end up with large mortar gaps in the middle which I
think would be dissapointing for all concerned :-)
Regards,
Chris B.
Post a reply to this message
|
 |
|  |
|  |
|
 |
|
 |
|  |
|  |
|
 |
Thomas de Groot wrote:
> Once in a while I try to solve this puzzle, but I give up. It is beyond my
> skills.
>
> How would one model this pavement in POV-Ray? It looks simpler than it is
> as - obviously - the inner arc of a row of stones is smaller than the outer
> arc. In RL (as on the examples below) this is constantly compensated I
> suppose to keep the pattern regular and symmetrical....
>
> Thomas
>
>
>
This is pretty close to what I did with the circular mosaic patterns on
the table tops I posted recently.
The code is real messy, it probably would be more work for you to try
and read it than to write your own but I will try to annotate it if you
are interested.
Basically what I contrived, was a set of concentric bands or rings of a
preset width. Since the tiles were considered squares the width of the
band determined the number of tiles along the inner circumference. But
each sucessive band, as you expand from the center, does not add enough
circumference to accommodate a whole new tile along it each time. So
what I did was average the growing discrepency across the gaps of all
the tiles, rather than leave a gap or try to make a partial tile at the
end. Then when the circumference had expanded enough, I added a new
tile. Also I randomized the 'starting' point for each ring of tiles.
Post a reply to this message
|
 |
|  |
|  |
|
 |
|
 |
|  |
|  |
|
 |
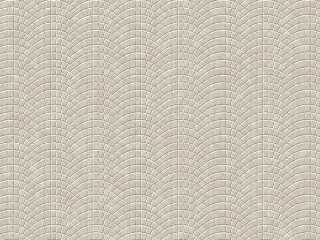
I had a bit of a play with a function to create this pattern. Obviously I'm
cheating and not using rectangular blocks. Here's the code:
#declare Wrap = function(a) { (a/2-floor(a/2))*2-1 }
#declare Feeder = function(x,y) { Wrap( (y -
sqrt(1-pow(Wrap(x*sqrt(2))/sqrt(2),2)))*8 ) }
#declare Tiles =
pigment { function {
min(
1-abs(Feeder(x,y))
,
abs(Wrap(8.8*(-Feeder(x,y)*.1+.9)*Wrap(x*sqrt(2))))
)
} }
--
Tek
http://evilsuperbrain.com
"Thomas de Groot" <t.d### [at] inter nlDOTnet> wrote in message
news:48c3964b@news.povray.org...
> Once in a while I try to solve this puzzle, but I give up. It is beyond my
> skills.
>
> How would one model this pavement in POV-Ray? It looks simpler than it is
> as - obviously - the inner arc of a row of stones is smaller than the
> outer
> arc. In RL (as on the examples below) this is constantly compensated I
> suppose to keep the pattern regular and symmetrical....
>
> Thomas
>
>
> nlDOTnet> wrote in message
news:48c3964b@news.povray.org...
> Once in a while I try to solve this puzzle, but I give up. It is beyond my
> skills.
>
> How would one model this pavement in POV-Ray? It looks simpler than it is
> as - obviously - the inner arc of a row of stones is smaller than the
> outer
> arc. In RL (as on the examples below) this is constantly compensated I
> suppose to keep the pattern regular and symmetrical....
>
> Thomas
>
>
>
Post a reply to this message
Attachments:
Download 'arctiles.jpg' (122 KB)
Preview of image 'arctiles.jpg'
|
 |
|  |
|  |
|
 |
|
 |
|  |


![]()