 |
|
|
|
|
|
| |
| |
|
|
|
|
| |
| |
|
|
Hi and thanks for the info.
In rating myself, I know I'm a LONG way from some of the experts here, given
what I have seen (lots of positive challenges ahead), but my strong math and
programming skills suggest that I'm a reasonably capable newbie.
Where I'm having some troubles is in fine-tuning things such as lighting.
Therefore I appreciate your comments that .... "you'd do this, this & that"
as a matter of *your* standards. In other words it works for you and it's
worth sharing the experience. YMMV, as they say.
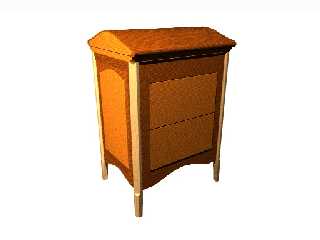
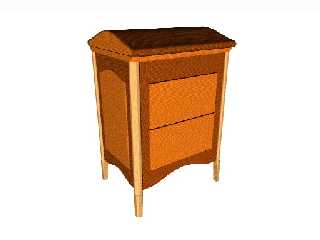
I just re-lighted what was to be my last image of the night, and now the
last and second-last are attached for your consideration.
I just changed the Z component without regard to the direction of the
lights, so the cabinet is lit differently in each picture. I didn't mean for
this to become a comparison, but, the lights in picture 8 are further away
are at z*-300 and intensity of 1.0
light_source { < -30, 10, -300> color rgb <1.0,1.0,1.0> }
light_source { < 0, 20, -300> color rgb <1.0,1.0,1.0> }
while the lights in picture 7 are close to the chest at z*-30 and intensity
2.0:
light_source { < -30, 10, -30> color rgb <2.0,2.0,2.0> }
light_source { < 0, 20, -30> color rgb <2.0,2.0,2.0> }
Does anyone typically use an intensity (light colour) greater than 1.0? I
just tried this to get more light into the picture. Both scenes are lit with
the above lights and a sky sphere. This is getting better, although I do
like the highlight on the front left leg from the close-in light.
I have been tending to put lights reasonably close but quiet happy to move
them to 500-1000 units away based on a 30x30x30 object (or a 3x3x3 as you
suggested). I'm wondering if the wood-textures I'm using are part of my
issue. Usually I use {Green} when I'm prototyping or {Red & Blue & Yellow}
and these colours tend to show up well.
I don't intend to go so far as the photorealistic lighting i.e. falloff,
etc, unless I have a specific project in mind, but thanks for pointing me in
that direction for future reference.
I didn't mean to turn this conversation into such a long one, but I do
appreciate suggestions such as you have provided.
best regards
Stephen
--
Stephen
and
Kathie
(S+K)
"Mike Thorn" <mik### [at] realitycheckmultimedia com> wrote in message
news:41c50d30$1@news.povray.org...
> Stephen wrote:
> > Thanks for the feedback.
> >
> > But the reason I was using three lights was to get **enough**
illumination.
> > Just one light doesn't seem to cut it, so I'm wondering if there's
something
> > basically wrong in my approach or system.
> >
> > So the question would be - in any typically arbitrary scene such as
modeling
> > a TV or a plant or a table or desk, can you illuminate the scene with
one
> > light source which would approximately simulate one 100W lightbulb in
the
> > room, at 6-18 feet away?
> >
> > My answer would be - nope- need multiple lights. What's that tell you?
> >
> >
> > I'll try the gamma correction right now.
>
> From an advanced newbie...
>
> Realistically simulating lamplight (or any other kind of real-world
> light source) in POV-Ray is a good deal more complicated than simply
> defining a light source at a certain distance, with a certain
> value/intensity, and hoping for the best.
>
> First of all, a default light source has no falloff. The light rays will
> be equally bright whether they're 100 units away or 10,000 units. The
> only difference is how many rays hit the object (since a default light
> source emits light in all directions, placing the light source very far
> away spreads the rays out more, thereby making an object *appear*
> darker). In reality, it's just receiving fewer beams.
>
> However, putting your light source very close isn't always the answer
> either, since you'll have high concentrations of light beams in a small
> area, causing washed-out spots.
>
> GrimDude is simply saying that you'll get smoother coverage with your
> lights - the rays will be more spread-out, reducing blown highlights -
> by moving your light sources farther away. I would have said exactly the
> same thing myself if I had noticed the problem (it really didn't strike
> me). When I'm not trying to achieve photorealism, I quite often put my
> lights 500+ units away, even if my object is only a few units each
> dimension. If I had a very large object, eg. 30x30x30, I would probably
> put my lights even farther, such as 800. That's just how I tend to
> operate, however. If you really want a photorealistic effect, the rules
> all change.
>
> There are ways to make the light sources behave realistically. POV-Ray
> supports light falloff and fading, which, when set properly (an area I
> can't advise on, unfortunately) can produce quite realistic results. If
> you want to look these up, look for the 'falloff' and 'fade_distance'
> keywords in the Help file.
>
> Incidentally, Jaime Vives Piqueres has done some research into the
> physical properties of light and has created some macros for realistic
> light simulation. I am still learning how to use them myself, but you
> might find them interesting. http://ignorancia.org/lightsys.php
>
> Hope this helps somehow. As long as you keep in mind that I'm not an
> expert and thus take all this with a grain of salt, I think you'll be
> okay. :)
>
> ~Mike com> wrote in message
news:41c50d30$1@news.povray.org...
> Stephen wrote:
> > Thanks for the feedback.
> >
> > But the reason I was using three lights was to get **enough**
illumination.
> > Just one light doesn't seem to cut it, so I'm wondering if there's
something
> > basically wrong in my approach or system.
> >
> > So the question would be - in any typically arbitrary scene such as
modeling
> > a TV or a plant or a table or desk, can you illuminate the scene with
one
> > light source which would approximately simulate one 100W lightbulb in
the
> > room, at 6-18 feet away?
> >
> > My answer would be - nope- need multiple lights. What's that tell you?
> >
> >
> > I'll try the gamma correction right now.
>
> From an advanced newbie...
>
> Realistically simulating lamplight (or any other kind of real-world
> light source) in POV-Ray is a good deal more complicated than simply
> defining a light source at a certain distance, with a certain
> value/intensity, and hoping for the best.
>
> First of all, a default light source has no falloff. The light rays will
> be equally bright whether they're 100 units away or 10,000 units. The
> only difference is how many rays hit the object (since a default light
> source emits light in all directions, placing the light source very far
> away spreads the rays out more, thereby making an object *appear*
> darker). In reality, it's just receiving fewer beams.
>
> However, putting your light source very close isn't always the answer
> either, since you'll have high concentrations of light beams in a small
> area, causing washed-out spots.
>
> GrimDude is simply saying that you'll get smoother coverage with your
> lights - the rays will be more spread-out, reducing blown highlights -
> by moving your light sources farther away. I would have said exactly the
> same thing myself if I had noticed the problem (it really didn't strike
> me). When I'm not trying to achieve photorealism, I quite often put my
> lights 500+ units away, even if my object is only a few units each
> dimension. If I had a very large object, eg. 30x30x30, I would probably
> put my lights even farther, such as 800. That's just how I tend to
> operate, however. If you really want a photorealistic effect, the rules
> all change.
>
> There are ways to make the light sources behave realistically. POV-Ray
> supports light falloff and fading, which, when set properly (an area I
> can't advise on, unfortunately) can produce quite realistic results. If
> you want to look these up, look for the 'falloff' and 'fade_distance'
> keywords in the Help file.
>
> Incidentally, Jaime Vives Piqueres has done some research into the
> physical properties of light and has created some macros for realistic
> light simulation. I am still learning how to use them myself, but you
> might find them interesting. http://ignorancia.org/lightsys.php
>
> Hope this helps somehow. As long as you keep in mind that I'm not an
> expert and thus take all this with a grain of salt, I think you'll be
> okay. :)
>
> ~Mike
Post a reply to this message
Attachments:
Download 'Chest36x24x18-Leg7.jpg' (61 KB)
Download 'Chest36x24x18-Leg8.jpg' (62 KB)
Preview of image 'Chest36x24x18-Leg7.jpg'
Preview of image 'Chest36x24x18-Leg8.jpg'
|
|
| |
| |
|
|
|
|
| |
| |
|
|
Stephen nous apporta ses lumieres ainsi en ce 2004-12-19 02:22... :
>Hi and thanks for the info.
>
>In rating myself, I know I'm a LONG way from some of the experts here, given
>what I have seen (lots of positive challenges ahead), but my strong math and
>programming skills suggest that I'm a reasonably capable newbie.
>
>Where I'm having some troubles is in fine-tuning things such as lighting.
>Therefore I appreciate your comments that .... "you'd do this, this & that"
>as a matter of *your* standards. In other words it works for you and it's
>worth sharing the experience. YMMV, as they say.
>
>I just re-lighted what was to be my last image of the night, and now the
>last and second-last are attached for your consideration.
>
>I just changed the Z component without regard to the direction of the
>lights, so the cabinet is lit differently in each picture. I didn't mean for
>this to become a comparison, but, the lights in picture 8 are further away
>are at z*-300 and intensity of 1.0
>
>light_source { < -30, 10, -300> color rgb <1.0,1.0,1.0> }
>light_source { < 0, 20, -300> color rgb <1.0,1.0,1.0> }
>
>while the lights in picture 7 are close to the chest at z*-30 and intensity
>2.0:
>light_source { < -30, 10, -30> color rgb <2.0,2.0,2.0> }
>light_source { < 0, 20, -30> color rgb <2.0,2.0,2.0> }
>
>Does anyone typically use an intensity (light colour) greater than 1.0? I
>just tried this to get more light into the picture. Both scenes are lit with
>the above lights and a sky sphere. This is getting better, although I do
>like the highlight on the front left leg from the close-in light.
>
>
>I have been tending to put lights reasonably close but quiet happy to move
>them to 500-1000 units away based on a 30x30x30 object (or a 3x3x3 as you
>suggested). I'm wondering if the wood-textures I'm using are part of my
>issue. Usually I use {Green} when I'm prototyping or {Red & Blue & Yellow}
>and these colours tend to show up well.
>
>I don't intend to go so far as the photorealistic lighting i.e. falloff,
>etc, unless I have a specific project in mind, but thanks for pointing me in
>that direction for future reference.
>
>I didn't mean to turn this conversation into such a long one, but I do
>appreciate suggestions such as you have provided.
>
>best regards
>
>Stephen
>
>
>
What diffuse value do you use? To low will darken your object, to high
can wash out the colours.
I sometimes use large values for light(s) like 100+. In deffining the
light, rgb 1 = rgb<1.0,1.0,1.0>.
Alain
Post a reply to this message
|
|
| |
| |
|
|
|
|
| |
| |
|
|
> There appears to be a small misunderstanding on how light sources
> work here. <snip>
I see where I went wrong here. Thanks for clarifying that! :)
~Mike
Post a reply to this message
|
|
| |
| |
|
|
|
|
| |
| |
|
|
Thanks for the update.
I tried something new which I thought I'd share. Typically I move lights
around until it "looks right", but now that they're farther away than I had
been placing them, it's a bit harder to guess how far they should be moved
to make a significant difference in terms of the vector of the light and the
vector of the camera.
So..... Let's find out where the lights actually are and make them visible
for testing:
1) define the light's position
#declare LightSource0 = < 0, 0, 0 >; // assume this is the
center of your scene or an important element:
#declare LightSource1 = < 300, 200, -300 >;
#declare LightSource2 = <-300, 100, -300 >;
#declare LightSource3 = < 0 , 70, -300 >;
2) define the lights at that position
light_source { LightSource1 color rgb <1.0,1.0,1.0> }
light_source { LightSource2 color rgb <1.0,1.0,1.0> }
light_source { LightSource3 color rgb <1.0,1.0,1.0> }
3) build a cylinder from the "origin" towards the lightsource, but not all
the way to the light because it then blocks the light
Perhaps there's other ways to do this, but this works.
cylinder { VWith_Len(vnormalize(LightSource1), 120), LightSource0, 1.0
pigment {Red} }
cylinder { VWith_Len(vnormalize(LightSource2), 40), LightSource0, 1.0
pigment {Green} }
cylinder { VWith_Len(vnormalize(LightSource3), 40), LightSource0, 1.0
pigment {Blue} }
Now that I know where the light is pointing from, I can see why I have
shadows in certain places. Works for me.
--
Stephen
and
Kathie
(S+K)
news:41c525eb@news.povray.org...
> -----BEGIN PGP SIGNED MESSAGE-----
> Hash: SHA1
>
> Mike Thorn wrote:
>
> | First of all, a default light source has no falloff. The light rays
> will
> | be equally bright whether they're 100 units away or 10,000 units. The
> | only difference is how many rays hit the object (since a default light
> | source emits light in all directions, placing the light source very
> far
> | away spreads the rays out more, thereby making an object *appear*
> | darker). In reality, it's just receiving fewer beams.
> |
> There appears to be a small misunderstanding on how light sources
> work here. For regular light sources (ie not area lights), there is
> exactly one ray of light for each point of your object no matter what
> the distance to the light source. If you don't use anything special
> like falloff or semi-transparent objects, that light ray will have
> the exact intensity specified in the light source definition. As a
> result, the object will have about the same brightness no matter how
> far the light source is situated. However the brightness is affected
> by the angle between the light ray and the surface: it is maximal if
> the ray hits the surface straight on and diminishes to zero when the
> ray is nearly parallel to the surface. This is why placing the light
> source farther away makes for more uniform illumination: the farther
> away, the closer to parallel the rays.
>
> Incidentally, your description ("rays spread out more") is more or
> less what happens in real life and the reason why real light sources
> get dimmer with distance.
>
> | There are ways to make the light sources behave realistically. POV-Ray
> | supports light falloff and fading, which, when set properly (an area I
> | can't advise on, unfortunately) can produce quite realistic
> results. If
> | you want to look these up, look for the 'falloff' and 'fade_distance'
> | keywords in the Help file.
> |
> To get realistic results, you should use "fade_power 2" and set the
> fade_distance to the size of your light bulb, then give a *very* high
> value for light intensity (you do know that intensity is not
> constrained to the 0-1 range, don't you? In fact you can even create
> negative light sources wich allows for some interresting special
> effects...). 'falloff' has nothing to do with it and has meaning only
> with spotlights and cylindrical lights: it defines how much light you
> get as you get further from the center of the beam.
>
> BTW, if you intend to use cylindrical lights, read the doc
> carefully, they probably don't do what you think. To get the right
> effect, you'll have to look at the 'parallel' keyword :p
>
> Jerome
>
> - --
> ******************************
> * Jerome M. Berger *
> * mailto:jbe### [at] ifrancecom *
> * http://jeberger.free.fr/ *
> ******************************
> -----BEGIN PGP SIGNATURE-----
> Version: GnuPG v1.2.4 (GNU/Linux)
>
> iD8DBQFBxSXpqIYJdJhyixIRAtD6AJ9/Pr7e2Fq16s0OIHA9exblcJ9NHgCeKBO0
> AYq6+ef9Ev9ahbfnsBNmEBQ=
> =DYOL
> -----END PGP SIGNATURE-----
Post a reply to this message
|
|
| |
| |
|
|
|
|
| |
|
|


