|
|
|
|
|
|
| |
| |
|
|
|
|
| |
| |
|
|
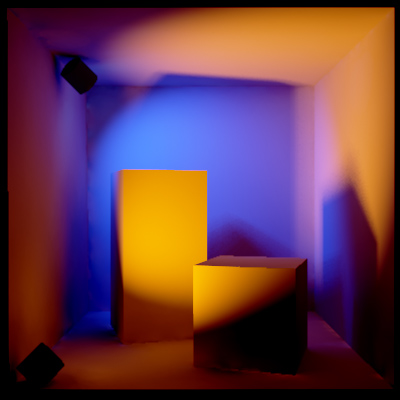
Outputted from pov as 48 bit linear. Compressed in Photoshop
using transfer curve (intensity only) based on a film response
curve from Kodak site. It's a typical compression curve. Then
gamma 2.2 corrected and converted to 24 bit.

My tests with the Cornell box indicated that correct fade_distance
for diffuse sources is same as source diameter. The spotlights
use (90^2/falloff^2)*diameter as fade distance because of the
directional nature of the source. I'm not sure if this is correct
but it looks ok. Any lighting engineers here?


_____________
Kari Kivisalo
Post a reply to this message
Attachments:
Download 'film_48bit.jpg' (47 KB)
Preview of image 'film_48bit.jpg'
|
|
| |
| |
|
|
|
|
| |
| |
|
|
That looks very nice. You'll have to write a tutorial for this. :)
Post a reply to this message
|
|
| |
| |
|
|
|
|
| |
| |
|
|
in news:3B731A2A.4B783AE3@pp.htv.fi Kari Kivisalo wrote:

> Outputted from pov as 48 bit linear. Compressed in Photoshop
> using transfer curve (intensity only) based on a film response
> curve from Kodak site. It's a typical compression curve. Then
> gamma 2.2 corrected and converted to 24 bit.

 I'm wondering a bit about what you are doing, but that can be the
result of me not knowing how povray works internaly.
 If I have a rgb 1 sphere and a rgb 2 lightsource in the camera
position, there is a spot on the sphere with a brightness > 1. Is this
spot immediatly clipped to 1, or does povray calculate with the higher
found value. Example, the sphere is reflected in a mirror, will the
mirrord spot have a brightness >1?
 How are the color values that go into the file determined? Is
everything >1 just clipped to 1? Do I understand the 48 bit output
right in that it just has more steps between 0 and !, but has no
influence on the contrast range?
 If the above is not terebly wrong, it seems to me that what you are
doing is adjusting the contrast range of the mid tones only, as there
is no information about the higjlights in the file.
 In photography what we do, is adjust the complete contrast range of
the scene so it fits in the range of the paper the image is printed on.
In a studio situation this is simple, you contro; the range with the
lighting, just as you do in POV-Ray. In outdoor scenes there are
different tricks.
 Lets take a high contrast scene, a marrying couple. The dress is
white, his suit is black. The contrast is too big for our film to
catch. Now we over expose to make shure that we get all the details in
the shadow. If we develop this film normaly, the resulting negative is
not usable, it has a too high density and contrast to print. So we
develop shorter. The detail in the shadows will be just there, the
highlights will not be developped completly, so the density is good
there too. The negative can now be printed to normal photo paper. In a
low-contrast scene the opposite is done, under-expose, over-develop.
 If this is what you want to do with POV-Ray it has to output all data
linear and unclipped. Such a file woul be a good base for all kind of
manipulations, contrast compression to view on a monitor or print. For
printing the data could be split in a high key and low key part for
duo-tone printing per colour-channel etc.


Ingo

--
Photography: http://members.home.nl/ingoogni/
Pov-Ray    : http://members.home.nl/seed7/
Post a reply to this message
|
|
| |
| |
|
|
|
|
| |
| |
|
|
ingo wrote:
>
>  If the above is not terebly wrong, it seems to me that what you are
> doing is adjusting the contrast range of the mid tones only, as there
> is no information about the higjlights in the file.

All the data is non clipped. By scaling light source and ambient
source intensities I can make sure the scene fits in 0-1 range.

A scene developed normally in povray where sun shines into a room
without light sources the lit area might have 500% intensity and
get clipped when the rest of the room seems to be lit enough. I then
scale all sources by 0.2 so I get all the data. That is why 16 bits
per channel are needed.

> Now we over expose to make shure that we get all the details in
> the shadow. If we develop this film normaly, the resulting negative is
> not usable, it has a too high density and contrast to print. So we
> develop shorter.

> In a
> low-contrast scene the opposite is done, under-expose, over-develop.


out ^          __
    |      _--*
    |    _/
    |   /
    |  /
    | /
    |/
    +------------> in

So developing stretches the scene's intensity range down along the
curve. Exposing stretches the range up along the curve. I just looked
at linearised film response curve and concluded that it's just a typical
compress operation. Check: density=blackness ? :)


_____________
Kari Kivisalo
Post a reply to this message
|
|
| |
| |
|
|
|
|
| |
| |
|
|
in news:3B7### [at] pp htvfi Kari Kivisalo wrote:
> All the data is non clipped. By scaling light source and ambient
> source intensities I can make sure the scene fits in 0-1 range.
The "studio-situation" form a photography view point.
So what you are doing is "gamma adjustment the hard way", but with more
control over the result?
Dens^ __
| --* ***this curve is for negative material.
D2 ____ / for positive material (slide) mirror
| / the curve.
| /
D1 __ /_a
|__/ |
+---|---|------------> log H (light dosis)
logH1 logH2
> So developing stretches the scene's intensity range down along the
> curve. Exposing stretches the range up along the curve. I just
> looked at linearised film response curve and concluded that it's
> just a typical compress operation.
Not quite, without any change in the light dosis, when the film is
developed longer the gamma will be higher, the curve steeper. This only
to a certain extend, there is a maximum density that can be reached for
a certain light dosis. If developed longer the film wil get a to high
background haze, that reduces contrast. Shorter development, flatter
curve.
Without change in development, a higher light dosis moves the
highlights towards, or into, the shoulder. The shadows move from the
foot towards the middle section. You'll lose detail in the bright
parts. Lower lightdosis does the opposit and you'll lose detail in the
shadows.
For negative material goal is to always get the same gamma ( tang(a),
(D2-D1/logH2-H1) ) that fits with the printing paper and enlarging
apparatus used.
> Check: density=blackness ? :)
Yes
Ingo
--
Photography: http://members.home.nl/ingoogni/
Pov-Ray : http://members.home.nl/seed7/ htvfi Kari Kivisalo wrote:
> All the data is non clipped. By scaling light source and ambient
> source intensities I can make sure the scene fits in 0-1 range.
The "studio-situation" form a photography view point.
So what you are doing is "gamma adjustment the hard way", but with more
control over the result?
Dens^ __
| --* ***this curve is for negative material.
D2 ____ / for positive material (slide) mirror
| / the curve.
| /
D1 __ /_a
|__/ |
+---|---|------------> log H (light dosis)
logH1 logH2
> So developing stretches the scene's intensity range down along the
> curve. Exposing stretches the range up along the curve. I just
> looked at linearised film response curve and concluded that it's
> just a typical compress operation.
Not quite, without any change in the light dosis, when the film is
developed longer the gamma will be higher, the curve steeper. This only
to a certain extend, there is a maximum density that can be reached for
a certain light dosis. If developed longer the film wil get a to high
background haze, that reduces contrast. Shorter development, flatter
curve.
Without change in development, a higher light dosis moves the
highlights towards, or into, the shoulder. The shadows move from the
foot towards the middle section. You'll lose detail in the bright
parts. Lower lightdosis does the opposit and you'll lose detail in the
shadows.
For negative material goal is to always get the same gamma ( tang(a),
(D2-D1/logH2-H1) ) that fits with the printing paper and enlarging
apparatus used.
> Check: density=blackness ? :)
Yes
Ingo
--
Photography: http://members.home.nl/ingoogni/
Pov-Ray : http://members.home.nl/seed7/
Post a reply to this message
|
|
| |
| |
|
|
|
|
| |
| |
|
|
Very nice.. Can we see the non post-processed image to see the effect of
compression ?

M
Post a reply to this message
|
|
| |
| |
|
|
|
|
| |
| |
|
|
Mael wrote:
>
> Very nice.. Can we see the non post-processed image to see the effect of
> compression ?

http://www.pp.htv.fi/kkivisal/48bit.jpg
http://www.pp.htv.fi/kkivisal/48bit2.jpg


_____________
Kari Kivisalo
Post a reply to this message
|
|
| |
| |
|
|
|
|
| |
| |
|
|
You've got to be kidding! Wow!
Post a reply to this message
|
|
| |
| |
|
|
|
|
| |
| |
|
|
ingo wrote:

> So what you are doing is "gamma adjustment the hard way", but with more
> control over the result?

It's the engineer's approach. I tested with gamma corrected range limited
output and the compression can be done also after gamma correction but
I had to iterate some time to get it right because the gamma changes
the shape of the compression curve. When black and white tresholds
are used it will be even more complicated. In general the order of non
linear operations can't be reversed but this is about faking a certain
look anyway so it's the final result that counts. I tried it before
but without experience of the whole process the results weren't good.
Now I can find more economical way to make it work.


_____________
Kari Kivisalo
Post a reply to this message
|
|
| |
| |
|
|
|
|
| |
| |
|
|
That looks so real! Great technique, I'll have to try it. :)

--
Tek
http://www.evilsuperbrain.com


Kari Kivisalo <kki### [at] pphtvfi> wrote in message
news:3B731A2A.4B783AE3@pp.htv.fi...
>
> Outputted from pov as 48 bit linear. Compressed in Photoshop
> using transfer curve (intensity only) based on a film response
> curve from Kodak site. It's a typical compression curve. Then
> gamma 2.2 corrected and converted to 24 bit.
>
> My tests with the Cornell box indicated that correct fade_distance
> for diffuse sources is same as source diameter. The spotlights
> use (90^2/falloff^2)*diameter as fade distance because of the
> directional nature of the source. I'm not sure if this is correct
> but it looks ok. Any lighting engineers here?
>
>
> _____________
> Kari Kivisalo


--------------------------------------------------------------------------------
Post a reply to this message
|
|
| |
| |
|
|
|
|
| |
| |
|
|
"Tony[B]" wrote:
>
> You've got to be kidding! Wow!

It's no magic. The idea is to use realistic texture parameters
(diffuse, reflection, transmit) and light source intensities so
that when you want to put 60W and 200W light bulbs in a scene
you say: LightBulb(60) LightBulb(200). Then adjust a global scale
parameter so that nothing important isn't clipped. In the editor
compress the bright parts so that the important parts of the scene
become visible. It's basically just contrast adjustment so that
IRTC judges should be ok with that :)

_____________
Kari Kivisalo
Post a reply to this message
|
|
| |
| |
|
|
|
|
| |
| |
|
|
ingo wrote:
>
> > All the data is non clipped. By scaling light source and ambient
> > source intensities I can make sure the scene fits in 0-1 range.
>
> The "studio-situation" form a photography view point.

Actually no. The uniform scaling is done only to fit all the samples
in the 48 bit file, not to reduce contrast ratio. 48 bit file can store
a scene with 60 000:1 contrast ratio.

_____________
Kari Kivisalo
Post a reply to this message
|
|
| |
| |
|
|
|
|
| |
| |
|
|
"Kari Kivisalo" <kki### [at] pphtvfi> wrote in message
news:3B731A2A.4B783AE3@pp.htv.fi...
>
> Outputted from pov as 48 bit linear. Compressed in Photoshop
> using transfer curve (intensity only) based on a film response
> curve from Kodak site. It's a typical compression curve. Then
> gamma 2.2 corrected and converted to 24 bit.
>
> My tests with the Cornell box indicated that correct fade_distance
> for diffuse sources is same as source diameter. The spotlights
> use (90^2/falloff^2)*diameter as fade distance because of the
> directional nature of the source. I'm not sure if this is correct
> but it looks ok. Any lighting engineers here?


At the risk of sounding dim, I don't understand what you are doing here.
This is just one of many of the more technical threads that I find are above
my head.

Are the two 'before' images you linked to really transformed into these
gorgeous images by post-processing? They look as though you have rendered
them again with radiosity. Is your process equivalent to both the
compression and expansion techniques used in audio production... compressing
the peaks whilst making the softer passages 'louder'?

I don't have Photoshop.. I have Paint Shop Pro. How would I go about
adopting your technique? Infact, could I impose upon you and ask you to
provide a sample scene/tutorial?

I have often wished for the ability to say Lightbulb(60) or equivalent, and
have the scene behave as much like the real world as posible, without the
tedious (and in my case 'blind') parameter changes. A fully featured .INC
would be great.

All the best,

Andy Cocker
Post a reply to this message
|
|
| |
| |
|
|
|
|
| |
| |
|
|
Andy Cocker wrote:
>
> Are the two 'before' images you linked to really transformed into these
> gorgeous images by post-processing?

Correct. That is the unmodified pov output, only 24bit because
that's jpg limitation.

> Is your process equivalent to both the
> compression and expansion techniques used in audio production...
> compressing  the peaks whilst making the softer passages 'louder'?

That's it. I just apply one transfer curve to the whole image.

> Infact, could I impose upon you and ask you to
> provide a sample scene/tutorial?

These were just tests to see if this can be done with povray. It seems
to work but as always there's a cost. Longer rendering time because
higher quality aa and maybe radiosity are required. I'm building a
more normal scene to test with textures and all and if that looks as
good as I hope then I will write a page about it. Currently it doesn't
seem to work with a more complex scene because there is still some
parameter in radiosity that's dependand on absolute scale of the scene :(

I think that currently Photoshop is the only editor that can apply
histogram and curve adjustments to 48 bit images while displaying
gamma corrected result in real time.

> I have often wished for the ability to say Lightbulb(60) or equivalent,
> and have the scene behave as much like the real world as posible,

Radiance can do this far better than pov and can even simulate how person
would see a scene. The compression is just a simple way to mimic how a
photograph of a scene might look like.

The problem with light sources is their radiation
pattern. Simple light bulbs and fluorcesent tubes pov can handle but
as soon as they are put inside a fixture with reflecting, diffusing
and translucent surfaces things get so complicated that it's just
better to guess how it would distribute the light and use spot_light(s)
for it. Indoor radiosity scenes are sensitive to the total energy
output from a light source so I'm trying to find way to relate
the spot_light parameters to the imaginary 100W bulb inside this
virtual spotlight. This would allow the scene builder to say:
This is a 100W light source and I'm going to use this spot_light(s)
to approximate it's radiation pattern. When there is only one light
source the strength can be chosen at will but when there are several
sources their relative strenghts are important.


_____________
Kari Kivisalo
Post a reply to this message
|
|
| |
| |
|
|
|
|
| |
| |
|
|
in news:3B785287.36E72AE8@pp.htv.fi Kari Kivisalo wrote:

> The problem with light sources is their radiation
> pattern. Simple light bulbs and fluorcesent tubes pov can handle
> but as soon as they are put inside a fixture with reflecting,
> diffusing and translucent surfaces things get so complicated that
> it's just better to guess how it would distribute the light and use
> spot_light(s) for it.

Use a sphere with an image_map around the source, to simulate the
radiation pattern. Maybe even generate the image_map from photometric
files (IES LM_63), if something like that is possible.

Ingo

--
Photography: http://members.home.nl/ingoogni/
Pov-Ray    : http://members.home.nl/seed7/
Post a reply to this message
|
|
| |
| |
|
|
|
|
| |
| |
|
|
ingo wrote:
>
> Use a sphere with an image_map around the source, to simulate the
> radiation pattern. Maybe even generate the image_map from photometric
> files (IES LM_63), if something like that is possible.

I thought of that but I'm not trying to make a Radiance out of povray :)

And even though pov radiosity works with the Cornell box scene the minute
I tried to make an ordinary room there were some major errors in the rad
solution. The gurus haven't respondend yet in the "other" forum so I'm
assuming it's a feature. I have one earlier simple test scene where the
error is so big it took a while for me see it as an error. I was hoping
that particular scene was just extra tough but I guess not. As Beavis
would say: "Damn it! There is always someting."


_____________
Kari Kivisalo
Post a reply to this message
|
|
| |
| |
|
|
|
|
| |