|
 |
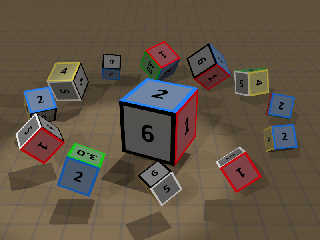
For my continuing work on my 'city buildings' scene, I wanted to check out the
new(?) CUBIC pattern, to see if might be an easier way to apply my
building-window image_maps to the five visible sides of a box.
The docs explain only the very basics of using the pattern, as a simple list of
six textures to apply. This works fine as-is for applying 'typical' pigments--
bozo, bumps, gradients, etc.-- but doesn't work well with individual image_maps
on the cube's faces. How to do that turned out to be not quite so obvious, so I
thought I would post the basic procedure.
There might be other permutations of scale/translate that would also work, but
these are what I came up with. (Ideally, the same scales/translations should
also be used with POV-Ray's other pigment patterns, but are probably unnecessary
because of the visual nature of those patterns. The placement of image_maps is
more finicky.)
[NOTE: DON'T use the 'once' keyword in the image_maps; it causes that particular
face of the cube to disappear! Which might actually be useful, of course.]
------------
box{0,1
translate -.5 // box needs to be centered on origin, as docs say
texture{
cubic
// RIGHT-SIDE
texture{pigment{image_map{jpeg "CUBIC image 1.jpg"}
rotate -90*y translate <0,.5,.5>}}
// TOP
texture{pigment{image_map{jpeg "CUBIC image 2.jpg"}
rotate 90*x translate <.5,0,.5>}}
// REAR
texture{pigment{image_map{jpeg "CUBIC image 3.jpg"}
scale -1 rotate 180*x translate <.5,.5,0>}}
// LEFT_SIDE
// texture{pigment{cells scale .15}}
texture{pigment{image_map{jpeg "CUBIC image 4.jpg"}
rotate 90*y translate <0,.5,.5>}}
// BOTTOM
texture{pigment{image_map{jpeg "CUBIC image 5.jpg"}
rotate -90*x translate <.5,0,.5>}}
// FRONT
texture{pigment{image_map{jpeg "CUBIC image 6.jpg"}
translate <.5,.5,0>}}
}
}
Post a reply to this message
Attachments:
Download 'cubic_pattern_good.jpg' (377 KB)
Preview of image 'cubic_pattern_good.jpg'

|
 |


![]()