|
|
|
|
|
|
| |
| |
|
|
|
|
| |
| |
|
|
What ho
I've been trying to make some HDR light probes over the last few weeks. It's
tricky. :) The "stainless steel" balls I got from a garden centre were not up
to scratch... much deformation was apparent on the surfaces. They weren't even
stainless steel - plastic with a chrome coating probably, and even the
strongest permanent magnet I could lay hands on failed to grip the surface more
than fractionally.
So, I purchased a 60mm ball bearing from ebay instead, and this seems to work
very well. It has some slight scuff-marks which I can no doubt polish out in
time, but otherwise gives very sharp reflections.
My camera seems adequate to the task, although it would have been very difficult
without the CHDK upgrade to the Canon firmware (thanks to tgq for the link). I
have two tripods, which I have 'calibrated' for HDR-gathering (even drawing a
line round the neck of the larger one to mark the elevation!), and a great
little plastic tub-thingy which sits on the larger tripod and supports the ball
nicely.
However, I am having a few problems, particularly with image alignment. I'm
using HDRShop for the whole process, following the tutorial here:
http://gl.ict.usc.edu/HDRShop/tutorial/tutorial5.html
It works a treat, but often I find that the rotated image doesn't quite match
the other image after unwrapping. The points I select in the editor match
perfectly, naturally, but the images seem to diverge near the edges. I'm not
entirely sure why this is happening, but making sure the ball is centred in the
frame when taking the pictures seems to help considerably. Can any resident
HDR-makers shed any light on this?
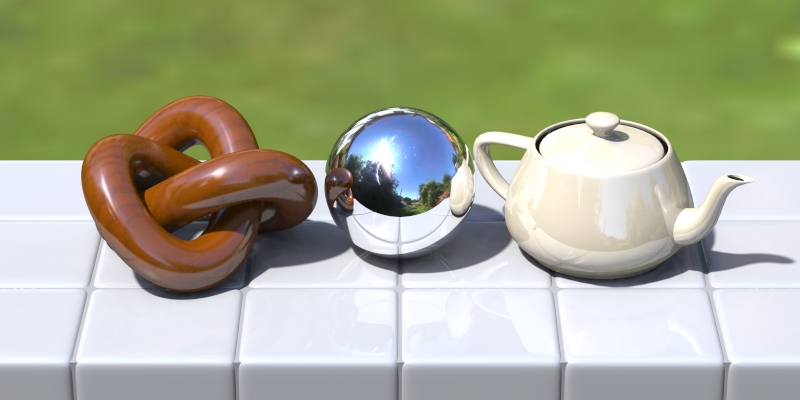
In any case, here's my test scene so far, using the probe I made at the weekend.
I don't have a light-dome setup so I've cheated a little by using a single
light-source to account for the sun.
Bill
Post a reply to this message
Attachments:
Download 'hdr_tester.jpg' (111 KB)
Preview of image 'hdr_tester.jpg'

|
|
| |
| |
|
|
|
|
| |
| |
|
|
"Bill Pragnell" <bil### [at] hotmail com> wrote:
> What ho
>
> I've been trying to make some HDR light probes over the last few weeks. It's
> tricky. :) The "stainless steel" balls I got from a garden centre were not up
> to scratch... much deformation was apparent on the surfaces. They weren't even
> stainless steel - plastic with a chrome coating probably, and even the
> strongest permanent magnet I could lay hands on failed to grip the surface more
> than fractionally.
>
> So, I purchased a 60mm ball bearing from ebay instead, and this seems to work
> very well. It has some slight scuff-marks which I can no doubt polish out in
> time, but otherwise gives very sharp reflections.
Your ball bearing is about 2.3 times bigger than mine, so it should be able to
give much better images. How much did you pay for it? I'm don't know where to
look for bigger ball bearings where I live...
My one inch ball bearing occupies about 850 pixels square with my 8 megapixel
camera (Canon IXUS 860). You should be getting 2000 square pixels or so?
Make sure you take the photo at maximum zoom to reduce the distortion of the
ball - this will help in stitching the two images together.
From what I can tell, the combination of magnification and bright light sources
(the sun or point-like interior lights) brings out even the smallest
imperfections in the polishing. I got my ball chrome plated, and that made a
huge difference. Almost no flare from the sun from the ball bearing surface
(but still a little from the cheaper lens on the point and shoot camera).
One last point - my ball bearings (I got three) started rusting after a couple
of months of use. I'm not sure exactly what your one is made of, but don't
touch it with your fingers, and clean it with a lint free cloth whenever you
use it or store it. I'm hoping the chrome plating on my third one will mean it
will now never rust...
> My camera seems adequate to the task, although it would have been very difficult
> without the CHDK upgrade to the Canon firmware (thanks to tgq for the link). I
> have two tripods, which I have 'calibrated' for HDR-gathering (even drawing a
> line round the neck of the larger one to mark the elevation!), and a great
> little plastic tub-thingy which sits on the larger tripod and supports the ball
> nicely.
CHDK is an absolute marvel :-) I used the custom grid function to draw a circle
and crosshairs that precisely matches the position of the ball on screen to aid
in getting it at exactly the right distance. I also used the "override focus"
setting to force the camera to focus on the minimum distance at maximum zoom.
Getting the ball in perfect focus had been a real problem up until that.
> However, I am having a few problems, particularly with image alignment. I'm
> using HDRShop for the whole process, following the tutorial here:
>
> http://gl.ict.usc.edu/HDRShop/tutorial/tutorial5.html
>
> It works a treat, but often I find that the rotated image doesn't quite match
> the other image after unwrapping. The points I select in the editor match
> perfectly, naturally, but the images seem to diverge near the edges. I'm not
> entirely sure why this is happening, but making sure the ball is centred in the
> frame when taking the pictures seems to help considerably. Can any resident
> HDR-makers shed any light on this?
I use HDR shop to convert the images from spherical mirror projection (i.e. the
HDR photograph) into Latitude/Longitude format, then do the stitching in
Photoshop. I think there is an HDR version of GIMP - Cinepaint? Everything is
much simpler to do in square lat/long format, and POV can use the resulting
images just fine.
Having the two images taken at max zoom will help, as will making sure that they
are taken from exactly the same elevation and that the camera is absolutely
level. I find I have to do a little stretching and fudging in Photoshop even
when I'm really careful about that stuff - it's just a case of minimising the
work required.
> In any case, here's my test scene so far, using the probe I made at the weekend.
> I don't have a light-dome setup so I've cheated a little by using a single
> light-source to account for the sun.
Looks pretty great already - I'm really jealous of the extra resolution you are
able to get!
> Bill
Cheers,
Edouard. com> wrote:
> What ho
>
> I've been trying to make some HDR light probes over the last few weeks. It's
> tricky. :) The "stainless steel" balls I got from a garden centre were not up
> to scratch... much deformation was apparent on the surfaces. They weren't even
> stainless steel - plastic with a chrome coating probably, and even the
> strongest permanent magnet I could lay hands on failed to grip the surface more
> than fractionally.
>
> So, I purchased a 60mm ball bearing from ebay instead, and this seems to work
> very well. It has some slight scuff-marks which I can no doubt polish out in
> time, but otherwise gives very sharp reflections.
Your ball bearing is about 2.3 times bigger than mine, so it should be able to
give much better images. How much did you pay for it? I'm don't know where to
look for bigger ball bearings where I live...
My one inch ball bearing occupies about 850 pixels square with my 8 megapixel
camera (Canon IXUS 860). You should be getting 2000 square pixels or so?
Make sure you take the photo at maximum zoom to reduce the distortion of the
ball - this will help in stitching the two images together.
From what I can tell, the combination of magnification and bright light sources
(the sun or point-like interior lights) brings out even the smallest
imperfections in the polishing. I got my ball chrome plated, and that made a
huge difference. Almost no flare from the sun from the ball bearing surface
(but still a little from the cheaper lens on the point and shoot camera).
One last point - my ball bearings (I got three) started rusting after a couple
of months of use. I'm not sure exactly what your one is made of, but don't
touch it with your fingers, and clean it with a lint free cloth whenever you
use it or store it. I'm hoping the chrome plating on my third one will mean it
will now never rust...
> My camera seems adequate to the task, although it would have been very difficult
> without the CHDK upgrade to the Canon firmware (thanks to tgq for the link). I
> have two tripods, which I have 'calibrated' for HDR-gathering (even drawing a
> line round the neck of the larger one to mark the elevation!), and a great
> little plastic tub-thingy which sits on the larger tripod and supports the ball
> nicely.
CHDK is an absolute marvel :-) I used the custom grid function to draw a circle
and crosshairs that precisely matches the position of the ball on screen to aid
in getting it at exactly the right distance. I also used the "override focus"
setting to force the camera to focus on the minimum distance at maximum zoom.
Getting the ball in perfect focus had been a real problem up until that.
> However, I am having a few problems, particularly with image alignment. I'm
> using HDRShop for the whole process, following the tutorial here:
>
> http://gl.ict.usc.edu/HDRShop/tutorial/tutorial5.html
>
> It works a treat, but often I find that the rotated image doesn't quite match
> the other image after unwrapping. The points I select in the editor match
> perfectly, naturally, but the images seem to diverge near the edges. I'm not
> entirely sure why this is happening, but making sure the ball is centred in the
> frame when taking the pictures seems to help considerably. Can any resident
> HDR-makers shed any light on this?
I use HDR shop to convert the images from spherical mirror projection (i.e. the
HDR photograph) into Latitude/Longitude format, then do the stitching in
Photoshop. I think there is an HDR version of GIMP - Cinepaint? Everything is
much simpler to do in square lat/long format, and POV can use the resulting
images just fine.
Having the two images taken at max zoom will help, as will making sure that they
are taken from exactly the same elevation and that the camera is absolutely
level. I find I have to do a little stretching and fudging in Photoshop even
when I'm really careful about that stuff - it's just a case of minimising the
work required.
> In any case, here's my test scene so far, using the probe I made at the weekend.
> I don't have a light-dome setup so I've cheated a little by using a single
> light-source to account for the sun.
Looks pretty great already - I'm really jealous of the extra resolution you are
able to get!
> Bill
Cheers,
Edouard.
Post a reply to this message
|
|
| |
| |
|
|
|
|
| |
| |
|
|
"Edouard" <pov### [at] edouardinfo> wrote:
> Your ball bearing is about 2.3 times bigger than mine, so it should be able to
> give much better images. How much did you pay for it? I'm don't know where to
> look for bigger ball bearings where I live...
I paid GBP17 + postage, about GBP21 in total. It was from a uk seller, which
helped (cos that's where I am!). The guy was also selling balls up to 100mm,
but those were 45 quid (not counting postage!).
> My one inch ball bearing occupies about 850 pixels square with my 8 megapixel
> camera (Canon IXUS 860). You should be getting 2000 square pixels or so?
That's about right, my camera's 7.2Mp and I can juuuust get it focused at full
zoom from about half a meter away, although I can't get it to focus full-frame.
I'm getting 1700 pixels square after cropping. Perhaps I'll try the focus
override - forgot about that.
> (the sun or point-like interior lights) brings out even the smallest
> imperfections in the polishing. I got my ball chrome plated, and that made a
> huge difference.
Yup, I'm seeing quite a bit of flare from the scuffs on mine - you can see it in
the attached image!
> One last point - my ball bearings (I got three) started rusting after a couple
> of months of use. I'm not sure exactly what your one is made of, but don't
> touch it with your fingers, and clean it with a lint free cloth whenever you
> use it or store it.
I think it's stainless steel, so I shouldn't have any problems. I've never had
stainless steel rust before except through wet contact over months. Where on
earth can I get it chrome-plated, and how much would that cost?! :)
> CHDK is an absolute marvel :-) I used the custom grid function to draw a circle
> and crosshairs that precisely matches the position of the ball on screen to aid
> in getting it at exactly the right distance. I also used the "override focus"
> setting to force the camera to focus on the minimum distance at maximum zoom.
> Getting the ball in perfect focus had been a real problem up until that.
Aye, I mean to use the grid eventually too. I have a 'manual' focus on my
Powershot, but it's a bit primitive. The override should help!
> I use HDR shop to convert the images from spherical mirror projection (i.e. the
> HDR photograph) into Latitude/Longitude format, then do the stitching in
> Photoshop. I think there is an HDR version of GIMP - Cinepaint? Everything is
> much simpler to do in square lat/long format, and POV can use the resulting
> images just fine.
Actually the blending is very straightforward in HDRShop, I can knock up a mask
in the GIMP in about 5 minutes. I don't have Photoshop, so I am limited in my
retouching facilities. I should see if Cinepaint works under wine...
> Having the two images taken at max zoom will help, as will making sure that they
> are taken from exactly the same elevation and that the camera is absolutely
> level.
I have been, but I get the impression that elevation is not a problem when I'm
using HDRShop's 3D rotation during unwrapping. Keeping a constant distance
would seem to be vital, however - I'd guess the difference in perspective will
affect the squashed reflections at the edges quite strongly.
> Looks pretty great already - I'm really jealous of the extra resolution you are
> able to get!
Thanks, I'll put up a page of probes somewhere when I've got a few more!
Post a reply to this message
|
|
| |
| |
|
|
|
|
| |
| |
|
|
"Bill Pragnell" <bil### [at] hotmailcom> wrote:
> What ho
>
> Bill
Good start.
What exact difficulties are you having?
Try to follow the tutorial exactly. The point matching and masking are the
trickiest parts to master I find.
A few minor points:
-When taking your pics, try to make the camera level in all directions (not
absolutely necessary, but it certainly makes things easier in my opinion.
-Use HDR shop to make sure the images are aligned perfectly. Open all of one
series, maiximize the windows, then centre all images (5 on the keypad). You
can then flick back and forth between each pic and use the
"Image/Transform/Shift w/wrap" function in HDR shop to align each one, using
one as a starting reference. Even one pixel shift can help if necessary.
-Do this alignment before cropping.
-Try to match resolutions with your two combined HDRs and the masking image.
Scale smoothly. I always scale up to the largest.
- I use the mask provided and scale it accordingly
- After youve successfully created your full HDR probe, it is still in
mirrorball, transform to Lat/Long. I like to keep the height the same as the
mirrorball resolutions and the width double that (eg 500x500 mirroball ->
1000x500 Lat/Long)
Maybe post some details of your difficulties, or if you'd like you can email me
directly.
-tgq
Post a reply to this message
|
|
| |
| |
|
|
|
|
| |
| |
|
|
"Bill Pragnell" <bil### [at] hotmailcom> wrote:
> Bill
If you can, can you make the HDRs available for DLing and testing out?
-tgq
Post a reply to this message
|
|
| |
| |
|
|
|
|
| |
| |
|
|
"Trevor G Quayle" <Tin### [at] hotmailcom> wrote:
> -Use HDR shop to make sure the images are aligned perfectly. Open all of one
> series, maiximize the windows, then centre all images (5 on the keypad). You
> can then flick back and forth between each pic and use the
> "Image/Transform/Shift w/wrap" function in HDR shop to align each one, using
> one as a starting reference. Even one pixel shift can help if necessary.
Do you mean the bracketed series before combination? There's no problem here,
the HDRs I'm getting are very sharp.
> -Try to match resolutions with your two combined HDRs and the masking image.
> Scale smoothly. I always scale up to the largest.
Yup, am doing. I scale down to the smaller one, but it's usually only different
by a dozen pixels or so. I make the mask by painting on a layer over the
rotated image to wipe out the unwanted areas, then clearing the lower layer to
black, merging and blurring.
> - I use the mask provided and scale it accordingly
I never thought of that. However, my shadow can be anywhere, and my tripod head
gets in the way quite a bit.
> - After youve successfully created your full HDR probe, it is still in
> mirrorball, transform to Lat/Long. I like to keep the height the same as the
> mirrorball resolutions and the width double that (eg 500x500 mirroball ->
> 1000x500 Lat/Long)
Hmm, I've been unwrapping to angular and rotating at the same time, as per the
tutorial. Do you think keeping it in the mirrorball projection would be better
for matching and blending? Or do you really mean angular ;-) ?
I'm using megapov, so I figured using the angular map would be fine for the time
being. I'll probably supply both projections when I get a collection going.
> Maybe post some details of your difficulties, or if you'd like you can email
> me directly.
I'll try post an example of the problem later today... it's slight, but enough
of a mismatch to be annoying. If it's an interior environment, straight lines
of walls/windows etc end up broken. Maybe I'm too much of a perfectionist!
Bill
Post a reply to this message
|
|
| |
| |
|
|
|
|
| |
| |
|
|
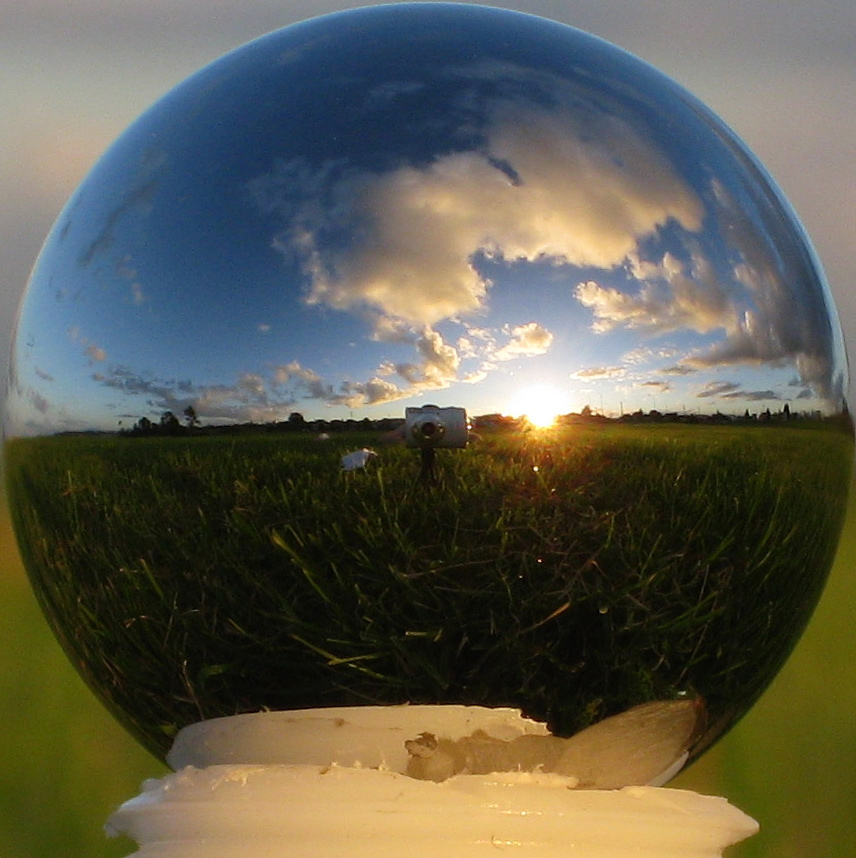
One of my shots - to give you an idea of the source material I'm getting with a
1 inch ball.
Cheers,
Edouard.
Post a reply to this message
Attachments:
Download 'img_8257.jpg' (252 KB)
Preview of image 'img_8257.jpg'

|
|
| |
| |
|
|
|
|
| |
| |
|
|
"Edouard" <pov### [at] edouardinfo> wrote:
> One of my shots - to give you an idea of the source material I'm getting with a
> 1 inch ball.
That's great - much clearer than I've managed so far even with my bigger ball. I
really need to polish it and investigate that focus override... :)
Post a reply to this message
|
|
| |
| |
|
|
|
|
| |
| |
|
|
"Bill Pragnell" <bil### [at] hotmailcom> wrote:
> "Trevor G Quayle" <Tin### [at] hotmailcom> wrote:
> > -Use HDR shop to make sure the images are aligned perfectly. Open all of one
> > series, maiximize the windows, then centre all images (5 on the keypad). You
> > can then flick back and forth between each pic and use the
> > "Image/Transform/Shift w/wrap" function in HDR shop to align each one, using
> > one as a starting reference. Even one pixel shift can help if necessary.
>
> Do you mean the bracketed series before combination? There's no problem here,
> the HDRs I'm getting are very sharp.
>
Yes, I mean the bracketed shots. But it sounds like you arent having a problem
here.
> > -Try to match resolutions with your two combined HDRs and the masking image.
> > Scale smoothly. I always scale up to the largest.
>
> Yup, am doing. I scale down to the smaller one, but it's usually only different
> by a dozen pixels or so. I make the mask by painting on a layer over the
> rotated image to wipe out the unwanted areas, then clearing the lower layer to
> black, merging and blurring.
>
> > - I use the mask provided and scale it accordingly
>
> I never thought of that. However, my shadow can be anywhere, and my tripod head
> gets in the way quite a bit.
>
If you can do it, a custom mask is probably the best as you can tailor it to the
specific areas you want to remove. However, typically it's the center and back
of the image that always need to be removed. Unwanted shadows can be an
additional problem though. I like to use a delay on my CHDK bracketing so I
can get myself and shadow out of the shot as much as possible (hide or move
further back so you are smaller)
> > - After youve successfully created your full HDR probe, it is still in
> > mirrorball, transform to Lat/Long. I like to keep the height the same as the
> > mirrorball resolutions and the width double that (eg 500x500 mirroball ->
> > 1000x500 Lat/Long)
>
> Hmm, I've been unwrapping to angular and rotating at the same time, as per the
> tutorial. Do you think keeping it in the mirrorball projection would be better
> for matching and blending? Or do you really mean angular ;-) ?
>
> I'm using megapov, so I figured using the angular map would be fine for the time
> being. I'll probably supply both projections when I get a collection going.
No wrapping and rotating at the same time is fine. I still would always
recommend Lat/Long format over angular.
>
> > Maybe post some details of your difficulties, or if you'd like you can email
> > me directly.
>
> I'll try post an example of the problem later today... it's slight, but enough
> of a mismatch to be annoying. If it's an interior environment, straight lines
> of walls/windows etc end up broken. Maybe I'm too much of a perfectionist!
>
> Bill
It will help to see what you see as the issue.
It may be that you are being too much of a perfectionist. Note that the larger
the ball and the closer the scene or objects in the scene are to the ball, the
greater the parallax errors are going to be (i.e. lines not lining up) This is
particularly the case in indoor shots, where the whole environment tends to be
closer to the ball. Make sure your mask has an appropriate blur to help hide
these imperfections.
-tgq
Post a reply to this message
|
|
| |
| |
|
|
|
|
| |
| |
|
|
"Trevor G Quayle" <Tin### [at] hotmailcom> wrote:
> Unwanted shadows can be an
> additional problem though. I like to use a delay on my CHDK bracketing so I
> can get myself and shadow out of the shot as much as possible (hide or move
> further back so you are smaller)
Another good idea.
> No wrapping and rotating at the same time is fine. I still would always
> recommend Lat/Long format over angular.
Any particular reason? Does this projection preserve more information? I expect
I can still do the blending in HDRSHop... ?
> It may be that you are being too much of a perfectionist.
Wouldn't be the first time ;-)
> Note that the larger
> the ball and the closer the scene or objects in the scene are to the ball, the
> greater the parallax errors are going to be (i.e. lines not lining up) This is
> particularly the case in indoor shots, where the whole environment tends to be
> closer to the ball.
This is as I suspected. It feels reminiscent of the parallax ghosting one sees
with handheld-shot panoramas. The worst example was when I had the ball sitting
on a window-sill, but it's still noticeable in the middle of a room.
Bill
Post a reply to this message
|
|
| |
| |
|
|
|
|
| |
|
|