 |
 |
|
 |
|
 |
|  |
|  |
|
 |
From: Thomas de Groot
Subject: Revisiting Norbert Kern's Position Pattern Trick
Date: 11 Jul 2018 07:22:03
Message: <5b45e85b@news.povray.org>
|
|
 |
|  |
|  |
|
 |
I refer to Norbert's 2012 message
http://news.povray.org/povray.binaries.images/thread/%3C4f661a38%241%40news.povray.org%3E/
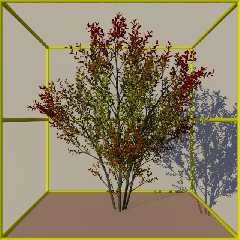
I wanted to find out by myself how to model an autumn tree/shrub, using
the mesh2 file provided by Poseray as a basis. So, I did not use
Norbert's trick here. And indeed, like Nobert said, the render speed
dropped dramatically, but at least I understand texture patterning
better. As an example I used an Xfrog shrub (Cotoneaster integerriums -
Wild cotoneaster). The image is from my tree testing code.
For those interested, here is the code used (beware line breaks):
//start code
//=================================================================
#declare Obj_Leaf_ =
//The leaf image_map:
#declare PR_DIFFUSE = pigment {p_map2}
//Two colour variations using Poseray's pigment_multiply macro:
#declare PR_DIFFUSE1 = pigment {pigment_multiply(PR_DIFFUSE,
pigment{color srgb ((<1.00, 1.00, 0.00>-<1,1,1>)*1.00+<1,1,1>) })}
#declare PR_DIFFUSE2 = pigment {pigment_multiply(PR_DIFFUSE, pigment
{color srgb ((<1.00, 0.00, 0.00>-<1,1,1>)*1.00+<1,1,1>) })}
//A facultative uv-map scaling that may be set in Poseray:
#declare PatternScale = <1.25, 1.25, 1>;
//Finish decalration:
#declare F1 =
finish {
specular 0.2
roughness 0.001
diffuse 0.8
reflection {0 }
conserve_energy
}
//First texture definition with variation 1 of the leaf image_map:
#declare T1 =
texture {
pigment {uv_mapping PR_DIFFUSE1 scale PatternScale }
finish {F1}
}
//Second texture definition with variation 2 of the leaf image_map:
#declare T2 =
texture {
pigment {uv_mapping PR_DIFFUSE2 scale PatternScale }
finish {F1}
}
//A general transparency texture definition:
#declare T3 =
texture {
pigment {rgbft <0, 0, 0, 1, 1> }
}
//First patterned texture definition using a leaf mask image_map:
#declare T4 =
texture {/*uv_mapping*/
pigment_pattern {uv_mapping p_map3 scale PatternScale }
texture_map {
[0 T3]
[1 T1]
}
}
//Second patterned texture definition using a leaf mask image_map:
#declare T5 =
texture {/*uv_mapping*/
pigment_pattern {uv_mapping p_map3 scale PatternScale }
texture_map {
[0 T3]
[1 T2]
}
}
//Final material bringing it all together in a spherical texture pattern:
material {
texture {
spherical
texture_map {
[0.10 T5]
[0.90 T4]
}
translate 1*y //the spherical pattern is at the origin; you need
to position it
warp {turbulence 0.3} //some warp makes the pattern more natural
looking
}
}
//=================================================================
//end code
--
Thomas
Post a reply to this message
Attachments:
Download 'povtree_test.jpg' (256 KB)
Preview of image 'povtree_test.jpg'

|
 |
|  |
|  |
|
 |
|
 |
|  |
|  |
|
 |
Nice!
Thanks for posting this, Thomas. I was pondering how to go about this last
autumn, and perhaps if I can ever get ngPlant up and running, and have enough
time, I can actually get around to making some outdoor scenes.
Can you provide a little bit of background / explanation about the first few
lines and the PoseRay macros... ?
Thanks
Post a reply to this message
|
 |
|  |
|  |
|
 |
From: Thomas de Groot
Subject: Re: Revisiting Norbert Kern's Position Pattern Trick
Date: 13 Jul 2018 02:49:25
Message: <5b484b75$1@news.povray.org>
|
|
 |
|  |
|  |
|
 |
On 12-7-2018 16:14, Bald Eagle wrote:
> Nice!
>
> Thanks for posting this, Thomas. I was pondering how to go about this last
> autumn, and perhaps if I can ever get ngPlant up and running, and have enough
> time, I can actually get around to making some outdoor scenes.
>
> Can you provide a little bit of background / explanation about the first few
> lines and the PoseRay macros... ?
>
> Thanks
>
No problem.
1) The Poseray macros are those which are included standard in any
material include file when exporting from Poseray to POV-Ray. It is fun
to play with them and I recommend to do it. The only macro
'automatically' and widely used by Poseray is the pigment_multiply()
one. The way in which this is done changed somewhat with the Poseray
version. Originally, it was used in the form, e.g.:
#declare PR_DIFFUSE = pigment {p_map2}
#declare PR_DIFFUSE = pigment {pigment_multiply(PR_DIFFUSE,
pigment{MyPigment})}
Where MyPigment was defined under the Poseray Materials tab by setting
the Color and Filtering values for the used Pigment (aka image_map).
In the latest Poseray version, the exported use of the macro is as shown
in my code:
#declare PR_DIFFUSE = pigment {p_map2}
#declare PR_DIFFUSE = pigment {pigment_multiply(PR_DIFFUSE, pigment
{color srgb ((<MyColor>-<1,1,1>)*MyFilter+<1,1,1>) })}
Where MyColor and MyFilter are respectively the Color and Filtering
values set in Poseray and mentioned above. I suppose FlyerX has good
reasons for this change of code ;-)
2) Now you can understand what I did. I declared two different diffuses
with a simple yellow and red colour code respectively. I declared
separately a scale vector for the uv map, which I had set previously
under the Poseray Materials tab, under the Transform... button.
For this example, I kept as much as possible the writing style of
Poseray. You may adapt that to your own preferences of course, which I
do all the time.
--
Thomas
Post a reply to this message
|
 |
|  |
|  |
|
 |
From: Thomas de Groot
Subject: Re: Revisiting Norbert Kern's Position Pattern Trick
Date: 13 Jul 2018 02:59:18
Message: <5b484dc6$1@news.povray.org>
|
|
 |
|  |
|  |
|
 |
On 11-7-2018 13:21, Thomas de Groot wrote:
> I refer to Norbert's 2012 message
>
http://news.povray.org/povray.binaries.images/thread/%3C4f661a38%241%40news.povray.org%3E/
>
My next goal of course is to work my way through Norbert's instructions
and compare. Originally, I had thought I could get away with simply
tweaking the mesh2{} files and bypass the need for intermediate mesh{}
files, but I begin slowly to understand that that is not as easy as I
dreamed... Mesh2{} files are devilish.
All this with the ultimate goal of applying the trick to my Crossing
Border scene.
--
Thomas
Post a reply to this message
|
 |
|  |
|  |
|
 |
|
 |
|  |
|
 |


![]()