|
|
|
|
|
|
| |
| |
|
|
|
|
| |
| |
|
|
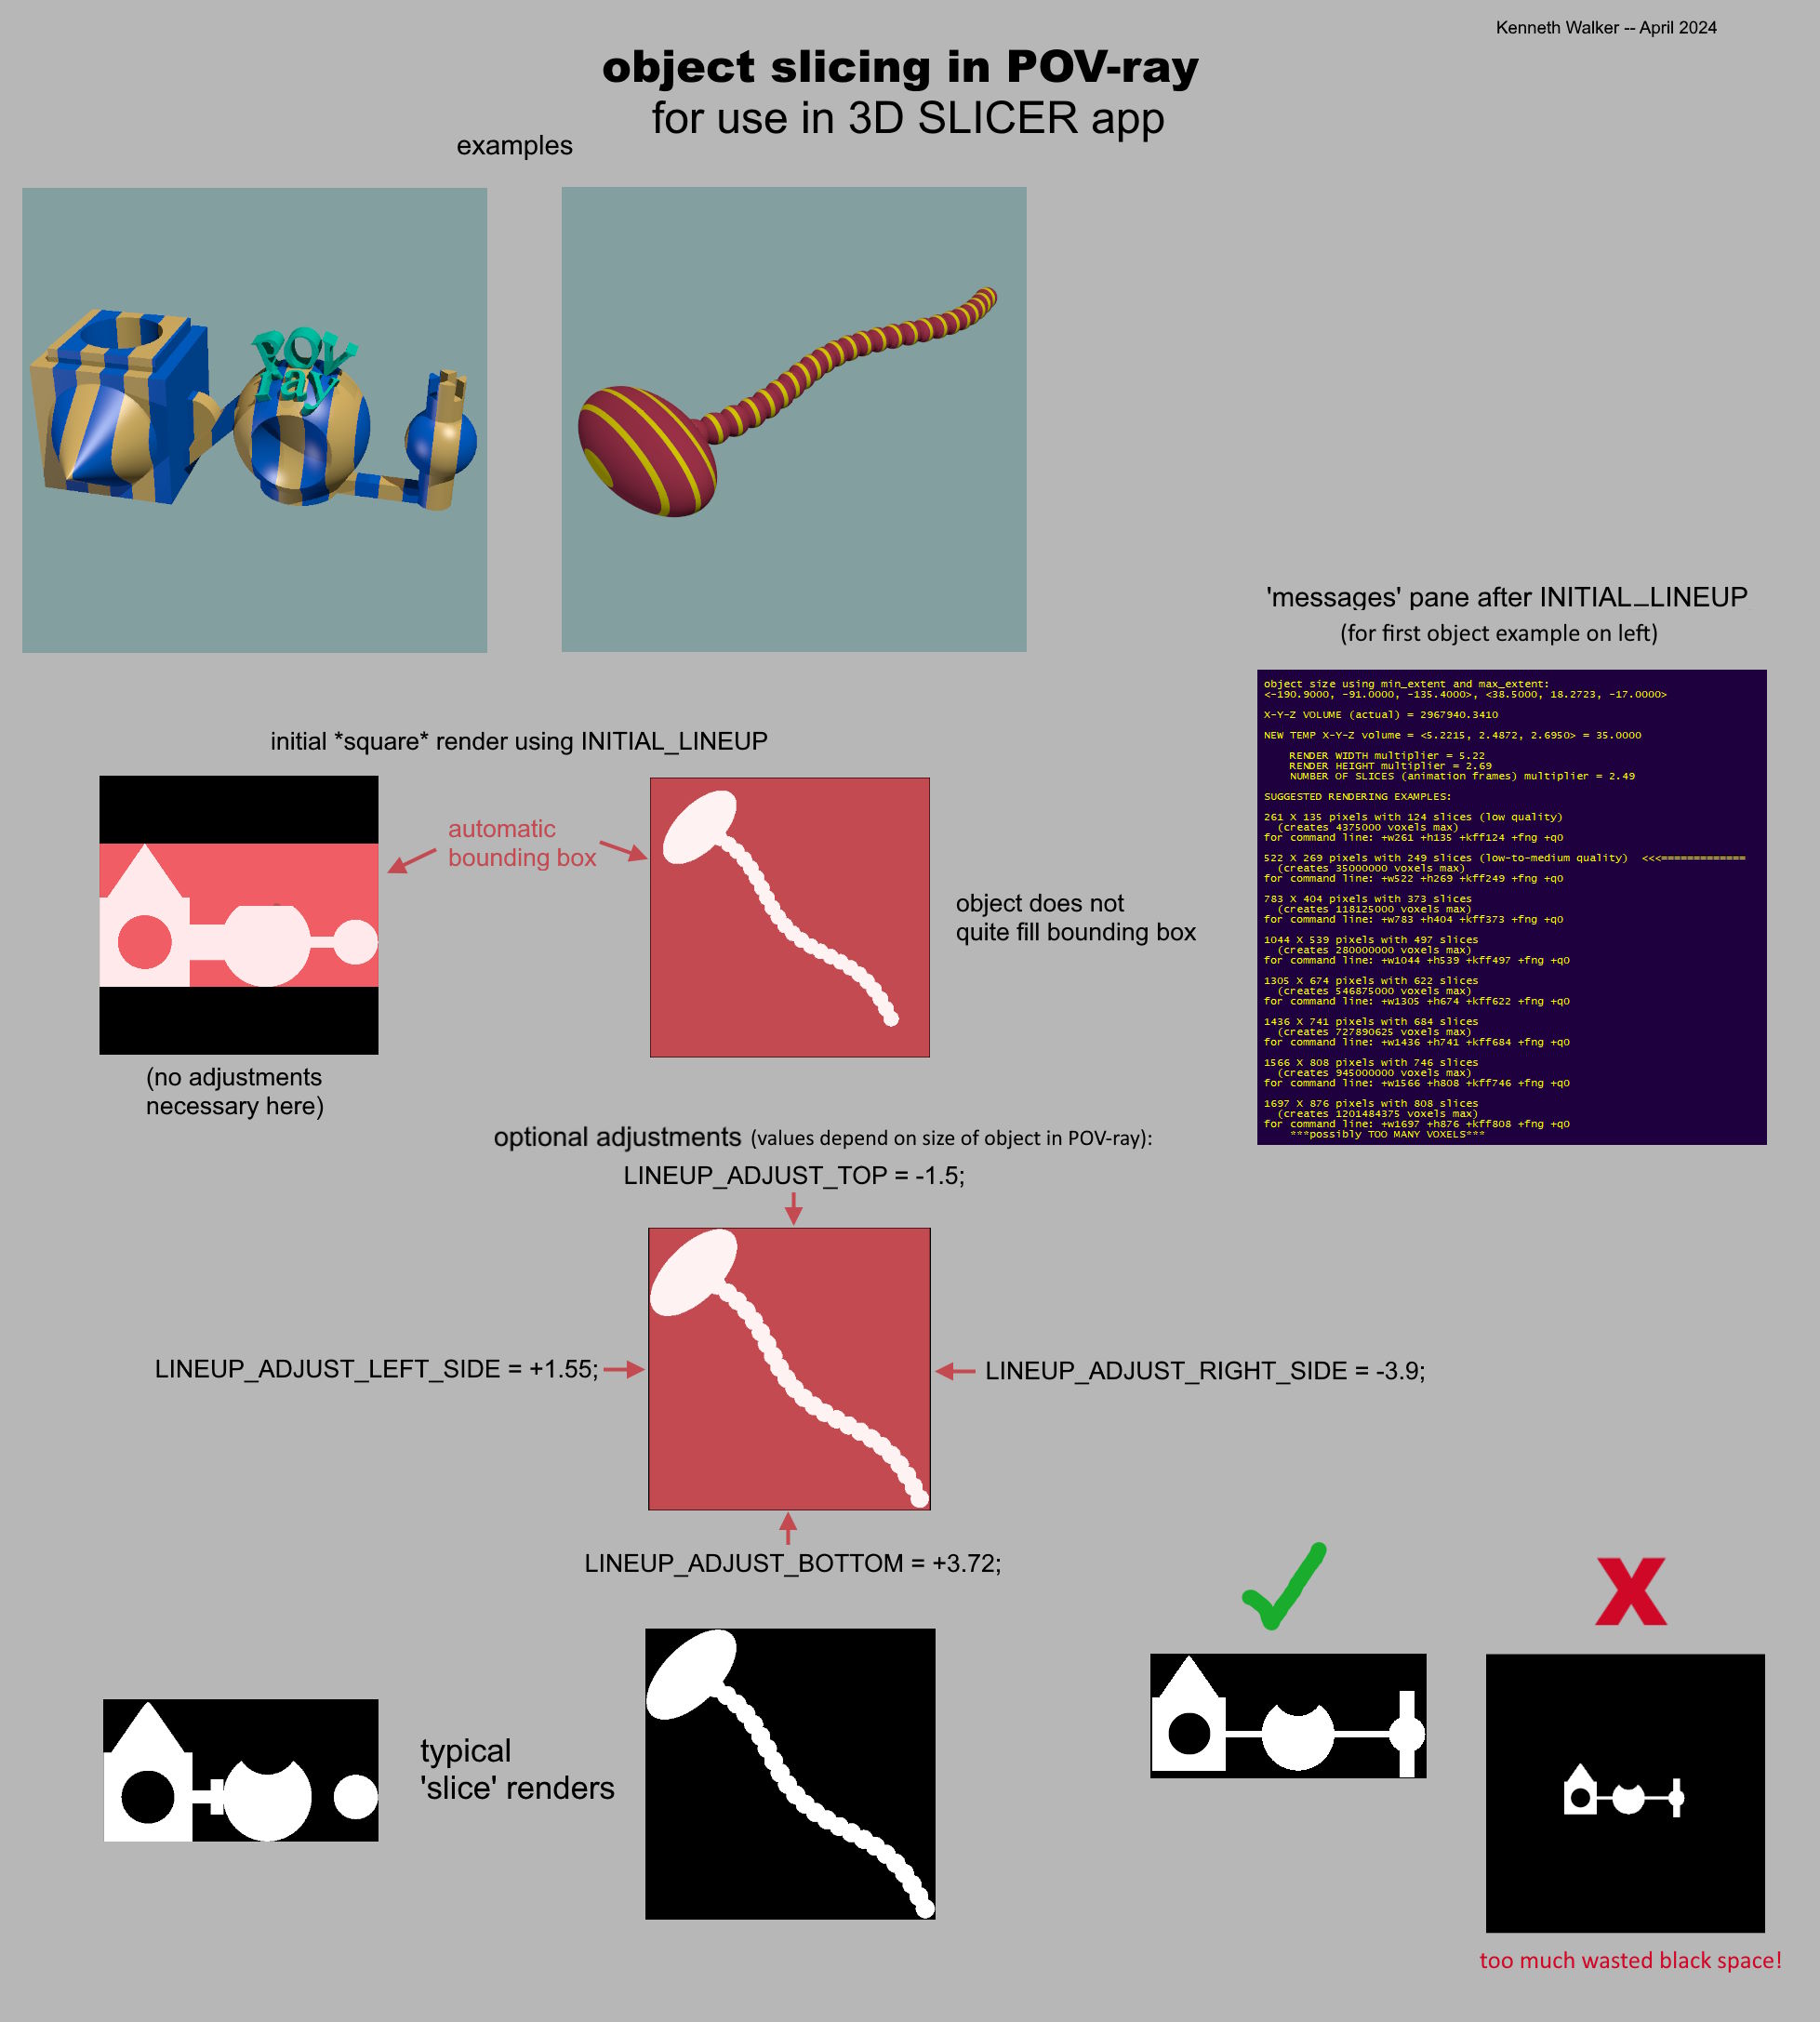
An image to help with the POV-ray slicing...
Post a reply to this message
Attachments:
Download 'object slicing in pov-ray kw 4_2024.jpg' (322 KB)
Preview of image 'object slicing in pov-ray kw 4_2024.jpg'

|
|
| |
| |
|
|
|
|
| |
| |
|
|
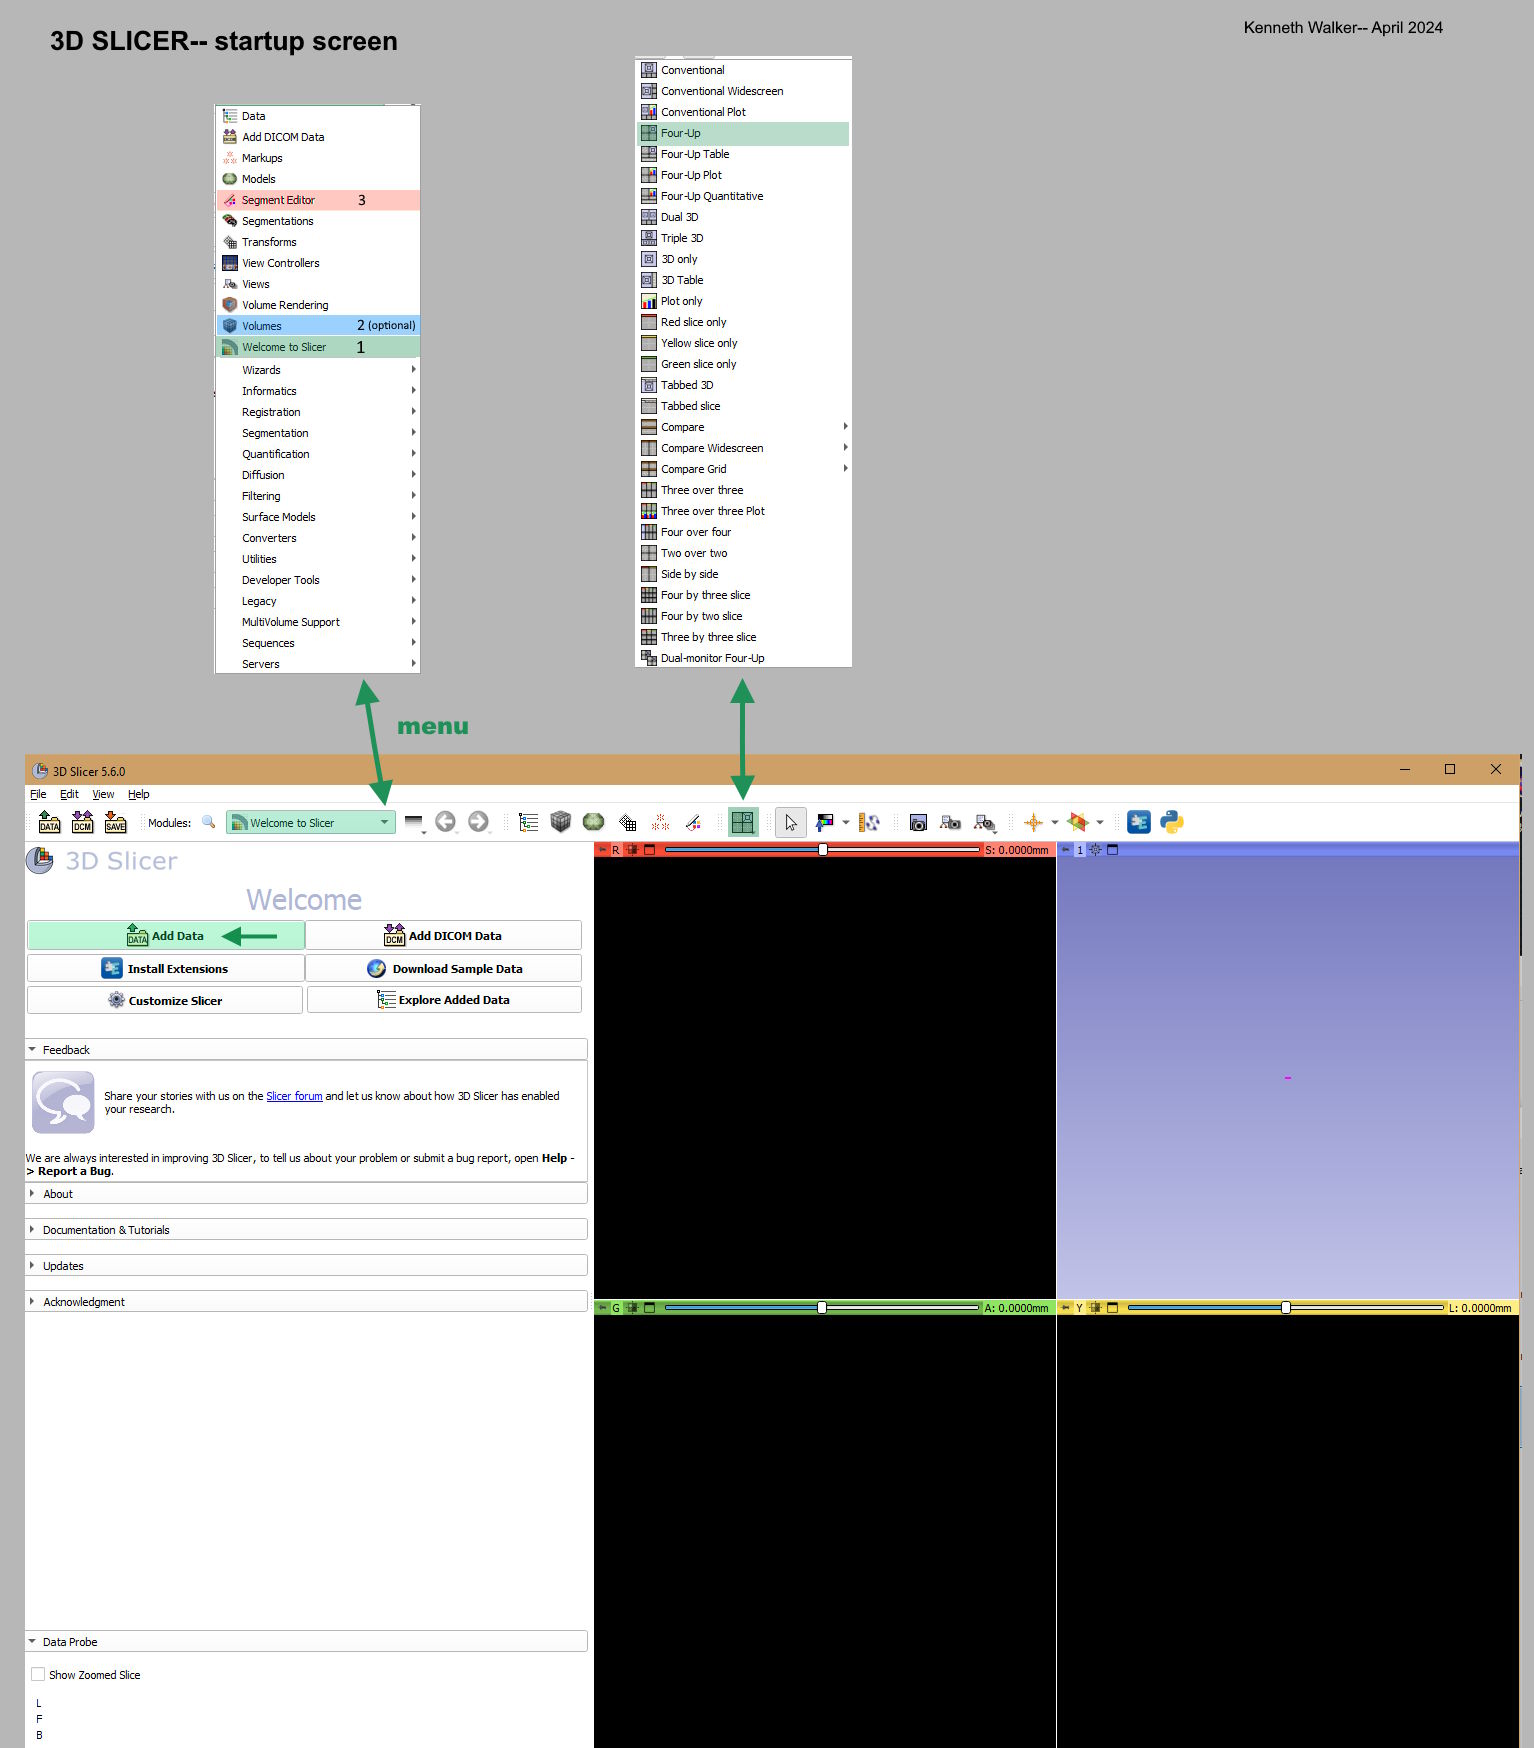
3D SLICER automatically starts up in its 'Welcome to Slicer' view; the attached
image is the start-up screen, with my annotations (as it appears in Windows 10.)
It's a large app, so give it time to load. You should see four blank view-panes
to the right. If not, go to the top row of icons and choose the 'Four-up'
working view from a pull-down menu.
The large 'Add Data' button on this opening page will be used to import your
previously-rendered image slices.
Only THREE of the app's core 'modules' will need to be used for the entire
process, and in a simple way:
'Welcome to Slicer' (the first module)
'Volumes' (which is optional)
'Segment Editor'
(The 'Welcome to Slicer' icon at the top has a menu; we will use that later to
choose the other modules.)
In this screenshot and those to follow, only the details with my annotations are
important; the rest of the app's features can be ignored.
Post a reply to this message
Attachments:
Download '3d slicer startup view.jpg' (215 KB)
Preview of image '3d slicer startup view.jpg'
|
|
| |
| |
|
|
|
|
| |
| |
|
|
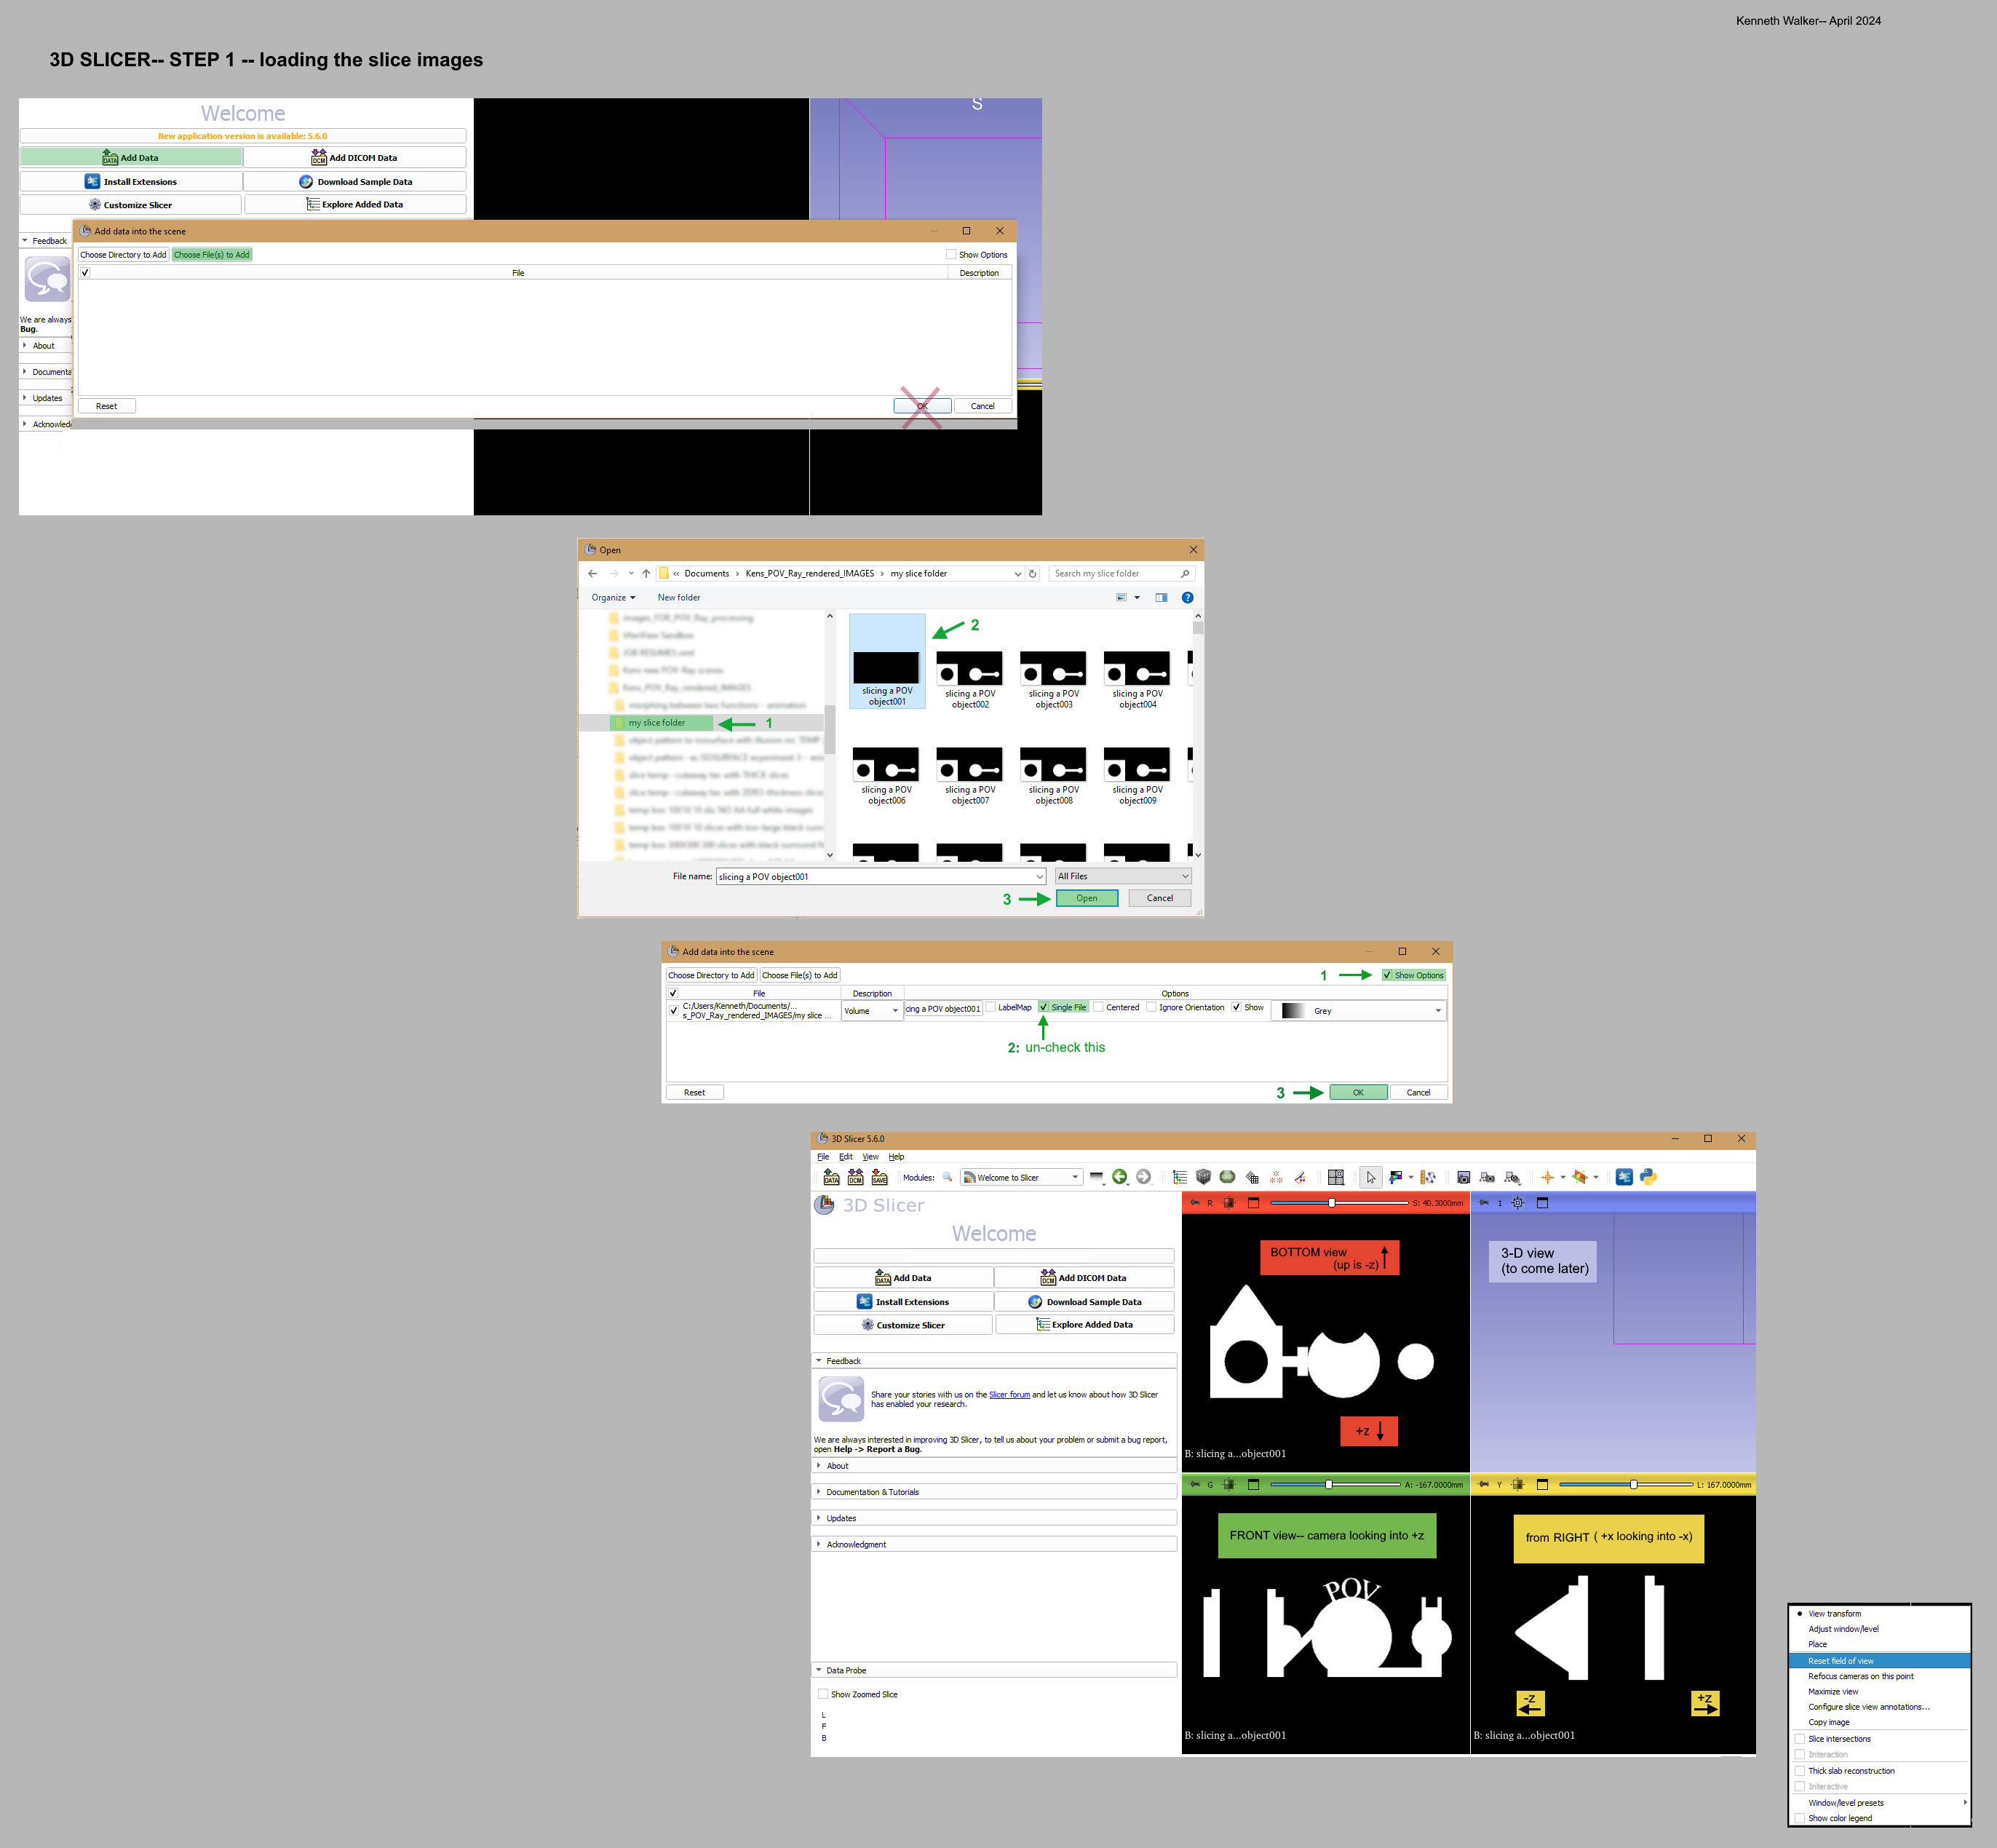
3D SLICER app-- STEP 1: importing the image slices
See the attached image as a guide.
(If you find that something does not appear to work correctly or if you make a
mistake, simply go to the main 'File' menu at top, choose 'Close Scene', and
start over.)
A) The large 'Add Data' button is used to import the slice images. The window
that comes up needs to be expanded left/right on your monitor, to see some of
the details that will eventually appear.
B) Click on 'Choose file(s) to add', and search for the folder with your slice
images. When you click on that, the slices will appear in a separate window.
Click on the first image there, and then 'Open'. That window will close, and the
first image's file path will appear in A)'s still-open window.
C) Click the small 'Show Options' box in that window in the upper right corner,
which brings up more choices. Then *UN-check* the 'Single file' box, and hit
'OK'. Give the slices time to load.
The slices will show up as the re-created model! In three orthographic views (no
3-D view yet). The sliders at the top of the three view-panes can be used to
cycle through the slices/voxels.
(3D SLICER does not use conventional x,y,z axes for the view-panes-- or even
up/down, left/right-- but medical terminology instead. The individual views'
orientations depend on the original POV-ray camera direction, which was looking
up from below. In the attached image, I have re-labeled the view-panes to make
them understandable.)
---- END OF STEP 1 ----
Step 2 will follow...
-------------
If any of the three object-slice previews seems to disappear, right-click on the
view to bring up a menu; choose 'Reset field of view'.
For moving the camera around in the orthographic view-panes (and later 3-D
preview):
GLOBAL ROTATIONS around the centerpoint: left mouse button click/drag (3-D view
only)
ZOOM: right mouse button click/drag
ROTATING clockwise/counterclockwise: Ctrl+left mouse button click/drag (3-D view
only)
PANNING up-down/left-right: Shift+left mouse button click/drag
Post a reply to this message
Attachments:
Download '3d slicer step 1-- importing the images kw 4_2024.jpg' (449 KB)
Preview of image '3d slicer step 1-- importing the images kw 4_2024.jpg'

|
|
| |
| |
|
|
|
|
| |
| |
|
|
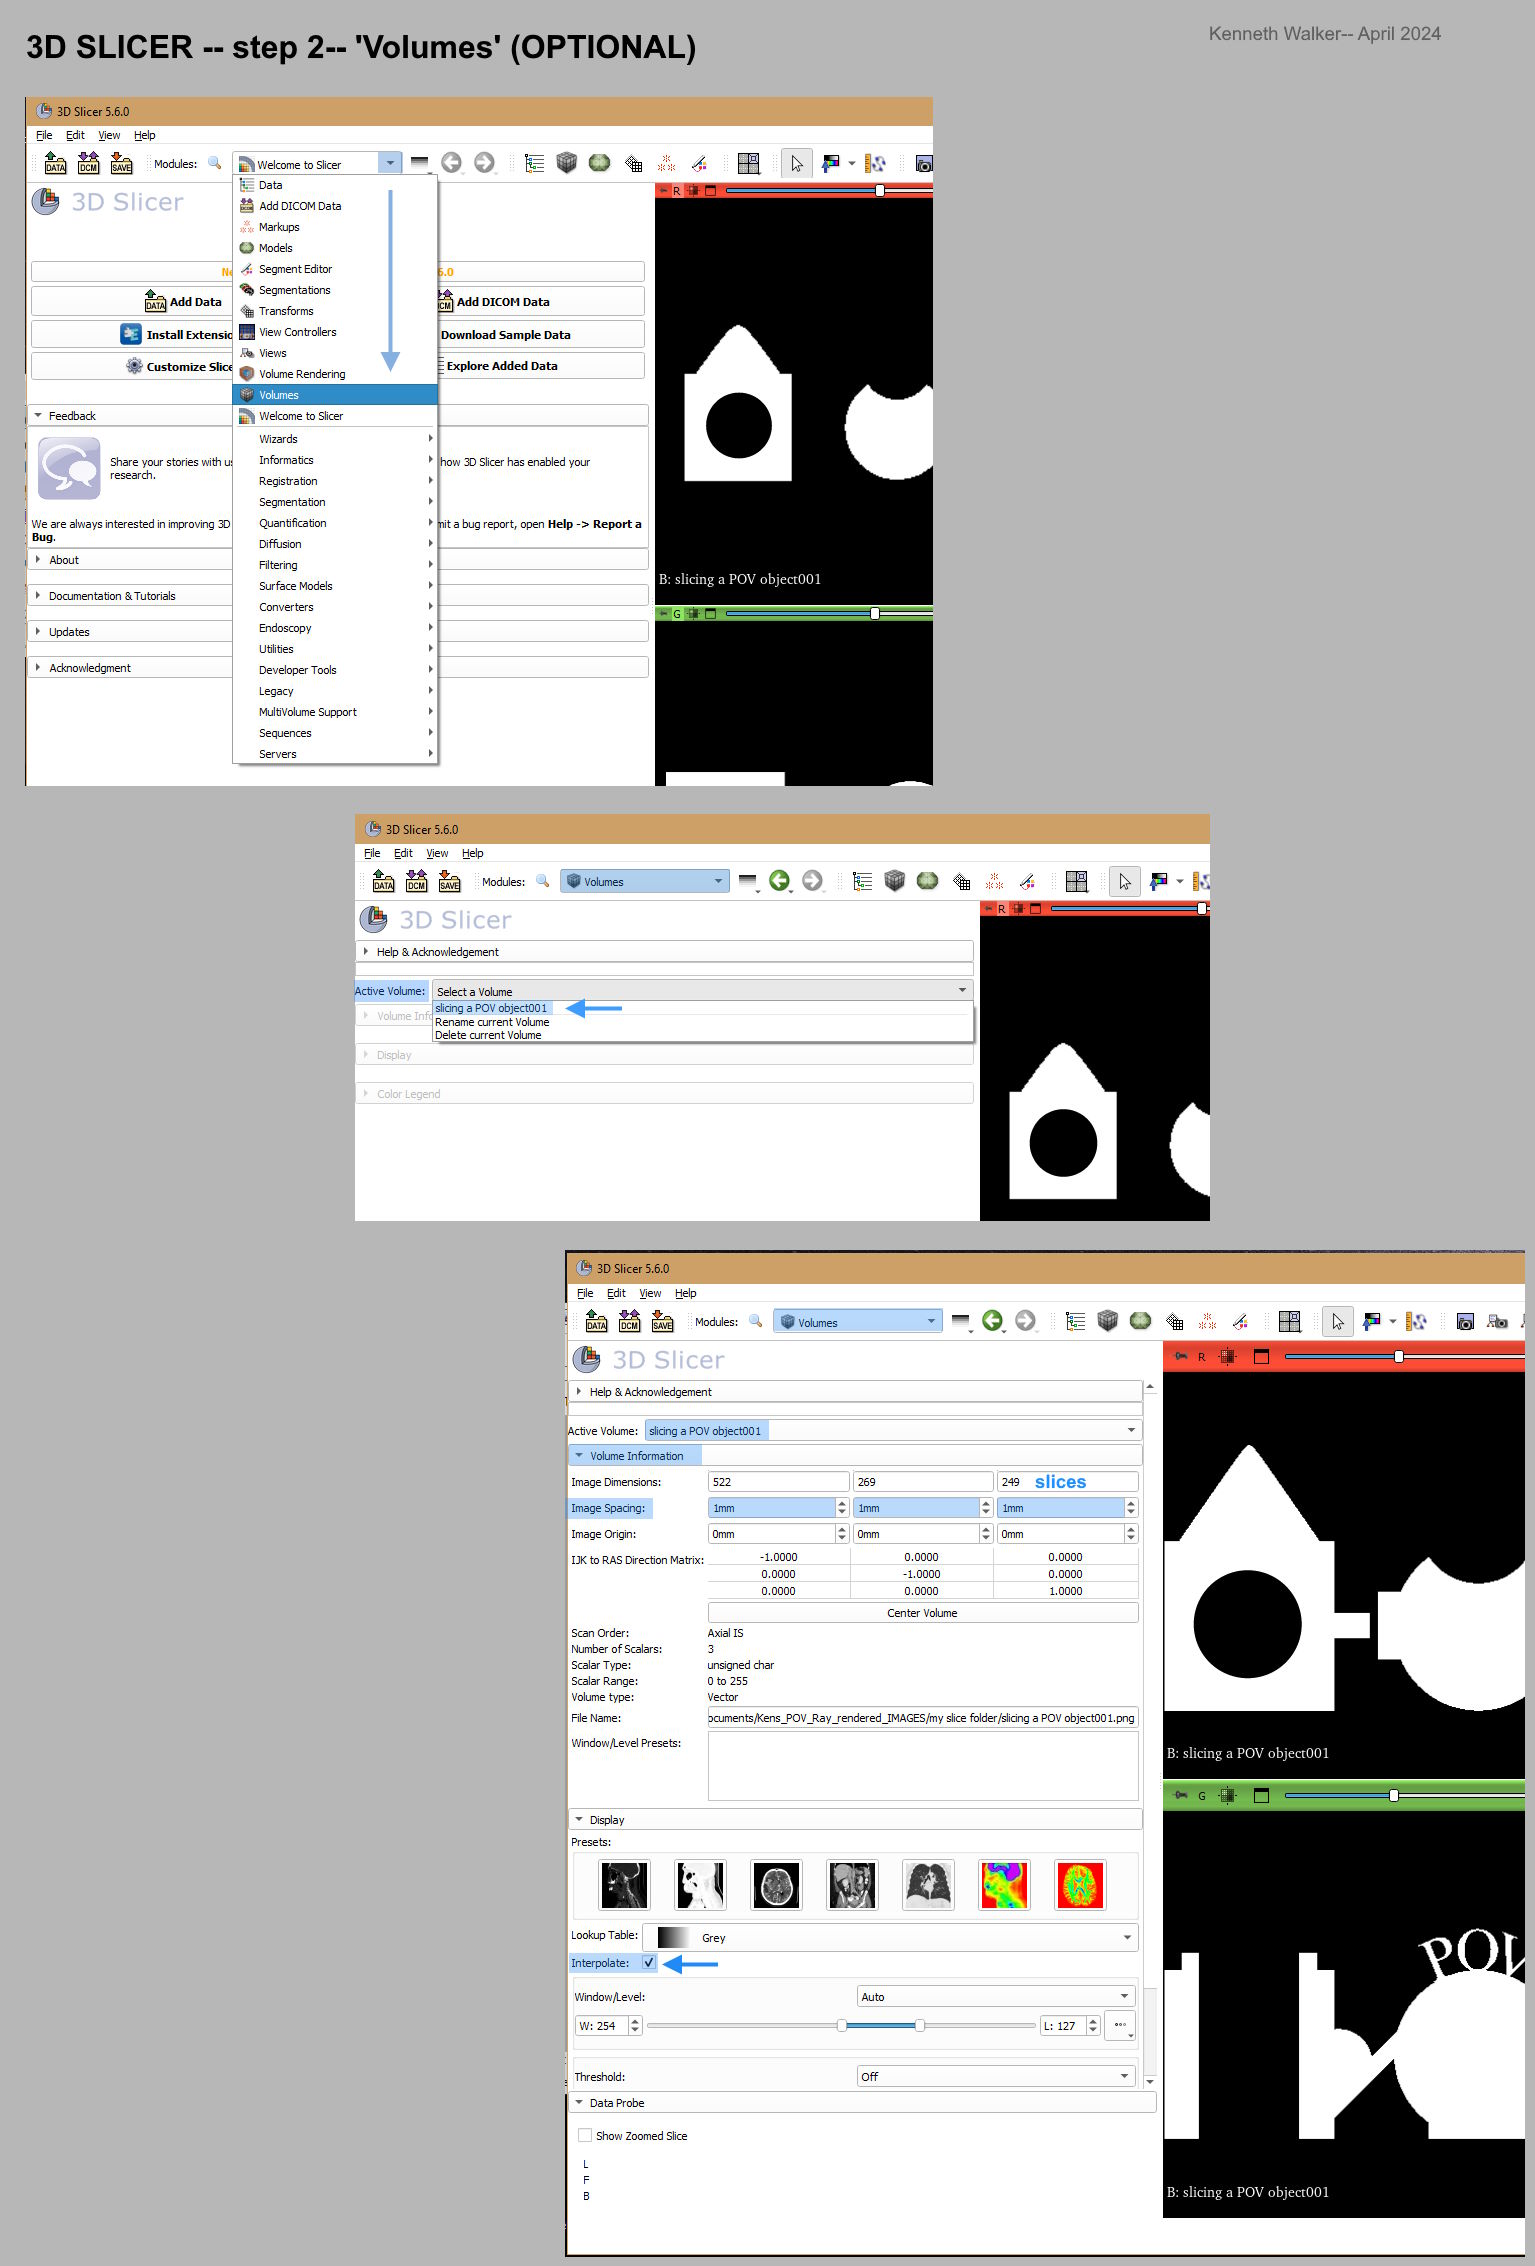
3D SLICER STEP 2-- the 'Volumes' module (COMPLETELY OPTIONAL)
At the 'Welcome to Slicer' icon (menu) at the top, choose the 'Volumes' module
instead. The window that appears has some interesting features.
At 'Active Volume', you should see the name of the first image slice you opened
previously. If not, 'Select a volume' there and choose that image name from the
options. This opens a partial data field.
Look for a little checked 'interpolation' box; this is ON by default, and
slightly smooths the three orthographic views. You can turn this off the see the
raw image-slice pixels. This interpolation does NOT affect the (later) 3-D view,
or the final model output; it's just for previewing.
Now click on the little arrow at 'Volume information' to open its sub-menu. The
three 'Image Spacing' boxes that appear are for varying the default 1X1X1mm
voxel size of the app-- should you have a need for that, or to correct any
out-of-shape proportions of your model. Essentially, you can squash-and-stretch
the model here, and the three view-panes update automatically. However, this
simply stretches or distorts the individual voxels-- and the final .stl
triangles; no new ones are created. (I think there is a slight bug when trying
to enter fractional values; the cursor caret does not behave well, compared to a
traditional word processor.)
------ END OF OPTIONAL STEP 2------
Post a reply to this message
Attachments:
Download '3d slicer step 2-- volumes-- optional-- kw 4_2024.jpg' (342 KB)
Preview of image '3d slicer step 2-- volumes-- optional-- kw 4_2024.jpg'

|
|
| |
| |
|
|
|
|
| |
| |
|
|
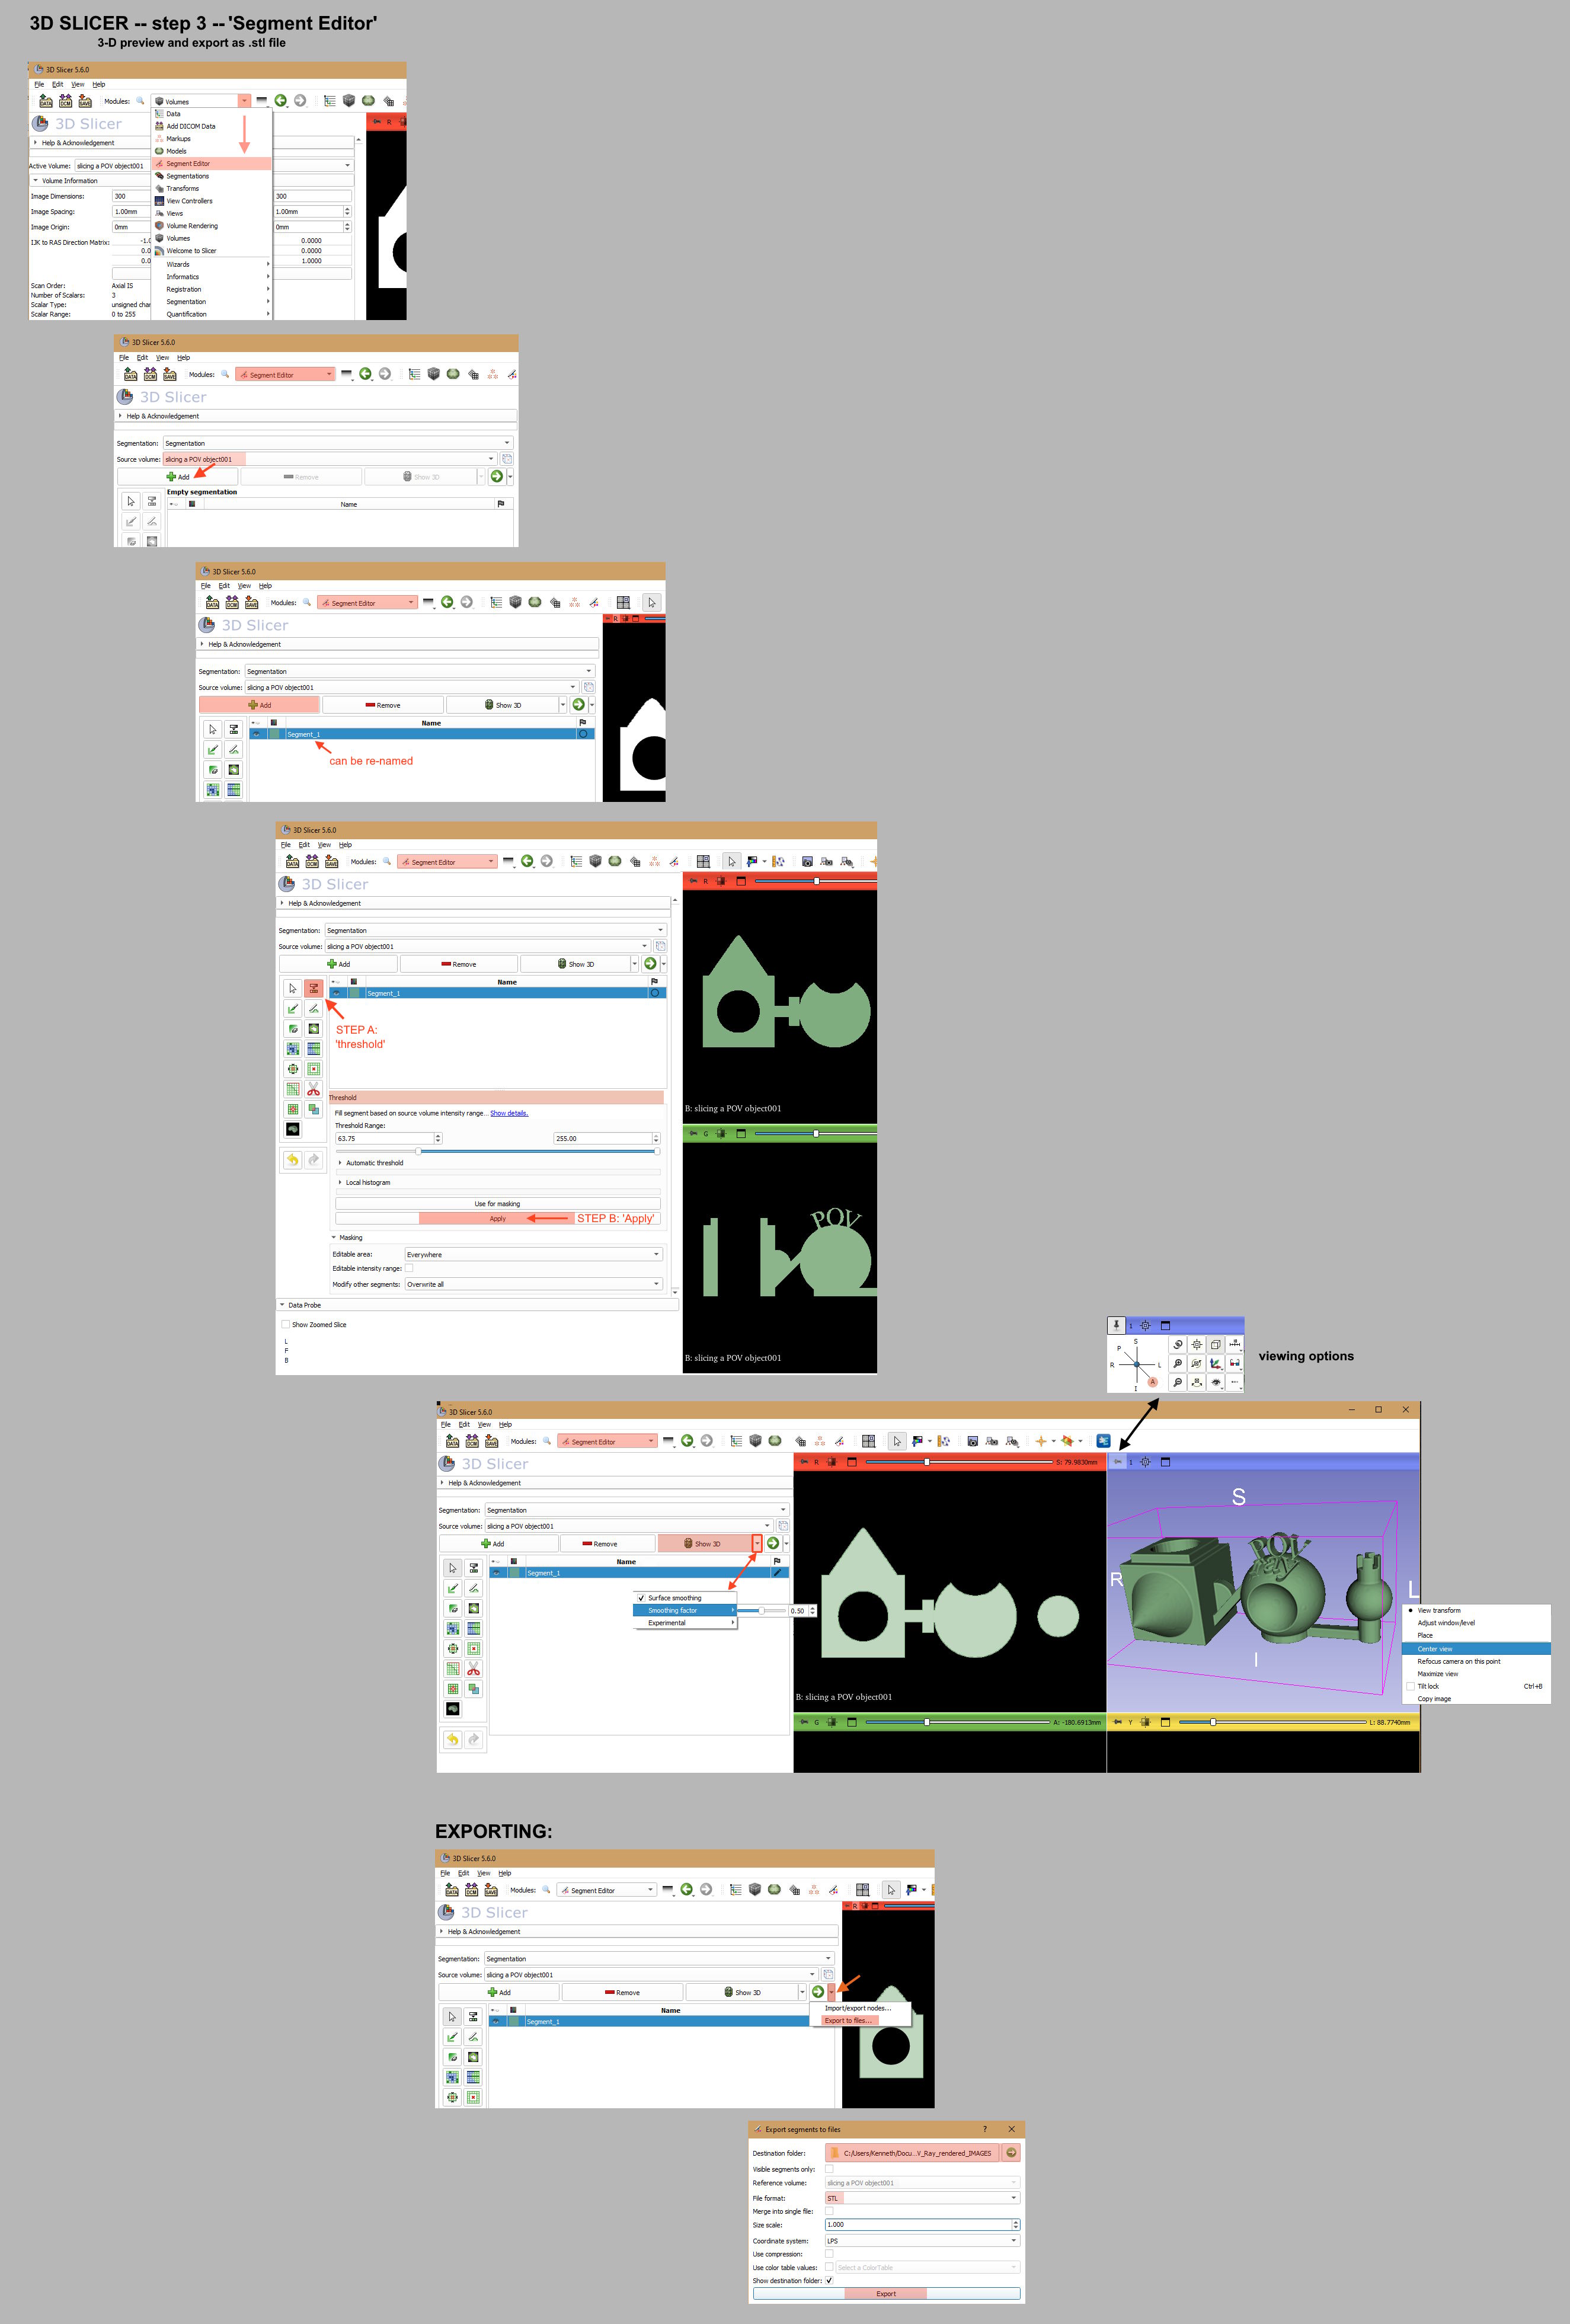
3D SLICER STEP 3-- The 3-D preview, and exporting the .stl printer file.
See the attached image as a guide.
From the original 'Welcome to Slicer' menu at the top, choose 'Segment Editor'
instead. This is where the 3-D preview is generated, and where the recreated
voxel model is exported as an .stl triangle-mesh file for 3-D printing.
A) In the 'Source volume' box, the name of your first chosen slice image will
automatically appear.
B) Press the large '+Add' button. An entry line will appear called 'Segment_1'.
This will eventually be the default name of your exported file, but you can
double-click on it here to re-name it as anything you like.
C) Next to that line on the immediate left is an icon (one of many); this
particular icon looks like two horizontal bars or an = sign. It is called
'threshold', but you will need to hover your mouse over it to bring up the name.
Click on that (or you can use your keyboard's space bar to activate it.)
D) The three orthographic view-panes will start flashing green-- just the
'active' models parts, not the black background. A new data box will also
appear, with a 'threshold' slider, but that does not need adjusting because the
voxel-creation 'threshold' of our white-on-black image slices has been
automatically set. (This slider has an interesting use when CUTAWAY_TEXTURES has
been invoked in the original slicing code-- where the resulting gray-level
pixels can be incorporated as voxels or eliminated. But that will be described
later.)
E) Press the 'Apply' button in the lower data field. This essentially finalizes
the model, and the green flashing stops. (Be careful not to hit the space bar on
your keyboard after this step; it re-activates the 'threshold' icon...the green
blinking. To escape this, hit the space bar again.)
Now comes the 3-D view generation:
F) Press the 'Show 3D' button, and give the app time to generate the model. Once
it appears, right-click on that view-pane to bring up a menu and choose 'Center
view'. Now you can use your mouse to interactively rotate, zoom, etc. (Note
that this somewhat crude 3-D preview is not the higher-quality that will
eventually be printed.) At the top of the 3-D view are some icons; experiment
with those to see some interesting features.
At this point, the model's voxels have been automatically 'smoothed' by a
default amount of '0.5', but that can be changed:
G) To the immediate right of the 'Show 3D' button is a downward-pointing arrow.
Click on it to bring up the little 'smoothing' menu. The 'smoothing factor'
slider there can be adjusted between 0.0 and 1.0, and the 3-D view will update--
quickly or not-so-quickly, depending on the object. You will need to experiment
to choose which value is best for a particular model. My personal preference
when using *hi-rez* original slice images-- i.e. lots of created voxels-- is
between 0.5 and 1.0; even sharp edges are retained. [BTW: This smooths
individual voxels-- and thus the final .stl triangles, but by simply moving
their vertices; no finer-scale tessellated triangles are created.) Ideally,
sharp-edged objects should have zero smoothing, while curved surfaces should
have 0.5 to 1.0. Unfortunately, that's not possible, so a compromise is
required...but high resolution slice images (and more of them) makes this less
of a problem.]
The model is now ready to be exported as an .stl file:
H1) Of the three arrows to the right of the 'Show 3D' button, click on the
right-most arrow. Choose 'Export to files...' there; the export dialogue box
will appear. You will need to choose a suitable folder location for your file,
using the 'Destination folder' box; search by clicking in that box (not with the
green arrow.) Once chosen, 3D SLICER will remember that location in the future.
H2) Choose .stl as the 'File format', then press the 'Export' button.
***** FINISHED! *****
This is a binary file, not a text file. There is no choice of which, but it can
be easily converted in another app like Meshmixer--should you want to. (3D
SLICER can also export an .obj file, if you have a need to edit the model in
another app.)
-------------------
Before hitting the 'Show 3D' button, the initially empty 3-D view shows a 'cubic
volume' in red outlines...probably a default bounding-box. When the 3-D view is
activated, the object appears in the upper right quadrant of that volume-- in
the x/y/z 'positive space' quadrant-- instead of at the center. (Imagine
POV-ray's x/y/z origin planes going through the center of that cubic space.)
Apparently, a medical CT scan will be automatically centered in that cube(?)
because it has both 'positive and negative' values in its data-- probably based
on the central horizontal axis of the particular CT machine. Whereas, the
POV-ray image slices have pixels that are all 'positive values' so to speak, no
'negative pixels'. Thus the model initially shows up in the upper-right 'fully
positive' space. By centering the view in step F) above, the model is
re-centered within the red outlines (and in a more tight-fitting box).
There is a neat trick in this 'Segment Editor', after applying 'Show 3D': Press
and hold cntrl+left mouse button and slide the mouse from right to left in any
of the 3 orthographic views. The 3-D model becomes more or less transparent--
fully solid at the right, fully transparent at the left. You can see all of the
object's internal surfaces, like an x-ray! (This does not affect the final
export.)
Once you have done these 'Seqment Editor' steps, there is a way to determine how
many actual voxels have been created. 3D SLICER has 'extra' features in another
pull-down menu at the top called 'Modules'. Use the magnifying glass icon
there to open it, then search for the 'Segment Statistics' module. Open that,
then open 'Advanced' from the data field, then hit 'Apply'. (Afterward, to
close the statistics box that appeared, go back to the top of the app and choose
the 'Four-Up' view again.)
Post a reply to this message
Attachments:
Download '3d slicer step 3-- 3d preview and exporting-- kw 2024.jpg' (705 KB)
Preview of image '3d slicer step 3-- 3d preview and exporting-- kw 2024.jpg'

|
|
| |
| |
|
|
|
|
| |
| |
|
|
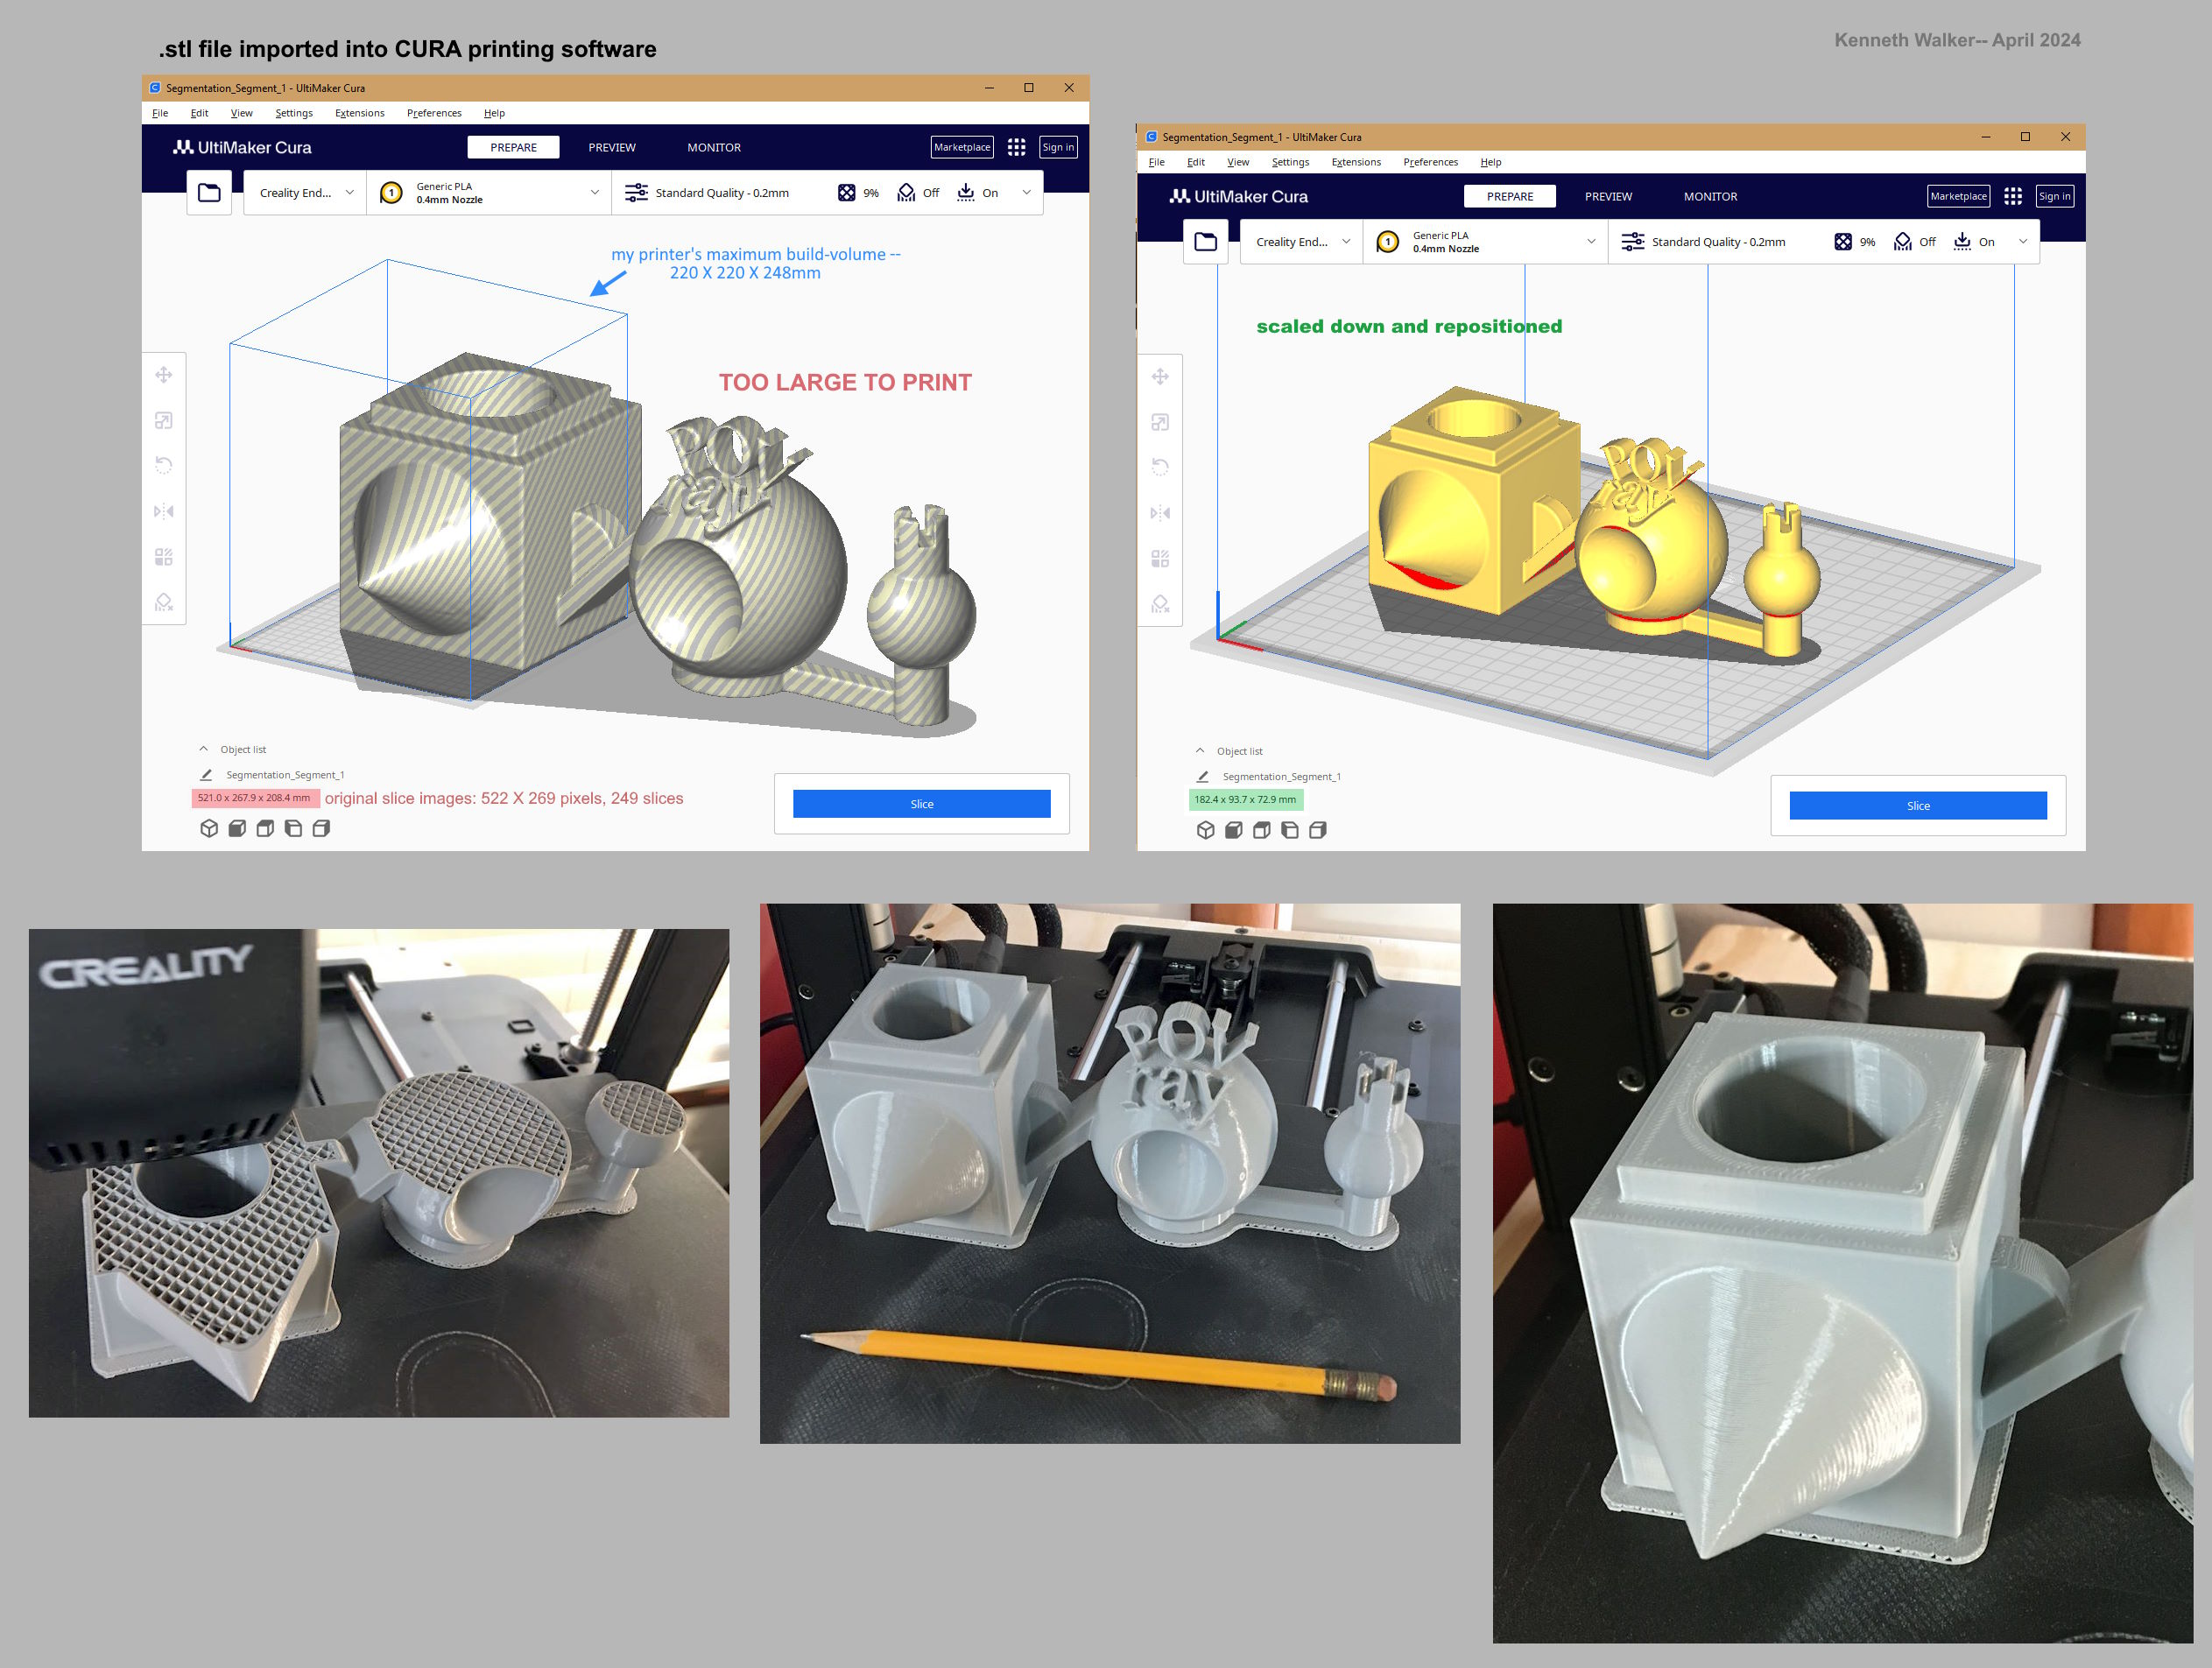
[importing the .stl file into CURA, and printing the final model]
The attached image shows the final result: the .stl file brought into my
printer's software (Ultimaker CURA) then printed with medium-quality settings
and a standard 0.4mm print nozzle.
As previously mentioned, this demonstration model was 'sliced' at "low to
medium" quality (from the POV-ray returned messages)-- 522 X 269 pixels, 249
slices. That included a number of black slices at the beginning and end of the
animation. Much better results can be obtained with higher rez images and some
adjustments there. BTW: This model in 3D SLICER ended up having 7,076,000 active
voxels. (None are created from black pixels.)
The honeycomb infill I used-- added in CURA-- was only for supporting any flat
horizontal surfaces in the model, and a few areas on the spheres. Surprisingly,
angled surfaces down to 45-deg from vertical can be printed without supports.
In most cases, the model-as-.stl will be much larger that typical desktop
printers can print-- CURA adds stripes to a model to indicate that it's
oversized-- so it needs to be down-sized in your printing software. This has the
great advantage of reducing the size of the voxel-created triangles--
sharpening-up the model-- and is key to the entire process.
Post a reply to this message
Attachments:
Download 'final printing via cura-- kw 4_2024.jpg' (521 KB)
Preview of image 'final printing via cura-- kw 4_2024.jpg'

|
|
| |
| |
|
|
|
|
| |
| |
|
|
"Kenneth" <kdw### [at] gmail com> wrote:
> This is a step-by-step guide to 3-D-print almost any type of POV-ray object ....
Well, ... Damn.
You HAVE been busy, haven't you?
Excellent work, fellow Walker!
How's that Creality printer treating you?
Maybe you'll have an FGC9 to print soon :D
- BE com> wrote:
> This is a step-by-step guide to 3-D-print almost any type of POV-ray object ....
Well, ... Damn.
You HAVE been busy, haven't you?
Excellent work, fellow Walker!
How's that Creality printer treating you?
Maybe you'll have an FGC9 to print soon :D
- BE
Post a reply to this message
|
|
| |
| |
|
|
From: Thomas de Groot
Subject: Re: 3-D printing via 3D SLICER app-- step by step
Date: 6 Apr 2024 08:45:28
Message: <661143e8$1@news.povray.org>
|
|
|
| |
| |
|
|
Op 6-4-2024 om 13:24 schreef Kenneth:
> See my earlier introductory post about this topic...
>
>
https://news.povray.org/povray.binaries.images/thread/%3Cweb.655527ca7165e2419b4924336e066e29%40news.povray.org%3E/
>
> Here it is, finally-- only 5 months late! Real-life got in the way, but I also
> spent time simplifying the required steps and re-writing the 'object slicing'
> code for POV-ray...then tested everything on an almost-daily basis.
>
Wow! This is a serious piece of work, Kenneth! Well done indeed!
--
Thomas
Post a reply to this message
|
|
| |
| |
|
|
|
|
| |
| |
|
|
Thanks BE and Thomas!
You would not *believe* the number of hours I have spent on this project, with
the explanations and code and screenshots-- re-editing almost daily, adding
stuff, erasing stuff, making corrected screenshots, choosing what to include and
what to leave out as unnecessary, making more 3-D test printings etc etc. I kept
telling a few friends that I could probably write a BOOK about it all. But it
sure has been fun :-) For the last couple of weeks, I've been almost
single-minded about finishing it. Now I'm exhausted, ha.
Over the intervening months since last November, I also made some important
discoveries about how 3D SLICER actually works-- by trial and error. My earlier
tests and printed model examples used a much simpler slicing scheme-- which
resulted in squashed-or-stretched results in that app, that I had to re-scale by
eye. Then a 'eureka' moment FINALLY occurred, and my 'automatic' slicing scheme
was the result.
BE: I thought a lot about your earlier suggestion of using POV-ray's 'object
pattern' as a simpler and standard approach to the slicing-- but 3D SLICER's
method of operation makes that approach difficult. (The proper scaling of the
object there requires a certain number of image slices, not arbitrary like I
originally thought.) A POV-ray object's bounding-box size turned out to be the
answer to that problem-- and object_patterns don't have those. Of course, an
object_pattern has a 1:1 size correspondence with the object it is *made* from,
so I could have used that to get the bounding-box size. Hmm, at some point I
might re-write my code to try that approach!
In some ways, I feel that this entire object-slicing-to-3D-SLICER idea is just
an interim step to the POV-ray 3-D printing problem... waiting for some clever
fellow to take the image-slices and instead create a triangle mesh (and .stl
file) *directly* from the image pixels. Like POV-ray does with height_fields
from a single image, but 'stitching together' all the triangles from all the
slices. Then we would have a direct-to-.stl solution!
Post a reply to this message
|
|
| |
| |
|
|
|
|
| |
| |
|
|
"Kenneth" <kdw### [at] gmailcom> wrote:
>
> In some ways, I feel that this entire object-slicing-to-3D-SLICER idea is just
> an interim step to the POV-ray 3-D printing problem... waiting for some clever
> fellow to take the image-slices and instead create a triangle mesh (and .stl
> file) *directly* from the image pixels.
Well, from the image pixels on the 'outer surfaces' of the white-on-black
slices, the pixels at the outer edges of the object. Possibly using eval_pigment
and a tracing loop, to somehow get all of those pixel positions-- and just
those-- as well as on inner holes and enclosures. I have some half-formed
ideas...
Post a reply to this message
|
|
| |
| |
|
|
|
|
| |
|
|