|
|
|
|
|
|
| |
| |
|
|
|
|
| |
| |
|
|
"Bald Eagle" <cre### [at] netscape net> wrote:
>
> How long do these renders take? I tried a 1024x768 with some code jr has worked
> out, and it was taking so long, that I canceled the render and did a tiny one -
> which still seemed quite slow.
>
Well, my 8 core/16 thread machine is pretty fast as-is, but...
My 40-mesh blur example, at 800X600 and no AA (and no 'vignetting' or
'distortion'), took a total of 2min 15sec (!)-- of which about 16 sec was the
parse time. Pretty amazing. (I did turn off the radiosity that was in one of the
meshcam includes though.) I guess most of the parse time is spent constructing
the single mesh; it's done in SDL in 'meshcam_macros.inc', not internally. By
saving the mesh on the first go-round, subsequent renders will be even faster--
which makes it easier to experiment with the motion-blur, since the mesh itself
doesn't change. net> wrote:
>
> How long do these renders take? I tried a 1024x768 with some code jr has worked
> out, and it was taking so long, that I canceled the render and did a tiny one -
> which still seemed quite slow.
>
Well, my 8 core/16 thread machine is pretty fast as-is, but...
My 40-mesh blur example, at 800X600 and no AA (and no 'vignetting' or
'distortion'), took a total of 2min 15sec (!)-- of which about 16 sec was the
parse time. Pretty amazing. (I did turn off the radiosity that was in one of the
meshcam includes though.) I guess most of the parse time is spent constructing
the single mesh; it's done in SDL in 'meshcam_macros.inc', not internally. By
saving the mesh on the first go-round, subsequent renders will be even faster--
which makes it easier to experiment with the motion-blur, since the mesh itself
doesn't change.
Post a reply to this message
|
|
| |
| |
|
|
|
|
| |
| |
|
|
Josh English <Jos### [at] joshuarenglishcom> wrote:
>
> For the anaglyph, remember you can also include the mesh AS AN OBJECT in
> the scene itself. Jaime's Vignette code does this. The mesh_camera
> doesn't sit on the mesh, but starts the rays just offset from the mesh.
> So you may be able to include them and tint them ... oh, yeah. I see the
> problem. You can't group real world objects with individual rays in the
> definition. Maybe build the scene in two sets, and two copies of the
> mesh with the tinted overlays for each set (or, at that point, large
> semi transparent spheres around each set would do it).
>
> Just a thought.
>
SO... I've been concentrating on the 'meshcam_persp.demo' scene, and came up
with a way to easily generate a two-'camera' stereo view, at least as the
*basics* of a 3D anaglyph. It's the same set-up as the motion-blur code, but
using only two 'eyes'. The camera's initial position doesn't actually change;
it's the camera's mesh that is displaced, which has the same effect. Honestly,
I was not *sure* that this trick produced a true 3-D effect, so I had to prove
it to myself with a different test set-up.
(It would seem that the 'meshcam_stereo_demo' scene would be the logical choice
for my experiments, but I have not yet been able to *overlap* the two images
there instead of being side-by-side. My math attempts have been woefully crude
and unsuccessful.)
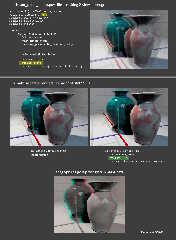
In the attached image, the center-row renders are the same as in the overlapped
stereogram. If you can cross your eyes, you'll see the nice 3-D effect. My color
anaglyph example had to be made in a separate app though. I hope the 3-D effect
is apparent, as my red-cyan glasses are actually a very dense and
non-standard(?) red/GREEN. I had to fudge the colors somewhat, as well as image
brightness etc.
So far, my attempts to color each of the two views as red/cyan, *within* the
meshcam scene, have all failed. I've tried using the instantiated meshes as
objects...or semi-transparent spheres... or even tiny thin cylinders and discs--
but they interfere with each other in an odd way when used in pairs, and ruin
the effect. For a *single* camera view (only one mesh), an instantiated/colored
mesh works very well-- but not with two views that overlap. As you alluded to,
the mesh-as-CAMERA and the mesh-as-INSTANTIATED-into-the-scene behave completely
differently. That's difficult to visualize and explain though.
Here are some interesting little facts that I've learned along the way:
1) The camera mesh is curved-- like a section of a sphere surface-- and is not
actually at the given 'c_location'; that's the CENTER of the 'sphere'. And the
spherical diameter depends on the given 'c_angle'.
2) When the camera-mesh is first constructed in 'meshcam_macros.inc', it is
apparently made facing +z, and centered on the origin (that is, the 'center of
the sphere' is at the origin, I think). Then it's later re-positioned and
re-oriented by the meshcam_placement macro-- like this in the
'meshcam_persp_demo' file:
camera{
mesh_camera{ aa_samples+1 0
mesh{camera_mesh
meshcam_placement(c_location,c_look_at)
}
So, prior to meshcam_placement, the mesh can be moved around (translated) in an
understandable x,y,z way, if you choose to :-)
3) In the 'meshcam_persp_demo' file: When 'aa_samples=0', only one camera mesh
is created. When it's set to 1, TWO meshes are actually made-- but they exactly
overlap and behave like one mesh. In the equations at
#declare c_look_at_tmp=...
it appears that the 2nd mesh should be 'jittered' in its position, but isn't.
I've tried to follow the math there, but I don't yet see why the 2nd one is not
being moved. (If aa_samples=2, the 3rd mesh IS jittered.) HOWEVER, when using
aa_samples=1, the 2nd mesh can be easily exploited to create a stereogram, which
is the method I used.
Anyway, I hope the attached image is self-explanatory.
More to come (!)
Post a reply to this message
Attachments:
Download 'meshcam_stereo_demo_diagram_kw_5_2023.jpg' (187 KB)
Preview of image 'meshcam_stereo_demo_diagram_kw_5_2023.jpg'
|
|
| |
| |
|
|
|
|
| |
| |
|
|
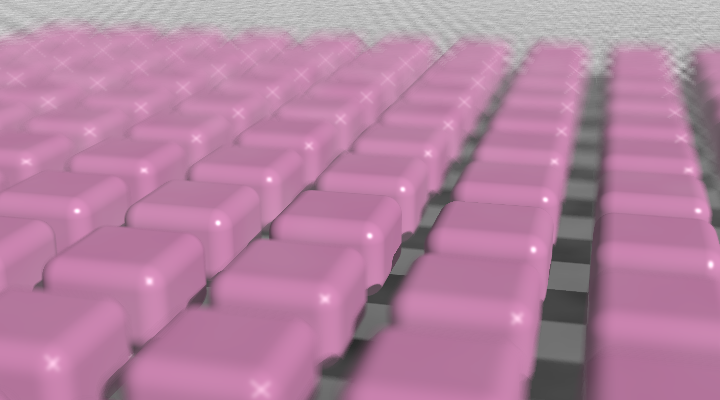
On 5/19/2023 3:14 PM, Kenneth wrote:
> Thanks. It's a lot of fun to play around with. I also*think* that the blur
> effect is distance-based-- that is, objects nearer the mesh camera are blurred
> more than distant objects. I haven't tried a different scene to confirm that,
> although it seems to follow from the fact that the camera's 40 meshes are
> essentially just translated sideways a little bit. Like having 40 'eyes', but
> spread out over a small 'interocular distance' in total. So distant objects
> should have much less blur, just as they would have much less 3-D depth in a
> human stereo view.
It depends on where you center the transformation. If you rotate the
meshes around the look_at point you get focal blur.
I suspect based on my Towers scene moving the meshes based on the camera
location you get less blurring in the distance. It makes sense because
the angles created by two triangles in a mesh to a distance object is
much smaller than the angle on a closer object.
Josh
Post a reply to this message
Attachments:
Download 'meshcam07c.png' (203 KB)
Preview of image 'meshcam07c.png'

|
|
| |
| |
|
|
|
|
| |
| |
|
|
On 5/19/2023 5:21 PM, Kenneth wrote:
>
> SO... I've been concentrating on the 'meshcam_persp.demo' scene, and came up
> with a way to easily generate a two-'camera' stereo view, at least as the
> *basics* of a 3D anaglyph. It's the same set-up as the motion-blur code, but
> using only two 'eyes'. The camera's initial position doesn't actually change;
> it's the camera's mesh that is displaced, which has the same effect. Honestly,
> I was not *sure* that this trick produced a true 3-D effect, so I had to prove
> it to myself with a different test set-up.
>
> (It would seem that the 'meshcam_stereo_demo' scene would be the logical choice
> for my experiments, but I have not yet been able to *overlap* the two images
> there instead of being side-by-side. My math attempts have been woefully crude
> and unsuccessful.)
I think that demo is designed for things like Google Cardboard.
> So far, my attempts to color each of the two views as red/cyan, *within* the
> meshcam scene, have all failed. I've tried using the instantiated meshes as
> objects...or semi-transparent spheres... or even tiny thin cylinders and discs--
> but they interfere with each other in an odd way when used in pairs, and ruin
> the effect. For a *single* camera view (only one mesh), an instantiated/colored
> mesh works very well-- but not with two views that overlap. As you alluded to,
> the mesh-as-CAMERA and the mesh-as-INSTANTIATED-into-the-scene behave completely
> differently. That's difficult to visualize and explain though.
Oddly enough, you can give the mesh a pigment:
camera {
mesh_camera { 2 0
mesh { spherical_mesh pigment { blue 1 transmit 0.1 }
transform { Position_on_Camera(Camera_Location, Camera_Look_At,
Camera_Sky) }
}
mesh { perspective_mesh pigment { red 1 transmit 0.1 }
}
}
and the thing renders without color. I would expect this to raise a
parsing error but it just ignores it. It's a shame, because this could
really help with these sorts of effects.
>
> Here are some interesting little facts that I've learned along the way:
> 1) The camera mesh is curved-- like a section of a sphere surface-- and is not
> actually at the given 'c_location'; that's the CENTER of the 'sphere'. And the
> spherical diameter depends on the given 'c_angle'.
Yes. It's a proper pinhole, not like the standard perspective camera.
>
> 2) When the camera-mesh is first constructed in 'meshcam_macros.inc', it is
> apparently made facing +z, and centered on the origin (that is, the 'center of
> the sphere' is at the origin, I think). Then it's later re-positioned and
> re-oriented by the meshcam_placement macro-- like this in the
> 'meshcam_persp_demo' file:
> camera{
> mesh_camera{ aa_samples+1 0
> mesh{camera_mesh
> meshcam_placement(c_location,c_look_at)
> }
>
> So, prior to meshcam_placement, the mesh can be moved around (translated) in an
> understandable x,y,z way, if you choose to :-)
Fun, ain't it? This is the easiest way to do it, in my opinion. There's
less math. At least, there's easier ways to sequester the math in a macro.
>
> More to come (!)
>
I'm looking forward to it. You're faster than I am.
Josh
Post a reply to this message
|
|
| |
| |
|
|
|
|
| |
| |
|
|
hi,
Josh English <Jos### [at] joshuarenglishcom> wrote:
> On 5/19/2023 5:21 PM, Kenneth wrote:
> ...
> >
> > More to come (!)
> >
>
> I'm looking forward to it. You're faster than I am.
+1.
(this thread is "shaping up nicely" :-))
regards, jr.
Post a reply to this message
|
|
| |
| |
|
|
|
|
| |
| |
|
|
Josh English <Jos### [at] joshuarenglishcom> wrote:
>
> Oddly enough, you can give the [camera] mesh a pigment:
>
> camera {
> mesh_camera { 2 0
> mesh { spherical_mesh pigment { blue 1 transmit 0.1 }
> transform { Position_on_Camera(Camera_Location, Camera_Look_At,
> Camera_Sky) }
> }
> mesh { perspective_mesh pigment { red 1 transmit 0.1 }
>
> }
> }
>
> and the thing renders without color. I would expect this to raise a
> parsing error but it just ignores it. It's a shame, because this could
> really help with these sorts of effects.
Yep. In my own tests, I tried the same coloring attempt in meshcam_macros.inc,
at the end of the #macro meshcam_pinhole(...) mesh-generator code.
But no result :-( (I even tried adding an interior_texture, AND an
inside_vector). It was all ignored. I guess the mesh-as-CAMERA in the source
code is a different animal than a mesh OBJECT.
Post a reply to this message
|
|
| |
| |
|
|
|
|
| |
| |
|
|
"Kenneth" <kdw### [at] gmailcom> wrote:
> Yep. In my own tests, I tried the same coloring attempt in meshcam_macros.inc,
> at the end of the #macro meshcam_pinhole(...) mesh-generator code.
> But no result :-( (I even tried adding an interior_texture, AND an
> inside_vector). It was all ignored. I guess the mesh-as-CAMERA in the source
> code is a different animal than a mesh OBJECT.
If I read the documentation correctly, there is a normal direction, and an
offset. If you keep the normal direction the same, but change the offset so
that the camera ray origin is behind the mesh instead of in front of it, does
that achieve the desired result?
I seem to recall something about being able to see the mesh used as the camera.
Post a reply to this message
|
|
| |
| |
|
|
|
|
| |
| |
|
|
"Bald Eagle" <cre### [at] netscapenet> wrote:
> "Kenneth" <kdw### [at] gmailcom> wrote:
>
> > Yep. In my own tests, I tried the same coloring attempt in meshcam_macros.inc,
> > at the end of the #macro meshcam_pinhole(...) mesh-generator code.
> > But no result :-( (I even tried adding an interior_texture, AND an
> > inside_vector). It was all ignored. I guess the mesh-as-CAMERA in the source
> > code is a different animal than a mesh OBJECT.
>
> If I read the documentation correctly, there is a normal direction, and an
> offset. If you keep the normal direction the same, but change the offset so
> that the camera ray origin is behind the mesh instead of in front of it, does
> that achieve the desired result?
> I seem to recall something about being able to see the mesh used as the camera.
Honestly, some of that documentation I don't understand at all. :-[ In the
meshcam_persp_demo file-- in the camera{mesh_camera{ ... block, there *is* a
location <0,0,-.01> (not to be confused with the camera's c_location). I've
tried changing that z value various ways; and a few times, I had an 'Aha!'
moment-- only to find that it messed up something else that I was trying. Some
of the features seem to be interconnected(?) But I haven't run through ALL the
permutations of things yet. *sigh*
I'm *still* trying to get a stereogram with the red/cyan filtering-- but it
appears that the (internal) mesh CAMERA interferes in some strange way with
*any* colored objects placed in the appropriate locations, when TWO views are
used. It's very odd. I'm putting together another collage of renders to
illustrate this...
Post a reply to this message
|
|
| |
| |
|
|
|
|
| |
| |
|
|
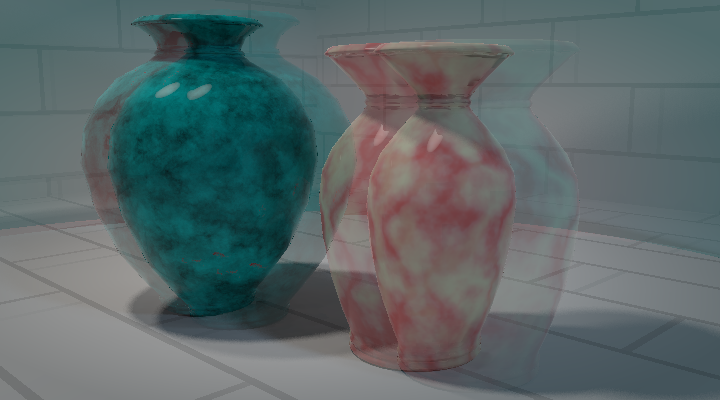
On 5/20/2023 7:08 AM, Bald Eagle wrote:
> "Kenneth" <kdw### [at] gmailcom> wrote:
>
>> Yep. In my own tests, I tried the same coloring attempt in meshcam_macros.inc,
>> at the end of the #macro meshcam_pinhole(...) mesh-generator code.
>> But no result :-( (I even tried adding an interior_texture, AND an
>> inside_vector). It was all ignored. I guess the mesh-as-CAMERA in the source
>> code is a different animal than a mesh OBJECT.
>
> If I read the documentation correctly, there is a normal direction, and an
> offset. If you keep the normal direction the same, but change the offset so
> that the camera ray origin is behind the mesh instead of in front of it, does
> that achieve the desired result?
> I seem to recall something about being able to see the mesh used as the camera.
>
You can include the mesh in the file, and since the mesh_camera rays are
offset, the mesh will be seen. The demonstration has a vignette feature
that demonstrates this in action.
I made a few changes to the perspective code demo:
// common test subjects and scenario
#declare Room = union {
#include "demo_common.inc"
}
...
// create the camera with the generated or loaded mesh
camera{
mesh_camera{ 2 0 // distribution 1 will do the job too in this case,
as all the meshes are the same
mesh{camera_mesh
meshcam_placement(c_location,c_look_at)
}
mesh{camera_mesh meshcam_placement(c_location, c_look_at) translate
28.5*x }
}
location <0,0,-.01> // look at the face slighty off along the normal
}
...
object { Room clipped_by { sphere { 0, 14 } } }
object { Room clipped_by { sphere { 0, 14 } } translate 28*x }
sphere { <0,0,0> 6 pigment { red 1 transmit 0.5} }
sphere { <28,0,0> 6 pigment { blue 1 green 1 transmit 0.5 } }
And this created a proof of concept below (completely wrong angles,
because I have no idea how to make one, and I don't know what it takes
to get a POV-Ray scene to even make one colorized version.
Post a reply to this message
Attachments:
Download 'meshcam_anaglyph_demo.png' (230 KB)
Preview of image 'meshcam_anaglyph_demo.png'

|
|
| |
| |
|
|
|
|
| |
| |
|
|
On 5/20/2023 10:02 AM, Kenneth wrote:
> Honestly, some of that documentation I don't understand at all. 😅 In the
> meshcam_persp_demo file-- in the camera{mesh_camera{ ... block, there*is* a
> location <0,0,-.01> (not to be confused with the camera's c_location). I've
> tried changing that z value various ways; and a few times, I had an 'Aha!'
> moment-- only to find that it messed up something else that I was trying. Some
> of the features seem to be interconnected(?) But I haven't run through ALL the
> permutations of things yet.*sigh*
The camera location is the offset from the individual triangles. If you
had a positive z value you'd shoot the rays the opposite way from the
mesh, reversing the triangle normals and probably not getting anything
exciting. I've experimented with sliding the location around the XY
plane but it doesn't seem to have any cool effects like slanting the
image or anything.
Post a reply to this message
|
|
| |
| |
|
|
|
|
| |
|
|