|
 |
There is currently a discussion on the IRTC mailing list
where people asks winners of IRTC rounds to write tutorials
about how they work to achieve these results.
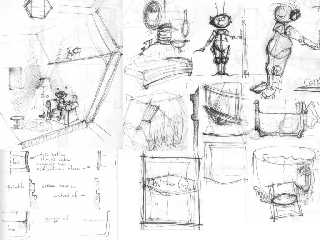
Since I won the "elements" round, I tried to write the
first "winner's tutorial"... It's been posted on the mailing list,
but, here, I can add the scanned sketches...
Comments, suggestions, whatever, tell me !
Cheers,
Fabien.
**********************************************************
IRTC WINNER'S TUTORIAL - ELEMENTS (jul-aug 98)- PXL506.JPG
**********************************************************
THE IDEA
--------
First, JM came up with a simple idea : showing the pixels (picture
ELEMENTS)
of a screen. In further discussions, some changes popped up : it could
be
figured with r/g/b flowers, or r/g/b bees in a honeycomb. I especially
liked the idea of the honeycomb because it was close enough to the real
arrangement of phosphors. In fact, since I had already sumitted
someting for
that round (fmelem.jpg), I expected JM to create the scene. As time
passed,
it seemed JM hasn't enough interest/skills (he's a beginner) to do it,
and
I decided to do it myself, wishing to not abandon such a good idea.
Then, instead of bees, I imagined putting little people, with their own
little
domestic lives, in the honeycombs. At that moment, the problem I
encoutered
was : "how do I make it clear that they are pixels from a screen ?"; I
had to
show both the screen and the big pixels... -dong !- a magnifying glass
!!
That's it !
At that point, the setup is clear : a screen, a magnifying glass, and
simple
surroundings.
THE HONEYCOMB
-------------
I did some sketches (see the scanned ones) to create the people and
their
"houses". The little guys were designed from the start to have
articulated
members, something that would be easy to position with a simple macro.
When using one people, you just give the rotation of shoulders,
knees,...
They are simple CSG, so is the furniture. Each room is white, with
only one area light to give the overall color; the area light allows
the soft and grany aspect that I like. 3 different rooms were created,
and repeated along. Final step was to render that at 800*600, with
a camera angled to match approximatively the angle between the screen
and the mag. glass (nothing very precise, but it looks good enough)
THE SCREEN
----------
The general dimensions are taken on a 15" screen. The rendered model is
entirely imaginary, because I needed something simpler, that would not
take too long to render.
It uses some complex (well, not too much) CSG, attention was paid to
curved surfaces and chamfered corners, because they "attract" highlights
much better than flat and right corner shapes.
The "PXL-506" label is in fact the car plate of JM ! (and is a
height-field).
Inside the screen, there's a coloured lightsource that fake the light
coming
from the cathodic tube, and, of course, the image_map is no_shadowed...
I had to choose a map for the screen. While I'm using a Win-AMD
computer,
I didn't want to show a Windows screen, much too common and graphically
uninteresting; Mac is also too common; I wanted something that will be
recognised
by people who knows more marginal platforms. I finally choosen to use
a NextStep (the OS Steve Jobs created after leaving Apple) screenshot,
and found one quickly by searching on the web.
A careful attention was paid to the plastic texture, zooming very
strongly
on the surface to find the right normal scaling.
THE MAGNIFYING GLASS
--------------------
Structurally simple, but since it's viewed from very close, it needs
high
detail level. See sketch to have an explanation about the profile.
The connection between the handle and the glass needed to be "animated",
with some shape complication, to make it visually interesting.
The image of the "pixels" is mapped onto a disc inside the glass, and
the glass is a refractive flattened sphere.
THE WALL BEHIND
---------------
The wooden plinth is made of rounded elements, just to catch highlights
andinteresting shadows. Careful wood scaling (and orientation !)is very
important, as is the randomization of the position of the woodgrain
between
each vertical board (if you repeat the object along with its texture,
the repeat
will show badly).
The wallpaper is mainly a plane with a checker-in-checker bluish
texture;
In real life, most of the wallpapers tend to unglue at the junction with
a plint. That's why I put a height-field, with the same texture, just
at
the top of the plinth, to simulate that imperfection.
THE LIGHTS
----------
- a general area-light, that cast some ambient lighting; kind of faked
radiosity (less compute-intensive !)
- an area light in the desk (?) lamp, wich give vivid lighting to the
important
elements in the scene. Point-lights doesn't exist in real life; to
achieve
some realism, area lights are the way to go (provided the settings are
correct :
if you model a lamp, use the size of the reflector as the area size).
- a light inside the monitor (see higher)
all lights in the scene are sliiiiiightly colored, it gives you control
about
warmth or coldness of a light (white light doen't exist, either).
THE CUP OF POV-TEA
------------------
It's a composition-filler; I really took a cup and made some tea, to
find
the good color, and I observed that the liquid intersected with the
recipient
as a "negative torus"; it was modelled like that, and catch a nice
highlight.
The sticker was inspired by a real Lipton sticker, paying some tribute
to the
POV-Tea(m)... (I think that it attracts sympathy from many voters ;).
It
says : "Pov-Tea(m) - pigment Yellow - Quality 9" instead of "Lipton -
Yellow
NOTES
-----
The composition is quite framed (it's usually how I do); the screen is
one
frame, the mag.glass is another one, the blue wall and yellowish wood
almost
define to squares. This gives opportunity to put interest in different
areas,
having a main subject, and subsequent things around.
Many elements of the scene are the result of cautious real-life
observations :
the light inside the screen, the tea in the cup...
Post a reply to this message
Attachments:
Download 'elem-explic.jpg' (112 KB)
Preview of image 'elem-explic.jpg'
|
|


