|
 |
Thomas de Groot <tho### [at] degroot org> wrote:
> Op 23/05/2023 om 18:17 schreef Mike Miller:
> > Thomas de Groot <tho### [at] degrootorg> wrote:
> >> Op 22-5-2023 om 23:03 schreef Bald Eagle:
> >>> "Mike Miller" <mil### [at] gmailcom> wrote:
> >>>> I had to post this. I looked over at my work surface and it's starting to
> >>>> resemble my rendering.
> >>>> Miller
> >>>
> >>> Either
> >>>
> >>> a) you're lying, and this is not a photograph, but another render....
> >>>
> >>> or
> >>>
> >>> b) You've crossed into the nexus between reality and POV-Ray
> >>>
> >>> because it really IS hard to tell where one ends and the other begins.
> >>>
> >>
> >> I agree with Bill. How do you *achieve* all of this amazing
> >> modelling/scene building? I cannot even dream about equalling your
> >> quality work...
> >>
> >> --
> >> Thomas
> >
> >
> > Thank you. Too kind. I do enjoy the modeling and scene building. I tend to look
> > at the world as "how would I model that!"....and then get all excited about
> > modeling it (without triangles). :)
> >
> Yes indeed, and you are a master at texturing/uv-mapping your objects.
> Personally, much of /that/ work I do with the help of dedicated
> modellers (mainly Silo), others here would probably mention Blender at
> this stage. Do you use those or do you all the modelling in POV-Ray?
>
> > As far as the quality, I would say most of that is the excellent programming and
> > development that has gone into POV - which I had nothing to do with.
> > After 30 plus years, I'm still amazed with POV.
> > Mike.
> >
> Still, when I examine for instance your jacks workbench scene, I am
> absolutely overcome by the quality of the lighting. And somehow, it
> looks so /casual/ that I wonder where the trick is hidden. Lighting a
> scene is - at least for me - something not /casual/ at all!
>
> --
> Thomas
Thanks for the kudos.
When I jumped back into POV, I was using 3DS Max to export some object types to
assist in modeling and object placement. Recently, I moved to Blender once I
realized I could export & convert almost all of the object types through the
..x3D file format. I wrote a small translator and now use it frequently for
object/scene building.
In Blender, I always start with an image underlay.
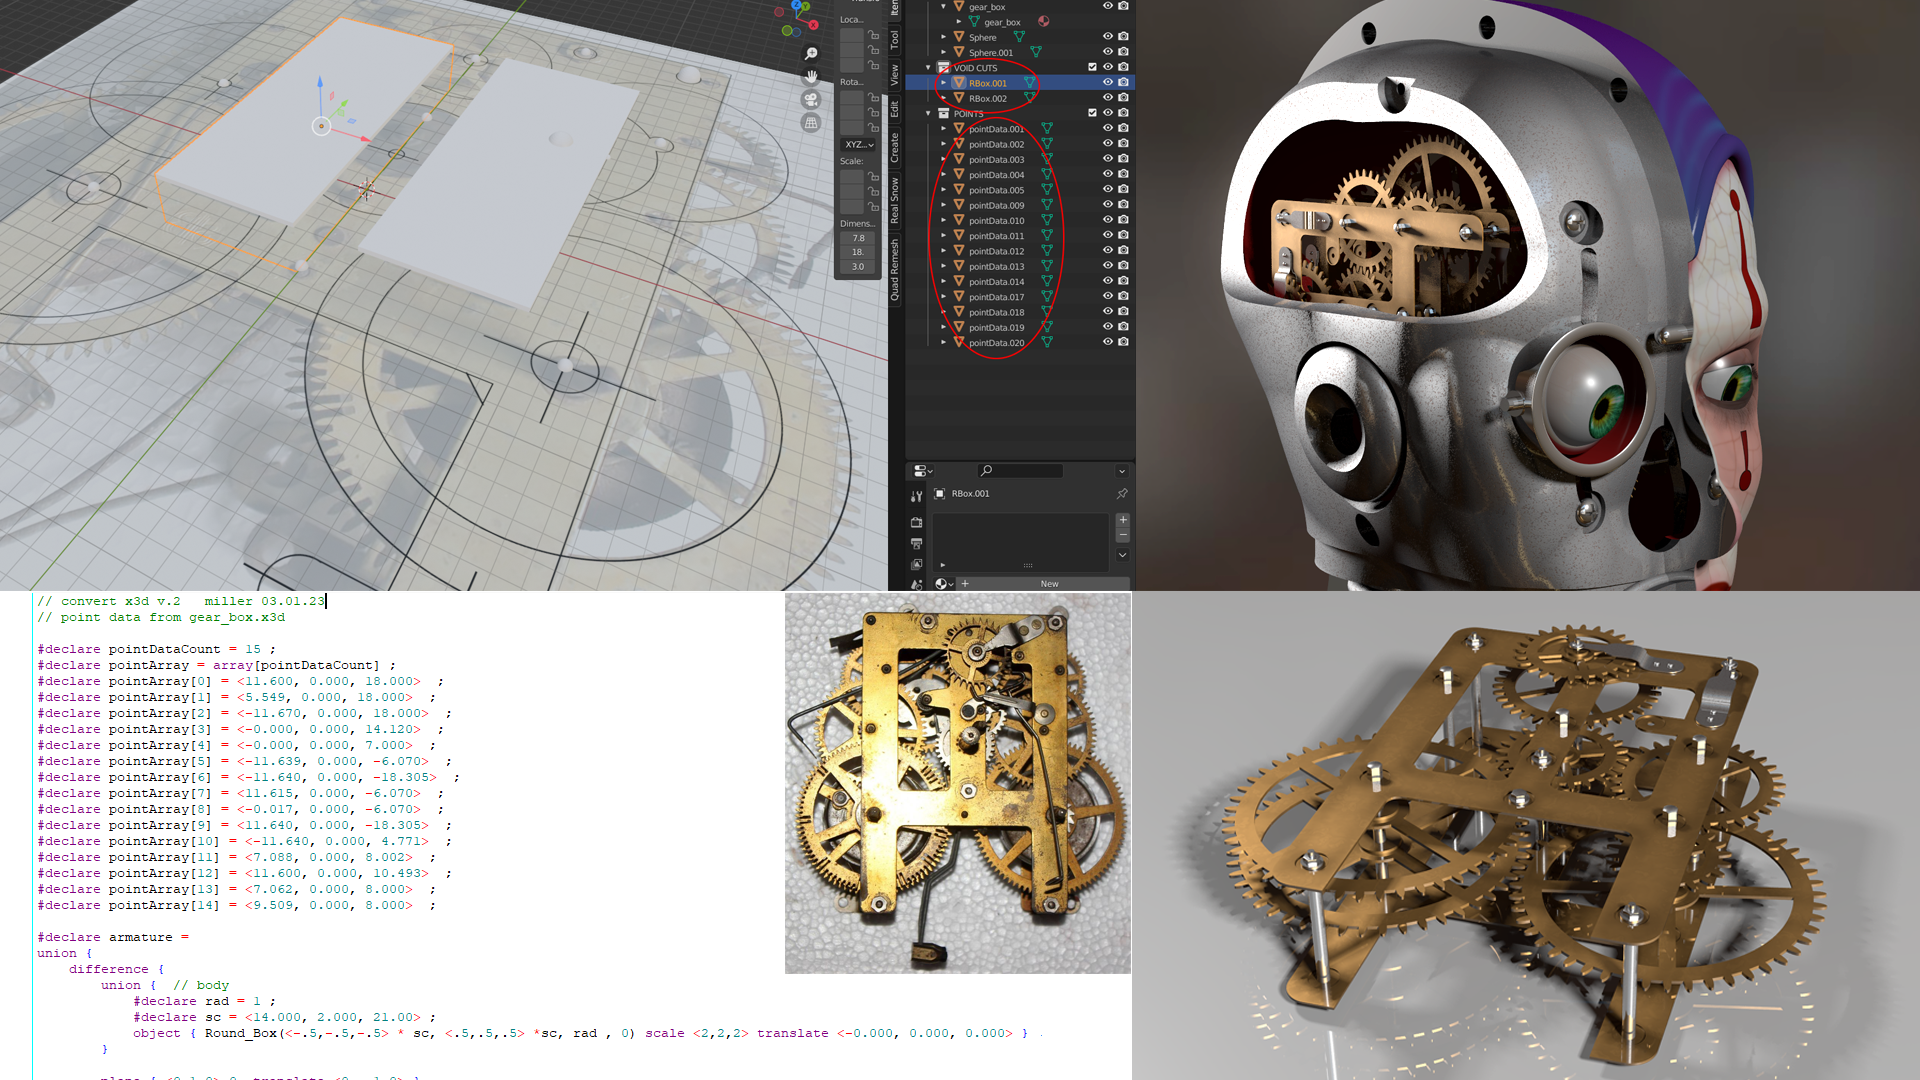
I use naming conventions to sort the POV object types. I currently convert
spheres, boxes, round_boxes, cylinders, torus, blobs, points for prisms, lathes,
sweeps, and position arrays.
Yesterday, I modeled a gearbox for Jack's brain. I found an image that was
approximately what I had in mind. I screened it back and adding some guide-lines
before importing to Blender. I used spheres renames as pointData for position
arrays and use cubes renamed as RBox to export as POV Round_Box(), etc...
In POV, I use the pointData array in a loop to punch holes in the frame, and
place the gears, and used the Round_Boxes to create and void cut the frame body.
Attached shows the Blender file, the data dump, and 2 test renders.
Always a work in progress. :)
As for lighting, it's lots of test renderings. :)
Start with no lights and a few objects to confirm the global ambient - try to
use as little as possible. Use a sky sphere imaged close to the final
environment lighting unless your scene is fully enclosed.
Position the camera close to the intended view. Add each light 1 one at a time
starting with the most dominate. Hide all scene objects and add a few
materialized spheres on a floor plane in front of the camera to determine light
intensity, color, shadow direction, and reflections. I use a chrome sphere and
another with a satin bumpy finish. Look at the bump and phong positions to
verify that the light direction looks good. Never position lights behind the
camera. I like to have good definition between 'light-side/dark-side' on
objects. If the dominate light is from the right, add a softer fill/bounded
light from the left. I try to use 2 light to fill a scene and sometimes a very
weak under-light (no shadow) to fake bounced light from below the camera. If the
scene is starting to look over-lit, hide all the lights and add them back in one
at a time with less intensity. ...and lots of test renderings. :>)
Render on - I love what you have going on in your current scene.
Mike org> wrote:
> Op 23/05/2023 om 18:17 schreef Mike Miller:
> > Thomas de Groot <tho### [at] degrootorg> wrote:
> >> Op 22-5-2023 om 23:03 schreef Bald Eagle:
> >>> "Mike Miller" <mil### [at] gmailcom> wrote:
> >>>> I had to post this. I looked over at my work surface and it's starting to
> >>>> resemble my rendering.
> >>>> Miller
> >>>
> >>> Either
> >>>
> >>> a) you're lying, and this is not a photograph, but another render....
> >>>
> >>> or
> >>>
> >>> b) You've crossed into the nexus between reality and POV-Ray
> >>>
> >>> because it really IS hard to tell where one ends and the other begins.
> >>>
> >>
> >> I agree with Bill. How do you *achieve* all of this amazing
> >> modelling/scene building? I cannot even dream about equalling your
> >> quality work...
> >>
> >> --
> >> Thomas
> >
> >
> > Thank you. Too kind. I do enjoy the modeling and scene building. I tend to look
> > at the world as "how would I model that!"....and then get all excited about
> > modeling it (without triangles). :)
> >
> Yes indeed, and you are a master at texturing/uv-mapping your objects.
> Personally, much of /that/ work I do with the help of dedicated
> modellers (mainly Silo), others here would probably mention Blender at
> this stage. Do you use those or do you all the modelling in POV-Ray?
>
> > As far as the quality, I would say most of that is the excellent programming and
> > development that has gone into POV - which I had nothing to do with.
> > After 30 plus years, I'm still amazed with POV.
> > Mike.
> >
> Still, when I examine for instance your jacks workbench scene, I am
> absolutely overcome by the quality of the lighting. And somehow, it
> looks so /casual/ that I wonder where the trick is hidden. Lighting a
> scene is - at least for me - something not /casual/ at all!
>
> --
> Thomas
Thanks for the kudos.
When I jumped back into POV, I was using 3DS Max to export some object types to
assist in modeling and object placement. Recently, I moved to Blender once I
realized I could export & convert almost all of the object types through the
..x3D file format. I wrote a small translator and now use it frequently for
object/scene building.
In Blender, I always start with an image underlay.
I use naming conventions to sort the POV object types. I currently convert
spheres, boxes, round_boxes, cylinders, torus, blobs, points for prisms, lathes,
sweeps, and position arrays.
Yesterday, I modeled a gearbox for Jack's brain. I found an image that was
approximately what I had in mind. I screened it back and adding some guide-lines
before importing to Blender. I used spheres renames as pointData for position
arrays and use cubes renamed as RBox to export as POV Round_Box(), etc...
In POV, I use the pointData array in a loop to punch holes in the frame, and
place the gears, and used the Round_Boxes to create and void cut the frame body.
Attached shows the Blender file, the data dump, and 2 test renders.
Always a work in progress. :)
As for lighting, it's lots of test renderings. :)
Start with no lights and a few objects to confirm the global ambient - try to
use as little as possible. Use a sky sphere imaged close to the final
environment lighting unless your scene is fully enclosed.
Position the camera close to the intended view. Add each light 1 one at a time
starting with the most dominate. Hide all scene objects and add a few
materialized spheres on a floor plane in front of the camera to determine light
intensity, color, shadow direction, and reflections. I use a chrome sphere and
another with a satin bumpy finish. Look at the bump and phong positions to
verify that the light direction looks good. Never position lights behind the
camera. I like to have good definition between 'light-side/dark-side' on
objects. If the dominate light is from the right, add a softer fill/bounded
light from the left. I try to use 2 light to fill a scene and sometimes a very
weak under-light (no shadow) to fake bounced light from below the camera. If the
scene is starting to look over-lit, hide all the lights and add them back in one
at a time with less intensity. ...and lots of test renderings. :>)
Render on - I love what you have going on in your current scene.
Mike
Post a reply to this message
Attachments:
Download 'gear_box.png' (1928 KB)
Preview of image 'gear_box.png'
|
|