|
 |
"s.day" <s.d### [at] uel acuk> wrote:
> Just playing around trying to add a Pov CSG object (the tripod) into a photo.
>
> Pretty pleased with the effect but I am wondering if there is an official method
> of doing something like this to get better results?
>
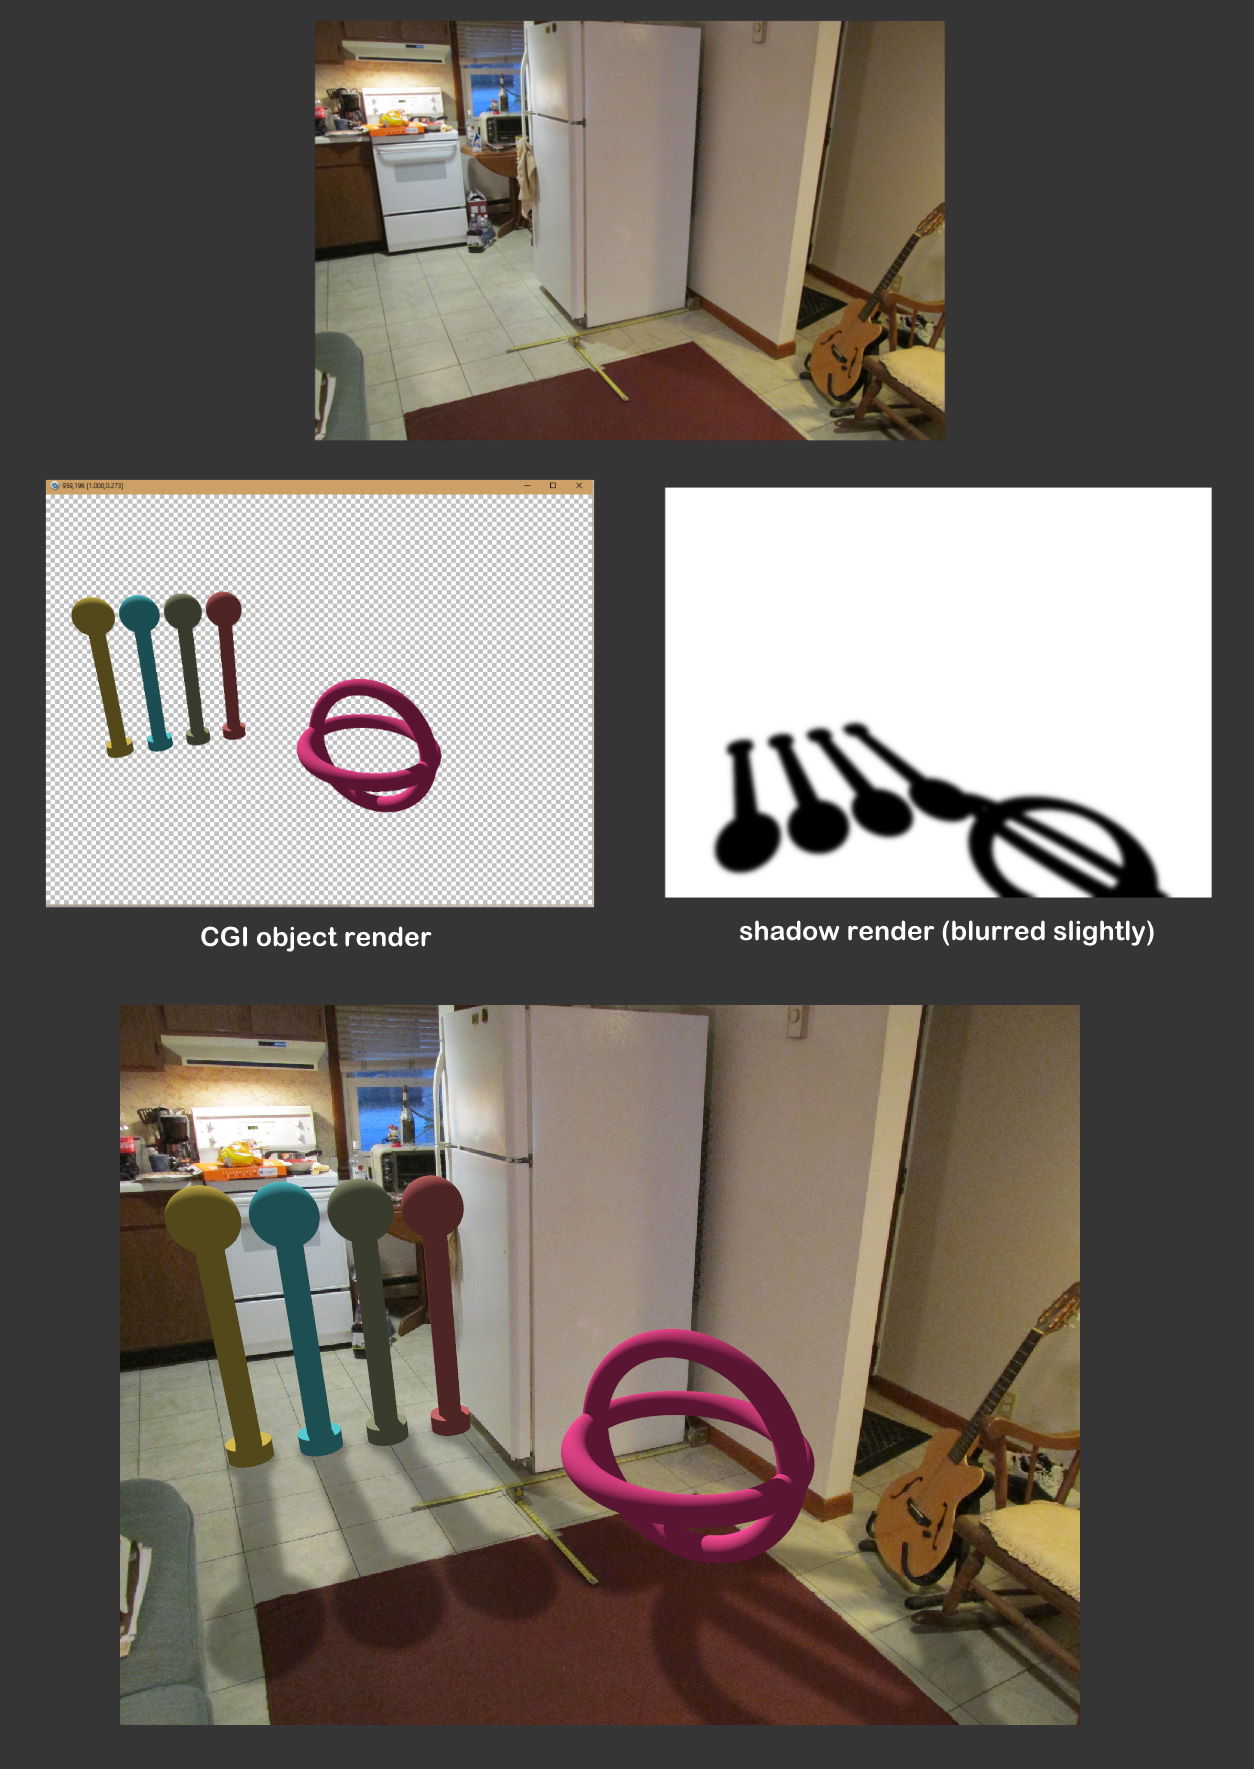
That's really nicely done. And your tripod is a great model.
I've been wanting to figure out such a 'fake shadowing' idea for years, but
never got around to it. You're example spurred me on.
BTW, I may have missed the post from Robert McGregor that you mentioned. Do you
have a link to that?
Before seeing your own explanation of the process, I likewise started tinkering
with an image-to-function approach-- specifically *multiplying* two image
functions like you did. The idea being that the pure white areas in the 'shadow'
image/function could be considered as 'multiplying by 1.0' (unity), whereas the
darker shadows themselves would be < 1.0. Multiplied by the background
photo/function, that should produce shadows (or more specifically, less
brightness) in those areas of the photo. It worked!
Like you, I initially rendered two images--
1) the *deep* shadow pass with no fill light (and no_image for the CGI objects),
using a ground plane and an additional vertical background plane. I made both
of those 'ultra white', using finish{...diffuse 2); otherwise, at least the
ground plane would be slightly gray-ish due to the raking angle of the main
light_source. I think I see that in your own shadow render. The idea is that the
NON-shadowed areas should be PURE white, for later function use/multiplication.
This works OK because the rendered image itself 'clips' the white values to a
max of 255/255.
2) the 'hero' pass for the CGI objects, with proper lighting and a transparent
background. I used a simple background{rgbt 1} for that-- plus Use_Alpha in my
...INI file, of course-- and eliminated the white planes.
My final step was compositing the images, in POV-ray-- using a slightly
different method from yours. And I eliminated the extra step of matting-out the
shadows *under* the objects (like your tripod's feet) by simply pasting-on the
'hero' texture as the final texture for my box object; the CGI objects then hide
their own base shadows.
For the compositing step, here's a simple method to vary the shadow 'density' in
the final image. Instead of this simple form for the shadow-image function...
function{pigment{image_map{png "shadow image.png"}}}
..... use an averaged pigment_map:
function{
pigment{
average
pigment_map{
[1 image_map{png "shadow image.png"}]
[1.5 rgb 1] // or whatever, for the 'weight'. Adds more
// white to the average.
}}}
This can easily make the shadows 'whiter' for the subsequent function
multiplication-- resulting in less-dense shadows.
Some finer points:
Your code has...
#case (DT_Mult)
pigment { p3 }
finish { ambient 3 diffuse 0 }
#break
.....for the final color-photo. I instead multiply the separate r-g-b color
functions by 3, same result. It's because the 'averaging' process for those
functions reduces each color contribution to 1/3. If each was at 1 instead of
3, the final photo would reproduce as only 1/3rd of its original brightness. But
using ambient 3 works just as well.
Making the plane object(s) 'ultra white' in my shadow render has a downside:
Antialiasing begins to fail when colors go over 1.0 (255/255). But I worked
around that by slightly blurring the shadow-image render in one of my
image-editing apps, as an intermediate step... shadows are usually a bit blurry
anyway ;-)
And the fun begins when the background photo has objects/shapes in it that need
to be reproduced for the shadow pass-- simplified shapes for the shadows to fall
over.
-------------
#declare SHADOW_FUNC =
function{
pigment{
average
pigment_map{
[1 image_map{png "shadow render.png" once interpolate 2}]
[.8 rgb 1] // or whatever
}
}
}
#declare PHOTO_FUNC = // the background photo
function{pigment{image_map{jpeg "background photo.jpg"}}}
#declare RED_CHANNEL =
pigment{function{PHOTO_FUNC(x,y,z).red * SHADOW_FUNC(x,y,z).red}};
#declare GREEN_CHANNEL =
pigment{function{PHOTO_FUNC(x,y,z).green * SHADOW_FUNC(x,y,z).green}};
#declare BLUE_CHANNEL =
pigment{function{PHOTO_FUNC(x,y,z).blue * SHADOW_FUNC(x,y,z).blue}};
// The shadow image is essentially grayscale, so I could have used .gray for
// it here; but that's an extra internal computational step...
// inefficient!! :-O
#declare FINAL_PIGMENT = // the background photo with shadows
pigment{
average
pigment_map{
[1 RED_CHANNEL color_map{[0 rgb 0] [1 rgb <3,0,0>]}] // 3, not 1
[1 GREEN_CHANNEL color_map{[0 rgb 0] [1 rgb <0,3,0>]}] // ditto
[1 BLUE_CHANNEL color_map{[0 rgb 0] [1 rgb <0,0,3>]}] // ditto
}
}
// The compositing step...
box{0,<1,1,.01>
texture{pigment{FINAL_PIGMENT} finish{ambient 1 emission 0 diffuse 0}}
texture{ // This one simply overlays onto the FINAL_PIGMENT
pigment{image_map{png "CGI render.png" } }
finish{ambient 1 emission 0 diffuse 0}
}
} acuk> wrote:
> Just playing around trying to add a Pov CSG object (the tripod) into a photo.
>
> Pretty pleased with the effect but I am wondering if there is an official method
> of doing something like this to get better results?
>
That's really nicely done. And your tripod is a great model.
I've been wanting to figure out such a 'fake shadowing' idea for years, but
never got around to it. You're example spurred me on.
BTW, I may have missed the post from Robert McGregor that you mentioned. Do you
have a link to that?
Before seeing your own explanation of the process, I likewise started tinkering
with an image-to-function approach-- specifically *multiplying* two image
functions like you did. The idea being that the pure white areas in the 'shadow'
image/function could be considered as 'multiplying by 1.0' (unity), whereas the
darker shadows themselves would be < 1.0. Multiplied by the background
photo/function, that should produce shadows (or more specifically, less
brightness) in those areas of the photo. It worked!
Like you, I initially rendered two images--
1) the *deep* shadow pass with no fill light (and no_image for the CGI objects),
using a ground plane and an additional vertical background plane. I made both
of those 'ultra white', using finish{...diffuse 2); otherwise, at least the
ground plane would be slightly gray-ish due to the raking angle of the main
light_source. I think I see that in your own shadow render. The idea is that the
NON-shadowed areas should be PURE white, for later function use/multiplication.
This works OK because the rendered image itself 'clips' the white values to a
max of 255/255.
2) the 'hero' pass for the CGI objects, with proper lighting and a transparent
background. I used a simple background{rgbt 1} for that-- plus Use_Alpha in my
...INI file, of course-- and eliminated the white planes.
My final step was compositing the images, in POV-ray-- using a slightly
different method from yours. And I eliminated the extra step of matting-out the
shadows *under* the objects (like your tripod's feet) by simply pasting-on the
'hero' texture as the final texture for my box object; the CGI objects then hide
their own base shadows.
For the compositing step, here's a simple method to vary the shadow 'density' in
the final image. Instead of this simple form for the shadow-image function...
function{pigment{image_map{png "shadow image.png"}}}
..... use an averaged pigment_map:
function{
pigment{
average
pigment_map{
[1 image_map{png "shadow image.png"}]
[1.5 rgb 1] // or whatever, for the 'weight'. Adds more
// white to the average.
}}}
This can easily make the shadows 'whiter' for the subsequent function
multiplication-- resulting in less-dense shadows.
Some finer points:
Your code has...
#case (DT_Mult)
pigment { p3 }
finish { ambient 3 diffuse 0 }
#break
.....for the final color-photo. I instead multiply the separate r-g-b color
functions by 3, same result. It's because the 'averaging' process for those
functions reduces each color contribution to 1/3. If each was at 1 instead of
3, the final photo would reproduce as only 1/3rd of its original brightness. But
using ambient 3 works just as well.
Making the plane object(s) 'ultra white' in my shadow render has a downside:
Antialiasing begins to fail when colors go over 1.0 (255/255). But I worked
around that by slightly blurring the shadow-image render in one of my
image-editing apps, as an intermediate step... shadows are usually a bit blurry
anyway ;-)
And the fun begins when the background photo has objects/shapes in it that need
to be reproduced for the shadow pass-- simplified shapes for the shadows to fall
over.
-------------
#declare SHADOW_FUNC =
function{
pigment{
average
pigment_map{
[1 image_map{png "shadow render.png" once interpolate 2}]
[.8 rgb 1] // or whatever
}
}
}
#declare PHOTO_FUNC = // the background photo
function{pigment{image_map{jpeg "background photo.jpg"}}}
#declare RED_CHANNEL =
pigment{function{PHOTO_FUNC(x,y,z).red * SHADOW_FUNC(x,y,z).red}};
#declare GREEN_CHANNEL =
pigment{function{PHOTO_FUNC(x,y,z).green * SHADOW_FUNC(x,y,z).green}};
#declare BLUE_CHANNEL =
pigment{function{PHOTO_FUNC(x,y,z).blue * SHADOW_FUNC(x,y,z).blue}};
// The shadow image is essentially grayscale, so I could have used .gray for
// it here; but that's an extra internal computational step...
// inefficient!! :-O
#declare FINAL_PIGMENT = // the background photo with shadows
pigment{
average
pigment_map{
[1 RED_CHANNEL color_map{[0 rgb 0] [1 rgb <3,0,0>]}] // 3, not 1
[1 GREEN_CHANNEL color_map{[0 rgb 0] [1 rgb <0,3,0>]}] // ditto
[1 BLUE_CHANNEL color_map{[0 rgb 0] [1 rgb <0,0,3>]}] // ditto
}
}
// The compositing step...
box{0,<1,1,.01>
texture{pigment{FINAL_PIGMENT} finish{ambient 1 emission 0 diffuse 0}}
texture{ // This one simply overlays onto the FINAL_PIGMENT
pigment{image_map{png "CGI render.png" } }
finish{ambient 1 emission 0 diffuse 0}
}
}
Post a reply to this message
Attachments:
Download 'fake_shadow_composite_kw.jpg' (246 KB)
Preview of image 'fake_shadow_composite_kw.jpg'
|
|