|
 |
Greeting,
bothering you to inform about (hopefully) final version of img2pov
converter of PNG heightfields into POVRay 3D-mesh. The program uses
image tracing algorithm quite different from normal, creating four
triangle pyramids per pixel, rather than two triangle fold per four
pixels as most programs do. Program is written in Python and is
available from:
https://github.com/Dnyarri/img2mesh
In supposedly final 2.8.1.0 version POVRay output is completely
rewritten to remove all POVRay transforms, hopefully making things to be
parsed faster. Textures and stuff reorganized and reformatted to improve
readability.
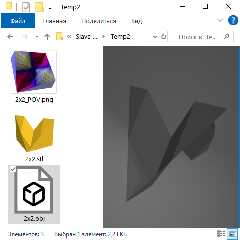
Also Wavefront OBJ and streolithography STL outputs added. Attached is a
screencap of Windows Explorer window, showing icon preview of output
generated from 2x2 pixels checkerboard PNG image (no idea who decided to
introduce such a previews for potentially huge files but in this case it
allows me to easily show them side by side without complex presentation).
Internally, img2pov, img2obj and img2stl programs converted into
self-calling functions, thus allowing both running them as standalone
and importing into some other program. For Windows users it gives a
benefit of having single img2mesh GUI with import of all three of the
above programs into single compressed EXE file, thus reducing the size
of this all-in-one converter (exe file is available for download from
"Release" section.
Hopefully this appear of some use :-)
--
Ilyich the Toad
https://dnyarri.github.io/
Post a reply to this message
Attachments:
Download 'printscreen2x2.png' (40 KB)
Preview of image 'printscreen2x2.png'

|
 |
|
 |
Ok, I was lying when I promised to stop updating img2mesh PNG
heightfield to 3D mesh conversion utility:
https://github.com/Dnyarri/img2mesh
I realized that, when doing something with heightfields "for fun", that
is, not trying to convert some actual geometry data but, say, creating
fake coins or medals, I often repeat one procedure: in Photoshop, apply
"Curves" to image, save it, convert to mesh, render, say "I need extend
gradations here and invert this small part" and repeat it again and
again (including saying).
To reduce time for resaving and number of resaying I implemented
"Curves" right in exported POVRay file - with img2pov (and,
correspondingly, img2mesh when POV export option is used) version
2.8.2.5 z-coordinate of mesh triangles, generated and saved according to
source PNG pixel brightness, is fed to map function in POVRay when
rendering. By default exported map is five points linear spline,
corresponding to straight line describing "identical" transform, i.e.
input=output. Map description is placed near the beginning of scene file
and I guess its two-column layout makes it easy to understand - input is
the first column, output is second column, third column contains unused
zeroes.
Note, that map does not change actual z coords in mesh, it is applied
when scene is rendered, so map is non-destructive and may be returned to
"identical" 0/0 - 1/1 line anytime you want. Note that, as a result, map
works only in POV file - with STL and OBJ export there is no map, since
only POVRay allows easy internal recalculation of every facet according
to user-defined function.
Have fun,
--
Ilyich the Toad
https://dnyarri.github.io/
Post a reply to this message
|
 |


![]()