 |
 |
|
 |
|
 |
|  |
|  |
|
 |
|
 |
|  |
|  |
|
 |
Hi everyone,
I just uploaded a .zip archive to p.b.scene-files* which contains the necessary
files to reproduce what you see here.
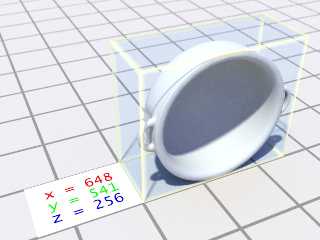
Attached is an image of the first step of process. The purpose of this step is
to generate three numbers that will be used to describe the dimensions of the
volumetric data produced by the next step. These numbers also help greatly when
scaling the final object.
*
http://news.povray.org/povray.binaries.scene-files/thread/%3Cweb.525dcd797919e005c8060b460%40news.povray.org%3E/
Post a reply to this message
Attachments:
Download 'registerobject9m_16s.jpg' (50 KB)
Preview of image 'registerobject9m_16s.jpg'

|
 |
|  |
|  |
|
 |
|
 |
|  |
|  |
|
 |
Step 2: producing the volumetric data. This image shows only 8 out of the 256
proximity pattern slices needed to produce the isosurface in step 3. The images
have been scaled down. The actual dimensions used for the bowl at this step: 648
x 541 x 256 voxels. The entire animation took 1h 36m 11s to render, but probably
could have been sped up by not using aa. Patience is needed for this step :)
Post a reply to this message
Attachments:
Download 'slices-example.png' (31 KB)
Preview of image 'slices-example.png'

|
 |
|  |
|  |
|
 |
|
 |
|  |
|  |
|
 |
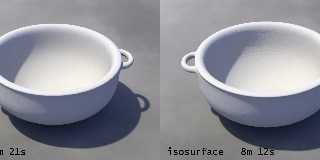
Third and final step: rendering the object. Notice the faceting on the
isosurface object; the conversion method took the object literally.
Well, that' it. I hope somebody finds this process useful!
Sam
Post a reply to this message
Attachments:
Download 'isorender-comp.png' (496 KB)
Preview of image 'isorender-comp.png'

|
 |
|  |
|  |
|
 |
From: Nekar Xenos
Subject: Re: ToVolume: Object-To-Volume Conversion and Rendering Process
Date: 15 Oct 2013 23:29:57
Message: <op.w402n6nnufxv4h@xena>
|
|
 |
|  |
|  |
|
 |
On Wed, 16 Oct 2013 01:56:05 +0200, Samuel Benge <stb### [at] hotmail com>
wrote:
> Third and final step: rendering the object. Notice the faceting on the
> isosurface object; the conversion method took the object literally.
>
> Well, that' it. I hope somebody finds this process useful!
>
> Sam
>
the isosurface looks hand-made :)
--
-Nekar Xenos- com>
wrote:
> Third and final step: rendering the object. Notice the faceting on the
> isosurface object; the conversion method took the object literally.
>
> Well, that' it. I hope somebody finds this process useful!
>
> Sam
>
the isosurface looks hand-made :)
--
-Nekar Xenos-
Post a reply to this message
|
 |
|  |
|  |
|
 |
|
 |
|  |
|  |
|
 |
"Samuel Benge" <stb### [at] hotmail com> wrote:
> Third and final step: rendering the object. Notice the faceting on the
> isosurface object; the conversion method took the object literally.
>
> Well, that' it. I hope somebody finds this process useful!
>
> Sam
Hi Sam,
Am I following this correctly, from the description it seems a bit like 3D
printing in a 3D app?
Either way, the outcome looks good and the isosurface version looks better.
Sean com> wrote:
> Third and final step: rendering the object. Notice the faceting on the
> isosurface object; the conversion method took the object literally.
>
> Well, that' it. I hope somebody finds this process useful!
>
> Sam
Hi Sam,
Am I following this correctly, from the description it seems a bit like 3D
printing in a 3D app?
Either way, the outcome looks good and the isosurface version looks better.
Sean
Post a reply to this message
|
 |
|  |
|  |
|
 |
|
 |
|  |
|  |
|
 |
"Nekar Xenos" <nek### [at] gmail com> wrote:
> the isosurface looks hand-made :)
Yeah, it's not too great :\ But the point of having such a process is so you can
do things like displace an object with functions, make ghost-like objects using
media, etc.
"s.day" <s.d### [at] uel com> wrote:
> the isosurface looks hand-made :)
Yeah, it's not too great :\ But the point of having such a process is so you can
do things like displace an object with functions, make ghost-like objects using
media, etc.
"s.day" <s.d### [at] uel ac ac uk> wrote:
> Hi Sam,
>
> Am I following this correctly, from the description it seems a bit like 3D
> printing in a 3D app?
Yes, it's pretty much just like 3D printing, only without the complicated
machinery (or the ability to hold the finished product in your hand). ;)
Sam uk> wrote:
> Hi Sam,
>
> Am I following this correctly, from the description it seems a bit like 3D
> printing in a 3D app?
Yes, it's pretty much just like 3D printing, only without the complicated
machinery (or the ability to hold the finished product in your hand). ;)
Sam
Post a reply to this message
|
 |
|  |
|  |
|
 |
|
 |
|  |


![]()