|
 |
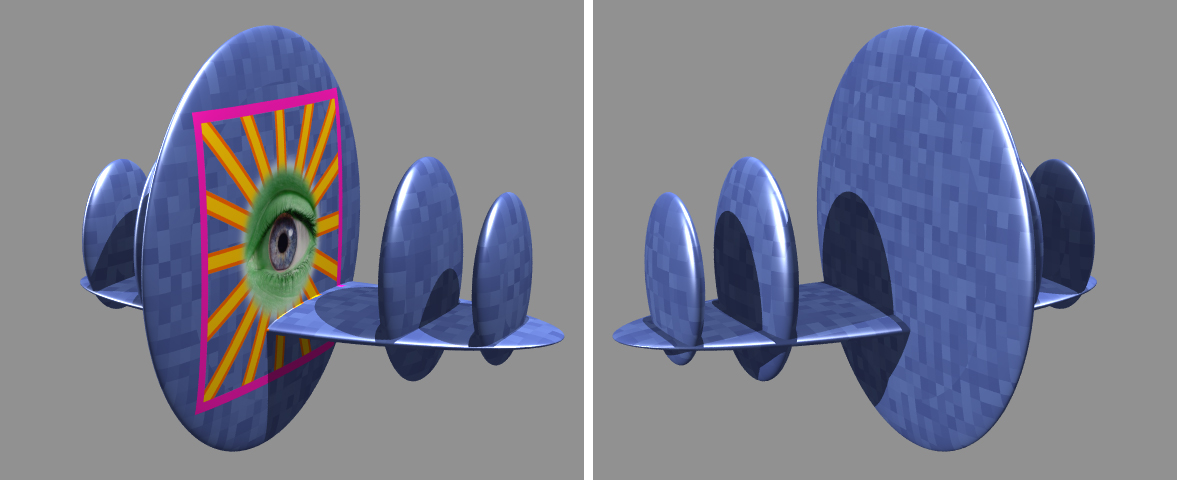
I've only lately realized that the BOXED pattern can be used (with an image_map)
as a way to place a decal on an object--sticking the image onto only a *single*
surface in a particular location. (A more-or-less flat surface, of course, to
avoid distortion.) The tail number on my B-29 bomber is an example. I don't know
why this idea never occurred to me before; it's so obvious now(!)-- maybe I'm
the last person on the planet to know. But it doesn't immediately spring to mind
when reading the bare-bones documentation. Some newsgroup posts of the past have
given clues, but I never picked up on them. :-( I've included my example scene
below, to help others who may not have realized its potential.
Most folks would use uv-mapping for this, I guess (or maybe 'cylindrical' or
'spherical'); but IMO, boxed is easier to 'grasp' and implement for such a small
application. The decal can look distorted on a complex, bumpy object--but that's
better dealt with through uv-mapping anyway.
A typical/default planar-projected image_map applies the image 'infinitely in
z'--it shows up on both front and rear surfaces of an object. The BOXED pattern
restricts the image to a 2X2 square volume of space (filling it)--which can then
be scaled/rotated/positioned to apply the image *just so* onto only one surface,
of even a very thin object. (The box itself is automatically centered on the
origin, but the image_map is not--so a small translation is needed.)
Rotation/translation of the box can be tricky, of course, to get the decal into
proper position on an object, with the image 'parallel' to a surface. The box
itself can be scaled thinner if necessary, to place the decal onto one surface
of some closely-spaced objects in a union--squashing down the box/image to be
almost plane-like; but simply moving the box around in space will usually
suffice.
The pattern needs a 'map' of some kind to work with--a pigment_map in this case.
And only two index entries (for visually-understandable results, anyway.) IMO,
the documentation isn't completely clear about how the map's index values treat
an image_map. A small value like 0.0001 keeps the edges of the image sharp--you
can vary that up to 1.0 or even higher to blend it into the 'outside' color.
Here's my complete test scene (just plug in your own image.) Play around with
the parameters. Note the horizontal wing, and how the image is barely visible on
it--I scaled the box very thin to get that.
Ken
...................
//global_settings{assumed_gamma 2.2} // I'm using v3.6.1c
camera {
perspective
location <0, 2, -10>
look_at <0, 0, 0>
right x*image_width/image_height
angle 25
rotate -30*y // make this 30*y to see the other side
}
light_source {
0*x
color rgb <1,1,1>
translate <-100, 40, -20>
}
light_source {
0*x
color rgb <1,1,1>
translate <30, 40, -5>
}
light_source {
0*x
color rgb <1,1,1>*.7
translate <5, 100, 0>
}
background{rgb .6}
union{
sphere{0,1.5 scale <.1,1,1>}
sphere{0,1 scale <2,.1,.8> translate <0,-.6,.6>}
sphere{0,1 scale 1.2*<.1,.5,.4> translate <-1.6,-.2,.5>}
sphere{0,1 scale 1.6*<.1,.5,.4> translate <-1,-.2,.5>}
sphere{0,1 scale 1.6*<.1,.5,.4> translate <1,-.2,.5>}
sphere{0,1 scale 1.2*<.1,.5,.4> translate <1.6,-.2,.5>}
texture{
pigment{cells scale .1
color_map{[0.0 rgb .7*<.5,.6,1>][1.0 rgb .9*<.5,.6,.9>]}
}
finish{ambient .4 diffuse .5 phong .5 phong_size 10}
}
texture{
pigment{
boxed
pigment_map{
[0.0 rgbt 1] // everywhere *outside* the box
[0.0001 image_map{png "my_image.png" once interpolate 2}
// without ONCE, the image_map repeats as usual, but only INSIDE the 2X2
// box; depends on image scale below, of course.
translate -.5 // BOXED is already centered on the origin, but the
// image_map isn't, by default. Translating an image_map in z has no
// effect.
scale 2 // usually 2--to make a standard 1X1 image_map fill the 2X2 box
// size. Scaling an image_map in z has no effect, as usual. Scaling
// larger than 2 will 'crop' the image--a useful trick in itself.
]
}
scale <1,1,.05>
rotate -90*y // whatever is needed to align image 'parallel' to a surface
translate <.101,0,0>
}
finish{ambient .4 diffuse .6 phong .5 phong_size 10}
}
}
Post a reply to this message
Attachments:
Download 'boxed_decal_example.jpg' (207 KB)
Preview of image 'boxed_decal_example.jpg'
|
|
|
|
Christian Froeschlin <chr### [at] chrfr de> wrote:
> there is no special treatement for image_maps. If the value
> you put before the image_map entry is V, and the boxed pattern
> at a certain point in space evaluates to x (0<=x<=1), then the
> resulting pigment is:
>
> x == 0 ==> Fully transparent
> x >= V ==> Pigment as specified at V (last entry in map)
> 0 < x < V ==> Resulting pigment is weighted average of
> fully tansparent and specified pigment
> depending on how close x is to 0 or V.
All true, of course. Basically like 'spherical.' BTW, what I have a somewhat
difficult time with (always, it seems) is the 'order' of the index list for
these kinds of patterns. Just a difficulty in keeping the spatial ordering in my
head.
[0.0] // *outside*
[1.0] // *inside*
My own way of visualizing this is...backwards. I.e., 0.0 tells me its the
origin, and 1.0 looks like 1-unit from the origin and everything outside. I have
to *re-think* every time I use such a pattern. I need to cement into my brain
that the values really mean 'weight' or intensity, leading away from the
origin--the origin having a weight of 1.0 (That may not even be the correct
paradigm--but it helps me.) What screws me up is that gradient y (or x or z) has
an index list that implies [0.0...] *as* the origin--the pattern goes up from
there. And that's the first pattern I learned to use. Of course, the docs
describe each of these patterns correctly--but I still have a hard time.
>
> E.g. if x = 0.5*V you will get 50% transparency. For your
> decal you don't want fading from the center so you need a very
> small value for V.
That's the little bit that threw me off initially.
>
> > Note the horizontal wing, and how the image is barely visible on
> > it--I scaled the box very thin to get that.
>
> if possible, it will of course be preferrable to apply the
> texture to the target object *before* adding extra geometry,
> so it will not be visible at all on the horizontal part.
> But I assume this was just for demonstration ;)
Yes, just as a demo. I completely agree: If possible, such a decal should be on
only one object, before being made part of a larger CGS construct. My scene is
really meant to show what is possible even in the worst cases. And it was fun to
do. ;-)
My B-29 bomber model isn't textured 'correctly' (neither is this simple example
scene)--the major texture in both cases is just a regular 3-D cells pattern,
applied once to the entire model, rather than its parts. (And it shouldn't be
3-D in any case, but rather wrapped around the parts using uv-mapping or some
such.) But that being the case, this decal idea came in very handy, as a simple
addition to the entire object.
Ken de> wrote:
> there is no special treatement for image_maps. If the value
> you put before the image_map entry is V, and the boxed pattern
> at a certain point in space evaluates to x (0<=x<=1), then the
> resulting pigment is:
>
> x == 0 ==> Fully transparent
> x >= V ==> Pigment as specified at V (last entry in map)
> 0 < x < V ==> Resulting pigment is weighted average of
> fully tansparent and specified pigment
> depending on how close x is to 0 or V.
All true, of course. Basically like 'spherical.' BTW, what I have a somewhat
difficult time with (always, it seems) is the 'order' of the index list for
these kinds of patterns. Just a difficulty in keeping the spatial ordering in my
head.
[0.0] // *outside*
[1.0] // *inside*
My own way of visualizing this is...backwards. I.e., 0.0 tells me its the
origin, and 1.0 looks like 1-unit from the origin and everything outside. I have
to *re-think* every time I use such a pattern. I need to cement into my brain
that the values really mean 'weight' or intensity, leading away from the
origin--the origin having a weight of 1.0 (That may not even be the correct
paradigm--but it helps me.) What screws me up is that gradient y (or x or z) has
an index list that implies [0.0...] *as* the origin--the pattern goes up from
there. And that's the first pattern I learned to use. Of course, the docs
describe each of these patterns correctly--but I still have a hard time.
>
> E.g. if x = 0.5*V you will get 50% transparency. For your
> decal you don't want fading from the center so you need a very
> small value for V.
That's the little bit that threw me off initially.
>
> > Note the horizontal wing, and how the image is barely visible on
> > it--I scaled the box very thin to get that.
>
> if possible, it will of course be preferrable to apply the
> texture to the target object *before* adding extra geometry,
> so it will not be visible at all on the horizontal part.
> But I assume this was just for demonstration ;)
Yes, just as a demo. I completely agree: If possible, such a decal should be on
only one object, before being made part of a larger CGS construct. My scene is
really meant to show what is possible even in the worst cases. And it was fun to
do. ;-)
My B-29 bomber model isn't textured 'correctly' (neither is this simple example
scene)--the major texture in both cases is just a regular 3-D cells pattern,
applied once to the entire model, rather than its parts. (And it shouldn't be
3-D in any case, but rather wrapped around the parts using uv-mapping or some
such.) But that being the case, this decal idea came in very handy, as a simple
addition to the entire object.
Ken
Post a reply to this message
|
|