|
 |
Off work today and playing with Sam's Tovolume code when it hit me, what
he has discovered is an incredibly easy way to create silhouette based
isosurface shapes.
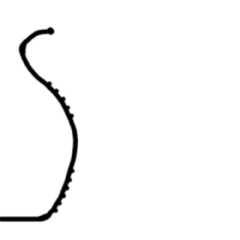
The blur.png file was drawn freehand in gimp with a solid brush after
which a Gaussian blur was applied - the blur is what Sam's proximity
pattern is doing in Tovolume. This single image is then used to create
the isosurfaces with the following code:
//------------------- Cut here --------------------------
global_settings {
assumed_gamma 1.00
ambient_light srgb <1.00,1.00,1.00>
}
#declare Grey35 = srgbft <0.35,0.35,0.35,0.00,0.00>;
background { color Grey35 }
#declare Camera00 = camera {
perspective
location <2.00,2.00,-2.00>
sky <0.00,1.00,0.00>
angle 35.00
right x*(image_width/image_height)
look_at <0.00,0.00,0.00>
}
#declare White = srgbft <1.00,1.00,1.00,0.00,0.00>;
#declare Light00 = light_source { <50.00,50.00,5.00>, White }
#declare Red = srgbft <1.00,0.00,0.00,0.00,0.00>;
#declare CylinderX = cylinder {
<-1.10,0.00,0.00>, <1.10,0.00,0.00>, 0.01
pigment { color Red }
}
#declare Green = srgbft <0.00,1.00,0.00,0.00,0.00>;
#declare CylinderY = cylinder {
<0.00,-1.10,0.00>, <0.00,1.10,0.00>, 0.01
pigment { color Green }
}
#declare Blue = srgbft <0.00,0.00,1.00,0.00,0.00>;
#declare CylinderZ = cylinder {
<0.00,0.00,-1.10>, <0.00,0.00,1.10>, 0.01
pigment { color Blue }
}
#include "functions.inc"
#declare Fnct00 = function {
pigment{image_map {"blur.png" gamma 1.0 once map_type 0 interpolate
3 }}
}
#declare Fnct01 = function (x,y,z) { Fnct00(x,y,0).red-0.95 }
#declare Fnct02 = function (x,y,z) { Fnct01(f_r(x,0,z),y,f_th(x,0,z)) }
#declare Fnct03 = function (x,y,z) {
// Fnct02(x,y,z)+(f_noise3d(x*29.0,y*29.0,z*29.0)*0.900)
Fnct02(x,y,z)+(f_agate(x*9.0,y*9.0,z*9.0)*0.900)
// Fnct02(x,y,z)+(f_bozo(x*29.0,y*29.0,z*29.0)*0.900)
// Fnct02(x,y,z)+(f_ripples(x*29.0,y*29.0,z*29.0)*0.900)
// Fnct02(x,y,z)+(f_wrinkles(x*29.0,y*29.0,z*29.0)*0.900)
// Fnct02(x,y,z)+(f_crackle(x*29.0,y*29.0,z*29.0)*0.900)
// Fnct02(x,y,z)+(f_granite(x*2.0,y*2.0,z*2.0)*0.900)
// Fnct02(x,y,z)+(f_leopard(x*49.0,y*49.0,z*49.0)*0.900)
// Fnct02(x,y,z)+(f_wood(x*49.0,z*49.0,y*49.0)*0.900)
}
#declare Magenta = srgbft <1.00,0.00,1.00,0.00,0.00>;
#declare Iso00 = isosurface {
function { Fnct03(x,y,z) }
contained_by { box { <-0.68,0.02,-0.68>,<0.68,0.98,0.68> } }
threshold 0.00
accuracy 0.001
max_gradient 160.00
max_trace 1
pigment { color Magenta }
}
camera { Camera00 }
light_source { Light00 }
object { Iso00 }
object { CylinderX }
object { CylinderY }
object { CylinderZ }
//------------------- Cut here --------------------------
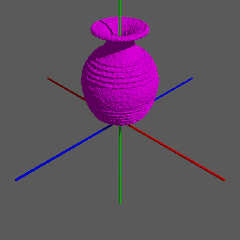
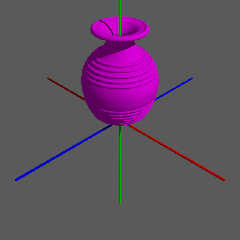
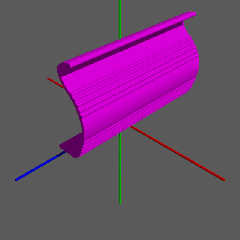
The three magenta vase show the shapes from the three internal functions
above.
The solid silhouette and Gaussian blur technique can be replaced in
gimp, photoshop with a blurred paintbrush. I been have fun just drawing
whatever freehand and watching shapes appear...
Notes:
1) As in Sam's Tovolume code, the blur depth from white to black sets
the limit for how much other functions can displace the surface.
2) The inverse blur image (white blurry lines on black) & base iso
function didn't work because povray seems to be returning 1.0 for out of
range values from the image_map.
3) The image_map interpolation with black on the png image edges causes
noise on the opposite edge despite using "once". Shrink the contained_by
range on that edge a little to avoid it. Sam did something similar in
his code which had me puzzled until I saw the edge interpolation, wrap
noise.
Have fun & thanks Sam for the image map with blurred image to isosurface
find!
Bill P.
Post a reply to this message
Attachments:
Download 'blur.png' (38 KB)
Download 'fnct03.jpg' (61 KB)
Download 'fnct02.jpg' (49 KB)
Download 'fnct01.jpg' (66 KB)
Preview of image 'blur.png'

Preview of image 'fnct03.jpg'

Preview of image 'fnct02.jpg'

Preview of image 'fnct01.jpg'

|
 |
|
 |
> Off work today and playing with Sam's Tovolume code when it hit me, what
> he has discovered is an incredibly easy way to create silhouette based
> isosurface shapes.
>
> The blur.png file was drawn freehand in gimp with a solid brush after
> which a Gaussian blur was applied - the blur is what Sam's proximity
> pattern is doing in Tovolume. This single image is then used to create
> the isosurfaces with the following code:
>
> #declare Iso00 = isosurface {
> function { Fnct03(x,y,z) }
> contained_by { box { <-0.68,0.02,-0.68>,<0.68,0.98,0.68> } }
> threshold 0.00
> accuracy 0.001
> max_gradient 160.00
> max_trace 1
> pigment { color Magenta }
> }
I have'nt tryed the third version, but I got very good renders, much
faster after some little changes to your code.
First, max_gradient 160 if huge overkill.
Using max_gradient 1.5 resulted in a nice render without any message
about max_gradient been to small or to large.
Next, I used:
#declare MinFact = 0.6;
evaluate 1.5*MinFact, sqrt(1/MinFact), 0.7
and got a slightly faster render.
Next, I reduced the contained_by object as follow:
box {<-0.34,0.02,-0.34><0.34,0.908,0.34> }
It's now much tighter and large enough to contain the whole isosurface.
This got me another performance increase.
Alain
Post a reply to this message
|
 |


![]()