|
 |
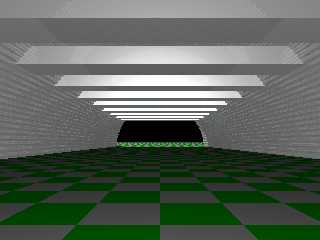
I was trying to create something similar to an Army Balowick, but I am
running into some problems. I've got the aluminium frame up, but I run
into a problem when I try to punch out some windows. Instead of getting
window holes, I get bars. I have included the code I am using, and a
picture of what I am getting. I am assuming that I have done something
wrong, but I can't figure out what. Anyone have a suggestion?
Jeff B.
Post a reply to this message
Attachments:
Download 'us-ascii' (2 KB)
Download 'labratory.png' (46 KB)
Preview of image 'labratory.png'

|
 |
|
 |
Jeff Baskin wrote:
>
> I was trying to create something similar to an Army Balowick, but I am
> running into some problems. I've got the aluminium frame up, but I run
> into a problem when I try to punch out some windows. Instead of getting
> window holes, I get bars. I have included the code I am using, and a
> picture of what I am getting. I am assuming that I have done something
> wrong, but I can't figure out what. Anyone have a suggestion?
>
> [...]
I think you have some misunderstanding on how CSG works. You probably
want something like:
object{
isosurface{
// This creates the corragated metal hull
function{
sqrt(pow(y,2)+pow(z,2))+(sin(atan2(z,y)*pi*RAD*6)/24)
}
threshold RAD
contained_by{
box{
<0,-19, 0>, <LEN,19,19>
}
}
open
rotate <-90,0,0>
}
// Now create the opennings for the hutch
// These are 1 x 2 holes in the wall.
#declare Divisions = 10;
#declare Space = ( LEN - ( Divisions * 2 ) ) / ( Divisions + 1 );
#declare Count = 0;
clipped_by {
union{
#while( Count < Divisions )
box{
<Space + Count * ( Space + 2 ),5,-20>,
<Space + Count * ( Space + 2 ) + 2,6,20>
}
#declare Count = Count + 1;
#end
inverse
}
}
texture{
pigment{ P_Chrome5 }
finish{ F_MetalA }
}
}
Christoph
--
POV-Ray tutorials, include files, Sim-POV,
HCR-Edit and more: http://www.tu-bs.de/~y0013390/
Last updated 28 Feb. 2003 _____./\/^>_*_<^\/\.______
Post a reply to this message
|
 |
|
 |
On Thu, 27 Mar 2003 11:09:27 -0500, Jeff Baskin wrote:
> #include "colors.inc"
> #include "metals.inc"
>
> /**************************************************
> * Secret Laboratory Interior *
> * *
> * Unit = 1 foot *
> * *
> * It's on old army shed that has been converted *
> **************************************************/
>
> light_source{
> <0,1,0>
> color White
> }
>
> light_source{
> <100,100,100>
> color White
> }
>
> camera{
> location <0,1,0>
> look_at <50,5.5,0>
> }
>
> #declare RAD=9;
> #declare LEN=50;
>
> // Basic military hutch interior
> difference{
> isosurface{
> // This creates the corragated metal hull
> function{
> sqrt(pow(y,2)+pow(z,2))+(sin(atan2(z,y)*pi*RAD*6)/24)
> }
> threshold RAD
> contained_by{
> box{
> <0,-19, 0>, <LEN,19,19>
> }
> }
> open
> rotate <-90,0,0>
> }
> // Now create the opennings for the hutch
> // These are 1 x 2 holes in the wall.
> #declare Divisions = 10;
> #declare Space = ( LEN - ( Divisions * 2 ) ) / ( Divisions + 1 );
> #declare Count = 0;
> union{
> #while( Count < Divisions )
> box{
> <Space + Count * ( Space + 2 ),5,-20>,
> <Space + Count * ( Space + 2 ) + 2,6,20>
> }
> #declare Count = Count + 1;
> #end
> }
> texture{
> pigment{ P_Chrome5 }
> finish{ F_MetalA }
> }
> }
>
> plane{
> y, 0
> pigment{ checker Green White }
> }
The camera is inside the interior of the isosirface and your differenced
boxed did cut holes in it. The only thing is that those holes were cut from
the outside instead of the inside. Giving the isosurface an inverse tag
does the trick and also fixes the hollow object warning (because the inside
of the lab is no longer the interior of the iso. Here's my new code:
#declare RAD=9;
#declare LEN=50;
#declare Thickness = 1;
// Basic military hutch interior
difference{
intersection{
isosurface{
// This creates the corragated metal hull
function{
sqrt(pow(y,2)+pow(z,2))+(sin(atan2(z,y)*pi*RAD*6)/24)
}
threshold RAD
max_gradient 1
all_intersections
contained_by{
box{
<-1,-(RAD+Thickness), -1>, <LEN+1,RAD+Thickness,RAD+Thickness>
}
}
rotate <-90,0,0>
inverse
}
cylinder{
0, (LEN)*x, RAD+Thickness
}
}
// Now create the opennings for the hutch
// These are 1 x 2 holes in the wall.
#declare Divisions = 10;
#declare Space = ( LEN - ( Divisions * 2 ) ) / ( Divisions + 1 );
#declare Count = 0;
union{
#while( Count < Divisions )
box{
<Space + Count * ( Space + 2 ),5,-20>,
<Space + Count * ( Space + 2 ) + 2,6,20>
}
#declare Count = Count + 1;
#end
}
texture{
pigment{ P_Chrome5 }
finish{ F_MetalA }
}
}
PS. I've also added some thickness to these windows (which can be
controlled) and given the isosurface all_intersections to avoid missing
surfaces in CSG.
--
light_source#macro G(E)sphere{z+E*y*5e-3.04rotate-z*E*6pigment{rgbt#end{
20*y-10#local n=162;1}#while(n)#local n=n-.3;G(n)x}}G(-n).7}}#end//GregE
Post a reply to this message
|
 |


![]()